Does anyone have a how-to on removing the ball joints
i know i have heard that you have to remove the hub but i do not want to, i know i have to support the lower A arm so the spring will not kill me, un-bolt the upper ball joint and swing the whole hub assembly to the left or right and then attempt to loosen the lower ball joint and smack away!!.. i attempted to do that and i braced the lower arm and normally i see the lower arm rise up a bit but i did not see it budge at all so i just said ill do it another day. i have seen people use threaded stock to unload the spring but i really do not want to do that
I presume you’re using a picklefork to separate the lower BJ from the upright/spindle/knuckle?
If so, just keep banging away. It’ll give, eventually.
But…
The way things are configured it’s possible to foul the picklefork against something that won’t move…so all the hammering in the world won’t help. So, make sure that isn’t happening.
I have several different pickleforks. Not all of them will work on a Jag; too big or too small.
If no joy you might consider one of those bolt-driven BJ separators
Cheers
DD
i am going to replace the whole ball joint completely so yes i will be separating it from the spindle/knuckle, i hope i dont have to use a pickle fork i have 8 different pairs but i hate using them… but my main concern is a good proper way of getting to it with out removing the hub assembly. im guessing to remove the two bolts on the wishbone and swing the hub forward a bit to get a wrench on the lower BJ
I have done it a few times and the lower ball joint is very tight.
Now to the best of my memory, if doing this job in the vehicle, here is how;
by using the spring pressure to help you
undo the lower ball joint nut just a few turns, remove the disc,
back the lower wishbone taper with a sledgehammer, strike the opposite side very hard with a heavy engineers hammer…usually this will pop the taper.
at this point, you have to deal with relieving the spring pressure to then undo the nut and take the lower ball joint out
be very careful you understand all pressures, and movement of upper arm as well.
You don’t have to unload the coil spring or the shock absorber.
You do have to remove the whole stub axle carrier, but you can leave the hub on it if that worries you.
Do you have the Haynes Manual?
Jack securely under the lower wishbone.
Remove tire and brake caliper. Hang the caliper on a wire or rope so it doesn’t strain the hose.
Remove steering arm.
Remove upper ball joint bolts but note where the shims were so you can put them back the same way.
Stub axle carrier will now tilt down.
Loosen a few turns but do not remove nut on lower ball joint.
At this point a pickle fork should work nicely.
The nut catches it so it won’t drop on your foot.
Best to do the lower ball joint job on the workbench.
The new parts may not look exactly like the old ones; there have been some revisions/improvements over the years.
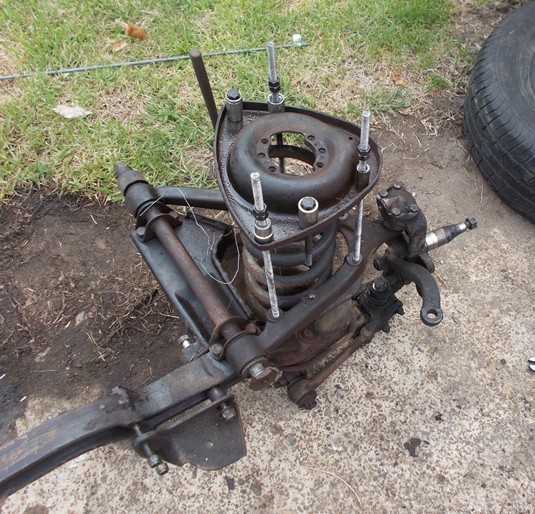
so i have to take this out completely…note this is just a picture i stole from the ENTER-WEBs

then fight the lower BJ correct?
i do not have a haynes manual, but i do have the xj6l series II service manual
Yes, that’s it, looks like not an XJ but similar enough. You don’t have to take the hub or rotor off the carrier.
I have the XJ12 Series II factory SM but its probably about the same. It says put the jack under the spring seat pan. The spring will be compressed enough to do the job.
thank you thats what i figured, i appreciate it
its easier to break the taper with it out completely, but that requires complete relief of the spring
the big advantage of doing it my way (no jack under pan initially) is you have hundreds of pounds of spring pressure forcing the joint apart.
The very instant you compress the taper by striking lower A-arm as described, it will separate apart
with the nut still on the thread, it cannot fly apart…then add the jack…or I prefer to use these rods which are safer than a jack, as they prevent side load from the spring, (they work fine in situ)
I went an helped an E-type owner one day, he was never ever going to get his lower BJs apart, he was most impressed when I popped them with a few hits
just swapped suspensions on 2 x 4wds, and I separated every joint with hammers, and find they work quicker and easier than any other method
in the instance below, the joint was separated on the bench
You don’t have to remove nor disc nor brakes.
Support the spring pan and undo the upper ball joint.
Place a bar or something the right size that will bit snugly at the inside side of the ball joint, between it and the wishbone.
Wack the hub towards the outside. This will create a tremendous lever at the ball joint and it will eventually free up. It worked for me.
Use anti seize on the new one.
Details at the Book.