3.8 Moss box not synchronizing 3rd

Got a thing or 5 done this weekend. The layshaft is assembed and installed. Sorry no photos. My phone was charging. It was less stressful than I expected. With a bit of assembly grease the needles go in easy and they’re held nicely against the gear’s inner wall by keeper rings on both ends of each course of needles. I was afraid they could be dislodged seeing as you have to use just a thin rod to hold it up until the main shaft is installed, but the keepers hold everything together well.

I was pretty shocked to find that the previous rebuilder had assembled it with a shim that left a full .008 gap. I can only assume he measured carelessly. There is a stack of parts on that shaft and to get the true gap you kind of need to push it all to one side. It’s now .0025. Very happy

Next start building up the mainshaft. This is trickier on a Moss because the gears aren’t shimmed per say. Adjustment is done by using retaining collars of different sizes. These aren’t available new but can be sourced used occasionally. I had 4 on hand to choose from.

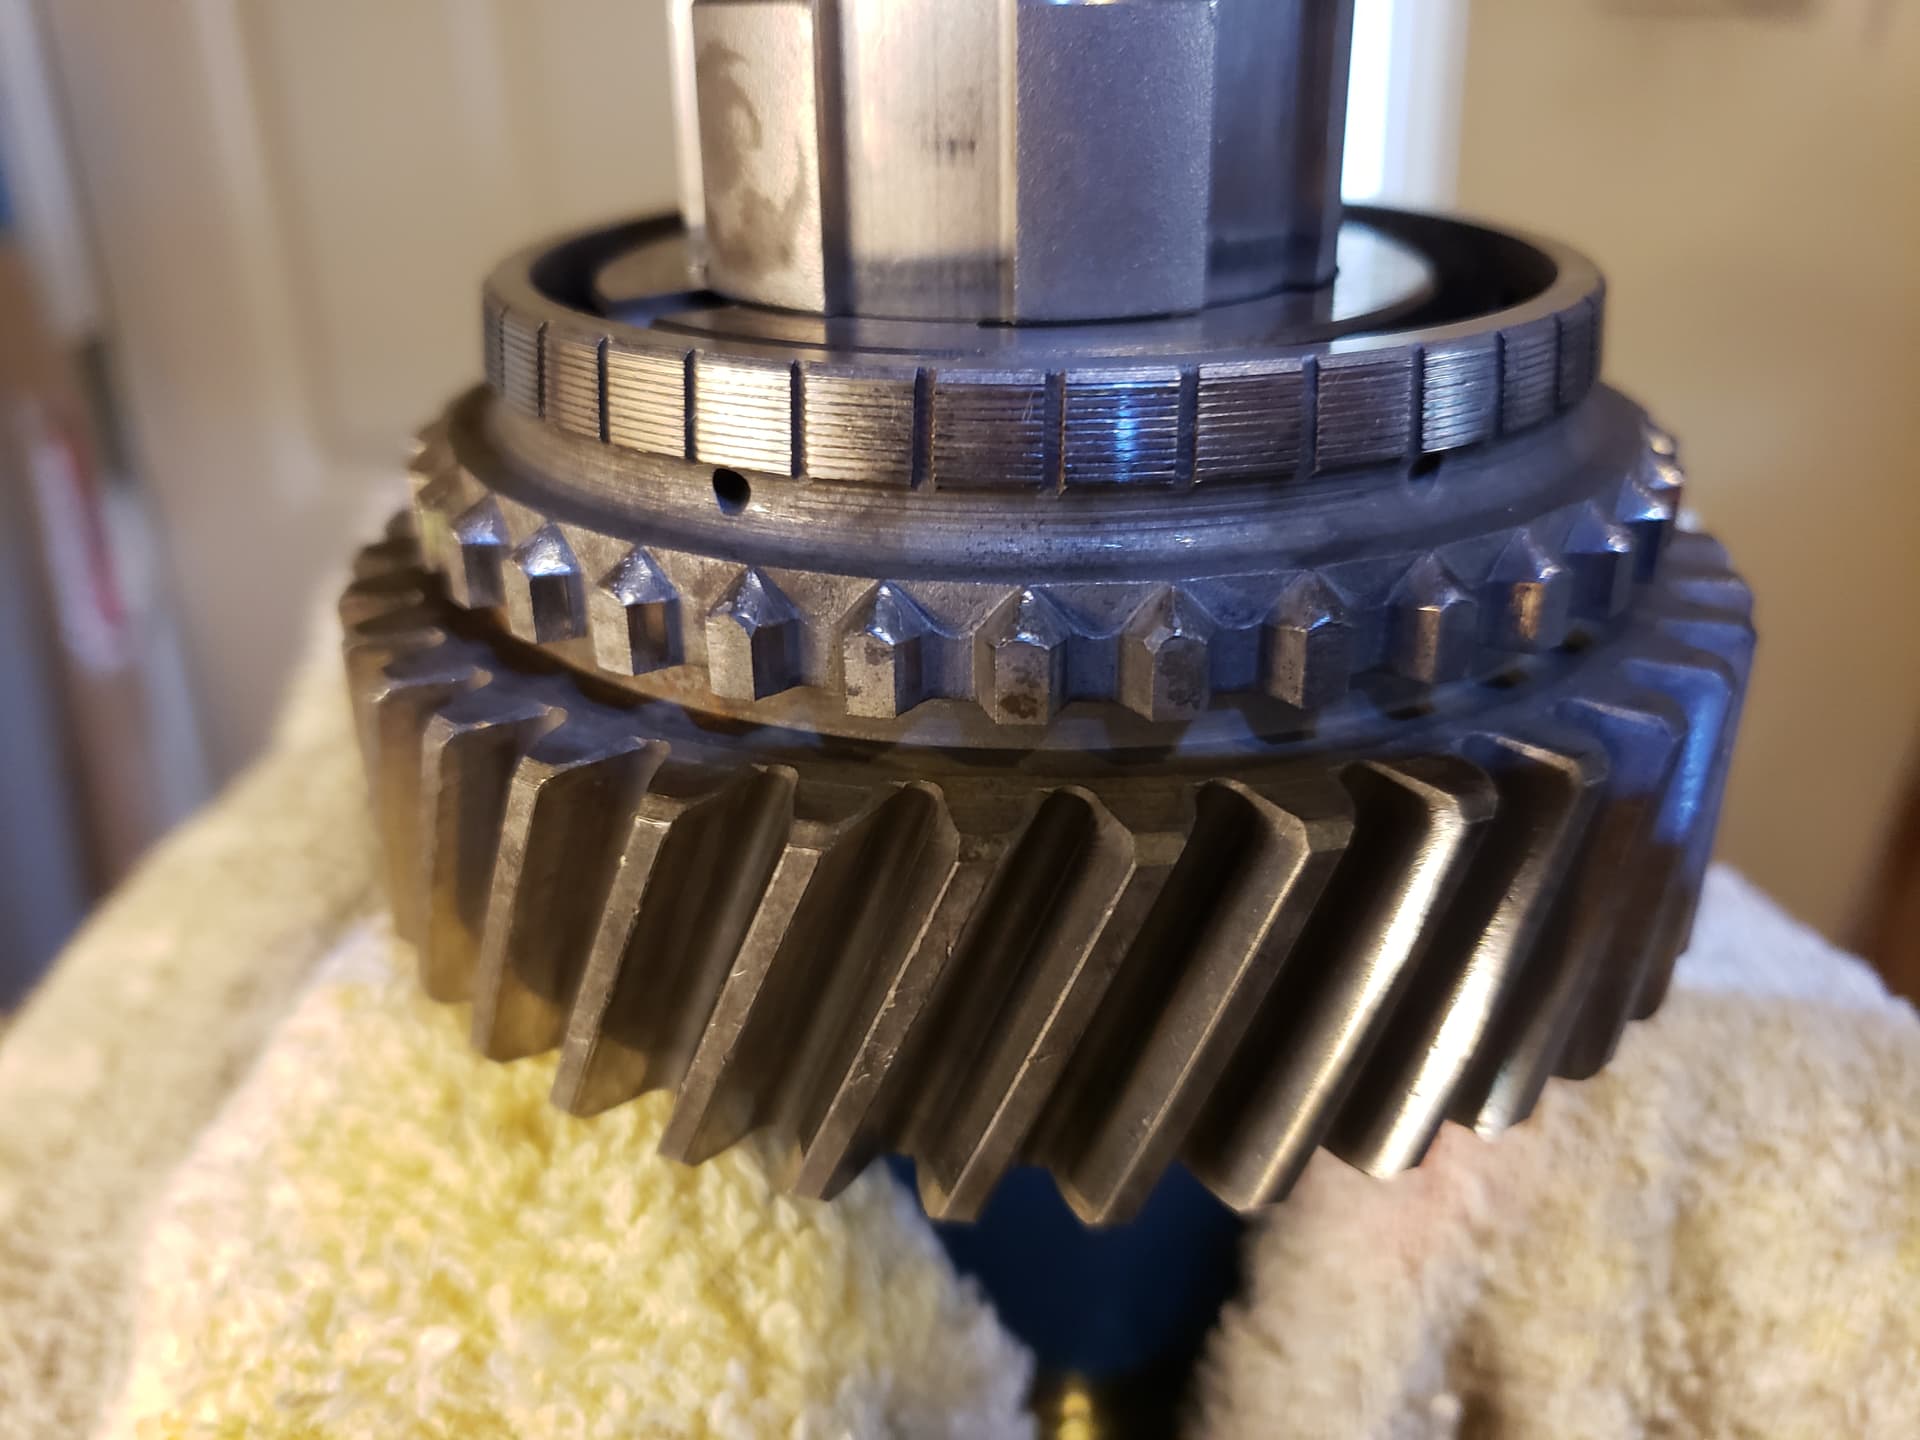
Assemble each gear temporarily. The book says use the needle bearings, but I didn’t see the point at this stage. This is 2nd gear. The exposed 3rd gear journal is wrapped with tape to protect it, and the vice jaws are padded and barely pinching.

Note the very nice synchro hub grooves on this new gear

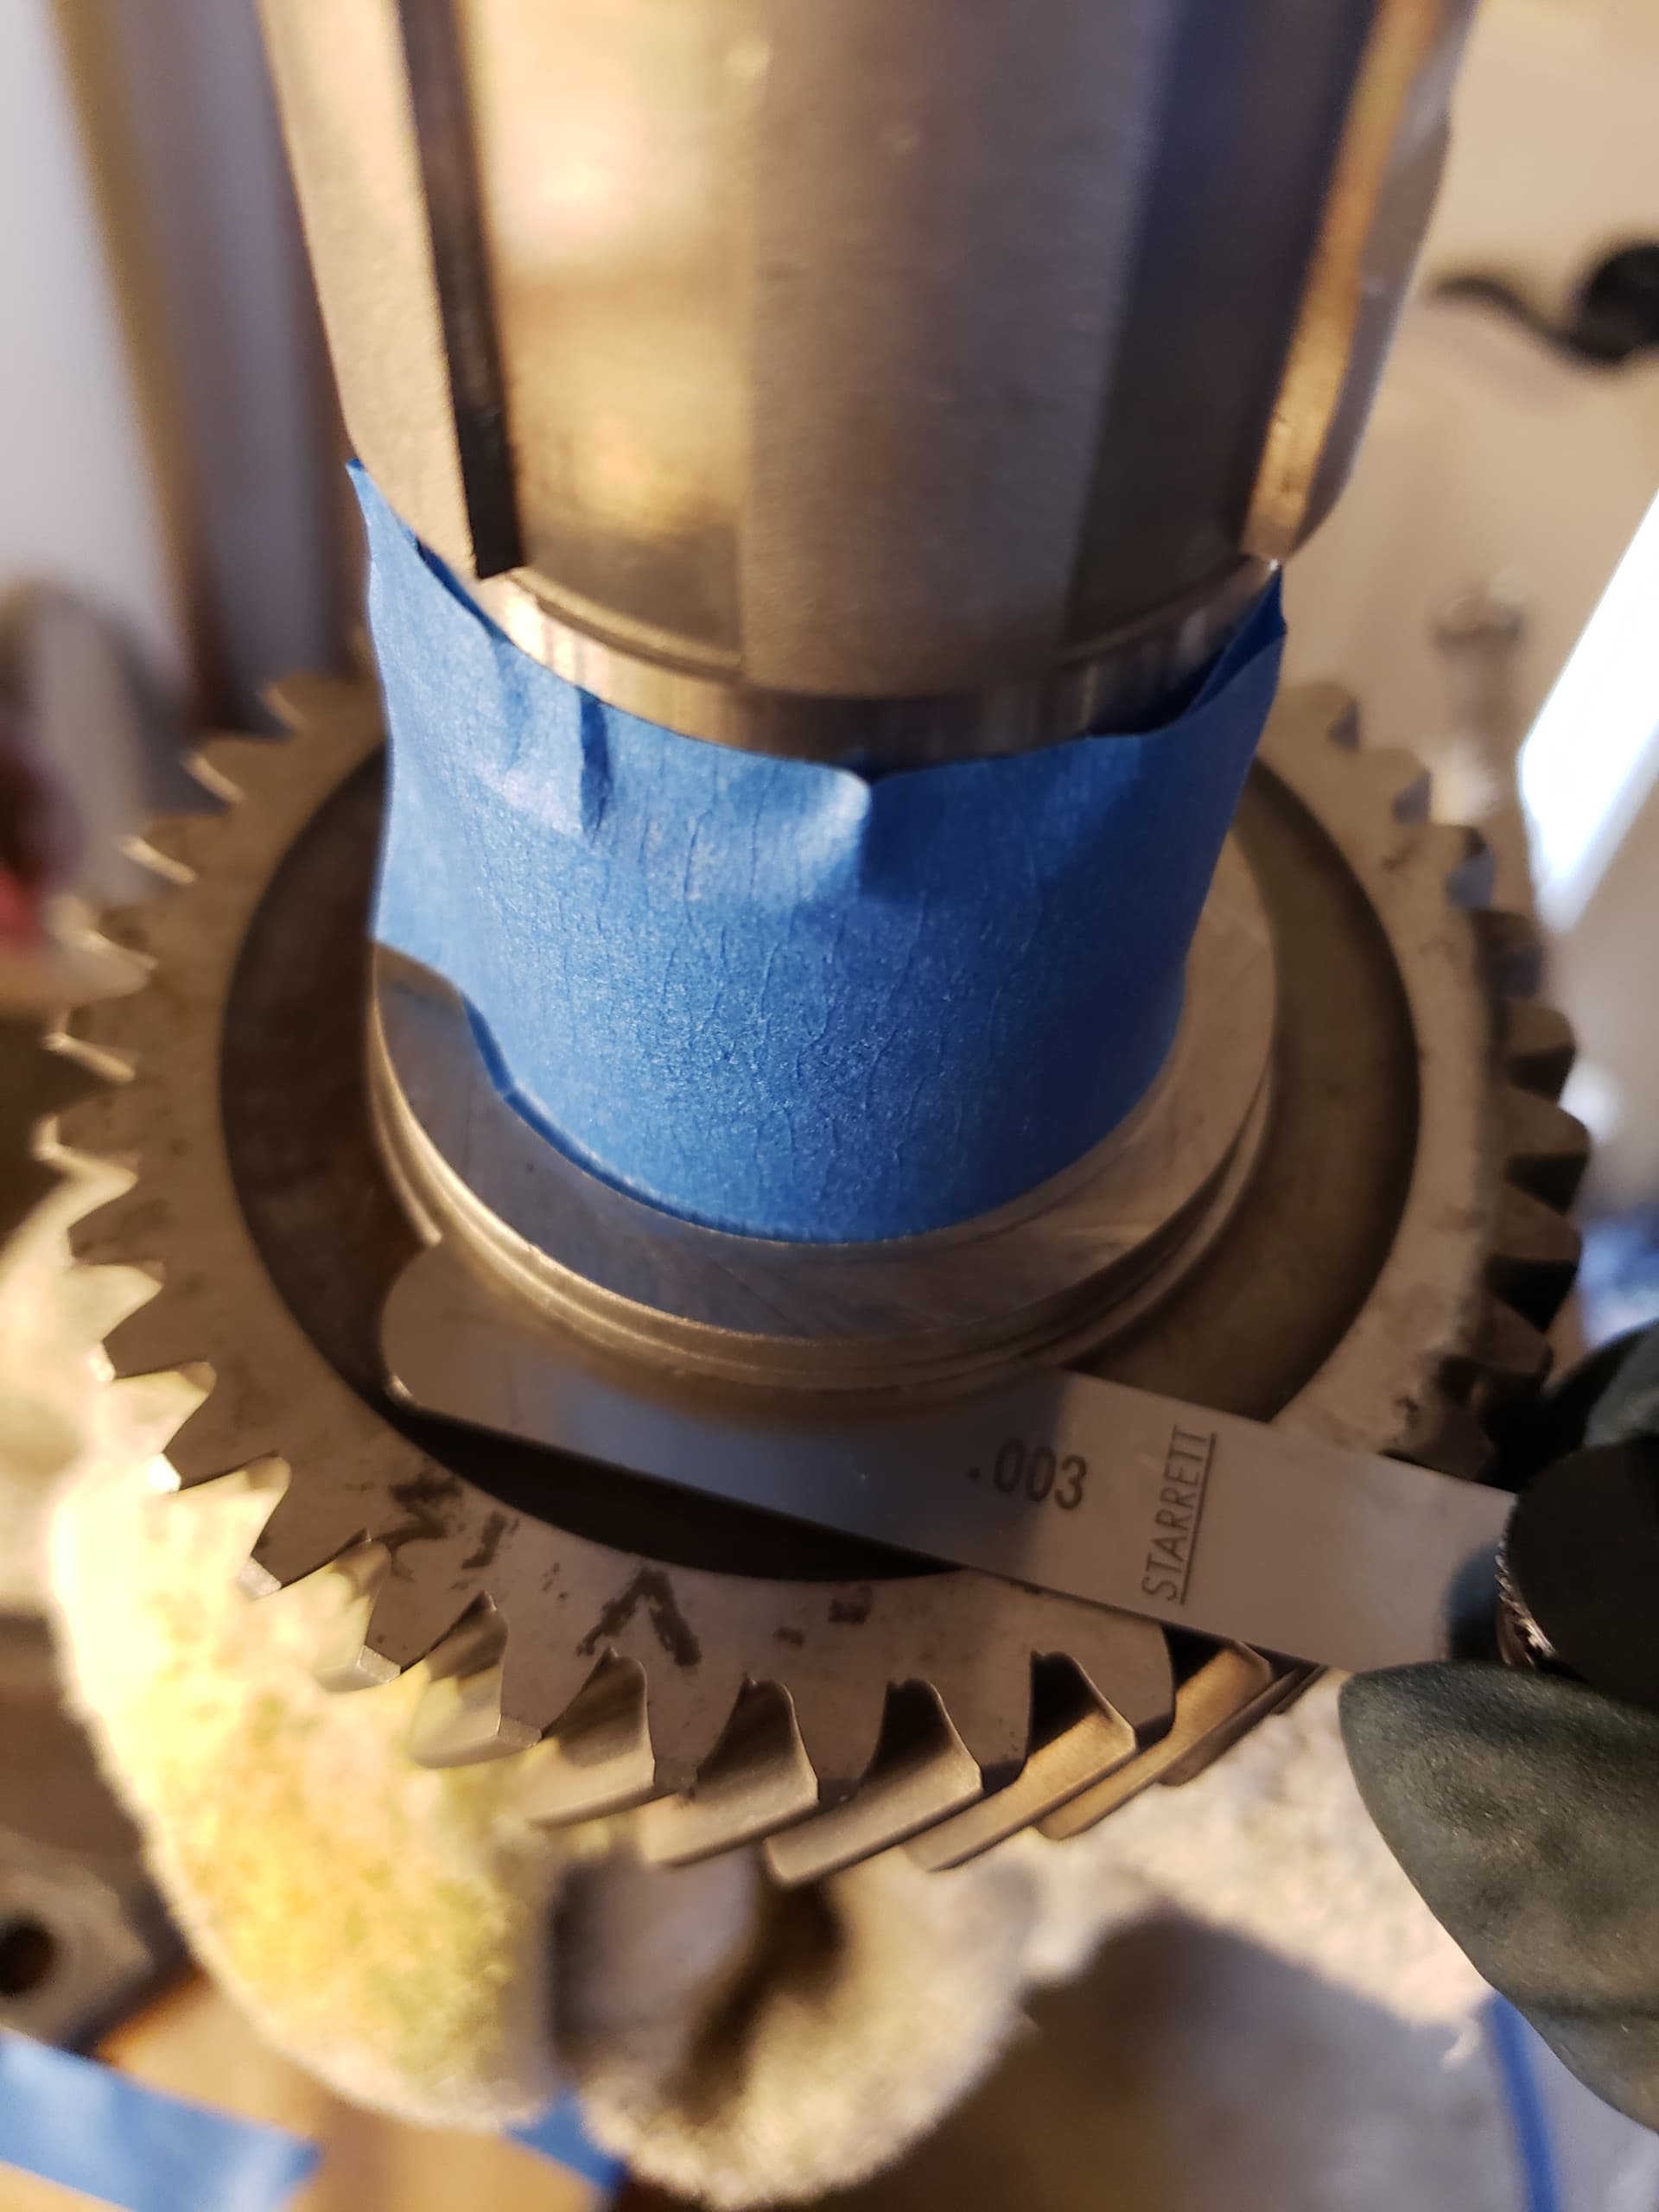
Flip it over to measure and allow the gear to rest on the locking collar, .003 right in the middle of the correct range. When I took it apart, both gears were out of spec.

Assembly time, I like this Redline grease. It’s very light but holds parts well and the fuchsia color is :+1:

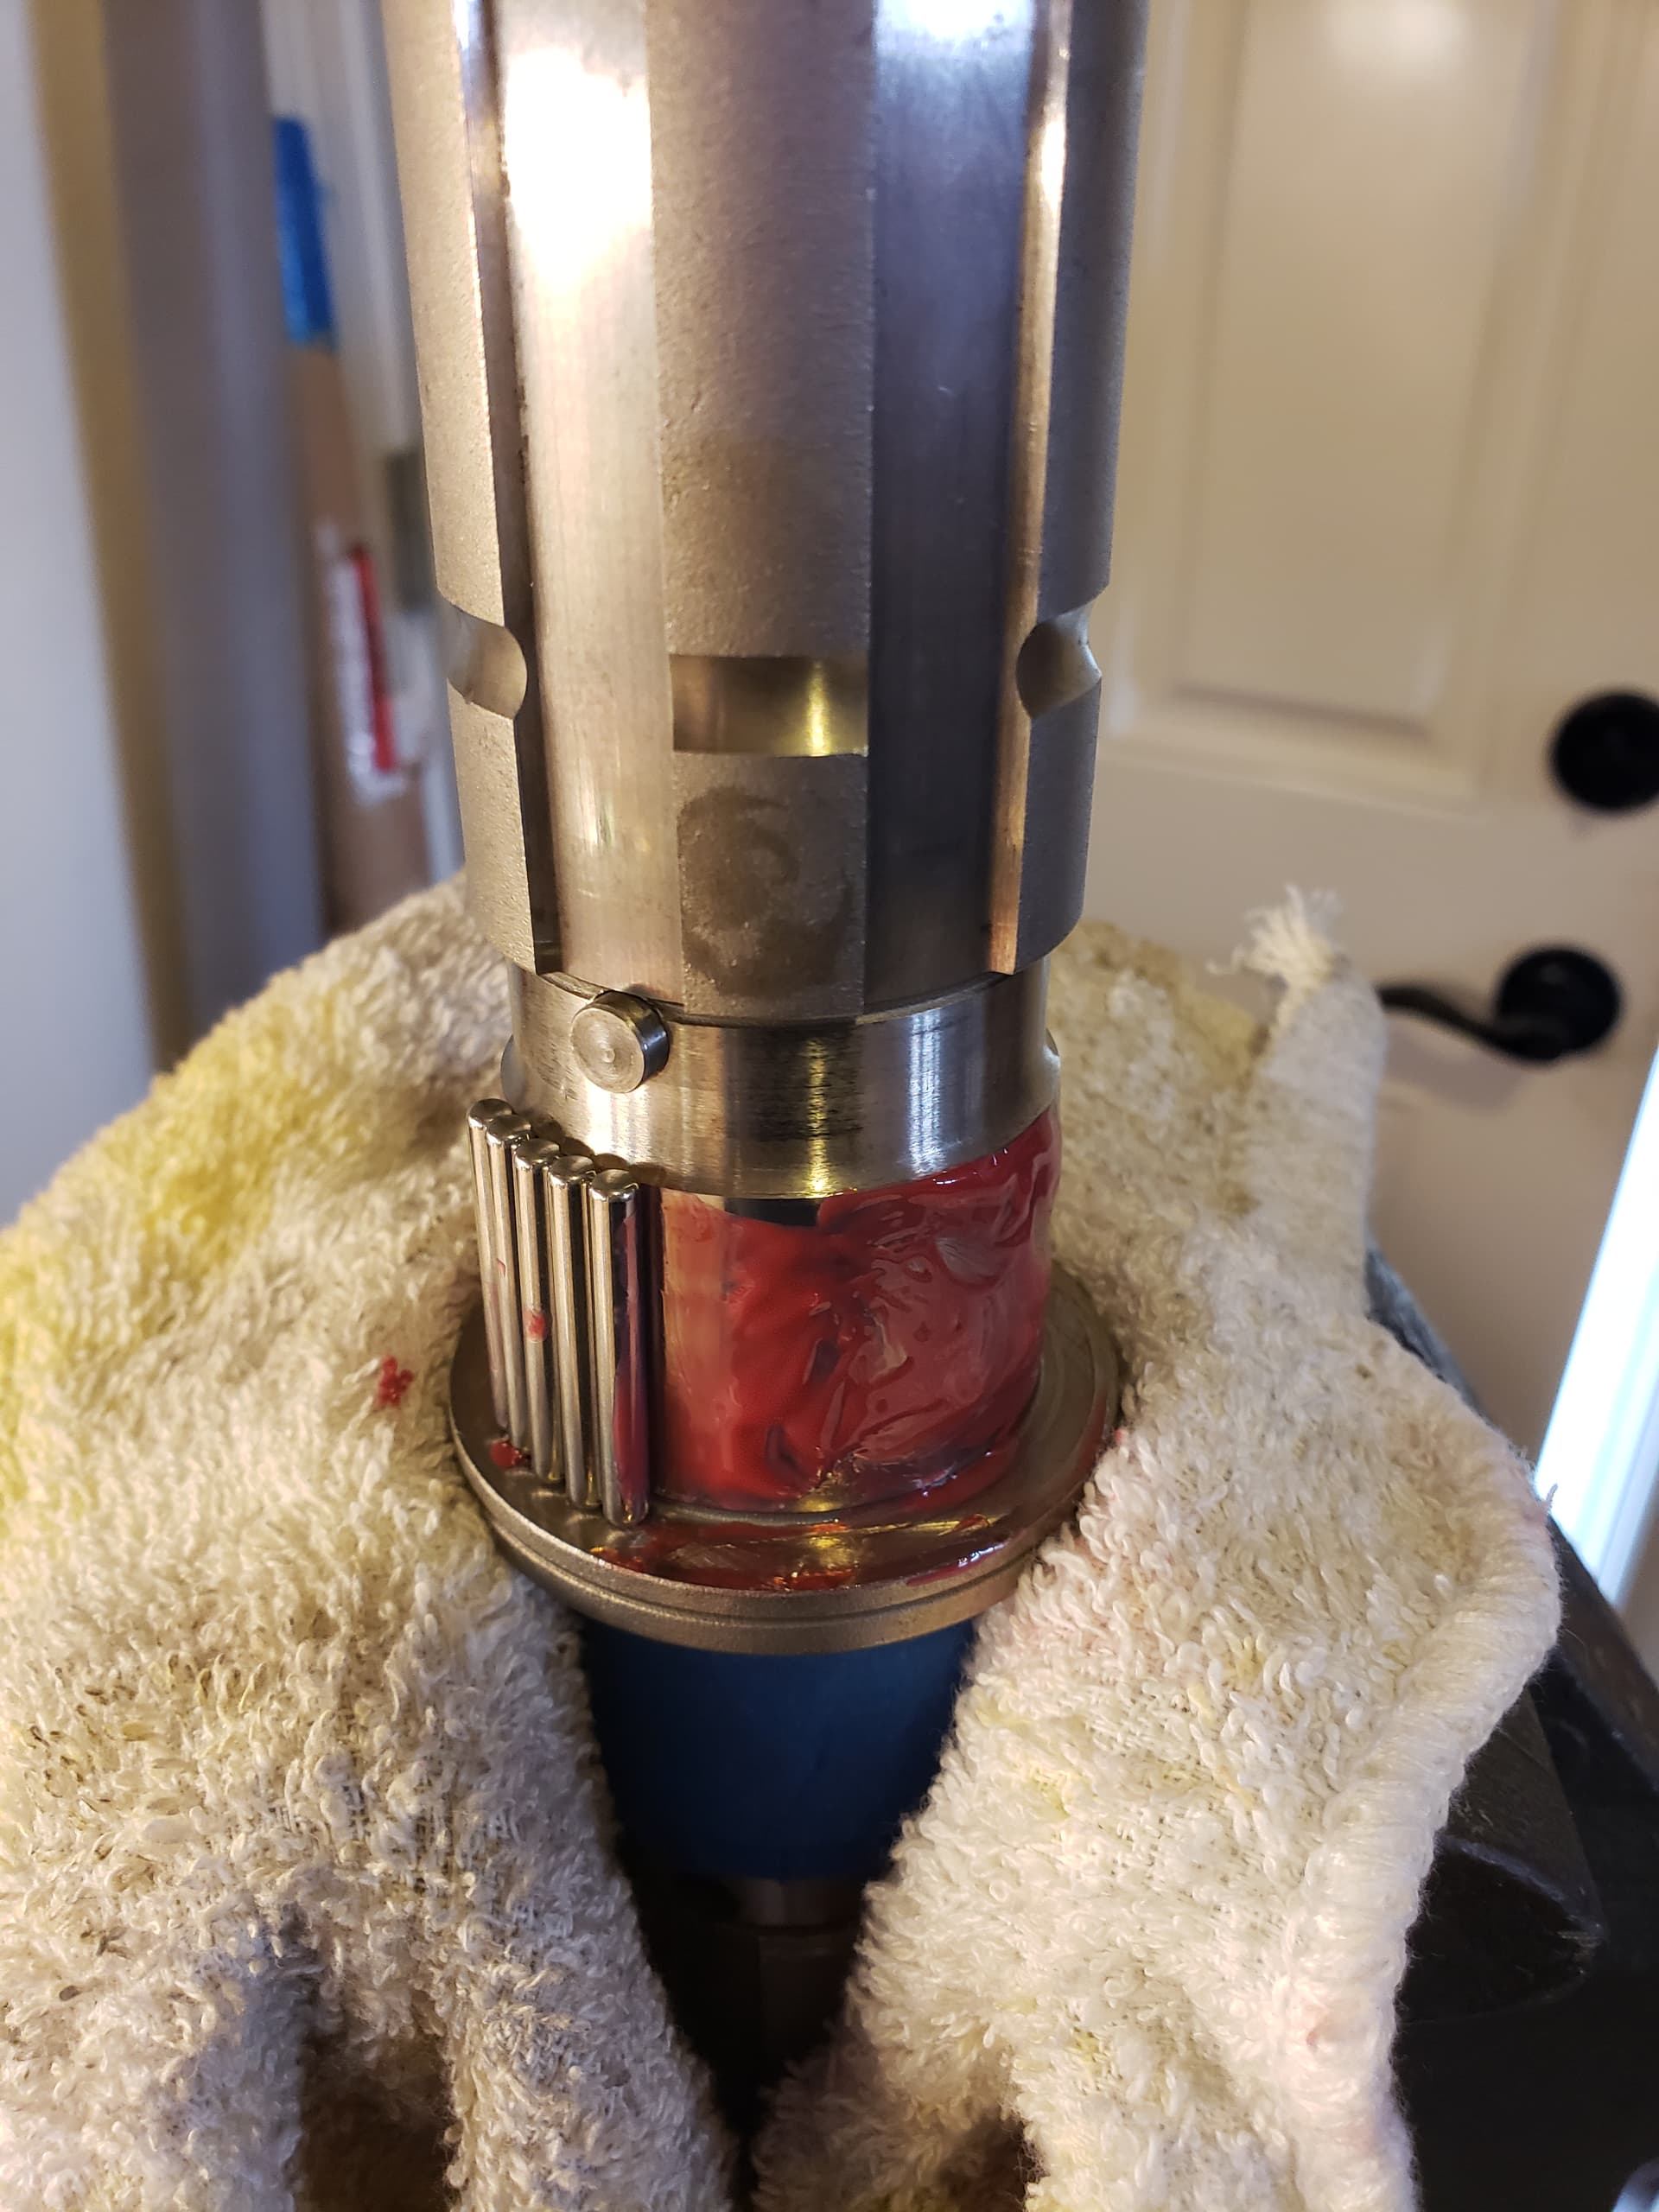
Carefully slide the gear over while wrapping a clean hand around the bearings to keep them in place.

Insert the spring and locking pin (it’s a different spring from the 12 springs in the synchro sleeves. Don’t mix them). The circled cutout should be one spline away from the locking pin when you slide it on the shaft

Rotate the gear so the larger hole faces the pin and push it in far enough with a small screwdriver to be able to nudge the collar over the pin and push it onto the gear.

Rotate the collar one spline until the pin pops out

Flip over and repeat for 3rd gear. This one also came out to .003 gap, perfect. Note my needle keeper. I stick them all to tape so I don’t accidentally drop them, and I roll them off the tape one at a time so it will catch any possible thing that might have jumped on them when I wasn’t looking. You have to be scrupulously clean through all this. Each part went through multiple rounds of scrubbing in thinner and blowing off with compressed air and was bagged up until assembly.

Now bagged up safe while I set up the synchro sleeves. Apparently I should have bought main shaft sized freezer bags.

3 Likes

Hello Erica,
That’s a shite method that’s described in the Jaguar Manual.

  1. Use a Dummy Shaft that is the same diameter as the Lay Shaft (I make them out of old Lay Shafts), cut to the length of the Lay Cluster plus a little less than the thickness of the the front Thrust Washer.

  2. After the Main Shaft is installed and its time to get the Lay Cluster in the correct position to be able to install the actual Lay Shaft, place two packers (circa 1" thick pieces of timber) that are wider than the gearbox housing, on your work bench.

  3. Invert the the Gearbox and place the face that the Top Cover attaches to, on the two packers.

  4. Now you have gravity working with you and the Lay Cluster will mesh with the gears on the Main Shaft. In this arrangement, the maximum vertical misalignment between the bore of the Lay Cluster and the bores in each end of the Gearbox Housing, can only be the few thou clearance between the Lay Cluster and Main Shaft Gears when the Lay Shaft is in position.

  5. The Lay Cluster may be significantly misaligned horizontally, but this is very easily corrected by rotating the Main Shaft whilst looking through the bore in the Front Face of the Gearbox Housing. You will see the Lay Cluster move into alignment as you rotate the Main Shaft.

  6. When the bore of the Lay Cluster Front Thrust Washer appears to be in alignment with bore in the Front Wall of the Gearbox Housing, insert the Lay Shaft and push the Dummy Shaft out, taking care to keep the end of the Lay Shaft and the Dummy Shaft in contact for the whole journey.

Using the above procedure, there is no chance of dislodging any needle rollers and getting the Lay Cluster in alignment is simple.

Regards,

Bill

2 Likes

Interesting idea! I had thought to wrap some thin cord around both ends of the shaft so it could be yanked up if needed, then pulled out, but this might be better and I do have the original shaft.

I’m unclear about the length though.

At this length wouldn’t the rear bronze spacer be at risk of not be captured? Why not make the shaft a little shorter than the entire stack of parts? Other than me needing an assist to flip it, this does sound easier.

Hello Erica,

The method with using two pieces of cord is how the process was once described in the Jaguar manual, but even that was easily improved by tethering one end of each cord to bolts used in securing the Top Cover to the Gearbox Housing on side, or one long cord that went around two bolts on one side of the Gearbox Housing and that were positioned close to each end of the Lay Cluster, then the cord goes under the Lay Cluster, to exit at the top of the Gearbox on the other side. Then some genius at Jaguar dropped that in favor of using a thinner rod than the Lay Shaft to lever the Lay Cluster into position and in my opinion, introduce the potential of having needle rollers dislodge. Think about it, to get the Dummy Shaft out and replaced with the thinner rod, the Lay Cluster must be aligned with bores in the Front and Back walls to the Gear Box Housing; D’OH. Admittedly the Main Shaft is not in the way at that time, but really?

Yes. I was thinking of the All Synchro Box that has the Rear Thrust Washer pegged to the inside of the rear wall of the Gearbox and therefore, can’t move with the Lay Cluster. So yes, the Dummy Shaft is made slightly shorter than the overall length.

Best regards,

Bill

1 Like

Cool, that makes sense. I’ll make it a bit shorter than the inner width of the box and relieve the corners. I think I might need to get one made though. I don’t want to create several ounces of filings in my operating theater since the patient is wide open. Maybe the shop working on my flywheel can cut one for me!

Hello Erica,
Yes, a chamfer on the end of the Dummy Shaft will overcome the few thou vertical misalignment. Using an Old Lay Shaft, the shaft will have an appropriate chamfer on the end that enters first when assembling a Lay Shaft with the Gearbox, therefore, you only have to break the corner of the other end when its machined to length.

Best regards,

Bill

Hello Erica,
If you can’t easily lift the Gearbox, you can roll it onto the wood packers by first rolling it onto its side opposite to the side that retains the Reverse Gear Selector Lever. From there its just another 90 degrees to get the Gearbox fully inverted.

Best regards,

Bill

1 Like

Here’s a question I’ll bet you know the answer to. Both NOS bearings came in Leyland boxes so 70s/80s maybe. The new rear has the desirable flat side. The part number on the box is C1845/1. It doesn’t say Hoffman. I’m not sure what brand it is. It only has England and the part number. Structurally it looks just like the Hoffman.

But when I looked at the original part, it is Hoffman and has the correct part number listed in the parts manual printed on it, but it does not have a flat side. The Jaguar part number in the manual is C1845 without the /1.

Did they originally use parts which caused problems and they later issued replacement parts with the flat side with a new /1 part number?

Hello Erica,

Many Moss Gearboxes don’t have Oil Pumps. Any that were coupled with an
Overdrive certainly didn’t and there were many early examples that
didn’t have Overdrive that also didn’t have its own Oil Pump. Therefore,
those without Oil Pumps didn’t require the bearing with the small corner
radius or chamfer.

Best regards,

Bill

1 Like

Interesting, I guess the JS boxes don’t have this pump? I’m not sure what it looks like and will have to review my parts. I have two JS box and both original rear bearings are chamfered.

The parts manual doesn’t seem to list a pump in that vicinity. I assume there is no harm or foul in using a flat bearing there?

I picked up my flywheel Friday. It looks much better. I’m currently cussing because I have three 3/4 sockets and not a single one fits on more than a few bolts at a time unless all the faces are parallel. Were sockets made of sheet metal in the 60s? Now I get to blow half a day shopping for a scrap socket and grinding a 1/16" off of it. Why…is…nothing…easy…on…these…infernal…machines… :rage:

I can’t recall the last new clutch I installed. Do they all come with this matte finish pressure plate? It seems like you’d wipe off 1/4 of the throw out donut before it got a nice polished finish like the one I removed.

Get yourself a Snap- On socket, then your troubles are all gone.

With my luck I’d end up with the rare chubby snap-on socket

2 Likes

This is where $1 each Chinese sockets at Supercheap Auto are fine

I havent ever broke on.

The ratchets and breaker bars are weak

I do have some expensive Sidchromes, known as “thin-walled”

I have one “Snap On” tool that I know of, a 7/8" socket, I dont think its very thin walled though, but its incredibly ancient and battered

This is my Indestro: this socket is at least 50 years old, and has removed/torqued many a 3/4" flywheel bolt.

1 Like

A 12 point socket should help the situation.

This was my huckleberry. For all the guff they take this newer Craftsperson did the job fine with room to spare. Borrowed it from a friend.


1 Like

Erica, yeah I know, way late to the party regarding a dummy shaft for the laygear, but when I was doing the 'box for my Healey I found a wooden dowel rod from the lumber / hardware store in the appropriate diameter and made one. No need to have it be steel.

2 Likes

That’s all I ever used, ditto for rear suspension.

I’m probably doing this for the short one Bill spoke about as I only have two factory shafts and need them to be full length. Getting a short metal one would require that it be turned down to .98