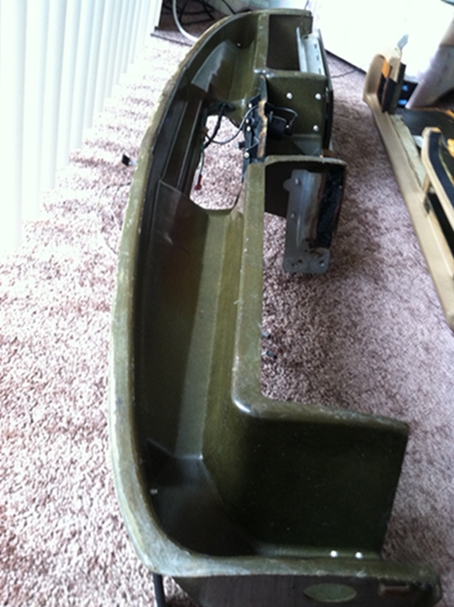
It’s easy, it will be fun and you can get the a/c blowing ice cold! Well I bit the bullet, wanted to put in a new stereo and find out where the green wire went. Found the green wire and thought well may as well pull the dash and see about the a/c.only took 2 hours plus some broken pieces, but it’s out! Anyone want some pics while it’s out? Let me know. Still trying to figure out all the sensors and goodies and I do boat air for a living!
Is it possible to run the car for testing by reconnecting the instrument panel?


Thanks for the pictures David. Looks like the dash separation is not an uncommon problem. Same thing happened to mine dash. I pulled it completely apart and that gave me a good chance to clean the air channels with some disinfecting wipes. Then I used the Loctite PL 3X adhesive to put both parts of the dash back together.


My center vent vaccum actuator is in pieces, I am thinking of just leaving it out, with the vent always open, any thoughts?
You mean the solenoid is taken off or you removed the center air flap? If you wanna leave it always open you can open/close the face air vent on front of the dash. Plus when it gets colder in the middle of the winter, you’ll have hot air coming out of the center vents. Try it and see how you like it.
The solenoid works but the piece that actually moves the door is broken. I have a block in there to hold it open so I thought just get rid of the door! Should I insulate the sensor above the door in the center top of the dash? Not sure what it is supposed to be there for.
Any idea why there is a motor driven door over the evap?
In my case there are two red round covers on top of that plastic. One is a light that blinks when I lock the car and alarm is activated. The other is a sensor for the a/c system. I believe if you select auto then that sensor adjust the air temp. according to the outside air temperature. The air that’s coming out of the evap system contact the bottom of that sensor only when the defrost airflaps open. There are two curved air flaps in the evap behind the radio and a/c controls that uses actuator motors. They’re located on the right side.
David … are you up for a little modification while you have the top apart for better airflow ?
Thats why I sought you out!
By the way I have decided to leave out the center vent flap, and who the heck puts a filter after the evap? That, or whats left is coming out today!
David …
The reason I decided to modify my dash air ducting was a lack of equal air flow between the center and side vents. Living in Texas cooling was my primary concern, but the heat also needed to work.
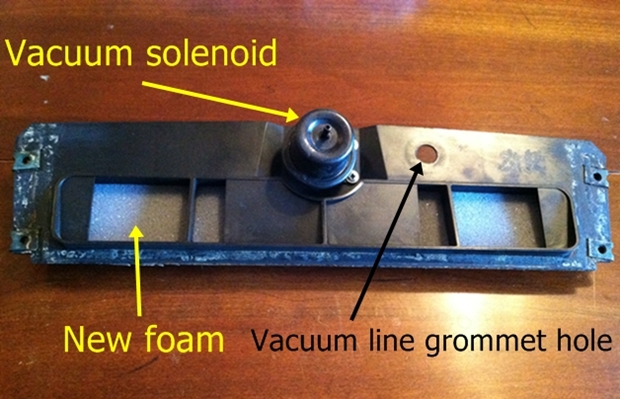
First thing to do is ensure that both your demisted assemblies are working. Since getting to them requires removing the dash so once you put them back in you want to be sure they keep working. As a minimum I would install a small steel rod the entire length of the flap. They’re very prone to breaking there. Drill some holes in the plastic so you can slide the rod in and epoxy it. This should be self explanatory when you actually look at them, but I’ll try to dig up a picture of what I mean. Make sure both vent assembly’s vacuum actuator are also working.
Completely get rid of the center actuator, flap. and the whole housing that it attaches to. Then simply
cap off it’s vacuum line. The only time the center vent opens is with A/C selected. The actuator fails (very common problem) to the vent closed position so no A/C airflow unless you replace the actuator (and here comes the dash off again) or stick in something, usually a short length of heater hose. I’d be willing to bet a vast majority of XJ40s on the road today have something stuck in there. I see no problem with warm air coming out of the center vent when heat is selected. I’ve had that mod for years. The reason for removing the center actuator and everything is that they seriously block the airflow.
The next thing I did was fabricate and install curved diverter vanes in the dash top directly above the opening in the evaporator. instead of the air blowing out of the evaporator into a rectangular box (very inefficient) 50% of the air is directed out of the center vent via a smooth curved vane. 25% of the air is directed via a curved vane to each side vent. I put tape over the round holes in the ends of the dash that is supposed to send air up the windows. The hole is totally useless and blocking it increases the flow out the side vents.
I was shocked how much these simple mods increased the airflow.

It may not show up in the picture but all three vanes have a nice smooth curve. I also used metal ducting tape to cover the two vacuum actuators sticking out of the curved center vane (done after picture was taken).

I permanently removed all of this for better airflow.
I also removed the entire center vent assembly, found 2 vacuum lines 1 black and 1 orange, missed that one, I like the rounding and splitting the air flows but I think I will tape the door vent in the door opening just in case. Were your plenums rounded or just strait 45 '5s?
Amazing amount of airflow with the dash off! For some reason the heater lines are hot at the evap, need to check new valve ahead of the firewall, can’t remember normally open or closed.
With the center vent out I can add a small piece of ducting with the dash reinstalled for the side vents , cant quite figure the center curve yet.
David …

Here’s the vacuum line routing and color code (this is for a series III but I’m almost sure it’s the same for the '40)
You can see that the black line operates the center vent. The light green line has a T and operates the two demister vents. Those are the only two vacuum lines in the dash top. Not quite sure how you ended up with an orange line up there? Does it go to the demisters?
Why put the center vent door back in and then tape it open? Just leave the whole assembly out for much better airflow. With the heat selected the airflow out of the center vent is much reduced because of the position of the two blend doors, it’s not like you have hot air blowing in your face. It’s literally unnoticeable.
If the water valve looses vacuum it goes to the open (or hot) position. Same as the two demisters actuators. The fan assembly vacuum actuators go to the outside air position.
As I mentioned, the 3 diverter vanes I installed have nice smooth 90 degree curves as not to disrupt the airflow. That doesn’t show up in the picture particularly well.
I thought about round ducting to the side vents but it won’t work because of the demister vents.
As Hans and Franz say “Ya Ya, listen to me now and believe me later !” these mods work really well.
Not the same, missing my orange hose. In the pic you can see where the hose connects the black hose went on the end which was disposed of when I propped open the center vents
and yes that whole assembly is going in the trash.
