I am about to start the replacement of my evaporator (94 Coupe, 6.0). Any words of advice or caution?
Thanks
I am about to start the replacement of my evaporator (94 Coupe, 6.0). Any words of advice or caution?
Thanks
Big job. Take lots of pictures as you take apart the dash. Be careful with the airbag.
BTW, where did you get the evaporator? Last time I checked they were NLA.
Thanks, will do.
I got the evaporator on ebay https://www.ebay.com/itm/A-C-Evaporator-For-95-06-Jaguar-XJS-XK8-XJ6-XJ8-XJR-Vanden-Plas-XJ12-XKR-PT14Z6/202578557958?hash=item2f2a9f7c06:g:N90AAOSwrpNdQAhq
It says it is for the 96, but according to my parts manual, the same evaporator is used from 94 on.
I would love to see that manual. Looking at some pictures online, the evaporator core for the 94-96 XJS will look like this:
And the one you got off of eBay looks like this:
If I were you, I’d need to be 100% sure they are the same BEFORE taking down everything.
And post them here, please.
this is from XKS unlimited.
Hopefully, the ebay picture is just a stock photo.
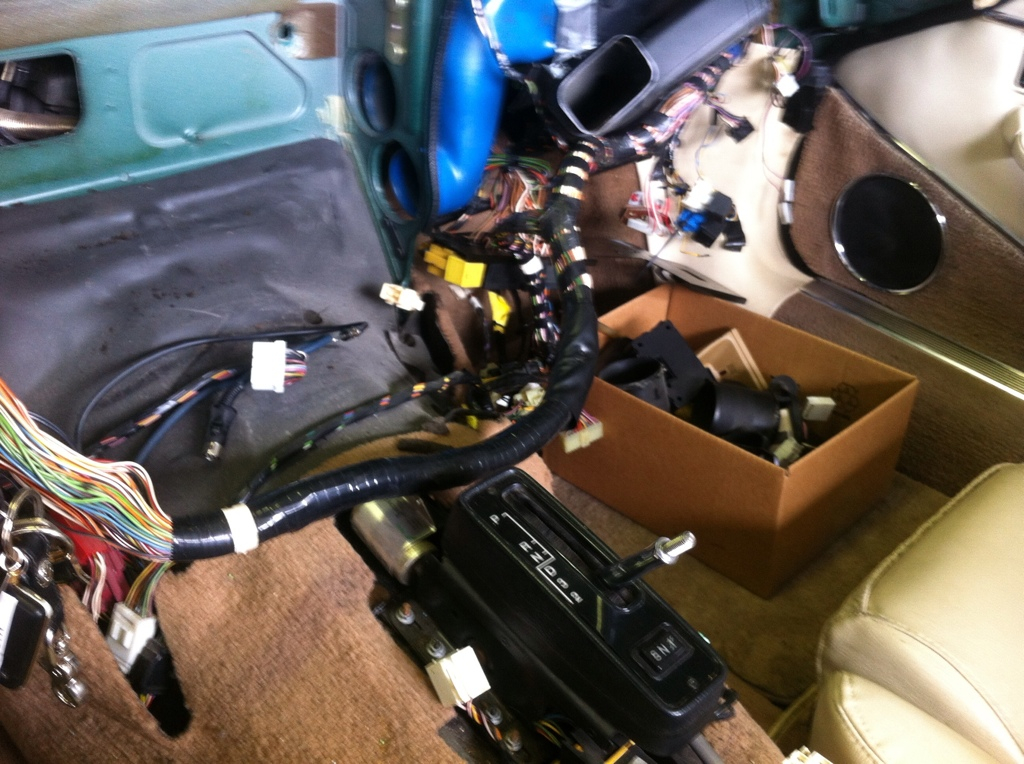
Though I haven’t rec’d the evaporator yet, I have started the job. I have removed the console, and radio. Not bad, yet.
I am trying to locate the support stay,
AIR CONDITIONING UNIT
RENEW 82.25.21
Disconnect the battery earth lead.
Drain the engine coolant into a suitable container.
Depressurise the air conditioning system 82.30.05.
Remove the console assembly 76.25.01.
Remove the fascia board 76.46.01.
Disconnect the air conditioning switch panel.
Displace the optical fibres from the air conditioning
unit.
Remove the switch panel.
Remove the screws securing the face level differential
control assembly and displace the panel.
Disconnect the differential potentiometer block
connector and displace the panel for access. remove
the screws securing the lower plate and remove
the plate.
Disconnect the optical fibre.
Refit and secure the lower plate.
Remove the screws securing the radio.
Displace the radio for access.
Note and disconnect radio, speaker and aerial
wires.
Remove the earth strap to radio securing nut and
remove the radio.
Reposition radio harness through the unit.
Removethe nutssecuringthe airconditioning support
stay.
Displace the tunnel carpet for access.
Remove the lower bolts securing air conditioning
unit stays and remove the stays.
Slacken the coolant ho,se to heater matrix pipe securing
clips and disconnect the hosesfrom the matrix.
Undo the refrigerant hose to evaporator and expansion
valve union nuts and disconnect the
hoses.
Remove and discard the '0’ri ngs.
Fit blanking plugs to hoses, evaporator and expansion
valve.
Removeairconditioning unitto bulkhead securing
nuts.
From inside the vehicle: Disconnect the pliable
trunking from unit.
Reposition seats rearwards for access.
Displace and remove air conditioning unit stub
pipes.
Remove the demister duct assembly to bulkhead
securing screw.
Remove demister duct assembly to bulkhead securing
nutslbolts.
,.~
Fig. 1
March
I don’t want to come across as obtuse, but in this case, if I were you, I would not continue with the teardown until the part is my hands and I can verify it is the same as the stock.
Early Jaguar XJS evaporators and the facelift are not the same. XJ Sedan and XJS are
also different. Apparently some early XK8, which shared a lot of parts with the facelift XJS also used the same design (and Jaguar part number), bur I am not aware of anyone selling JLM20609 - every URL you find if you Google it will show it as discontinued.
Please post pictures of the part once it arrives.
There’s the Delanair Mk II and the Mk III. Presumably that’s two different evaps. There’s also the switch from R-12 to R-134a, I dunno if that would entail a change in evap but it might. Other than that, I dunno why there’d be seven different part numbers here. I’d presume the 94-96 is the Mk III R-134a model.
Time to revise the Book Kirby (and leave the presumptions :-)) )
The US 94 and 95 are indeed R134a. I’ve heard of some 93.5 models that have R12, but Jaguar specifies the same evaporator part number - JLM20609 for anything 1992-1996
Received it today, looks like the picture. Maybe I am a masochist, but I am going to continue the tear
down until I can compare the parts.
IIRC, the OEM unit was copper. If so, and the leak is obvious, can it be repaired?
Depends, but most probably yes.
IIRC, this is true for the early cars (R12). The facelifts are aluminum.
I knew that I had seen pictures and someone else doing this job on a facelift XJS, just could not remember who. Then, by pure coincidence I found it (and a confirmation that the OE part is very different from the ebay evaporator).
Here is the picture:
And this is what your car will look like when you finally get to the evaporator core:
For posterity, here is the URL to the archived thread:
If @Mark_Janzic is still active on this site, perhaps we can offer some piece of advise.
Steve, Thanks for the picture. Looking at the pictures of the evaporators as shown by ebay, RockAuto, etc., I just could not imagine how either the older expansion valve, or the newer modular one, could possibly connect to the existing plumbing. The next question is if the later evaporator (as pictured here) will fit into the '92 facelift. which has the traditional expansion valve. If I find that the current /92 evaporator is leaking, I would prefer to replace it with the type of evaporator Mark Janzic found in his car. My goal is to convert to an Orifice tube system, and it would be easy to connect it up to the later evaporator. If the current evaporator is not leaking, then I am going to try to find an adapter fitting that will allow me to remove the expansion valve entirely and connect my line from the orifice tube directly to the evaporator where the expansion valve used to be. Connecting to the suction side of the evaporator is not a problem. A receiver/dryer would then be placed on the evaporator suction side line to the compressor and the previous tubular RD removed from the system, and a newer type condenser to replace the older type. Bottom line reason - a much simpler, easier to maintain system (with easy access to the orifice tube) which should cool better than the existing system with the funky expansion valve. Just another project floating around in my head.
Those pipes are clearly very different. But ignoring that for a minute, is the core of the evap the same size and shape? Can’t really tell from the photos.
Are we sure that the EBay photo isn’t just a representation, not a photo of the actual part?
Those of us that read ALL responses within a thread (as opposed to you Kirby, who reads only the emails) know that the OP, Maynard, 6 posts earlier reported that the picture is not bogus. He said the following:
Received it today, looks like the picture. Maybe I am a masochist, but I am going to continue the tear down until I can compare the parts.
Steve,
The two pictures you posted after Maynard’s second post - the top one looks to me to be the same as the Mark Janzic photo you posted. Your second photo, of the two, does not look related to any XJS evaporator plumbing. An easy way for Maynard to tell what he has, is to look at the firewall evaporator connection - if it has the modular expansion valve, then his evaporator is like your first photo and that of Mark Janzic. If it has the older expansion valve, then the evaporator photo for that is not posted anywhere in this thread. Anyone else with good info.- like a photo of the correct evaporator that goes with the old style expansion valve?
Alan, this is correct. The picture of the correct part - JLM20609 appears twice within this thread (so far).
The incorrect (for the facelift XJS) evaporator is the one I took from the ebay auction.
This one:

Somewhere in the aftermarket catalogs things went very wrong and whatever this evaporator fits, is NOT compatible with the XJS.
Maynard already confirmed that the picture from ebay is the actual part.
There is not enough money in the world, for me to EVER AGAIN do an evaporator R&R!