I had to pull the interior AC unit to fix the switch which decided I only needed the low and medium speeds out of t he blower motor. While I was in there I decided to replace the wimpy blower motor I was using. When I last had the system apart, during the restoration, I replaced the original blower motor with the Grainger 197 motor I had laying around. The air output was pretty much the same, but I figured leave it there, it’s new.
This time I bought new motor from Carquest/Advance Auto Parts. It’s a Four Season’s motor, made in Canada, part number 35576. Very quiet, no noise when running at no load at full speed. Size is a bit over 3" long and 3" in diameter, shaft is 1/4" and already “D” shaped. Installed in the AC unit it moves significantly more air; I’d estimate at least 50% more. Cost was about $28.
It would also be a better substitute for the heater blower motor, especially for those who don’t want to cut up their heater fan box.
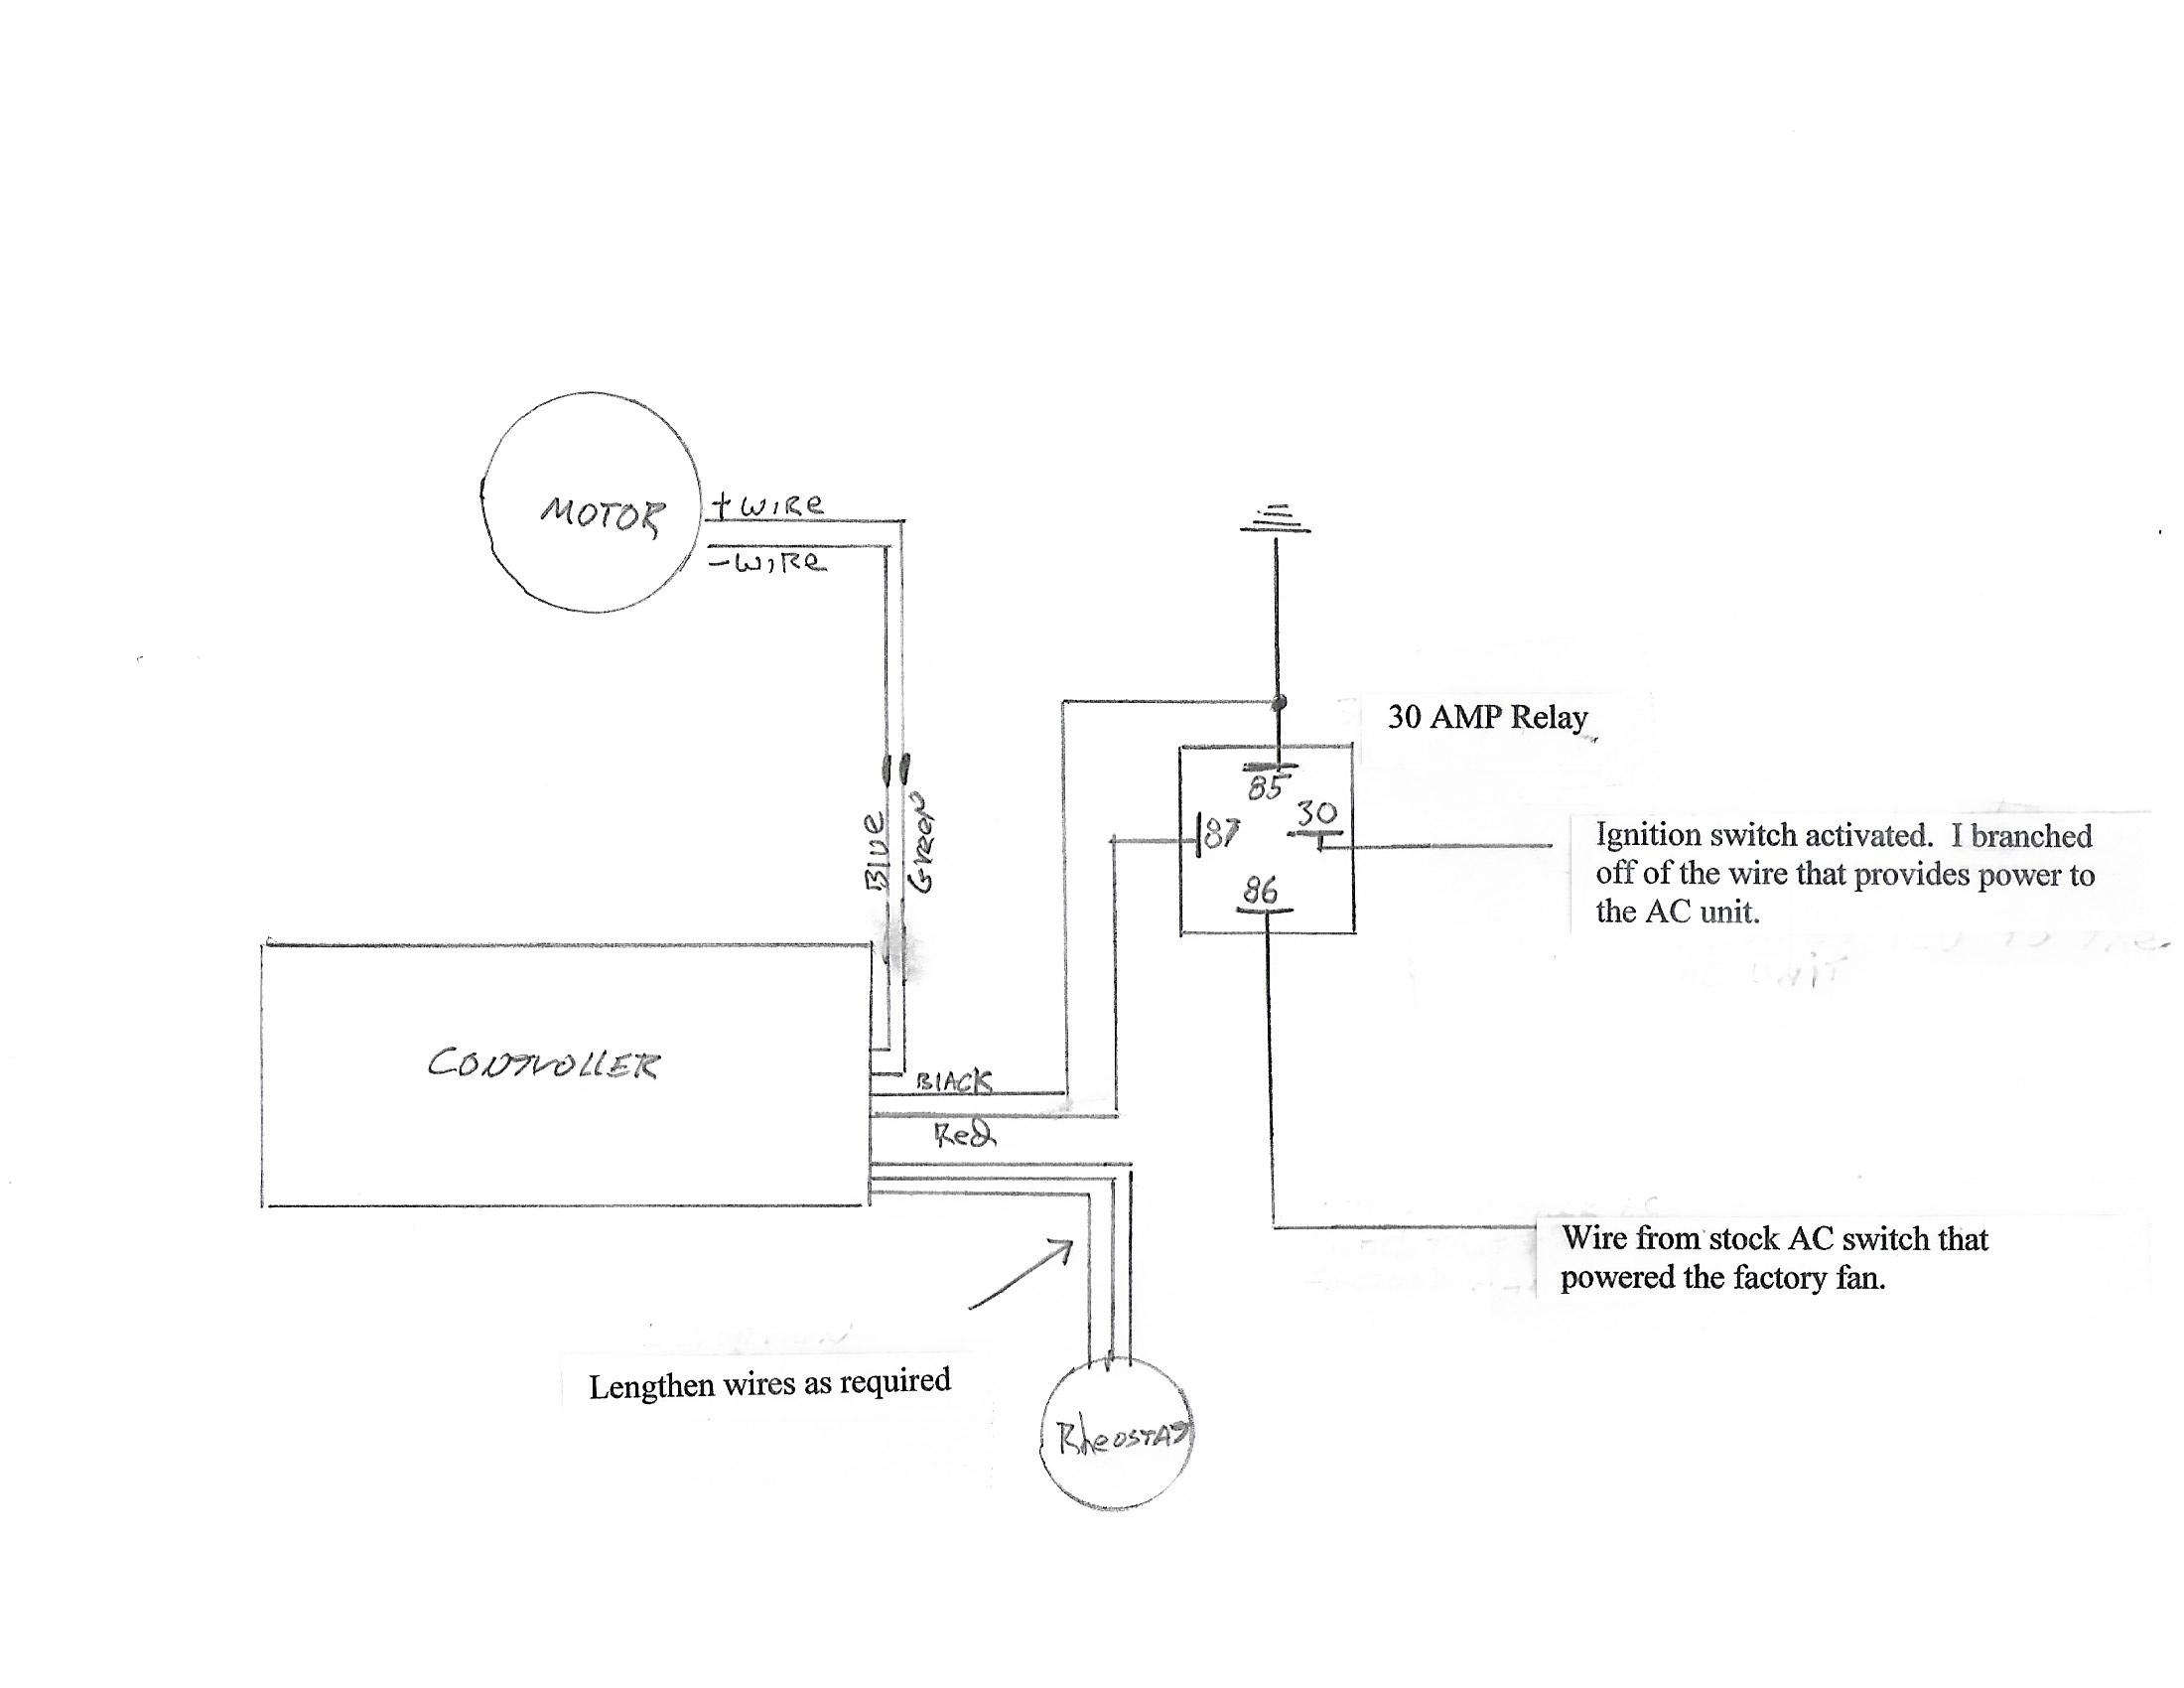
I haven’t had much luck repairing the fan switch, the plastic parts in mine are iffy. So I bought an electronic variable speed controller rated at 20 amps maximum, more than enough to handle the fan motor. I’ve installed it with a relay so it’s powered only when the factory AC switch is turned to one of the three blower positions and triggers the relay. So, now I have an infinite number of AC fan speeds and hopefully a switch that will last for years and years.
When I rebuilt my A/C system, I also replaced the original fan motor with the Grainger unit. I find it is noisy. The A/C has plenty of cold air even at the low fan speed. Also the poor design of the vents direct most of the air to the passenger. I was recently thinking about a variable speed fan control. Could you expand a little on the electrical components you used, maybe a little wiring sketch, the location of the variable switch.
Have you ever thought of a way to direct more A/C air to the driver side?
When I tested the fan on the bench, uninstalled with no load it was silent. Installed in the unit and bench tested the only noise I hear is air movement.
I’ll take some pictures and work up a wiring diagram.
Have you ever thought of a way to direct more A/C air to the driver side?
I was just looking at the same thing. I’m wondering if it’s possible to put a hole on the far left end of the blower box and route a hose under the steering column. to reach the left side of the cabin. Probably need to add a vent as well.
Interesting as I was looking at the poss of a elec var fan controller before I posted about orig switch.
( trying to keep factory at least functional) but I am def not opposed to upgrading elec functionality and reliability. was looking at these inexpensive controllers. either this one w remote mounting or the others…Haven’t checked Allied or Mouser elec… be interested in which one you used.
I just installed the unit and tested the fan function. The new motor moves much more air to the driver’s side, it’s now about equal to the passenger side.
So the controller does not receive power until the original AC fan switch is turned to one of the three speed settings. The output only acts as a trigger to activate the relay providing power to the controller and fan motor.
The back of the AC unit. I used two short screws to attach the controller and relay to the back of the unit. There is plenty of room behind the unit when it’s installed in the car.
Thanks John. You’re wiring diagrams and pictures are great! This will be a winter project as I don’t want to take the A/C down right now. I’ll try that motor first and hope that will get more air to the driver’s side.
In regards to Brian’s idea of piping air over to the driver’s side, I’ve also thought the same. That area at the far left end of the A/C unit is full of wires and switches. Maybe go a little more to the right of the left end and cut a rectangular hole out the bottom and fabricate some fiberglass to direct it into a round tube and send the tube under the steering wheel to the drivers window area. This is just a thought, will need to get some pictures out and look at the inside of that A/C case. When the sun is beating in on the drivers window it can get pretty hot, then I look over and my wife is putting on her sweater.
Thanks again
John yes , thank you for the photos , diagram and info. And Nice clean install BTW. I noticed on these controllers the the pot and knob are quite small . just wondering your thoughts , if that was the reason you chose to keep using existing blower motor switch installed and then tying in a relay ? vs just fab bracket for this knob to go in existing spot. and adapting so that the larger knob would fit, then existing ign feed direct into controller. Or am I seeing the system you have have a single knob for the temp and fan combined?
Also does that Pot. on that model have an Off position (clicks) or just rotates to 0%
I left the original switch wired as original with the exception of moving the wires that previously sent 12V to the blower motor to becoming the trigger for the relay. So now I turn the original fan control to low and three things happen.
The relay is triggered, powering the variable speed controller.
12V is sent to the AC compressor clutch, and
12V is sent to the relays that activate the radiator fans.
There is no off position on the pot, but it’s de-powered when I turn the original AC blower switch to off. The original switch acts as a master on-off switch for the system. I set this up the way I did because it seemed, to me at least, to be the easiest way to do it, and it’s easily reversible since the only alteration to the existing wiring was to the wires going to the blower motor.
Yes makes perfect sense, that’s true , as I forgot the blower switch also passes power to thermostatic switch -/clutch and secondary relay coil for fans.
You can’t really tell how the AC is blowing until you use the car on the road, in the sun, in 97F, 90% humidity weather. We went for a drive an hour ago. The AC fan now moves air about as forcefully as does the AC in our Mazda 6, Much, much better than the pathetic puffs from the factory motor. Stopped in the sun waiting 8 minutes for a train to pass we remained cool, bathed in climate controlled comfort while the engine temperature reached a peak of about 200F and never went any higher.
I guess I’ll buy a second motor and replace the one for the heater fan.