Better The Devil You Know? Now, I'm not so sure

I posted in the E-Type section about my 1969 S2 OTS with the ‘matching numbers’, yet probably unserviceable engine.

I moved forward with salvaging the block. I think I was successful. All the head stud holes are back to factory thread diameter and pitch specifications. Although they are open to the water jacket like the later ‘long stud’ engines.

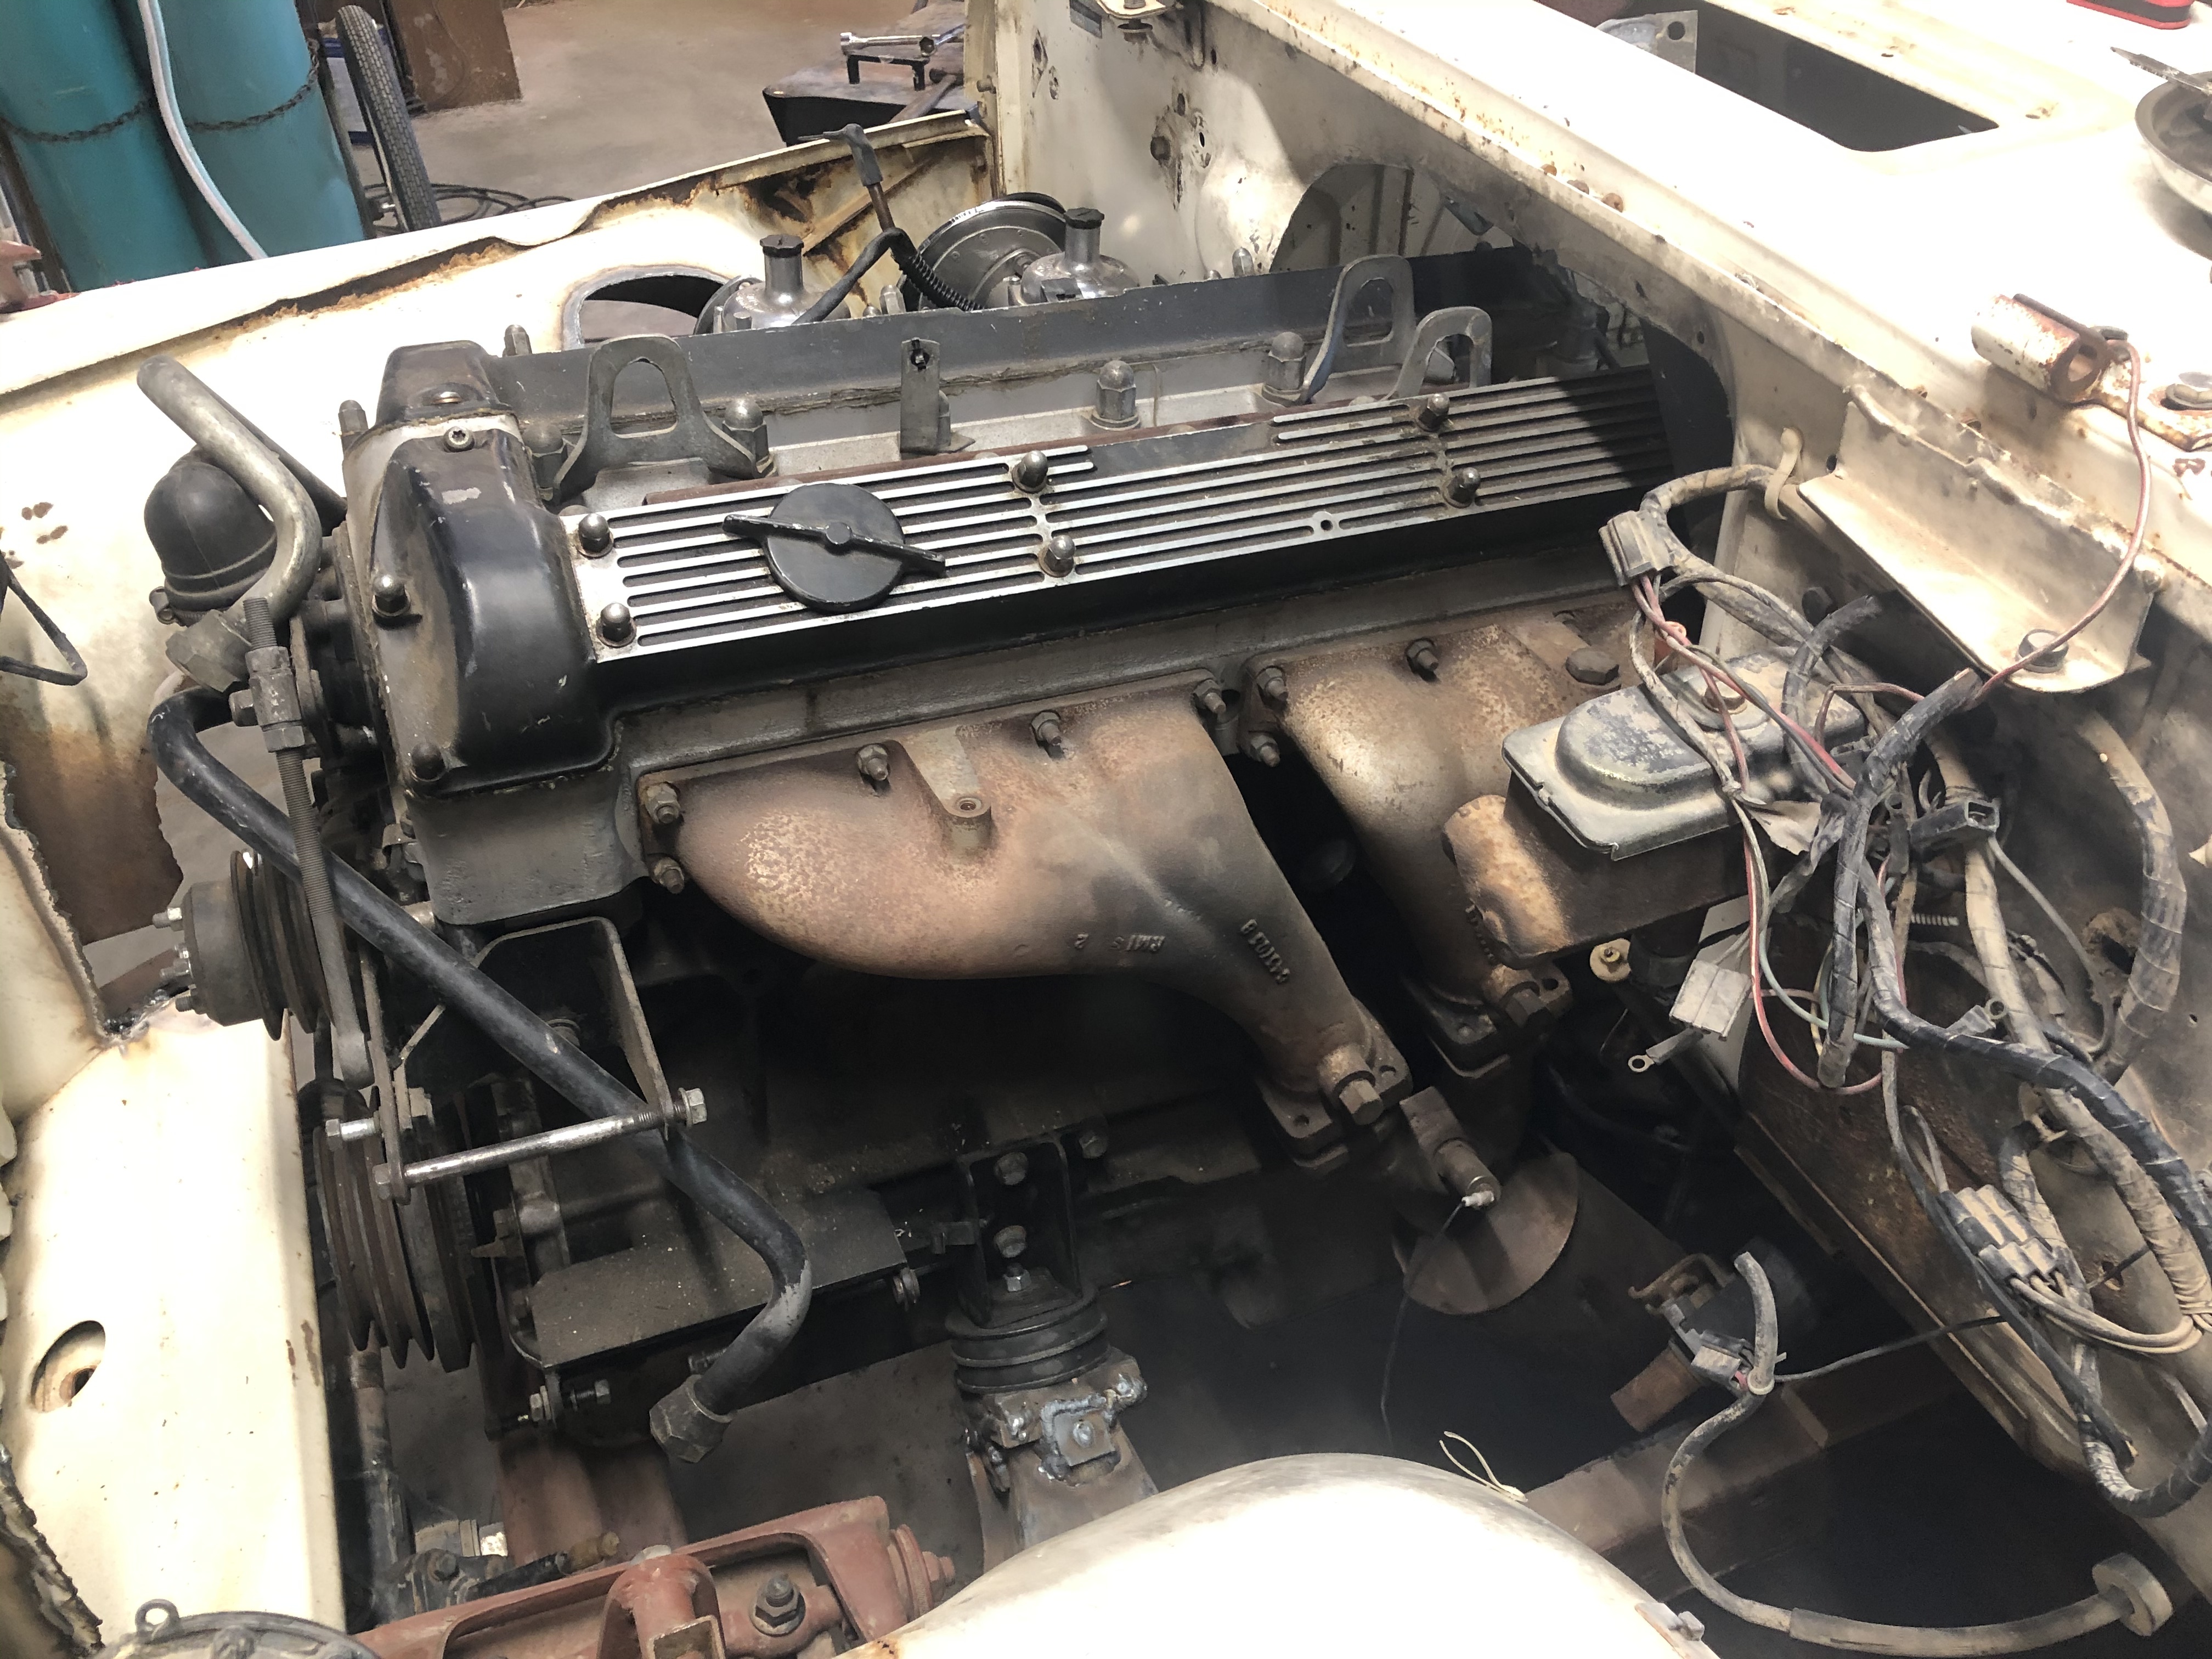
Then I went after the head. What A Mess!

The cam cap nuts were over torqued. Orange (high-temp) RTV was overused. Including under the exhaust gaskets.

I got lucky when removing the exhaust manifolds. Only 1 stud snapped off. With enough sticking out to weld a nut to. 3 MIG, 2 TIG attacks, 5 welded shut nuts and 1/3 of a can of penetrating oil later… I drilled out the remnants of the (now annealed) stud and re-tapped the hole.

There is some kind of repaired damage in the upper chain area. I’m guessing sprocket-to-cam bolts backed off or a piece of chain tensioner got loose? It also looks like someone cut (broke) a portion of the mating area with the timing case cover. Epoxy or body plastic was used to fill the gap.


Now, I know I have a serious uphill battle to recover these castings to make a nice engine for this car.

On the other hand… I have a 1984 S3 XJ sitting outside the barn. Full tanks of oxygen & acetylene, an air impact wrench and a front-end-loader will have the complete engine and transmission on the barn floor in a weekend.

Then tear the XJ engine apart with the expectation of using the later bock & head. With the E-Type cams, manifolds and oil pan.
Fresh, high compression pistons to make up for the taller combustion chamber. (Bigger valves!!!)
Which crankshaft? (Later rear seal…)
Convert to aftermarket fuel injection (Zenith Stromberg carbs? LOL! and the XJ intake runners don’t fit in E engine bay)
Convert to DSI.

Still restore the rest of the drive line and suspension

Preserve the original engine:
Throw the old XJ pistons and cams into the E’s original block and reassemble with a new head gasket, lots of assembly lube, torque everything to spec and close the bottom with the XJ oil pan. Connect all oil pup lines and install the oil filter. Fill the pan with oil. squirt oil into the cylinders and install spark plugs and distributor. Fabricate Plexiglass (Perspex) covers for the intake and exhaust ports; secure with the correct studs and nuts. Plug the timing case vent. Set it on wood and wrap in plastic with proper information.

Or am I being too nuts about this Matching Numbers thing?

I got the head fully disassembled last week.

Pretty well cleaned up.

Mating surface to the timing case cover repaired.

All studs have had their exposed threads chased.

All threaded holes chased.

All non-threaded hold cleared.

Checked for flat: Under .002

Parts ordered:
All 24 valve springs;
Two cotters (lost one during disassembly, expect similar during reassembly);
8 exhaust studs (1 broke, several missing, 2 unwound and will be destroyed getting them separated from the manifolds);
Brass nuts for the exhaust manifold and down-pipe connection;
Full head gasket set (especially the seals at the back of the cams).

One more thorough cleaning, reassemble and stuff in a plastic bag.

Then deal with the block/crank/pistons…

1 Like

If you modify things anyways, I would use the XJ rods (stronger), crank (hardened) and seal, cams (parabolic) and oil filter (different cam feed, spin on)…?
If you use the XJ block the timing cover has to be the same height.
So, yeah. I‘d use the S3 head which you don’t need now that you fixed it and call it a day if the bottom end is okay. I didn’t read everything. Not sure if bigger valves equal less compression but for the US XJs you‘d need 9:1 pistons separately.
I‘d stay as original as possible and see how well it lasts!

What a DANDY idea…:grimacing:

1 Like

Shame I can’t weld, I‘d leave a comment :joy:

The block is better too in some aspects. Maybe not in others, but overall I would think it is well improved.

Thank you very much for the useful advice.

However, as you mentioned, I have currently closed the door to the path you described.

Because I have the numbers-matching block and (probably) the original head, my first attempt is to get that engine operational.

If that fails, I’ll have recently done one of these engines… So rebuilding the XJ’s engine will involve less head scratching :thinking:

1 Like

Not to worry: Ill neaten up all the weldment, after the last engine-out.

1 Like

I like that! Good luck.

Puzzled by this reference? Did you mean keepers or collets, not cotter, in relation to the valve spring retainers? Or are you talking about the cotter pins in the connecting rod bolts? Cotter pins should never be reused.

" Did you mean keepers or collets, not cotter, in relation to the valve spring retainers? Or are you talking about the cotter pins in the connecting rod bolts?"

Yes, those annoying little 1/2 round pieces of holy terror! Try to gently dislodge 'em? Ping! off to the Hoseone Layer.

I was originally taught they are called “keepers” when working on USA built engines.

The Jaguar parts book (or Terry’s catalog?) calls 'em cotters. I just figured it was just one more piece of British vs. American nomenclature. “Boot” vs. “Trunk”, “Bonnet”::“Hood”, “Wings”::“Fenders”…

You need to build a valve spring compressor that bolts onto the cam cap studs. With the long lever, all valves in one or two hours without parts flying off is almost enjoyable. Almost, I hate those little collets although they look good.
I use one out of flat iron, a few bolts and a tube wrench socket that has two large windows for fingers, magnets and toothpicks. It works.

Wikipedia calls them split collets.

Yes, I am going to build a proper valve spring compressor tool. I found the perfect size pipe last night.

Cut a rough inside taper to closely match the retainer. Cut the pipe to make a 1/4" ring and weld on two legs.

Or leave the pipe 4" long and mill out large windows on opposite sides.

“Wikipedia calls them split collets.”
Ah, Wikipedia. The repository of perfect knowledge!
[\sarcasam]

Yes Sir, that’s the way to do it. I built something similar 30 or so years ago and have used it numerous times on mine and fellow club members engines, works great!

I’ve seen 2 very different ideas on how to bring the pressure to bear on the spring:

1: A long lever with the fulcrum bolted to the nearest cam bearing block. Has to be moved in order to get all 6 valves.
2: A slotted rail bolted to all 4 cam blocks. A screw (Looked like 3/8 threaded rod) and nut under the rail to press against the spring.

I really like the idea of bolting the rig down once and using a wrench or ratchet to bring the pressure…

What if the threaded rod comes has a reduced diameter tip that drops into a small hole at the top the adapter (piece of machined pipe)?

Now, we build the rail using C channel. Spaced just far apart enough so a 3/8-16 nut can slide, but not rotate!

Drop the adapter in place, start the rod while positioning the nut. Align while bringing up tension. Whups threaded rod just became a long-thread bolt. Use a normal ratchet and socket to compress the spring!

Got it!!!

Welding it up so that it doesn’t damage the cam blocks and the nut can be removed are priorities…

Go by 1. because the collets tend to fall down too far and you have to reorient them over and over again. You can probably do 4 valves from one spot if you make it just right.
Someone writes those Wikipedia articles, and just saying, I know them as collets too. Or keeper.

Actually, Wikipedia is crowd-sourced. Anyone can write anything. The ‘truth’ or ‘uncontested facts’ somehow, eventually, worm their way to the top.

I got the valves out using an improvised version of #1. Having to relocate the fulcrum was just annoying. Having the head squim around the bench when trying to compress the spring was very unpleasant.

I’m used to pullers that use screw threads. I’ll build my contraption based on them. Worst case: more scrap metal for reclamation.

Do you have a manual? You need a wooden board with semi-circular wooden pieces to rest the valves against and a better tool to come close to enjoying it. Do whatever you like best. Lever is better. Send pictures.

…which is why I said they call them split collets, so that is o n e way of saying it and has nothing to do with your apparent distrust.

1 Like

Whups, looks like an apology from me is in order.
Sorry, if I was appearing serious about Wikipedia not being correct.
I was trying to be a bit silly with my sarcasm. Wikipedia IS a fantastic repository of information.
Any repository build and managed by humans will always be flawed. It is just the way we are.

As I mentioned earlier I figured it was an ‘other side of The Pond’ nomenclature thing.

Unless there is a full glossary appended to a technical article, there will ALWAYS be misunderstandings.


Yes, I’ve got the Bentley manual. Never did quite understand about the semicircle blocks screwed to a single board.

Thanks, you just switched on my light bulb! The head is oriented as if installed, resting ON the blocks! The depressed centers of the valves locate the top of the blocks.

There goes 45 minutes of aggravation.

I‘m happy that helped! The bentley drawing lacks the most important detail, the 6 pieces are round like Andrews‘ hockey pucks and fill the chamber. We initially got that wrong when we made ours.
You‘ll need to hit the tool with a hammer sometimes to loosen the bond, and having something magnetic will be useful.
And say you put the tool on bearing #2, 3, 6, 7, it will give you access to four valves so you have to move the bolts just 4 times if you plan it right - especially make sure the lever doesn’t hit the head when you depress it fully, and better if you can adjust it without detents because they don’t all have the same distance I think.

No apology in order, they always had that idea that Wikipedia was/is inaccurate back in school and we‘ve all grown allergic to that because they repeated it constantly, all the time. Of course there are mistakes. I like collet because it is about the same as in a drill chuck in a way, but no matter how one calls it it is still the same thing. Sarcasm is good. So I’m sorry and absolutely no offense taken!