I have searched the archives for “body line” , “swag line”, “chrome strip”, and “diamler chrome” and I can not find details about how the chrome strips are attached to the body. Especially if the body did not originally come with the chrome strips.
Does anyone know of a video or pictures showing these strips being put on or removed?
Here is the situation. My 1976 XJ6C did NOT come with the chrome modeling above the creased body line? But I was able to find a COMPLETE set (all 6 peices) and two chrome strips for the vinyl top.
which I’ve taken the liberty to scribble on your picture. These were dealer fitted. Didn’t come from Coventry this way. Same story with the Leeper on early XJ’s reintroduced with Ford’s (ownership of Jaguar) rendition of the retro-look XJ X300- X350’s.
I do have experience with the door ding guards, some are fitted with screws at each end to kinda hold the strip in place, with either automotive trim tape or automotive trim glue applied to the middle to keep it from sagging. and some just stuck on with adhesive or glue.
My XJ-S has the same thing. for whatever that’s worth.
Hi Mark,
I will be removing the dealer installed door ding guards this weekend…this is the molding you circled in blue.
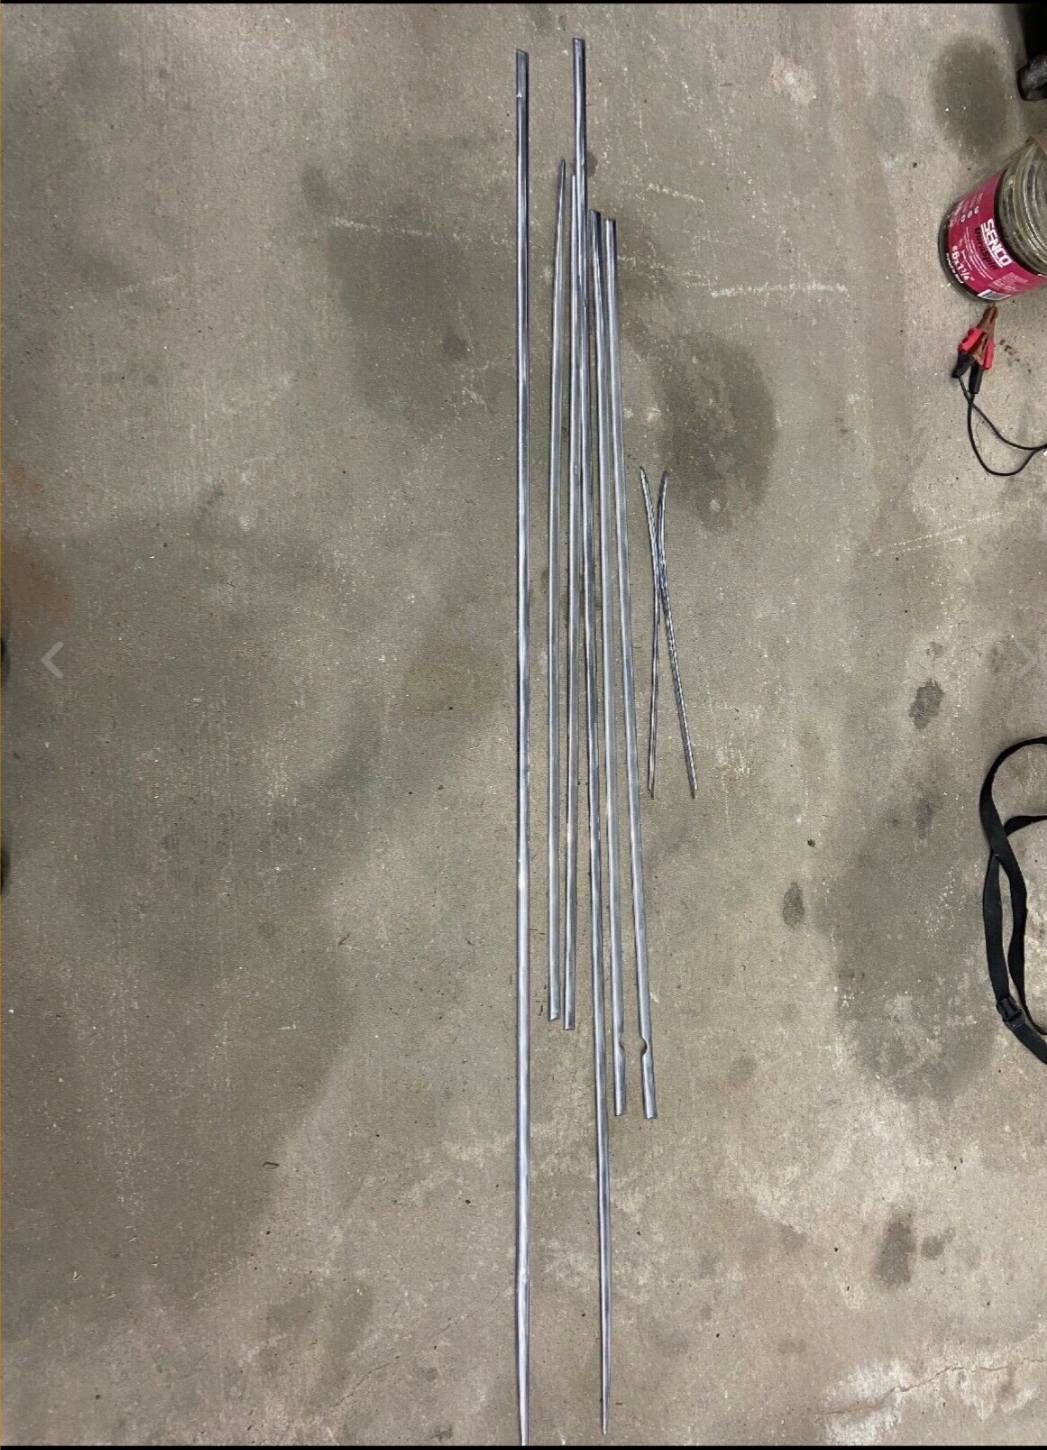
I will then be adding the chrome molding that goes above the swag line…these are the items in the first picture.
I purchased them already off the car so I dont know how or where they attach to the car body.
When I purchased my coupe the vinyl top was removed and so was the two chrome strips. Now that I have them I would like to put them back on, but do not see any previous holes/bondo in the c-pillar.
Metal strips, highlighting the swag line is new to me.
All of my XJ’s and XJ-S’s have a double pin stripe painted.
Green XJ has a gold pin stripe
Grey XJ has a bluish grey pin stripe
White XJ has a blue pin strip
Pink XJ – well no pin stripe (because it’s a respray) the original color is / was Primrose Yellow
Blue XJ-S (Coupe) has a camel / gold pinstripe
White XJ-S (convertible) has a blue pinstripe
Black XJ-SC has a crème / not so white – white pin stripe
As I’m writing this post, I’m thinking hmmm… that’s the same color as the interior. On all of the XJ’s Funny I just noticed that… The Blue XJ-S I’ve owned for over 20 years; and just noticed… Go figure.
sorry to have caused confusion. I just double checked in the XJ6 parts catalogue and to my big surprise found chrome side finishers both for the Jaguar and Daimler LWB four door models and for the coupés. Although they seem to be limited to the cars with a vinyl roof I could have sworn that even (all) vinyl roofed coupés came with glued or painted swage lines. Just check these out https://www.welt.de/motor/article121648078/Jaguar-XJ-Coupe-das-schnellste-Vinyldach-der-Welt.html#cs-07JaguarXJ12CoupeAb1975-jpg.jpg. The original sales brochure of the XJ range, including the coupés, likewise with vinyl roof, don’t show any chrome finishers. I just did a research and found chrome strips only on 12 cylinder coupés
.
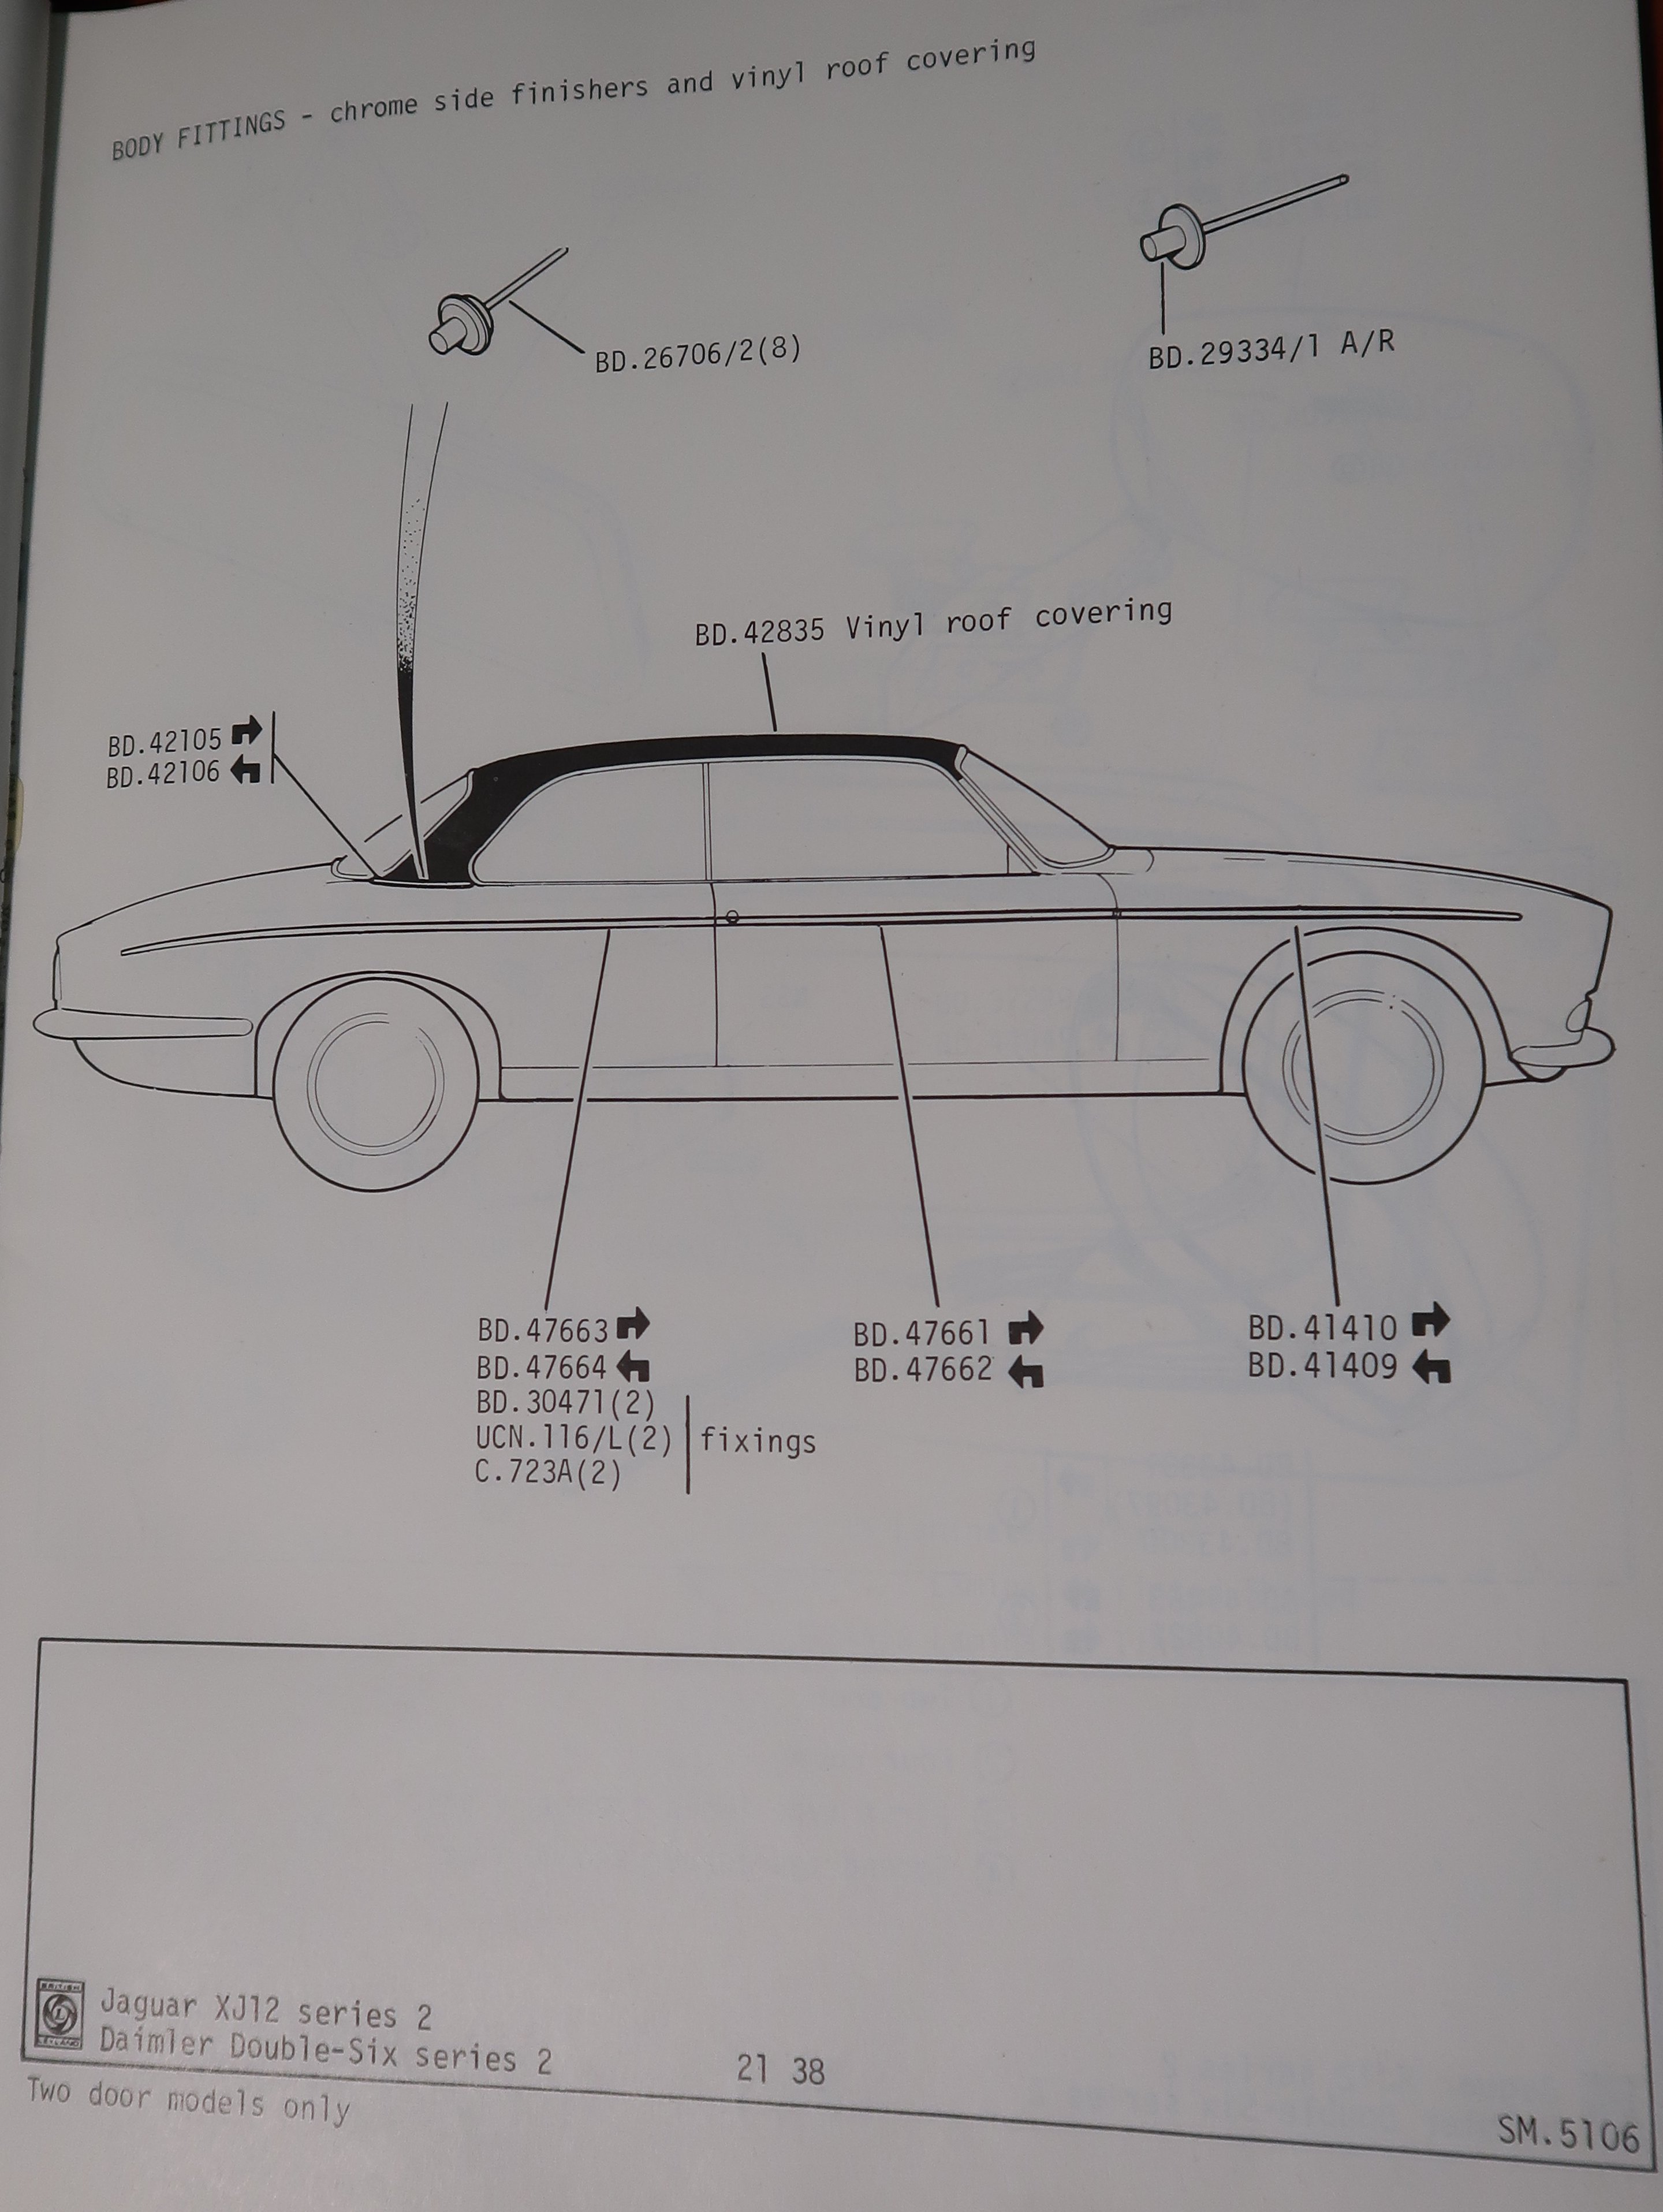
The parts catalogue indicates that the chrome finishers separating the vinyl roof and the painted area are fixed with some kind of pop rivets, BD.26706/8 (four for each side).
For the chrome finishers along the swage lines fixings BD.304/71 - moulding bolt -, UCN.116/L - a small nut - and WF702101/J - a simple shake washer - are indicated, strange enough only two of each.
Frankly, unless you already find holes in your car that you’d otherwise have to fill you might just wish to leave those chrome pieces on a shelf.
Good luck with the car, anyway, and keep us posted
Some trivia for those who like to tart up their cars (you ask how I know?):
The Series 1 Daimler saloons had the side finishers (4 per side) but only those with LWB, like the double-six. To my knowledge there are no finishers available for SWB cars (the rear door pieces being too long). Because of the finish at the ends, one would have to shorten those pieces in the middle by cutting and welding for use on SWB cars.
The finisher between vinyl roof and the painted area is available for Series 1 and 2 saloons as well as the Series 2 coupes. So one can fit a vinyl top to these cars (whether originally equipped or not) and include the proper finisher.
I believe the screw/clips that attach the side finishers are similar or identical to those that attach the chrome centre strip to the Daimler bonnet. All IMHO.
Phil from xjc.com.au sent me this image of the parts book that show the actual “chrome side finishers”, “vinyal roof covering”, and attaching hardware.
I am still looking for any info on how to put the molding on a car that did not come with them. Where to drill holes/slots? What are the measurements for placement, ect.?
These chrome moldings also came on the saloons/sedans. So if anyone has put the molding on a saloon please let me know.
The mouldings are held on by a combined pop rivet clip not sure what size . As for positioning they would go just above swag line , to find position put masking tape wider than moulding above swag line, get someone to hold moulding with you in position just above swag line leaving a small gap, then mark around moulding with pen keeping close to edge of moulding, repeat for all mouldings , find midway position of two lines. Measure width of wing mouldings and mark on masking tape where the mouldings thin down in width. Starting 1 1/2 inch from ends of mouldings (using marks where wing mouldings thins as end) then space out between these marks about every 6 to 8 inches ,even the spacings. Drill holes to the rivet diameter ( they used to be 1/8 inch ).Take off masking tape. Fix rivets on. To clip mouldings on, place moulding over top of rivet and use palm of hand to tap on, don’t go too hard and don’t use hammer .This is how we used to fit mouldings back in the day when replacing panels which had no holes in them.
sorry to get back to the thread a bit late. Glad Phil jumped in to post the pages. To make things easier: the original parts catalogue is available online https://parts.jaguarlandroverclassic.com/catalogue/xj12-and-daimler-double-6-ser-2/body/#p=12. Hardcopies and CD-ROMs can be had on ebay etc. The investment is definitely worth it - ask Paul! - even though in this case it is little precise and even the numbers seem to be wrong. I’d expect a lot more fixings to be needed.
The strips I’ve seen have a half-moon cutout to clear the door lock. Position of that cutout relative to the lock should determine the vertical height of the strips, IMHO.
I will take the rubber door ding guards off of one side and install the factory chrome strips, but keep both the door ding guard and the factory chrome strip on the otherside so everyone can see what these two options look like side by side…I have never seen a picture like this!!
To remove the door ding guards simply pull one end of the rubber and it slides out of the metal frame. It is best done on a warm day to make the rubber more pliable. Then drill the pop rivets out and that’s all.


