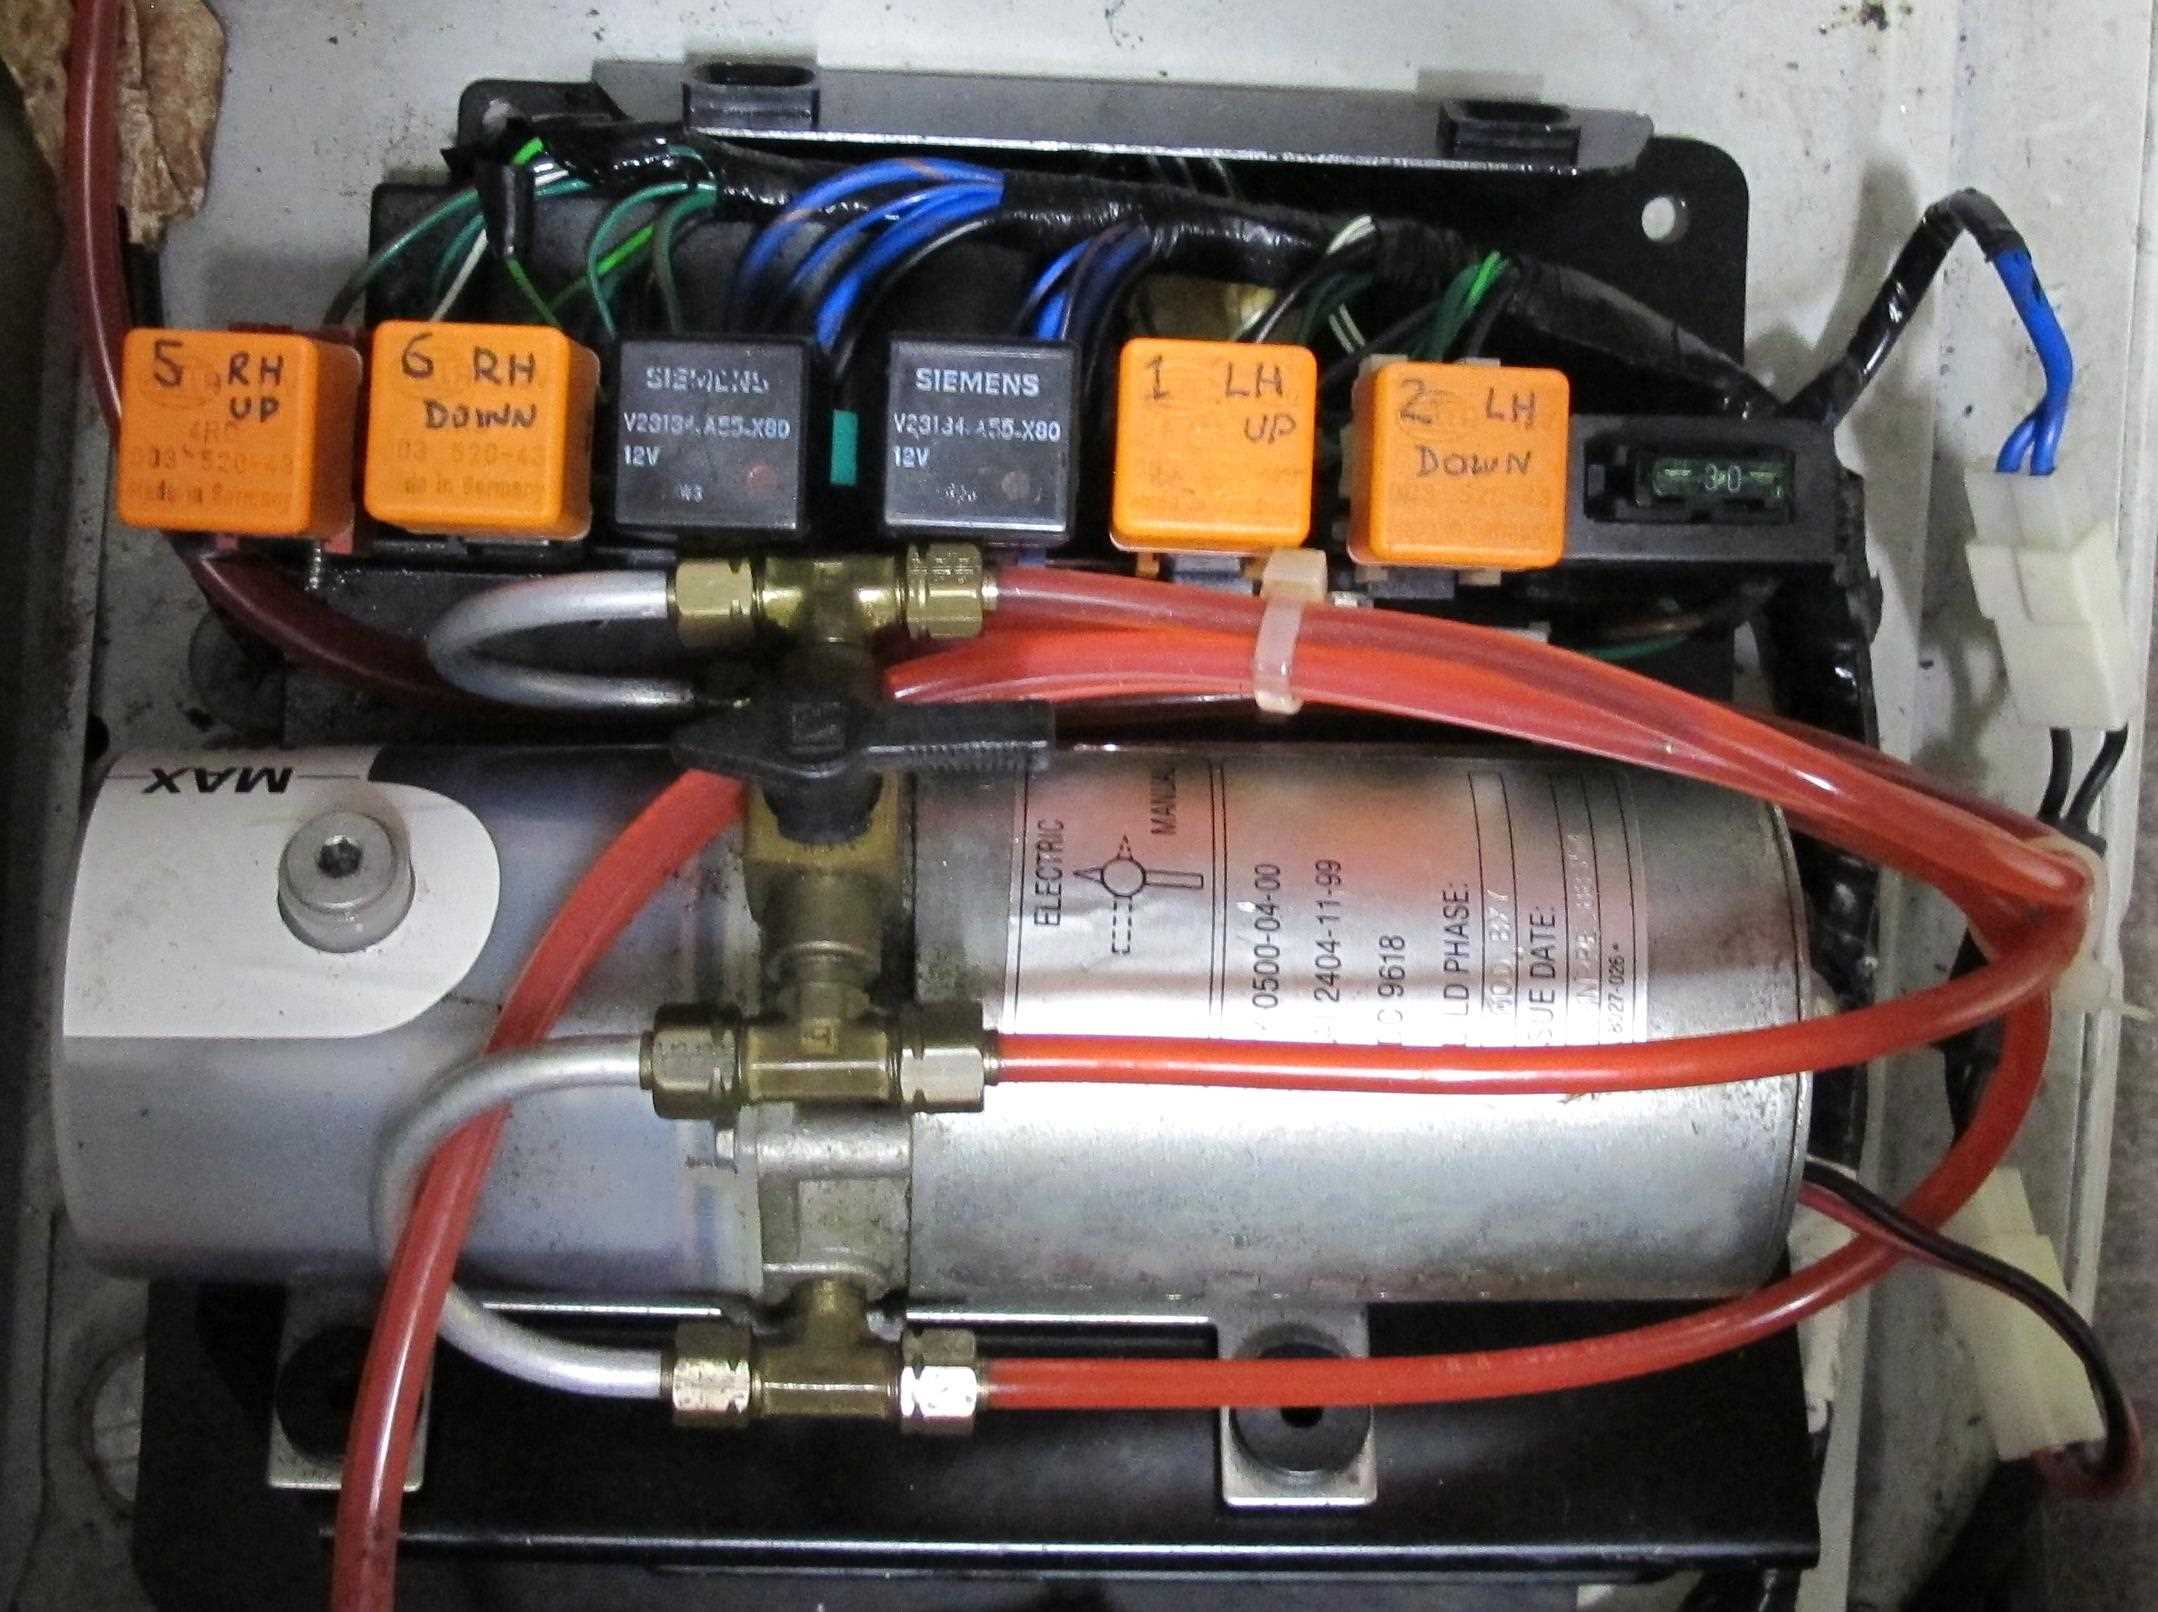
On the cylinders, Lines 1 (lower line) and 2 (upper line) are the driver side cylinder. Lines 3 (lower line) and 4 (upper line) are the passenger side cylinder. Top of the pump on the passenger side is #1 and #2 is on the drivers side, you cannot see 3 and 4, Three is below 1 and 4 is below 2. This is the original position
This is what I found as far as the hoses. This is left hand drive of course
Something I might have missed.
The RHS 1/4 window motor not working started this overhaul exercise.
After checking and cleaning, nothing wrong, put it back and worked OK for a while.
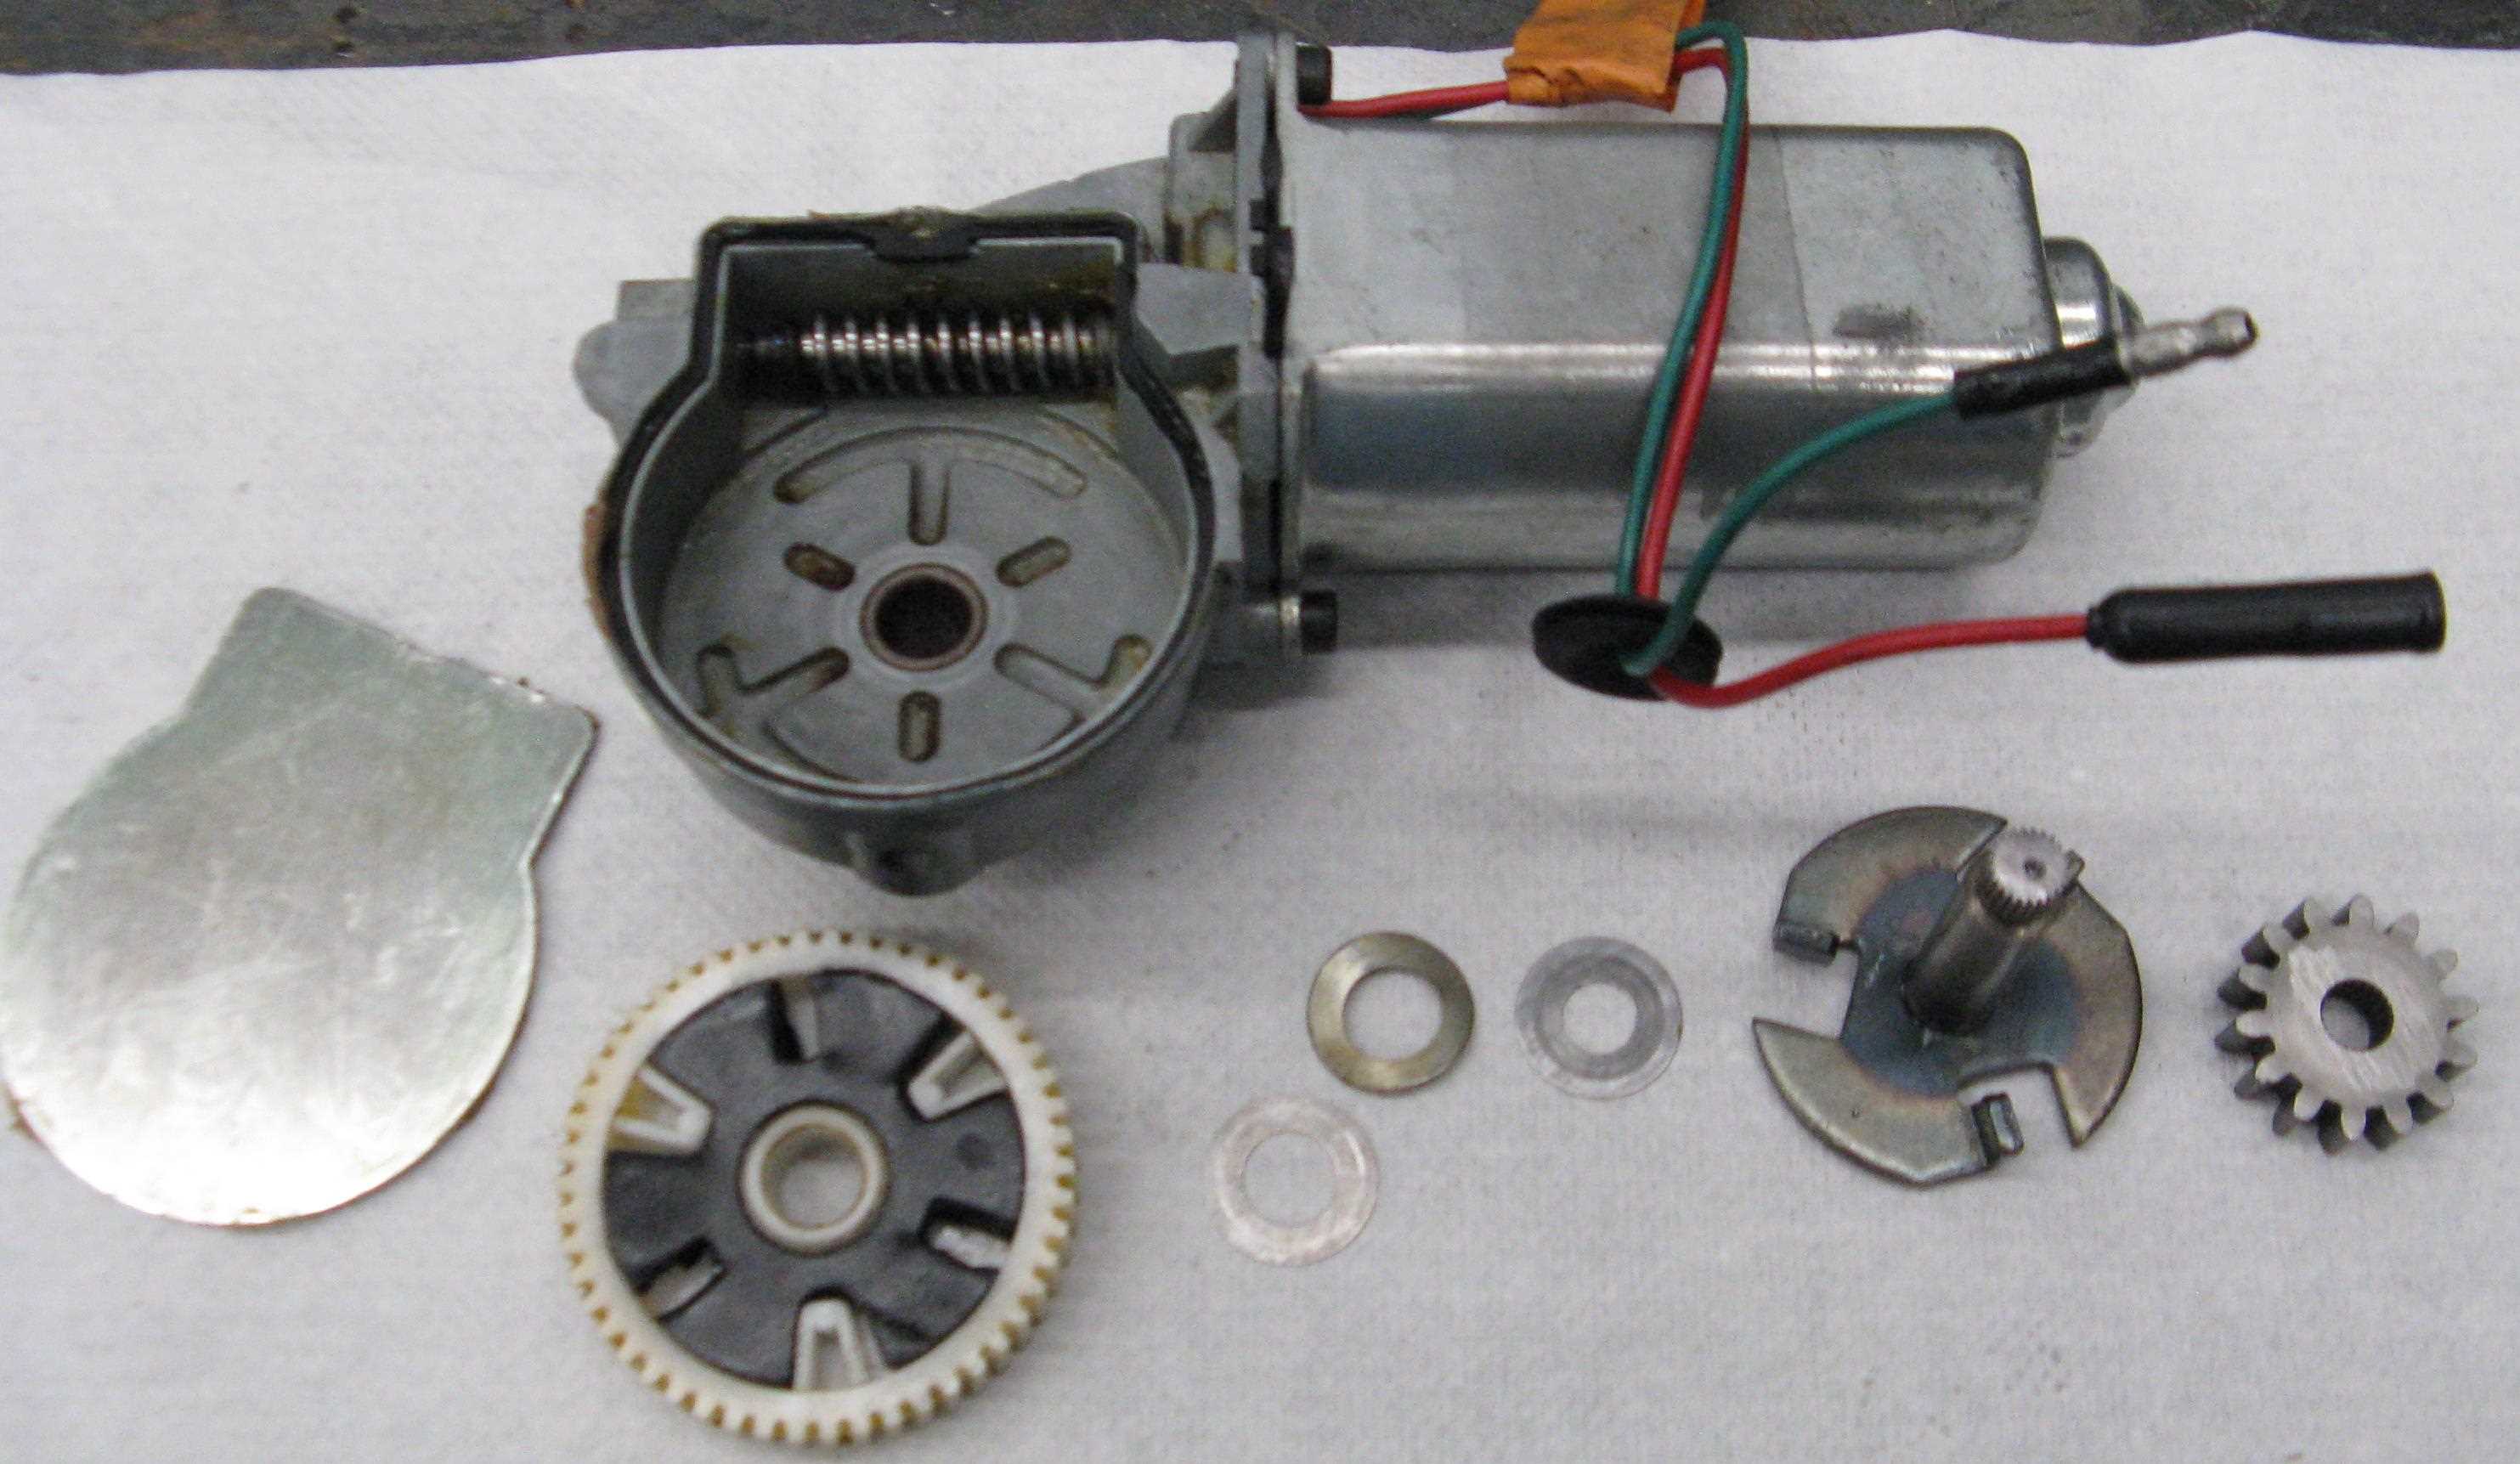
Then it stopped again. Took out the whole assembly and noted the motor appeared seized, although it was actually the worm on the motor shaft seized.
That can happen if the motor drives one way without a limit switch to stop it.
When you reverse the voltage to move it back it just does not have quite enough torque to unseize.
I think the rubber item ( spider ? ) in the gearbox is the answer. I theorise it should compress at the end of travel so when the motor reverses the compressed rubber helps to give a bit of added torque to unstick the worm. I did note that rubber was so hard I thought it was some kind of steel spring.
Of course a spring could do the same job.
I did not see any easy way to pull it apart. Any suggestions, anybody done it ?

To remove the rubber you have to remove the gear on the front of the shaft. When that’s off (which mine fought me, I think it’s locktighted on) the metal part over the rubber,and the shaft, will slide out. Then the rubber just lifts out. Mine seems to work fine without it. That is what was making mine not work. The rubber had actually twisted up and was jamming on the cover plate
Also as soon as you get the gear off, it will slide right on and off with very little effort. I used red lock tight on the splined shaft to help keep it on
These square-case motors are notorious for locking up because the screws holding the case together get stripped and the case cocks sideways. Easy fix is to just drill the holes out and use a longer screw with a nut on the back side.
One other thing you might check is continuity on the commutator segments. If one is open, the motor seems to run fine until it just happens to stop on that segment. Then it won’t start again.
For sure those rubber items appeared rock hard, which is not a good sign.
I will pull both window motor assemblies out again and check them.
The motors may work without the rubber, but I suspect the rubber is there for a purpose.
My bet is to overcome the problem of the worm seizing.
Might check all those commutator segments too just in case.
Pulled the motor assemblies out again.
To get at the rubber cush spider you need to remove the drive gear that is on the gearbox shaft.
The gear is fitted on the shaft spline, but the shaft end is peened over. So you need to grind that peened end off the shaft. Then the gear can easily be removed with a gear puller.
The cush spiders are mighty hard rubber, I would expect them to be softer to be effective. However they are 30 years old.
I think somebody might have mentioned finding spare for these recently on forum. Not sure what the topic was, anybody recall that ?


Ideally, it’d be nice to drill and tap that shaft for a screw to hold the gear back on.
You don’t want soft rubber there. Soft rubber would bulge when stressed and jam up the works.
You might be able to fab a replacement rubber spider out of an old car tire. Something with cord in it would be good.
Good point, if the rubber is too soft it can jam up. The rubber in there at the moment is really hard, not much chance it compresses more than a few thou at the end of travel. That rubber spider is not needed to cushion the drive, I suspect it is there to compress at end of travel and apply extra torque when the motor reverses so it does not jam the worm and wheel.
Looking back when the RHS window stopped rising, one test I did was to take out the relays and short across the bases to see if anything happened. Nothing happened except I did get a spark when the short was removed. That shows current can flow through the motor. Although I pulled it apart and thought at the time the commutator was not working because it was covered in grease, that was probably not the correct diagnosis.
More likely the worm and wheel had just jammed. After putting the whole assembly back in place it jammed again after 20 or so operations. I did note the end float on the motor spindle was fairly lage, so I will put it back together and adjust that.
Now I know how it all works I have marked the relays for UP and DOWN. The relays are quite easy to get at so if it jams I can use a fully charged battery to connect direct to motor through the relay base. The extra voltage might help unjam it.
Drilling and tapping the shaft end is almost a watchmaker’s business, that shaft is small. The right grade of Loctite is easier.
1 Like
Yep I used red on mine and let it set up over night. Seems like it should hold. Time’ll tell😁
I’ve replaced lots of window regulators both manual and electric and never seen one that didn’t have a spring on the regulator it’s purpose was to help raise the window just like a spring on a garage door.
I’ve never had a jag window regulator out do they not have a spring on the regulator
This is a 1/4 window, and the name is apt because it is about 1/4 the weight of the average car window.
For that reason it does not need a counterbalance spring to help the window motor raise a window.
The other windows on a Jaguar have the usual spring.
It does make you wonder if anyone has tried to rig up a spring on one at some point
I do not think a spring is needed for such a small window, in good condition the motor assembly has no problem getting the window up.
I was thinking more if someone’s kept locking up, it could be a way around it
Today I carefully reassembled the motor and gearbox back into the window operating assembly.
I used rubber grease on the rubber spider so it never jams in the gearbox.
I then checked the operation on a big variable DC supply, setting to 13.5V.
The motor draws 2A until it stalls at end of travel and then draws 8A.
Still cannot fathom why I had the windows going down as the top went up.
Easiest solution was to reverse the coil wiring on the window relays.
I pulled the relay bases off the metal tabs, which is when I noticed the black box underneath which is the logic module also called an ECM in Jaguar parlance.
The bases have a plastic locking tab which need releasing before removing the 1/4" faston receptacles in the relay base. You can see a red and black one beside the bases in the photo.
So now if I push the top switch forward the top goes up and the windows go up after a 8 sec delay.
That is the way my Jaguar handbook wanted the windows to work.
Push the switch backwards and the top goes down and also the windows without delay.

1 Like
What did you do with the logic module? Or am I just missing something
Not missing anything Jason.
At one stage I thought it might be easier to swap window functions by swapping wires out of the logic module. Well, it is not. Much easier to swap wiring to relay coils. Done and dusted.
A bit more work to do yet, putting all the various cabin fittings back in place.
1 Like
All done shipshape and Bristol fashion.
Halfway to reftittng all trim items thought better check the 2 speakers in the storage locker behind the seats. They hardly squeaked on full volume. Checked the wiring loop from radio through speakers and one side 30ohm, other side 12ohm. Unusual ! They are 4 ohm speakers and wiring should be few hundred milliohm at most.
Recalled there were in-line fuse holders in the wiring loom below the cylinders, and maybe they were for speakers. See no reason for fuses, but checked and they truly are in line with speakers.
Pulled the fuses out, but they are not fuses, they are special 3 ohm resistors to limit volume of rear speakers. Squirted WD40 into fuse holders, put the resistors back and now have decent sound out of all 4 speakers in the car.
1 Like