Gee, if this thread carries on any further, I’ll start making these grommets using my molding machine.
kind regards
Marek
Gee, if this thread carries on any further, I’ll start making these grommets using my molding machine.
kind regards
Marek
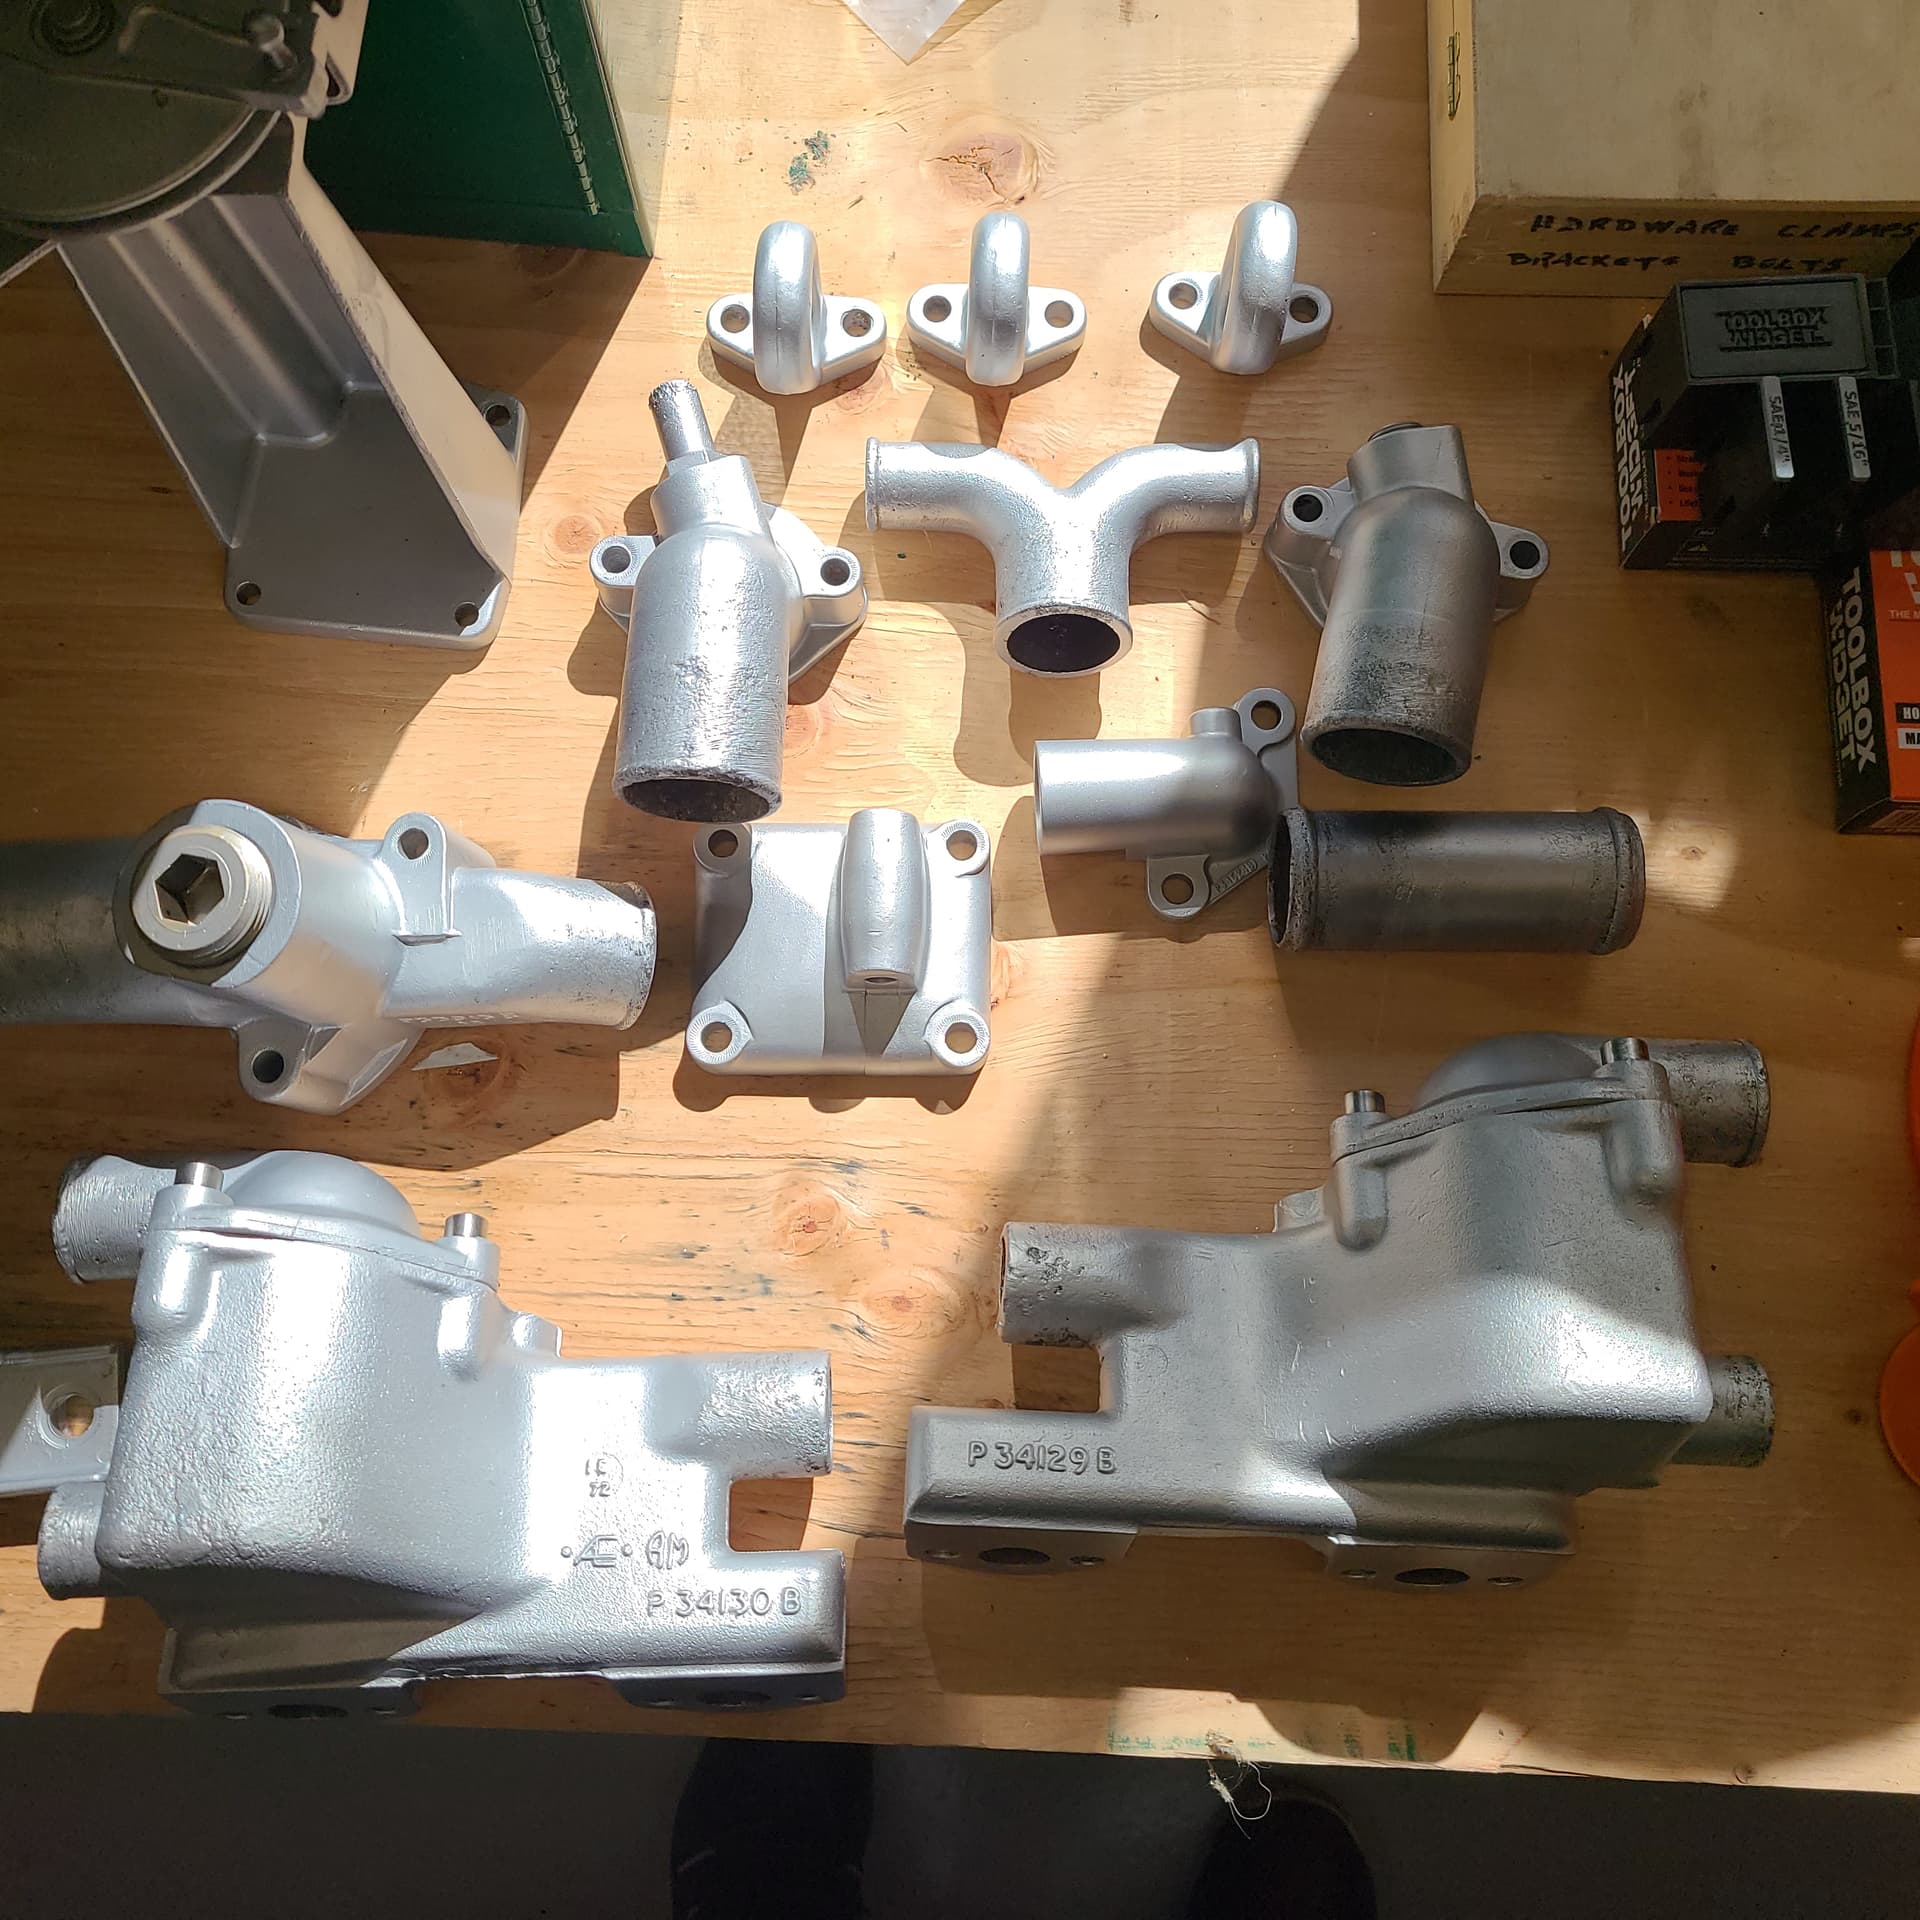
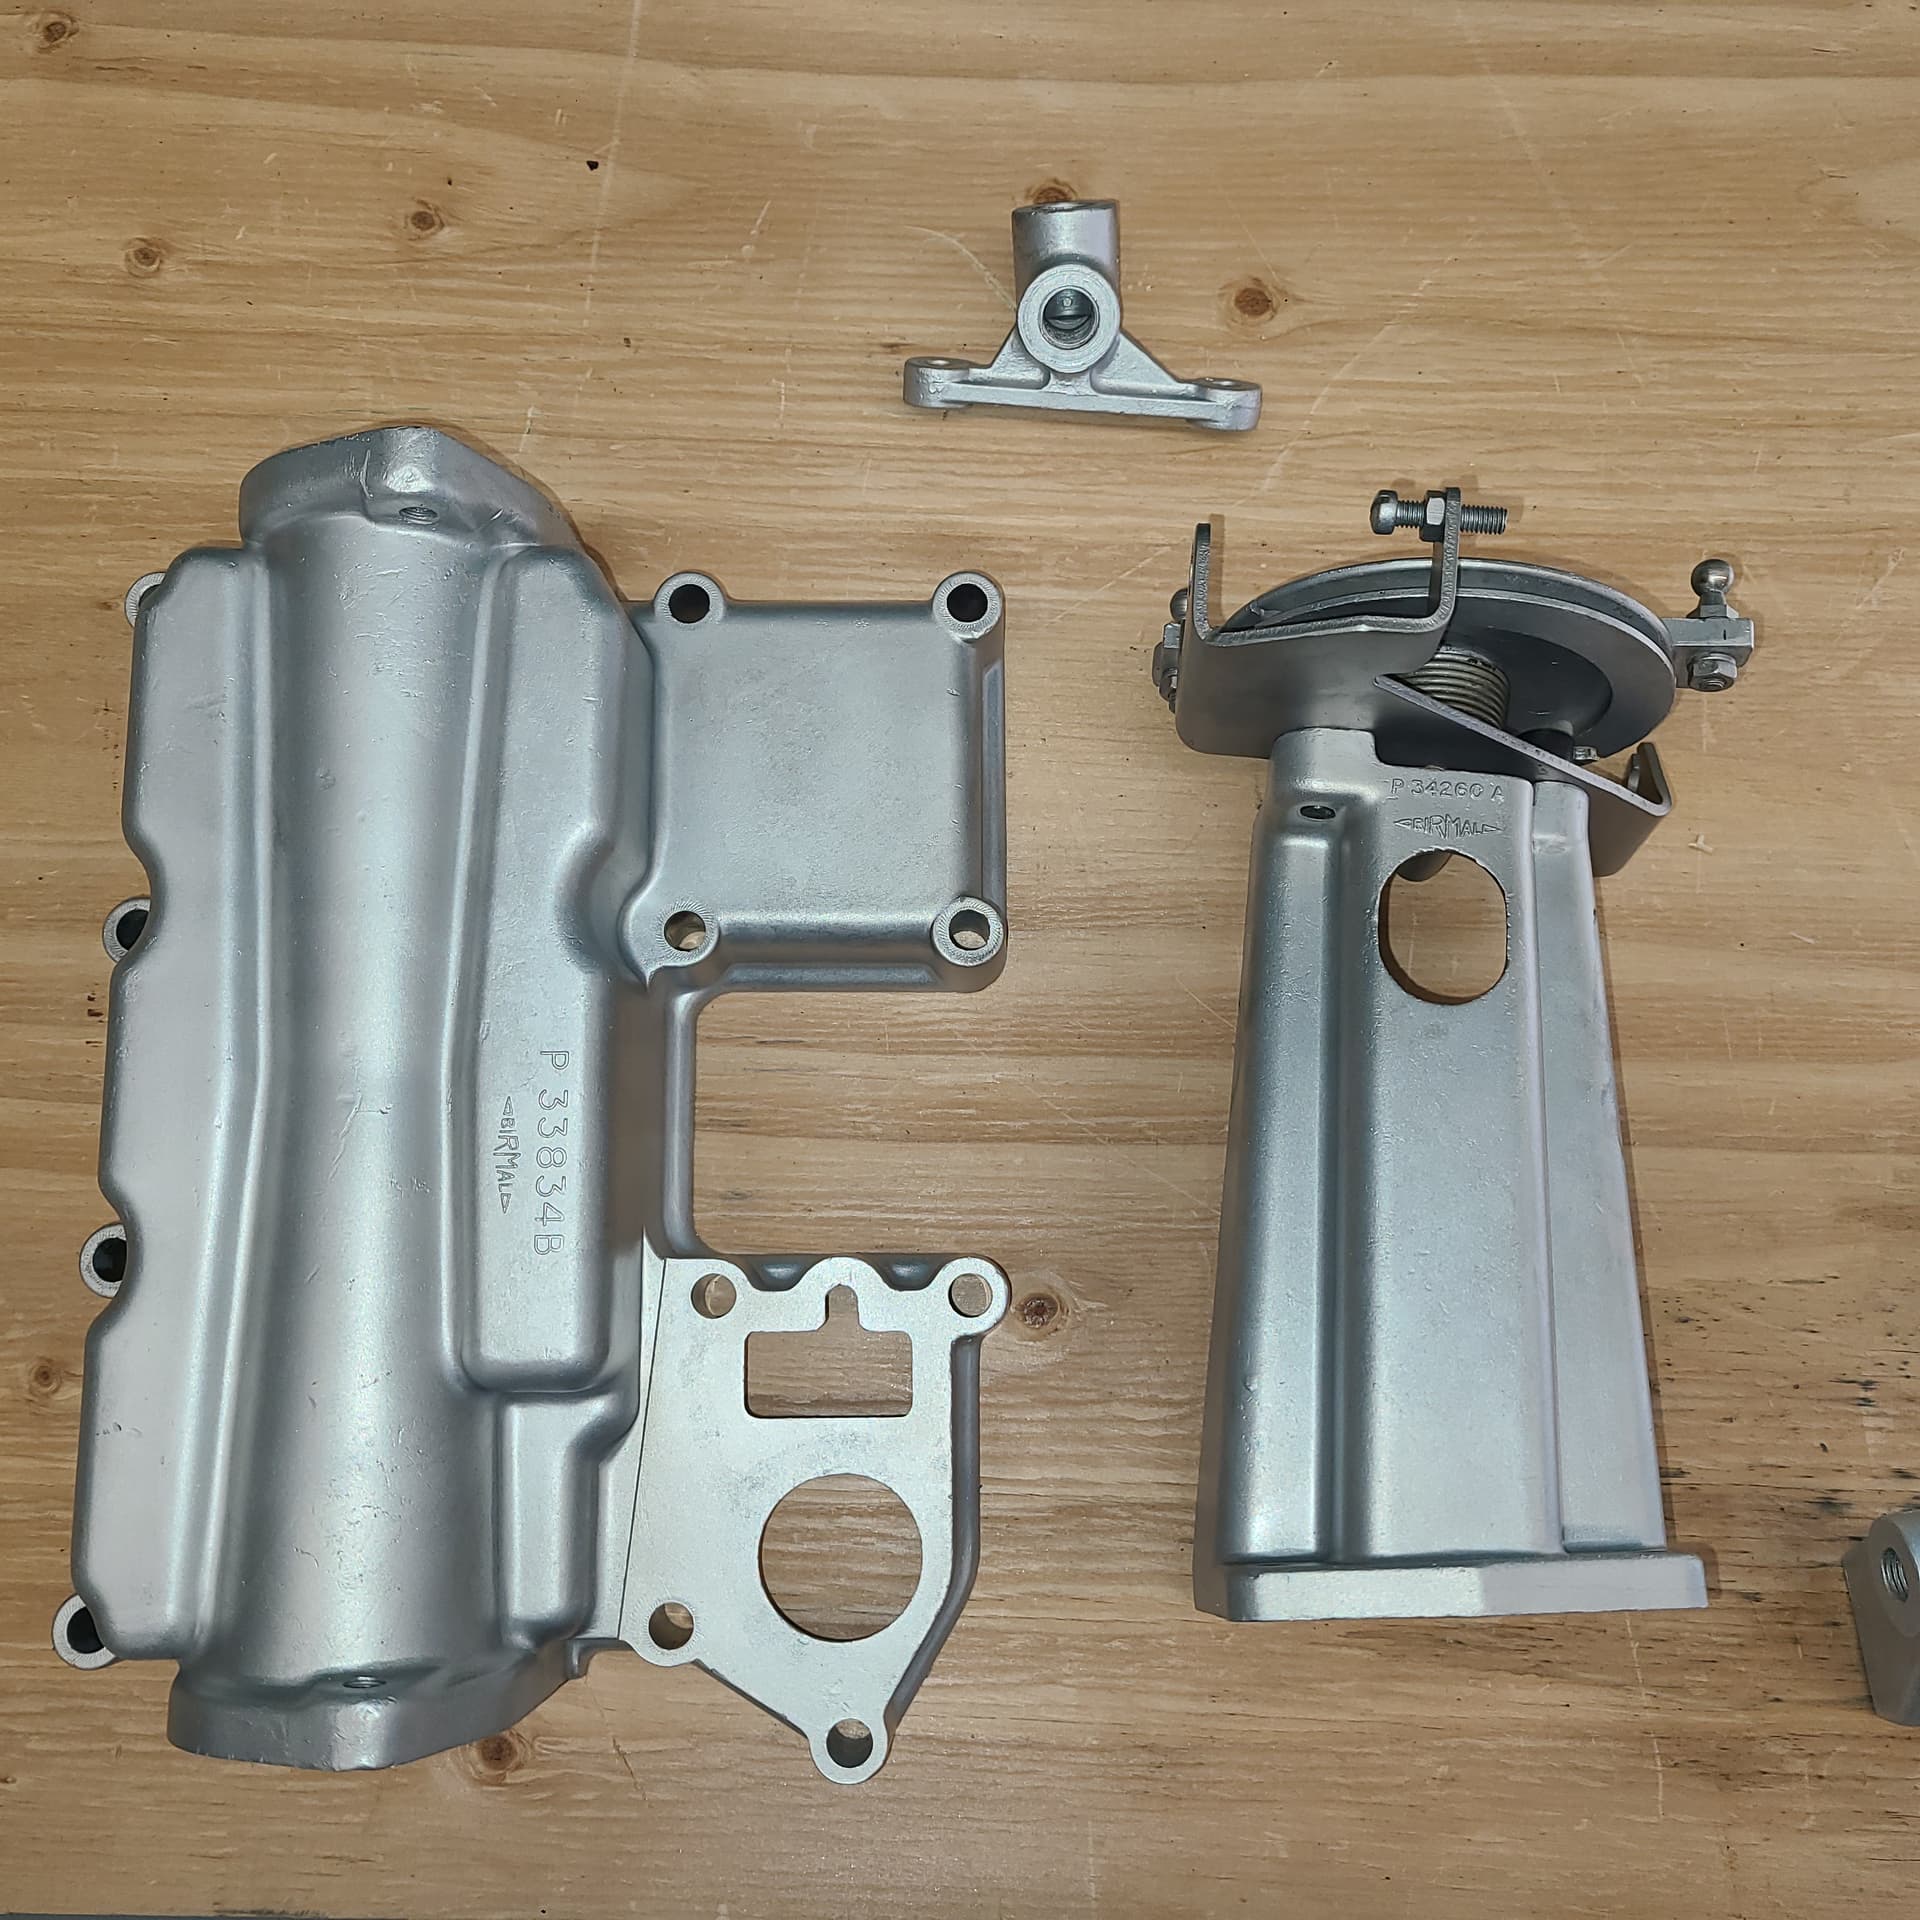
I haven’t accomplished much in the the last weeks – dancing with arthritis in my left knee and gout in my right ankle. Been on/off crutches and not able to get much done.
I did have a few more small pieces vapor blasted. Got them back today
In the event anyone is looking for a quality vapor blaster:
Jon Maudlin
Mint Parts, LLC
(719) 439-0628
Email - info@mintparts.com
www.mintparts,com
He charges $70/hour
Hi Craig,
I know others disagree but IMHO vapor blasting is FAR superior to glass beading! I only wish the units weren’t so expensive!!!
Parts look “factory new”.
Dick
Exactly.
And there is the minor benefit of sorta closing the pores of the metal to help keep them from getting greasy/oily.
Craig
Just read this ….Actually ….I don’t know the v12 loom at all …… but I wonder if the whole piece could be moulded in 2 halves fitted to the firewall and secured with 2 4/6 guage pan head self tappers …… ok it’s not original …… but will perform the function of the grommet …… to stop the wires rubbing through from vibrations
Wishful thinking Dick and Craig. The main claim to fame of vapor blasting is that the water keeps the product cool; absolutely not a problem with any of the parts you’ve had done Craig and the preservation of the Glass Bead media.
We do a shite load of Glass Bead blasting of aluminium alloy component and we can’t see the difference between dry glass and glass with water, which is what Vapor Blasting is. We have dedicated Glass and Garnet blasting cabinets, industrial level machines and if we considered there was a clear advantage for using a true Vapor Blasting set up, we would have one. We have made the comparison, with the supplier giving us a machine to try for a month and if anything, the parts processed using dry glass beads had a brighter finish, but that was a hard call. When considering the preservation of the Glass Bead, the longevity difference of the media is not that significant and you can buy a lot of Glass Bead media for the difference in price of the machines.
The typical benefits of Vapor Blasting listed by vendors are:
You can bet your bottom dollar, that if there was an advantage in finish or some type of pore closing, the marketing department would be hanging their hat on that as well.
The following pictures are of a V12 cylinder head that has been dry Glass Bead blasted.
I would challenge anyone to pick the difference between the finish shown here and a similar part processed using a Vapor Blasting machine.
The most noticeable difference for the consumer, is the greater cost, by a long shot, of having the parts Vapor Blasted.
Brent
Good points, all, Brent
Thanx for the run down – sounds like you have a fair bit of experience with media blasting.
I have often wondered if there was any difference between vapor blasting and standard dry glass beading: I think you’ve now answered my question.
So what do you usethegarnet for Brent?
We use the Glass Bead set up for producing a mildly satin finish, as seen in the pictures of the cylinder head in my previous Post and mainly for aluminium alloy parts; the Glass Beads get broken up far more quickly when used on steel parts. Garnet strips rust and paint way quicker than Glass Beads and if the part is to be painted, we use the Garnet setup, as the finish will be hidden by the paint.
Steel parts that are to be Zinc Plated, we initially clean them with Garnet and then shine them up a bit with the Glass Bead blaster; Garnet leaves quite a dull, mat finish.
Brent
Finally got off my butt and back in my Hobby Shop. On top of arthritis and gout, I threw out my back by – get ready – standing upright after bending over engine bay of my 62 Thunderbird for nearly three minutes. Ouch. Damn – how pathetic. Another week on the couch.
I did use my “down” time to ship out some parts:
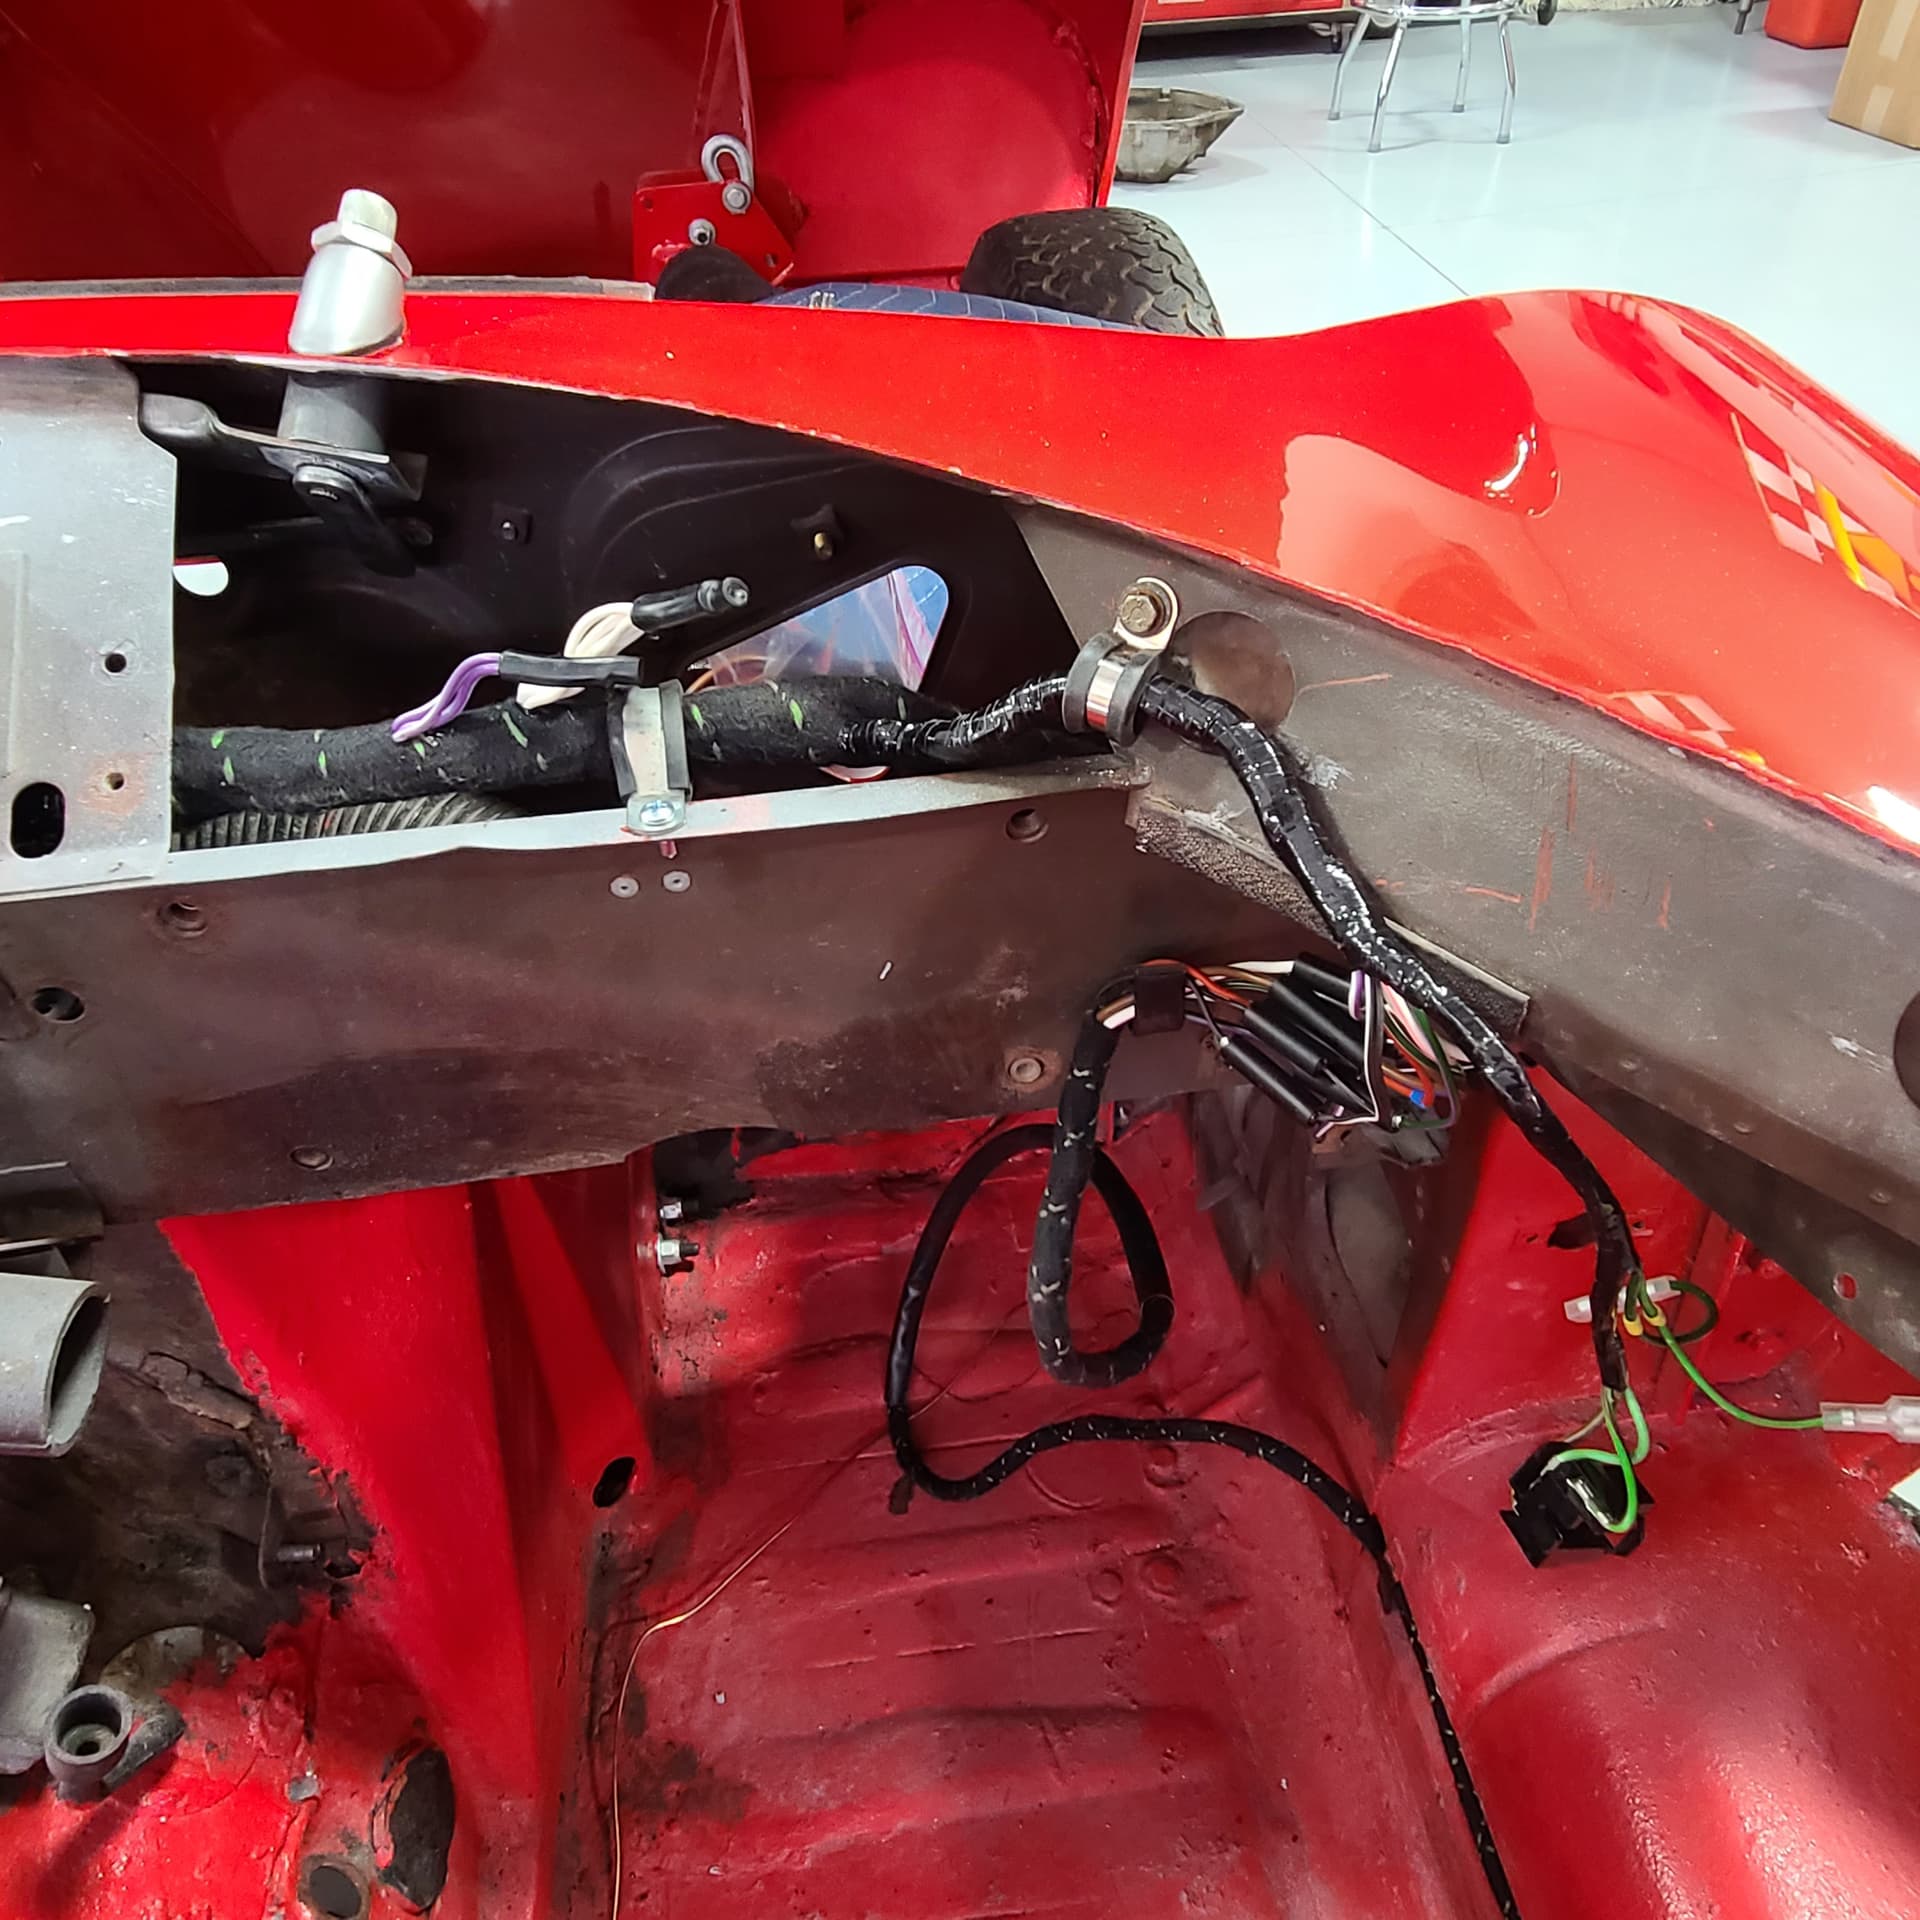
In between of all of that, when my knee, ankle, and back worked simultaneously, I started laying the wiring harnesses.
I got the passenger side bulkhead harness clamped in place
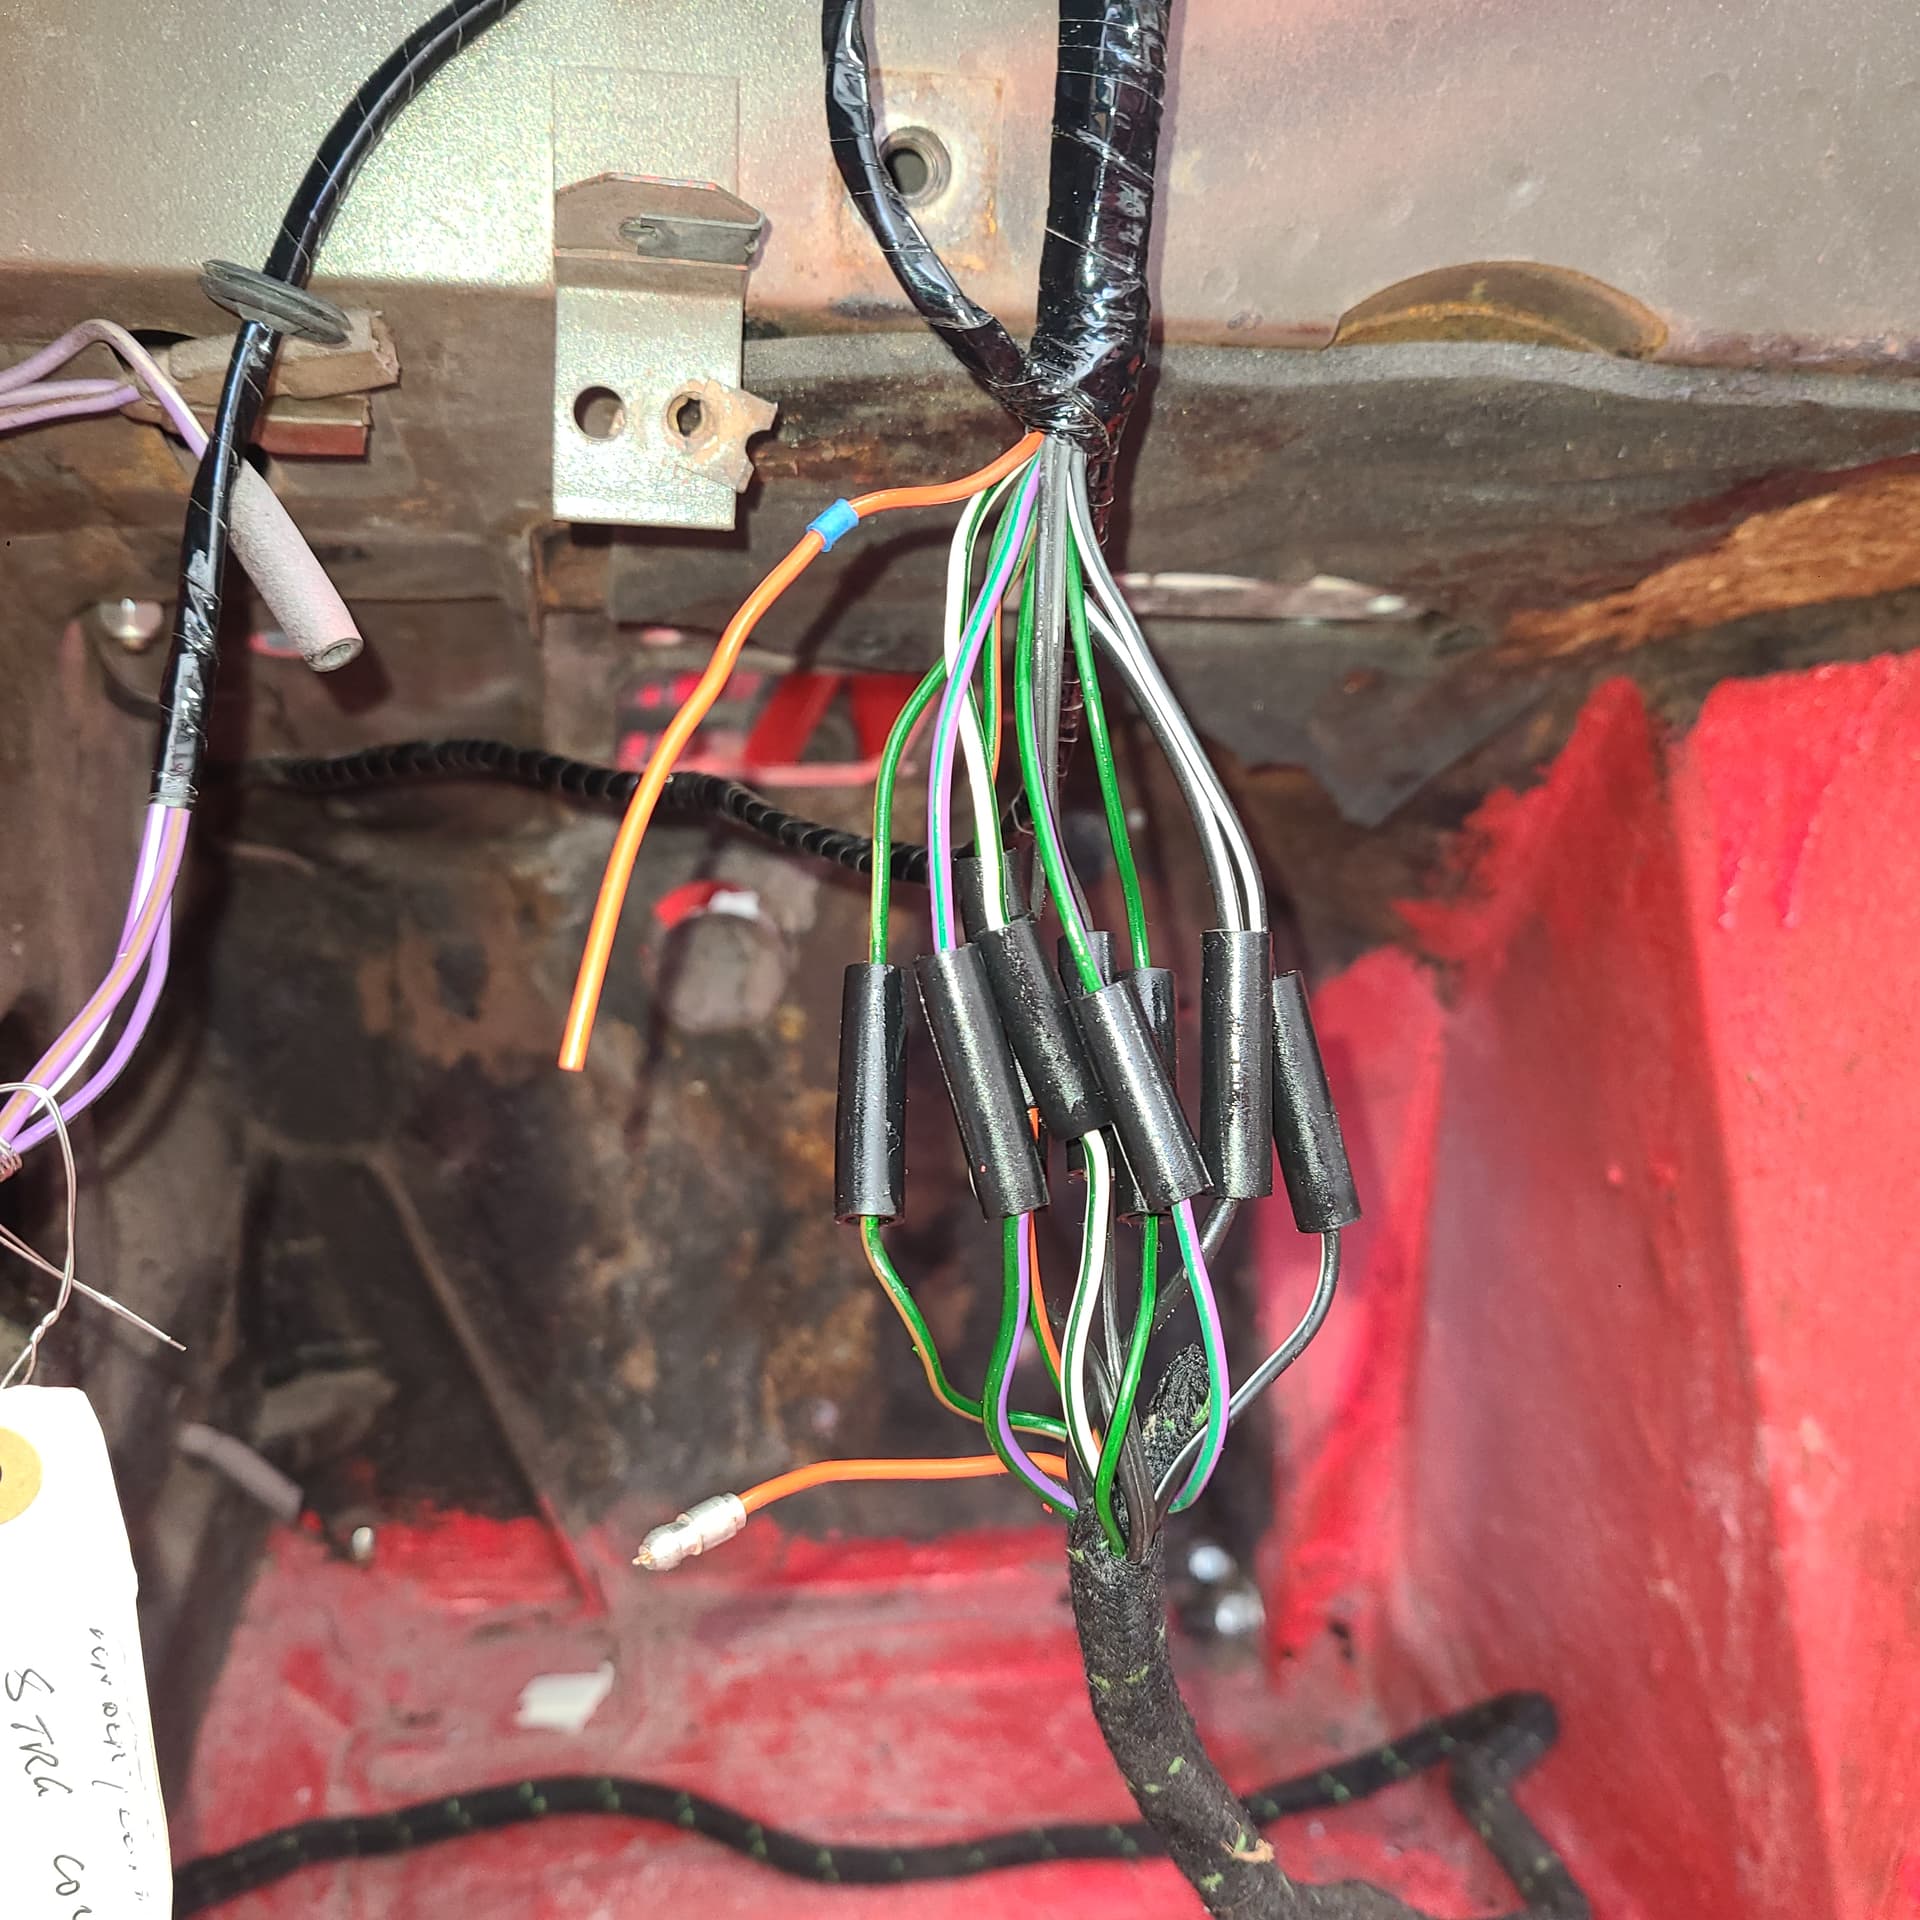
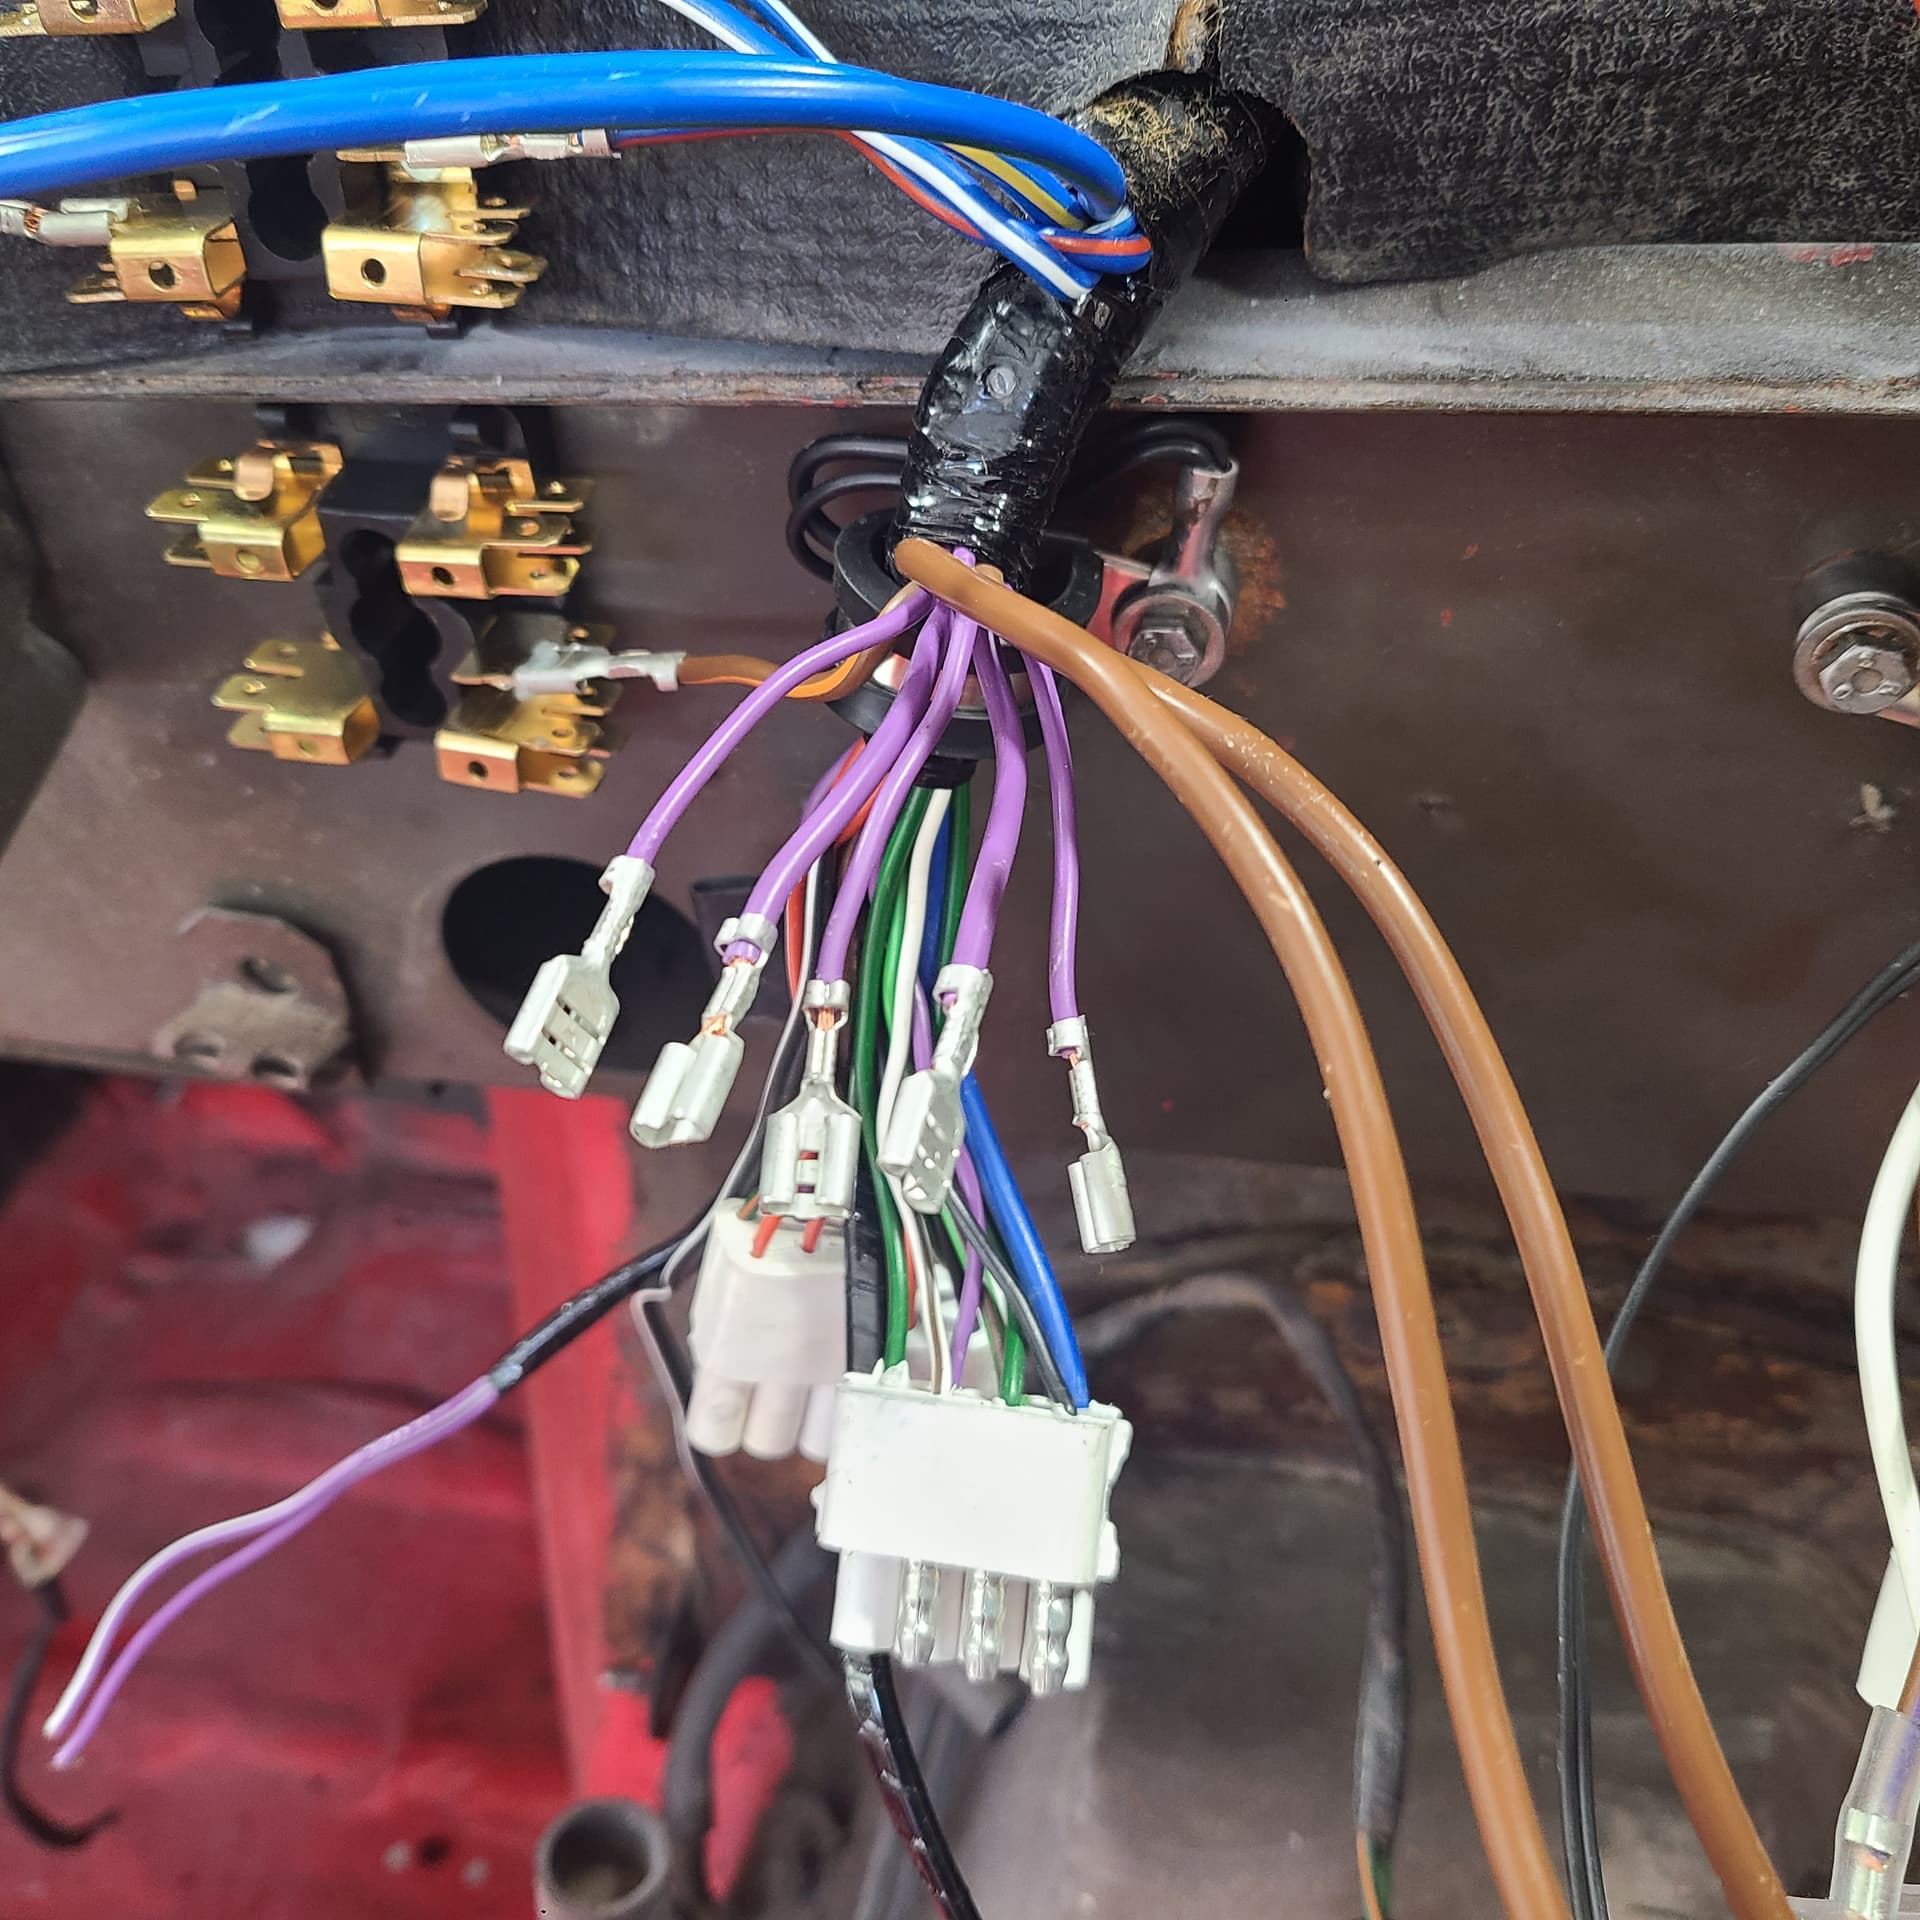
BELOW: the purple wire with white trace (at about 11 o’clock in the photo) took me two hours to install. It is the wire for the plunger on the a-pillar shut face for the map light. Just behind the bracket for the glove box at 9 o’clock is a body grommet the wire threads through – the plunger is just above the door check strap. The distance between the two is ~4-5 inches and involves the wire making a 90° turn to join with the plunger. To use the only aperture in the body structure would have involved having two more wrists on my left arm if it were the size of a 9 year old girl.
=====
I also connected the bulkhead harness to the driver’s side harness . . .
Tomorrow, I continue securing the bulkhead harness to the dashboard structure in the middle of the car and progress to securing the harness to the structure behind where the tacho and speedo will reside.
Attacked several areas on my Jag today (11MAY22)
1 - I test fitted the boot lid seal I purchased through the Candie-led group purchase. She found a source for a boot seal for her 1968. For the price she negotiated, it was an inexpensive trial.
The Factory Repair Manual shows this as the profile: a bulb atop the seal with a small tab. Most have found the rubber of the bulb to be too stiff resulting in the lid not closing flush to the body,
and this diagram shows the orientation - the small tab is oriented to the outside perimeter.
I found this seal on-line (eBay, IIRC). It has the bulb but no tab and the bulb is mounted on the side vice on top. No idea if/how it works to seal the boot
Candie’s version is similar but has a half-bulb and the seal is more solid, The eBay one has a spongey, almost aeriated, texture.
I purchased a 4 meter length thru Candie cuz the vendor only sells it multiples of a meter and 3 meters would gave been 3+ inches too short
I just did some basic maths:
4 meters= 157.5"
I had ~42" more seal than I needed: 157.5 - 42 = 115.5"
115.5" = 2.9337 meters (3 meters = 118.1")
When I get to the point of installing the seal (after I add 5 more springs to the hinges, get the latch back from the platers, powder cost its base, assemble the latch ass’y), I’ll test both seals to check the fit/resistance to closing the lid each seal offers.
Attacked several areas on my Jag today (11MAY22)
2 - I took the first steps to cleaning my brake and clutch bottles. I am carefully following the instructions as laid out by Candie last summer.
First step was to clean the exterior and internal surfaces. Candie recommended Dawn Powerwash.
I also used some Simple Green, an SOS pad, a Mr Clean Scrubber sponge and a nylon brush.
I cleaned 1 of the 3 bottles. Still need to mix up the bleaching paste and cook the bottles in direct sunlight. I’ll do all 3 together after cleaning the other bottles
.
Attacked several areas on my Jag today (11MAY22)
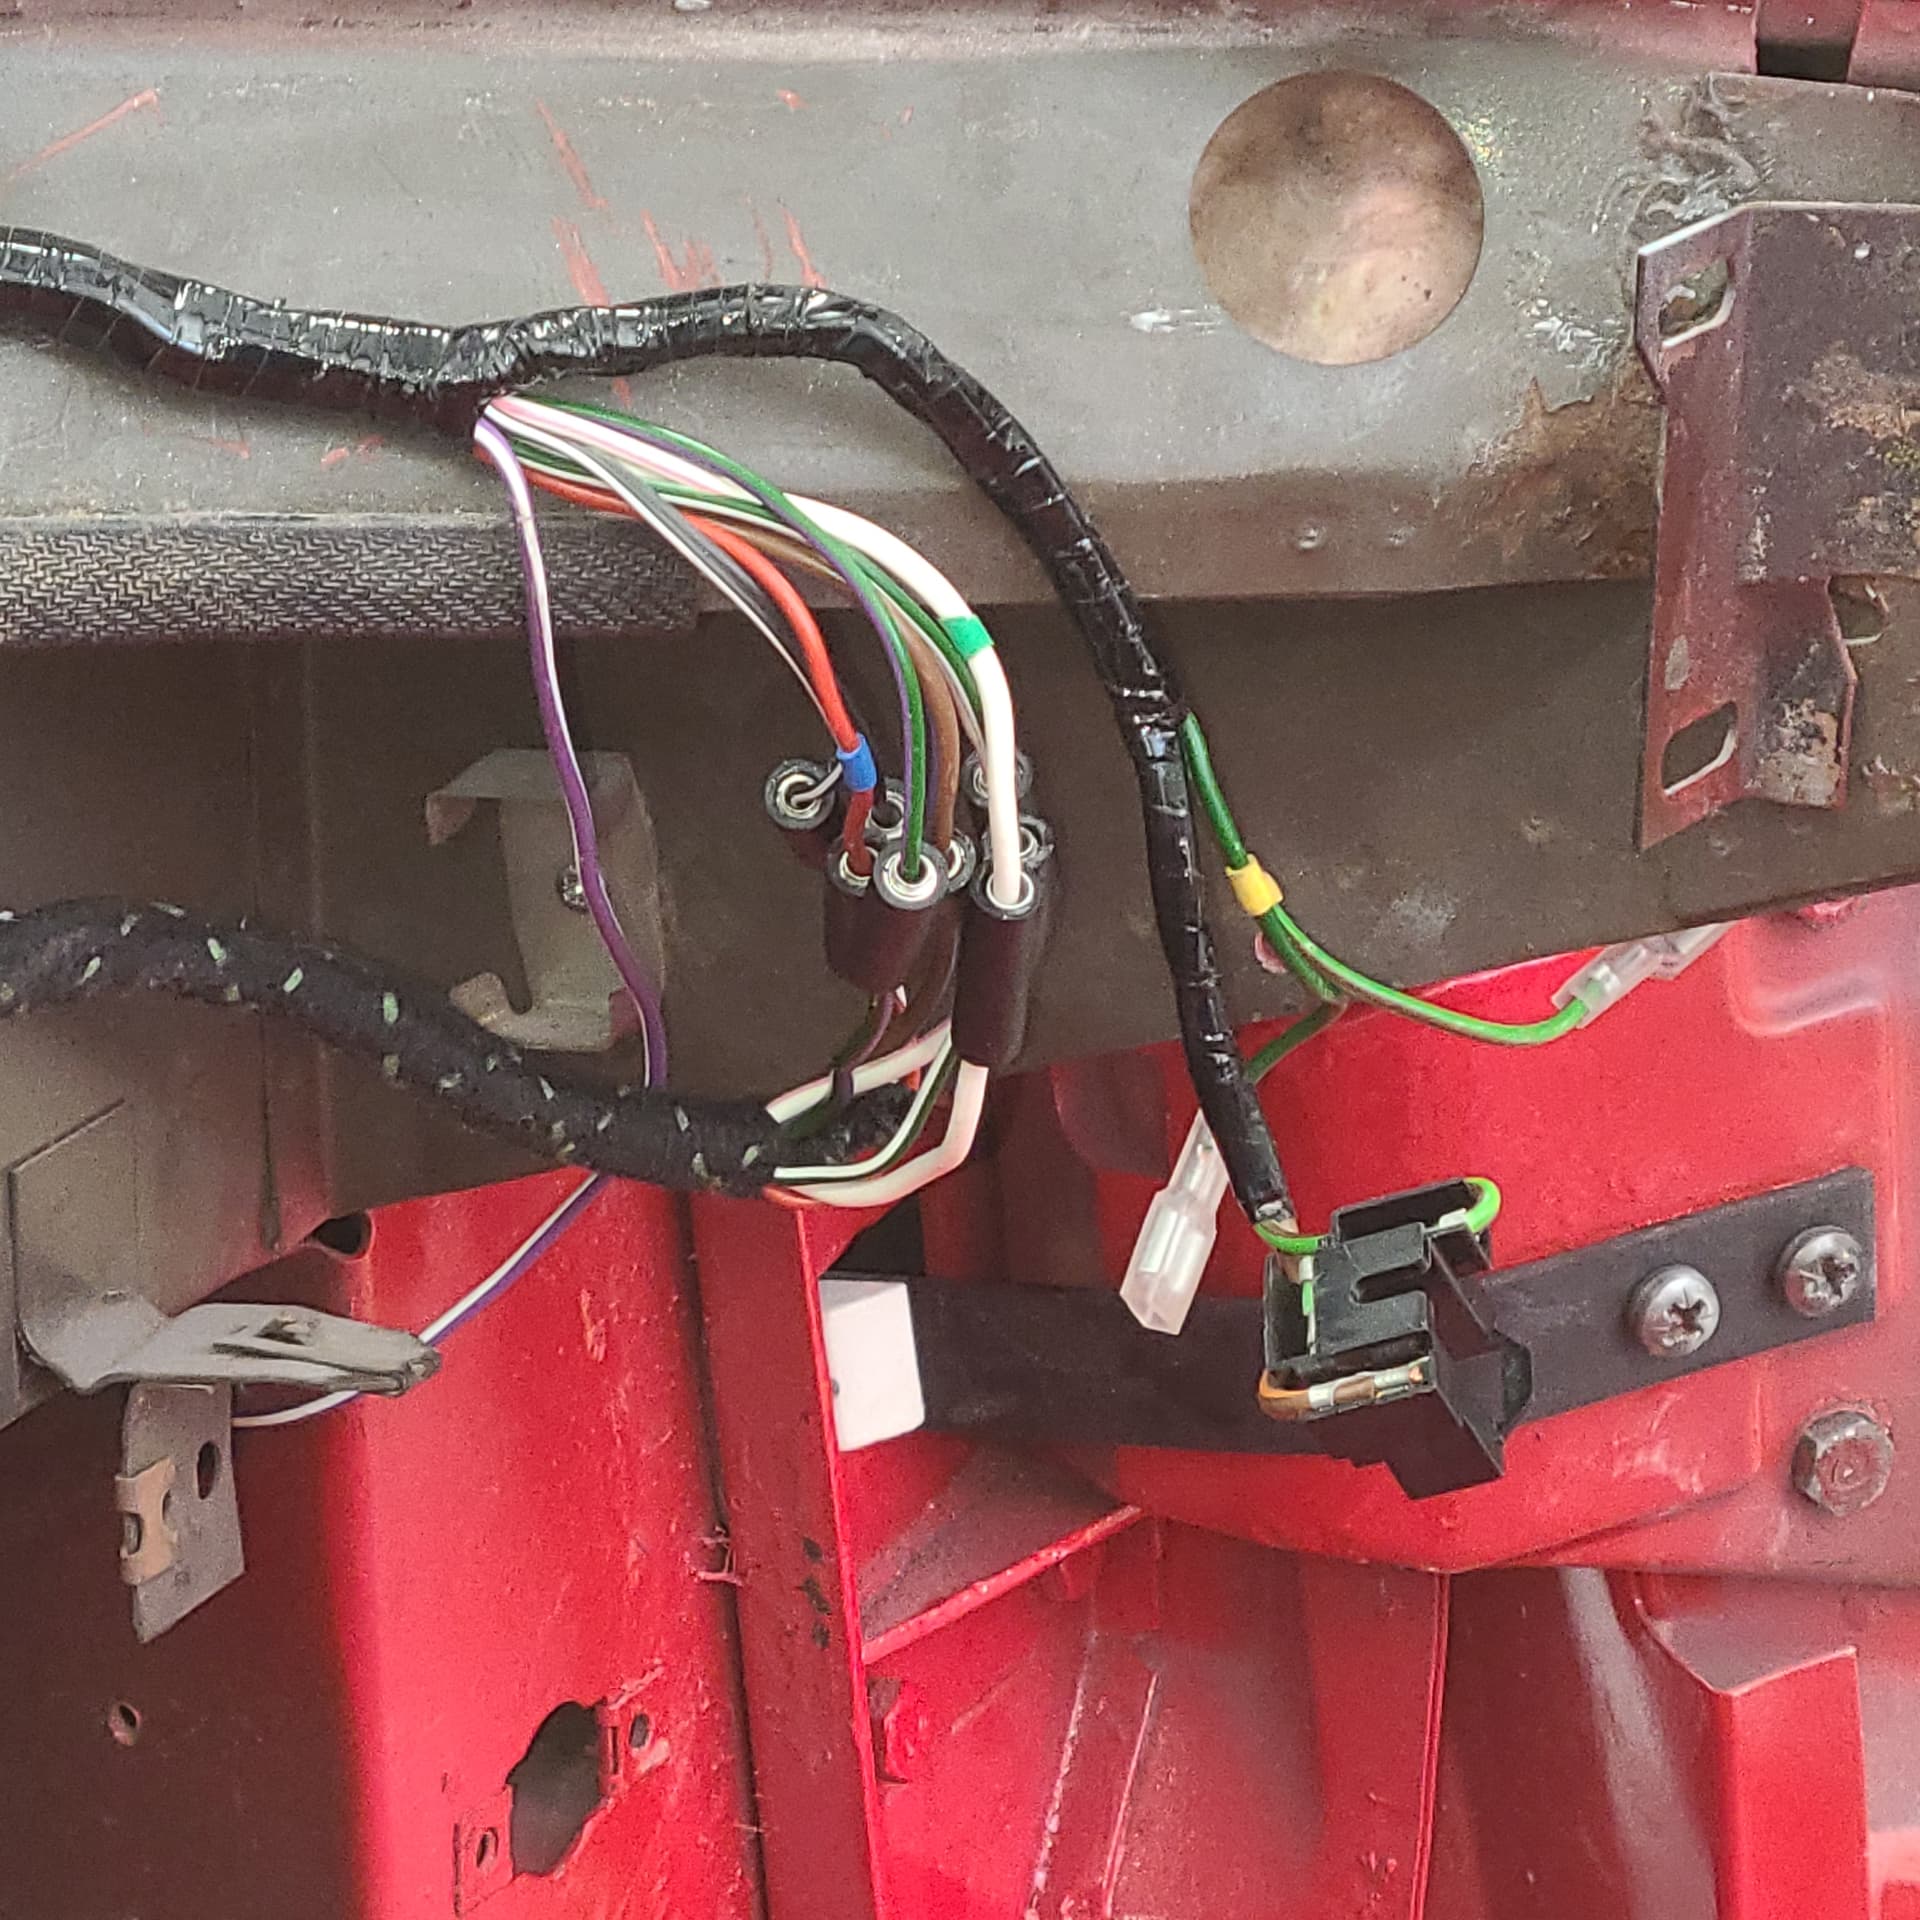
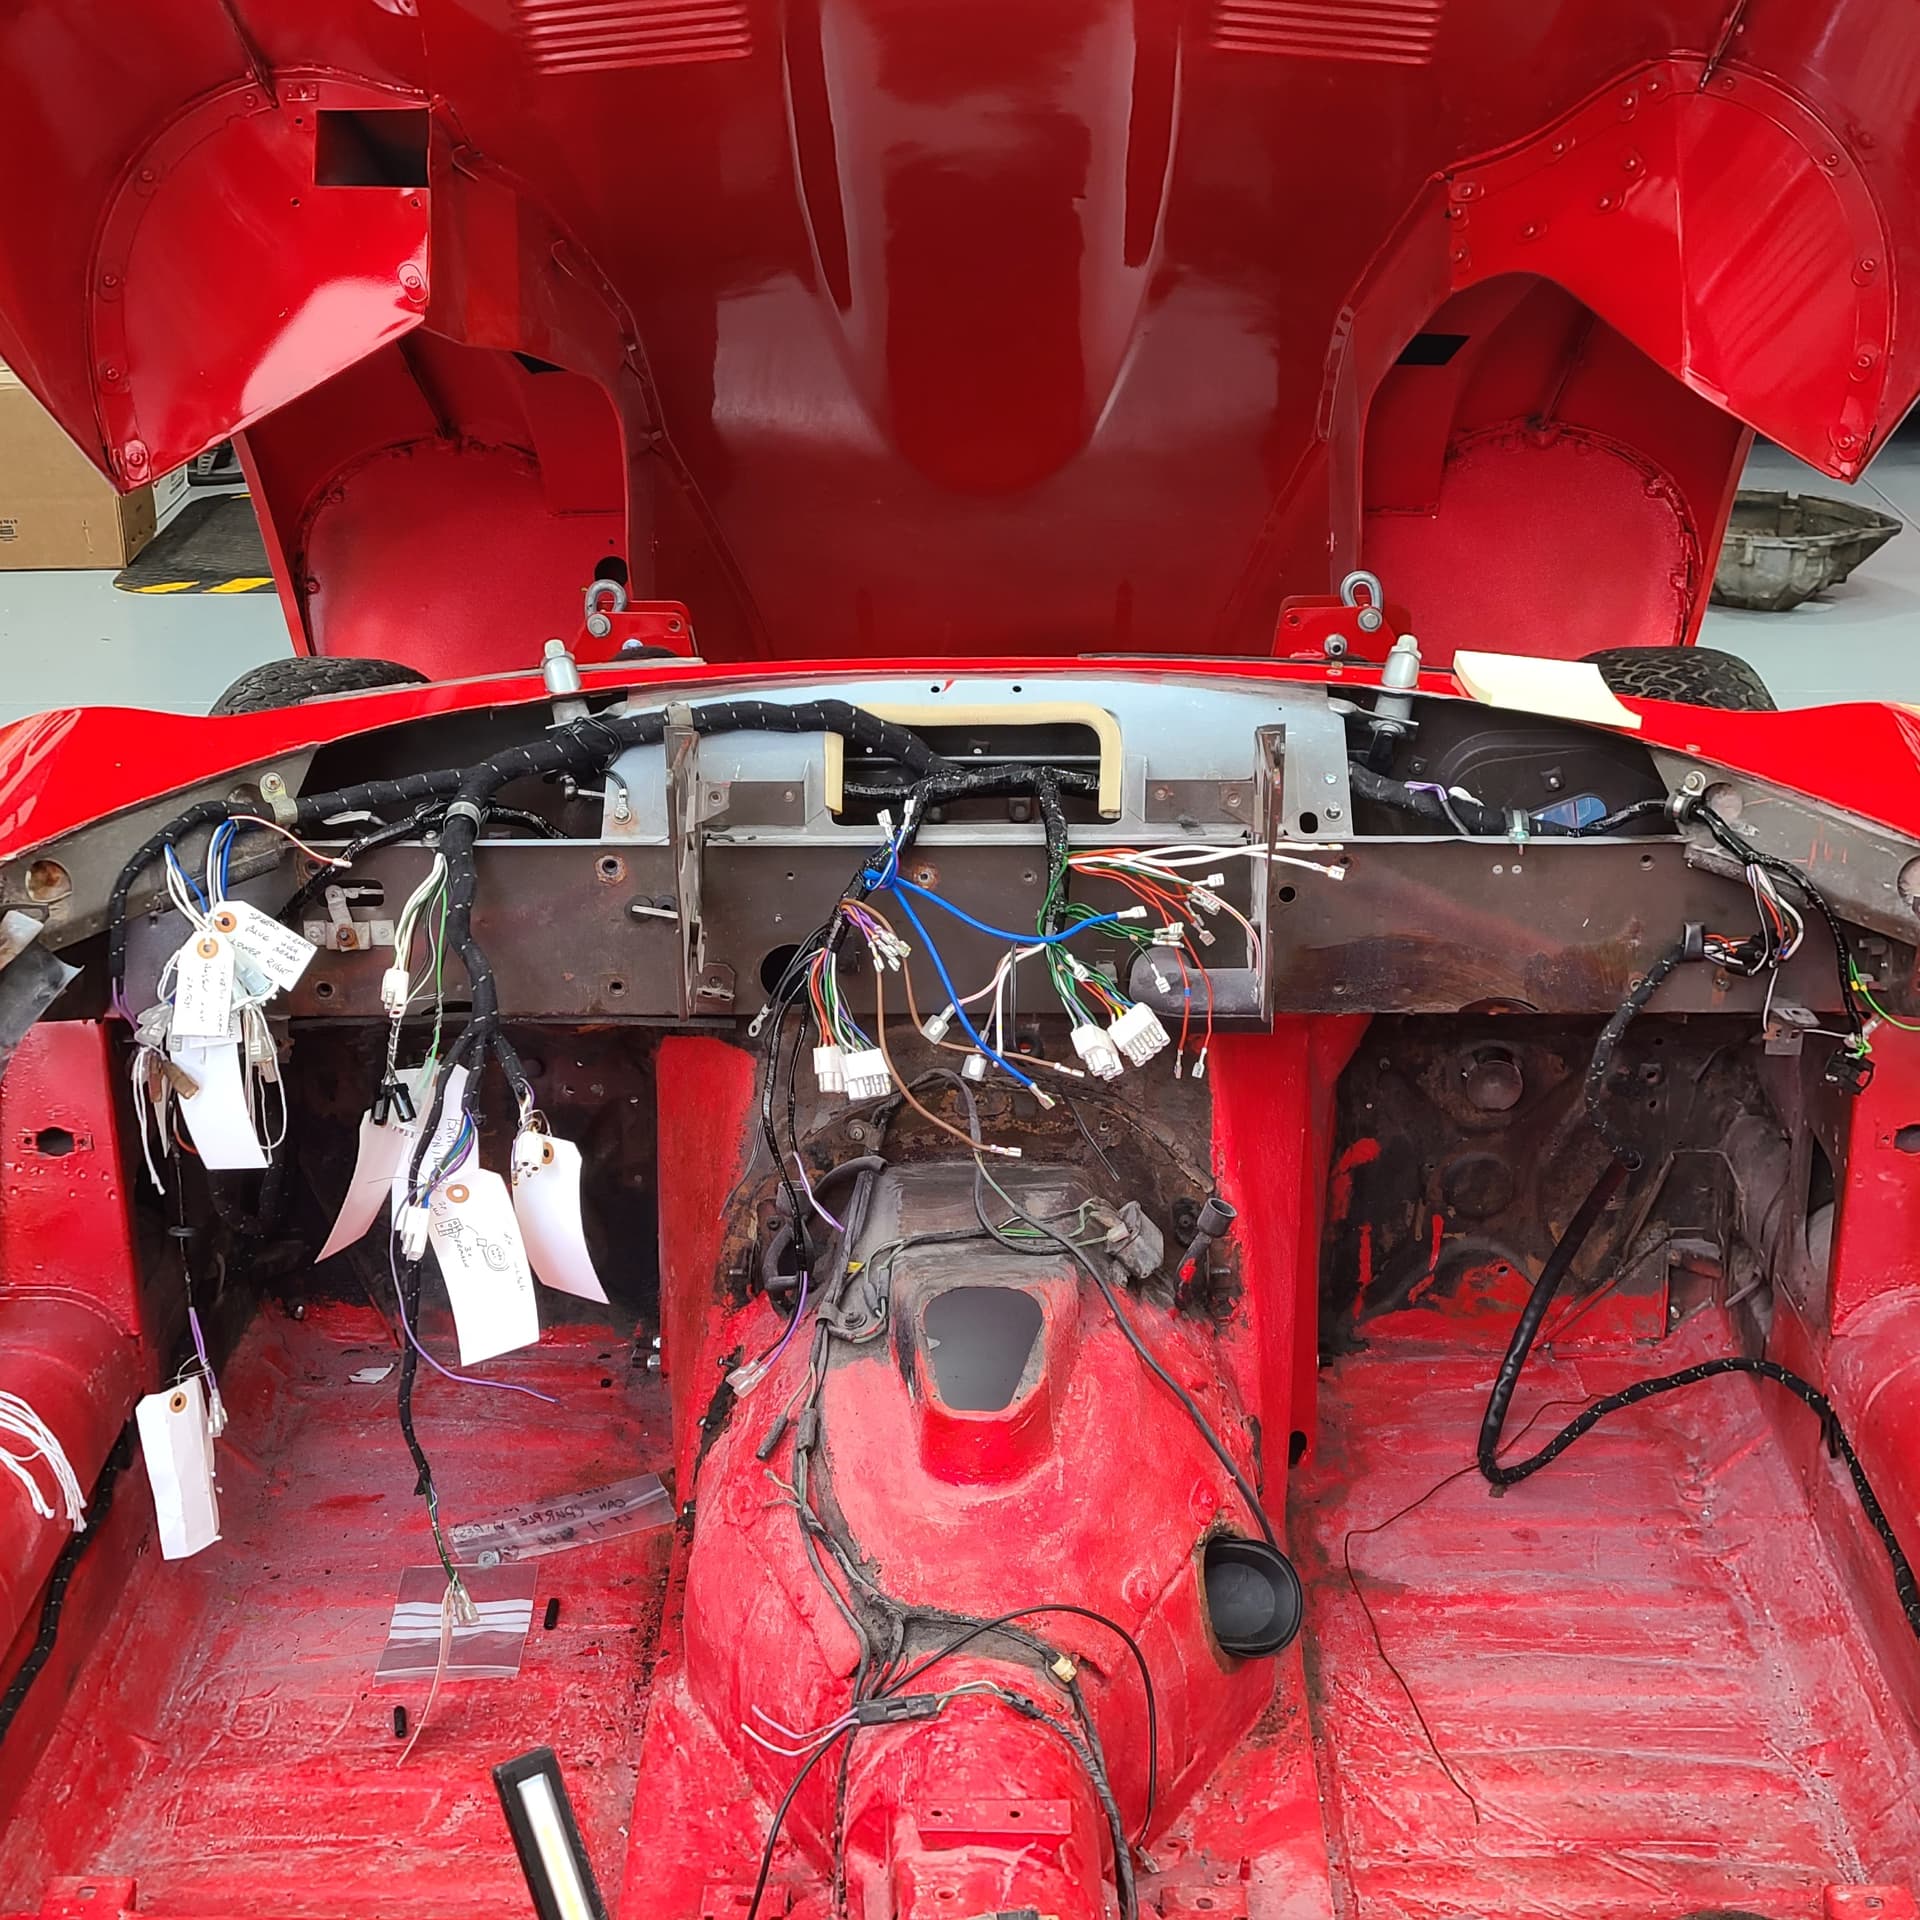
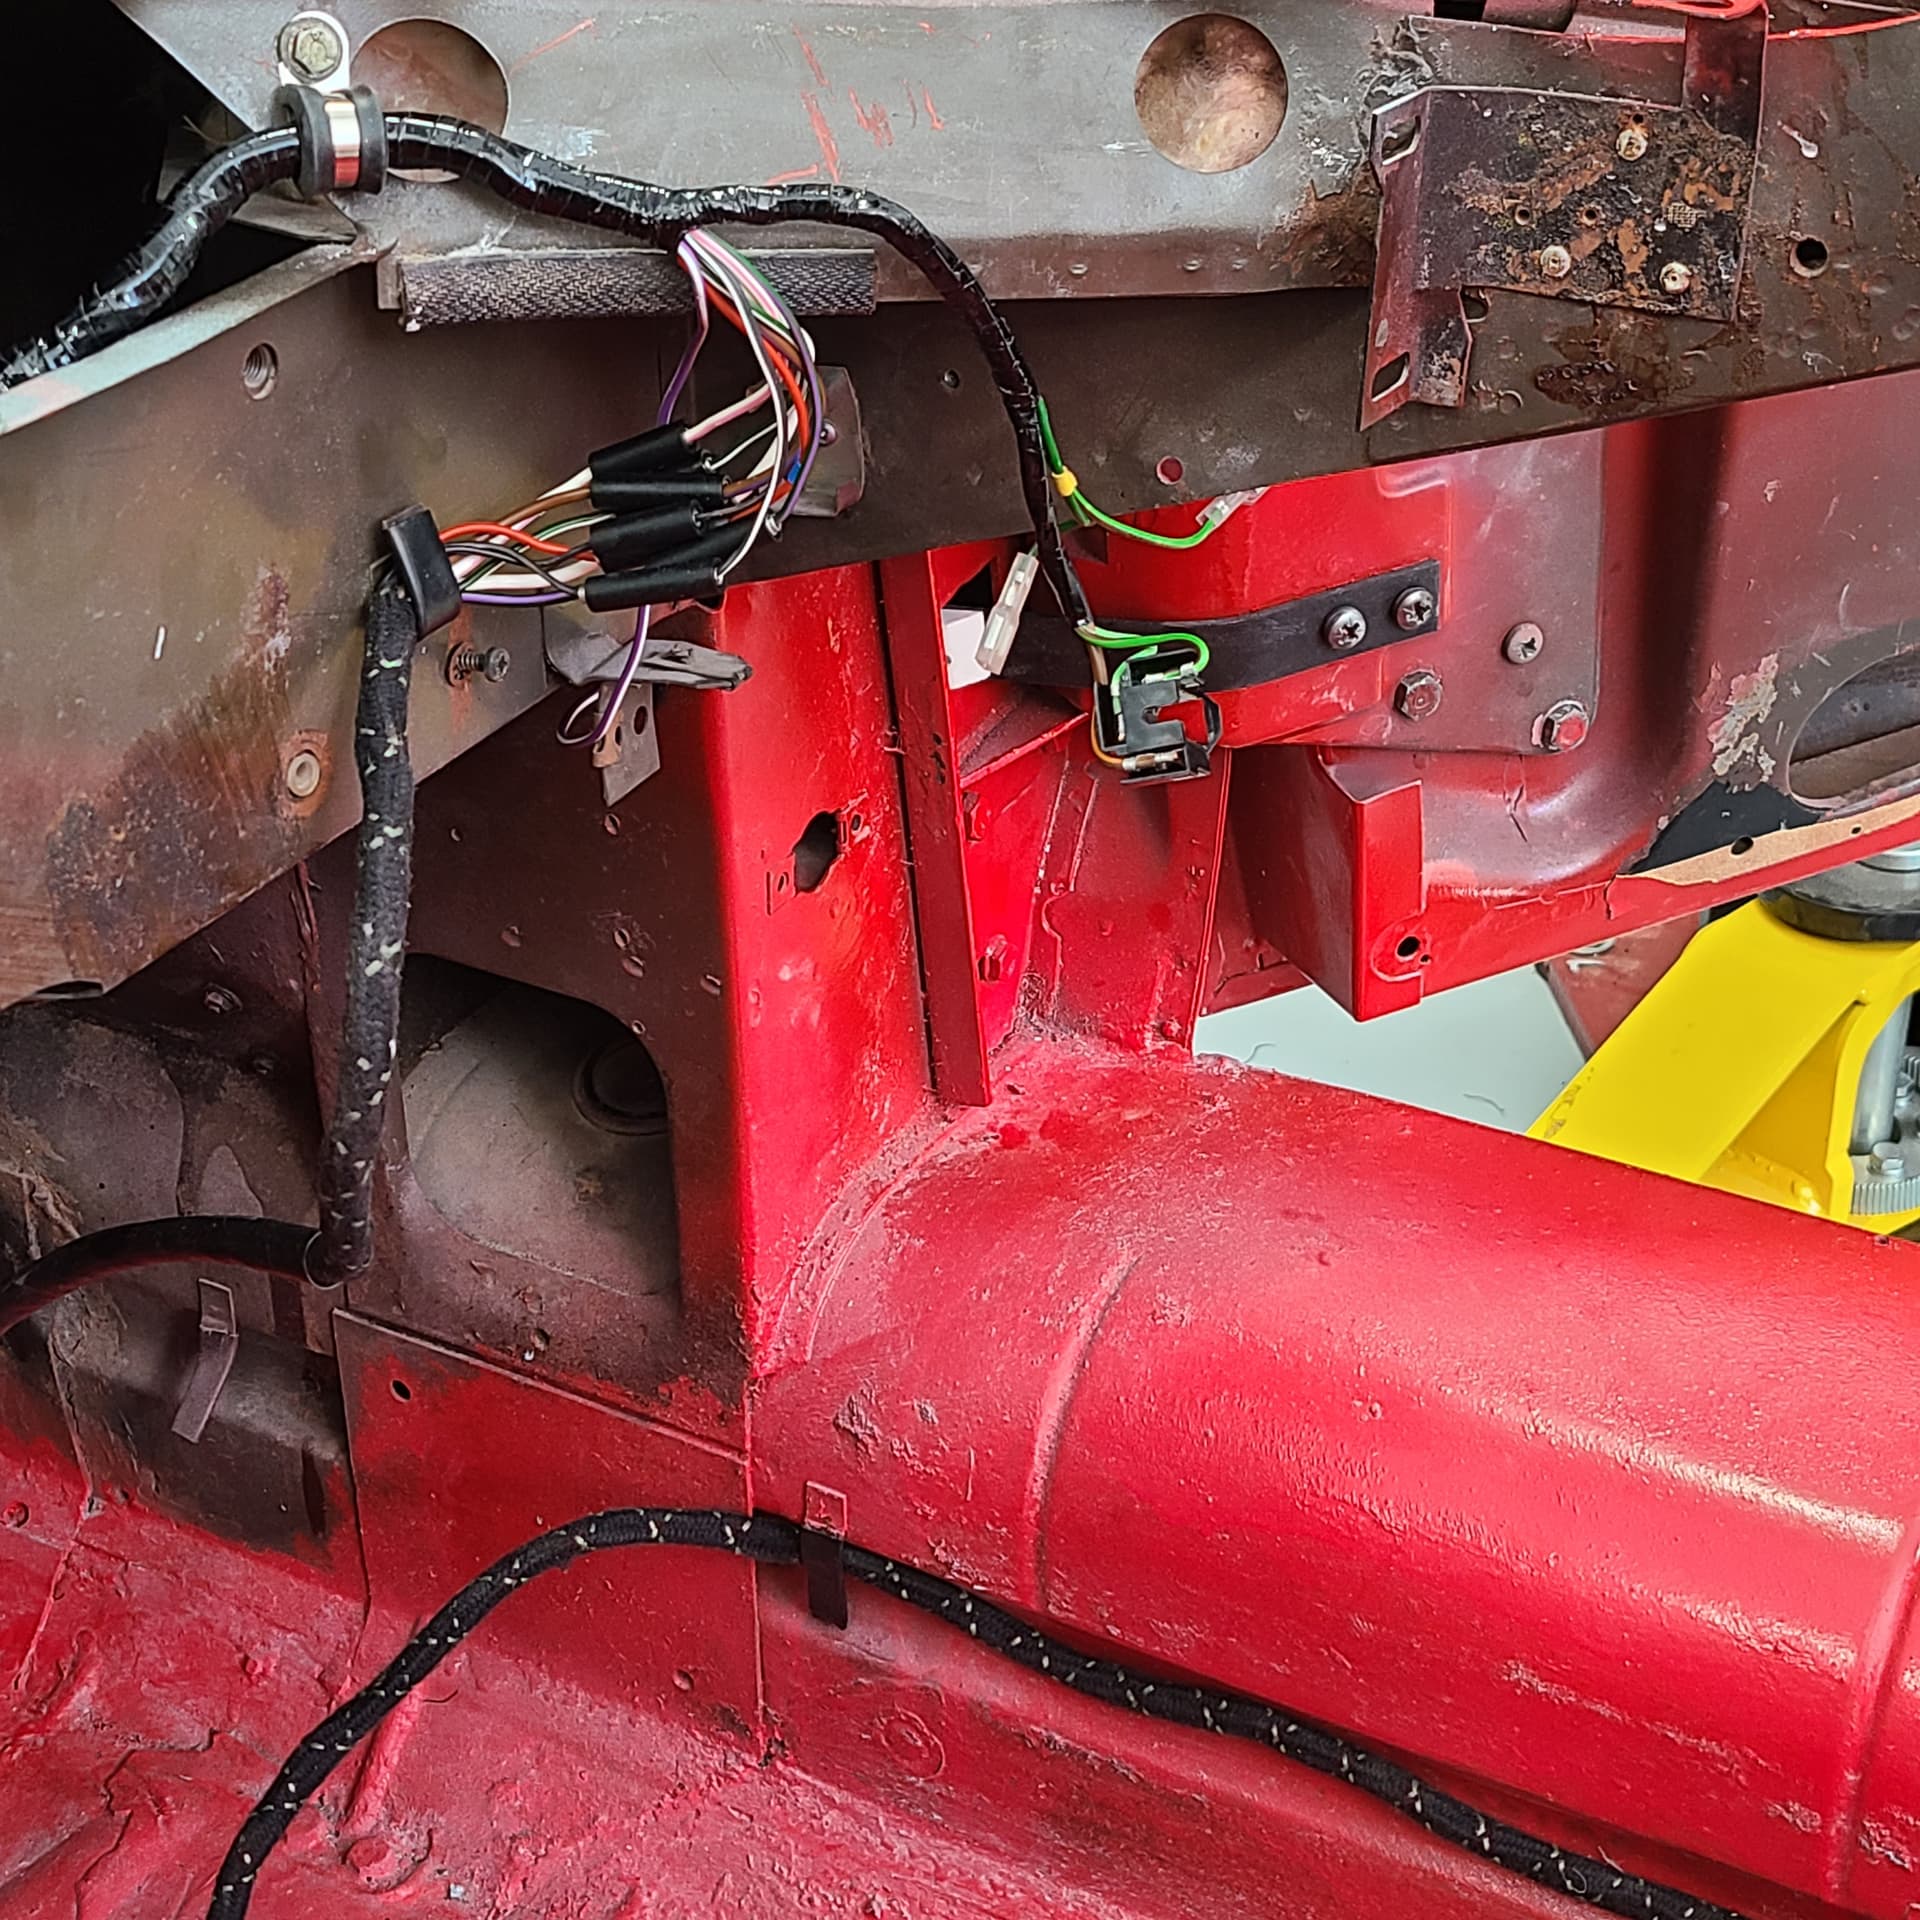
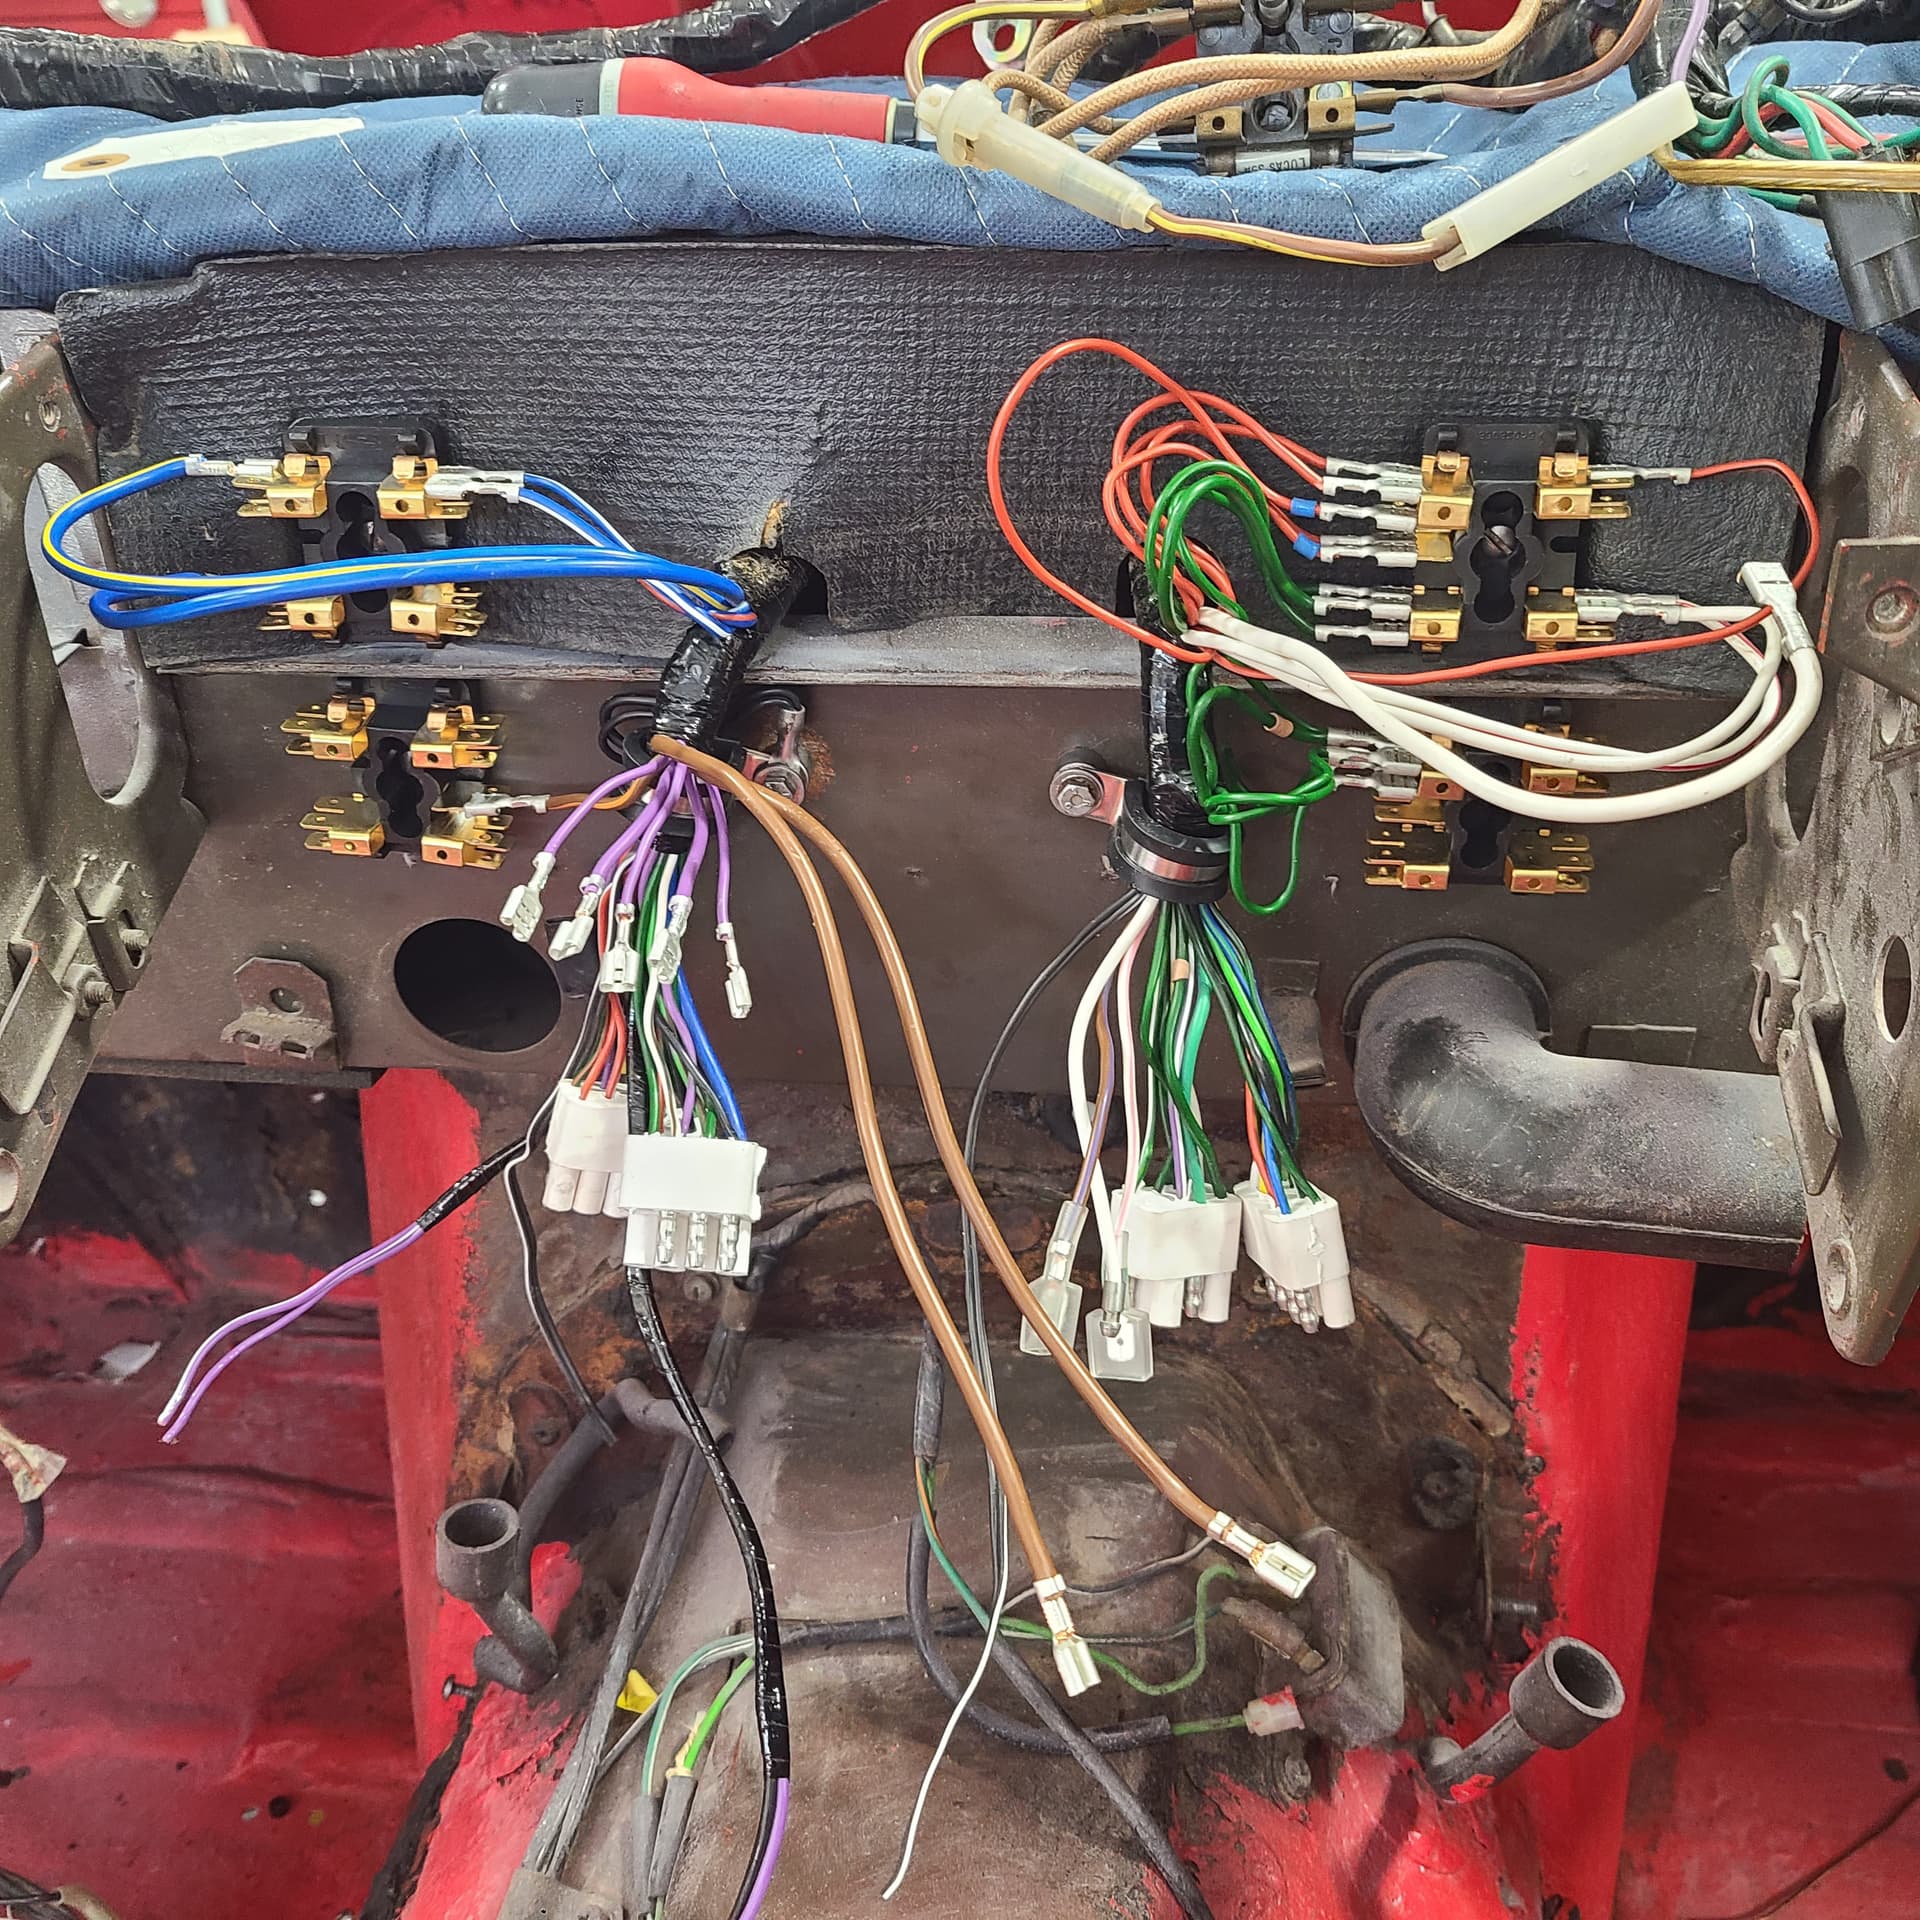
3 - I nearly finished installing the bulkhead harness.
I ended up installing the harness clamp that is centered on the glove box space 3 or 4 times. I needed to uninstall several times to get enough slack in the harness to install other clamps. For any other Series III-ers installing a new harnesses - I needed to change tge orientation of the clamp to the left of the glove box opening. The way I initially installed the clamp (on the underside of the center panel) pulled harness downward – the clamp needed to pull the harness upward. This to clear room to install the cardboard-y ventilation hoses
The other backward step was mixing up attaching orientation the smaller limbs of the harness directly behind the steering wheel.
What I should have months ago took me a coupla hours today. I labeled all the terminals on the harness – not just 20-30% of them figuring the unlabeled ones would be obvious. Still need to address the wiring in the center of the dash. These should go pretty quickly cuz groups of attached by bunch to the fuse boxes. Yeah – right; we’ll see how that goes.
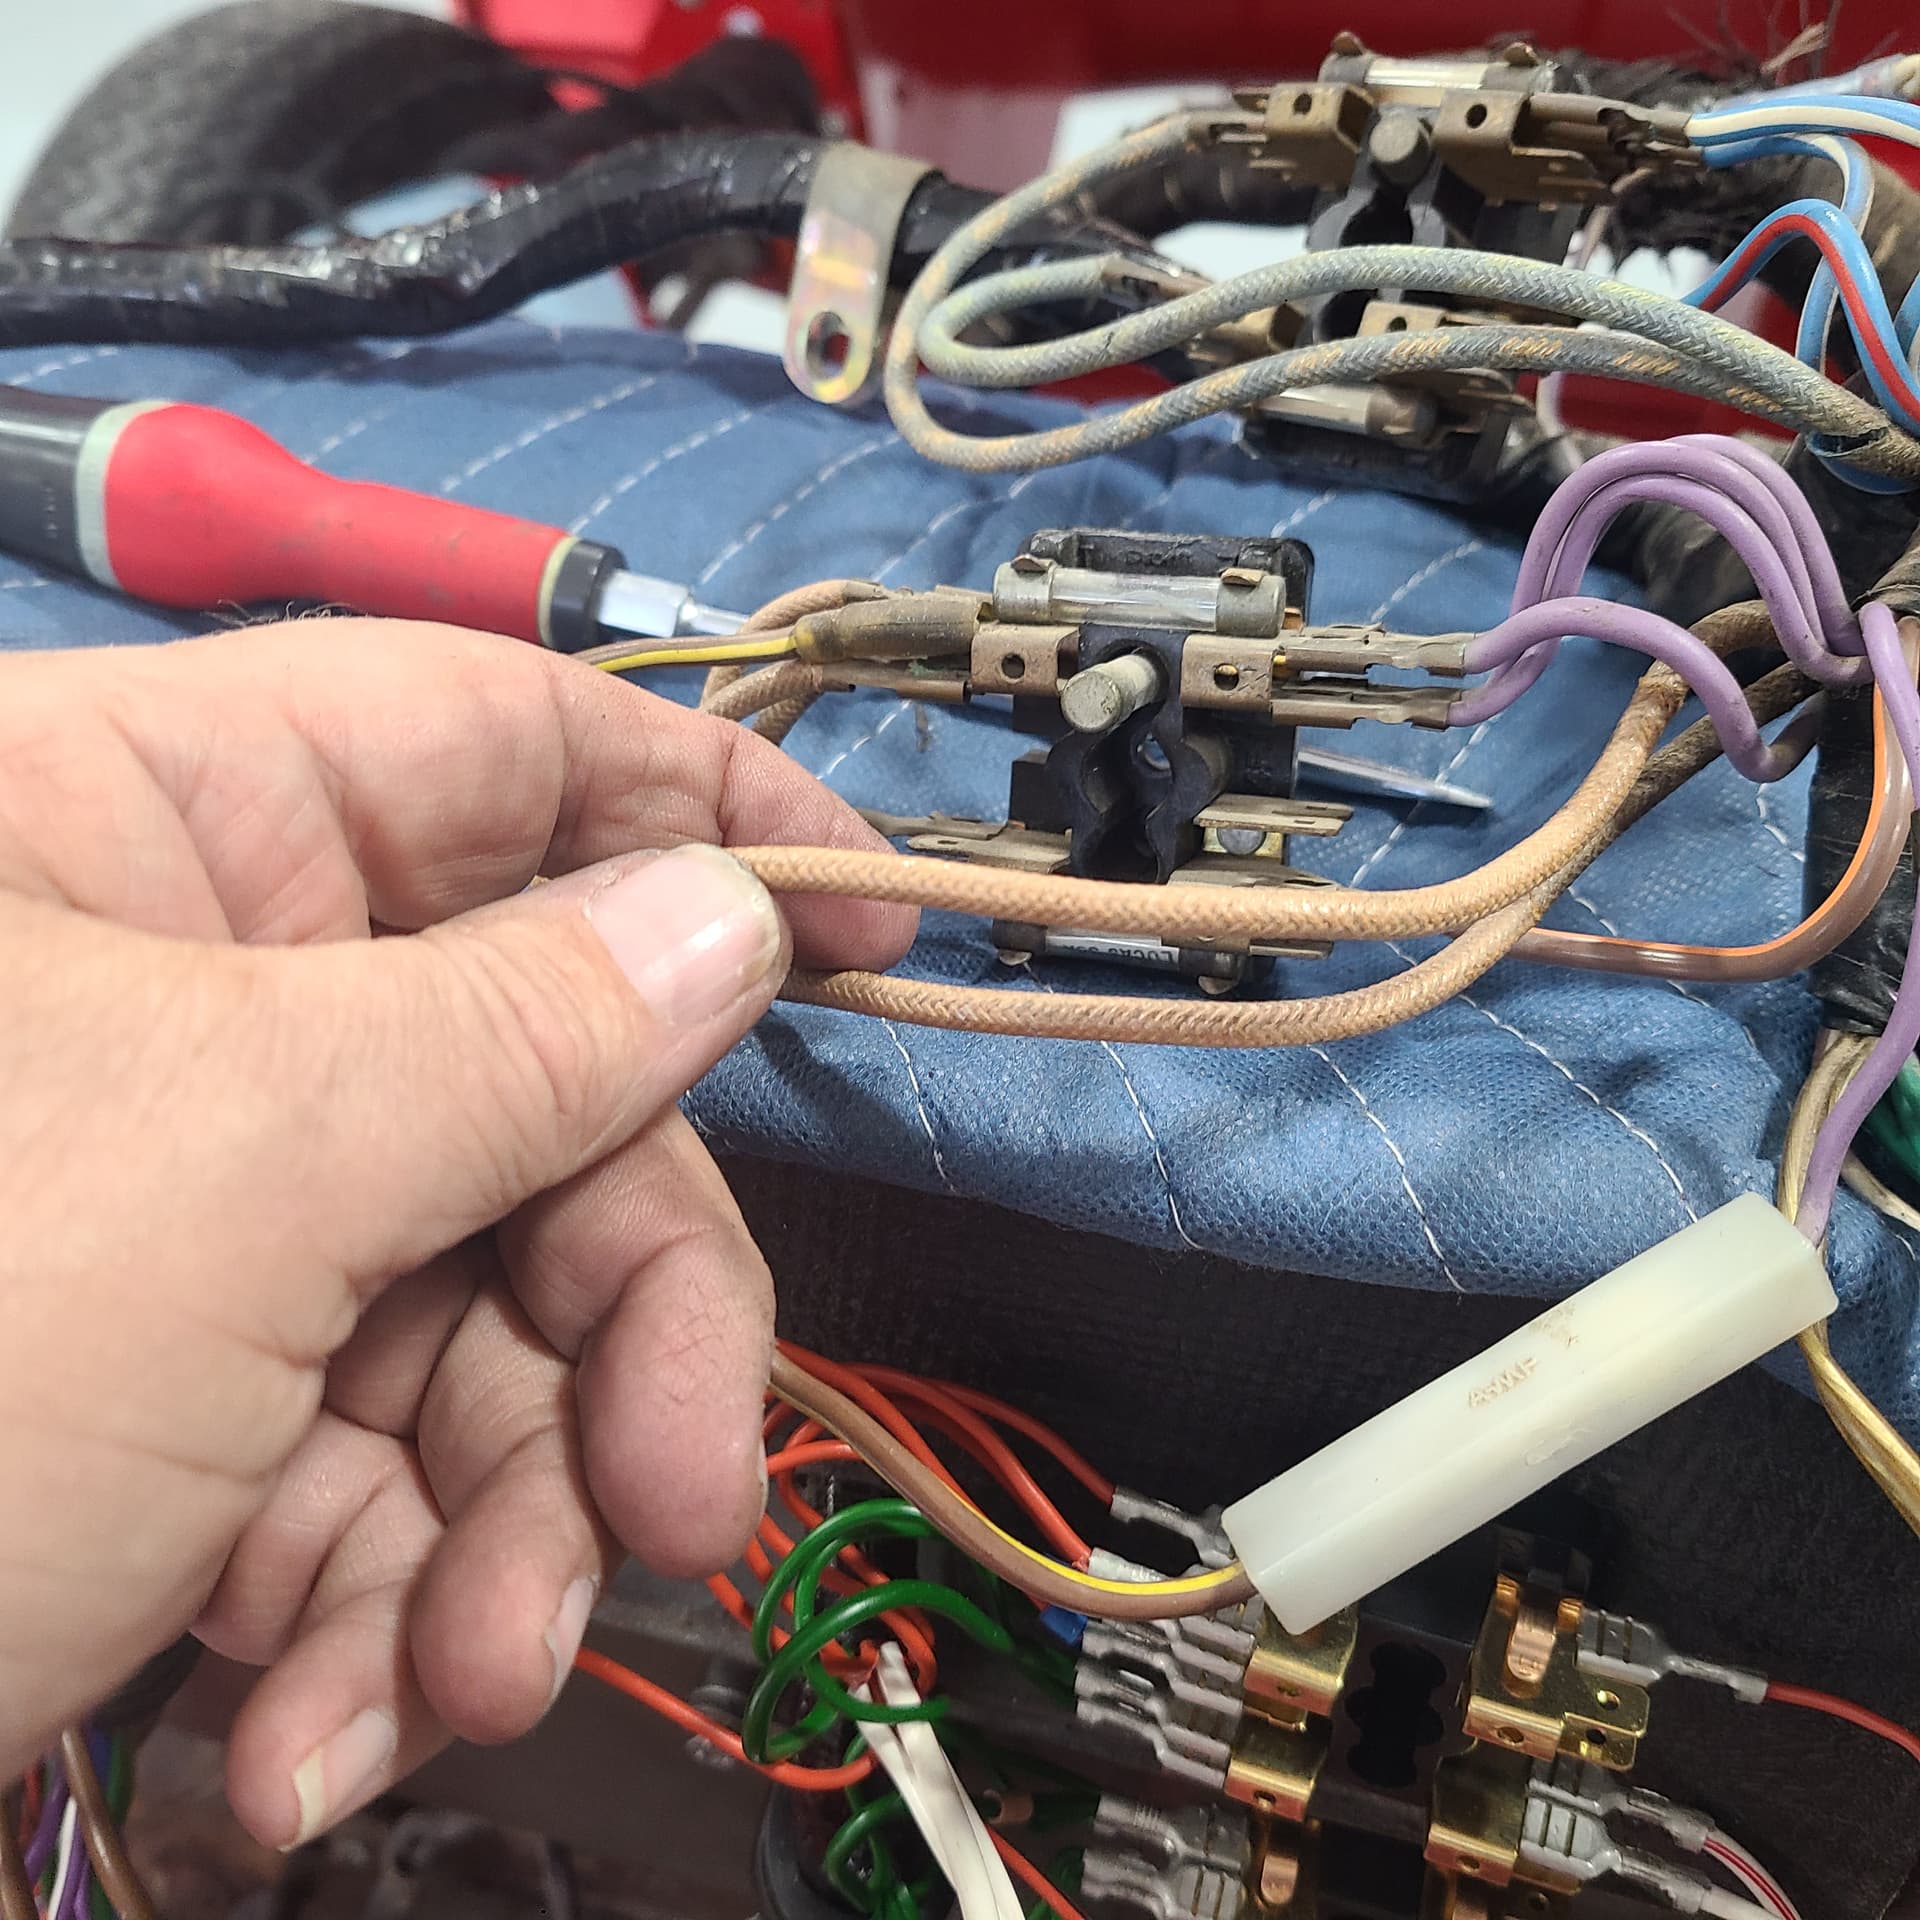
On the passenger side, just need to connect two cans/flashers/somethings to the footwell and attach a total of 5 wires.
Lookie what I saw at the Golden Cruise!
One day we need to caravan up with the 'Bird and the Buick and do that!
Nice
Looks very straight and presumably rust-free-ish.
Air cleaner says its a non-Gran Sport version so its only marginally over-carburated
Yes – The Golden Cruise sounds much more fun rather the typical static displays
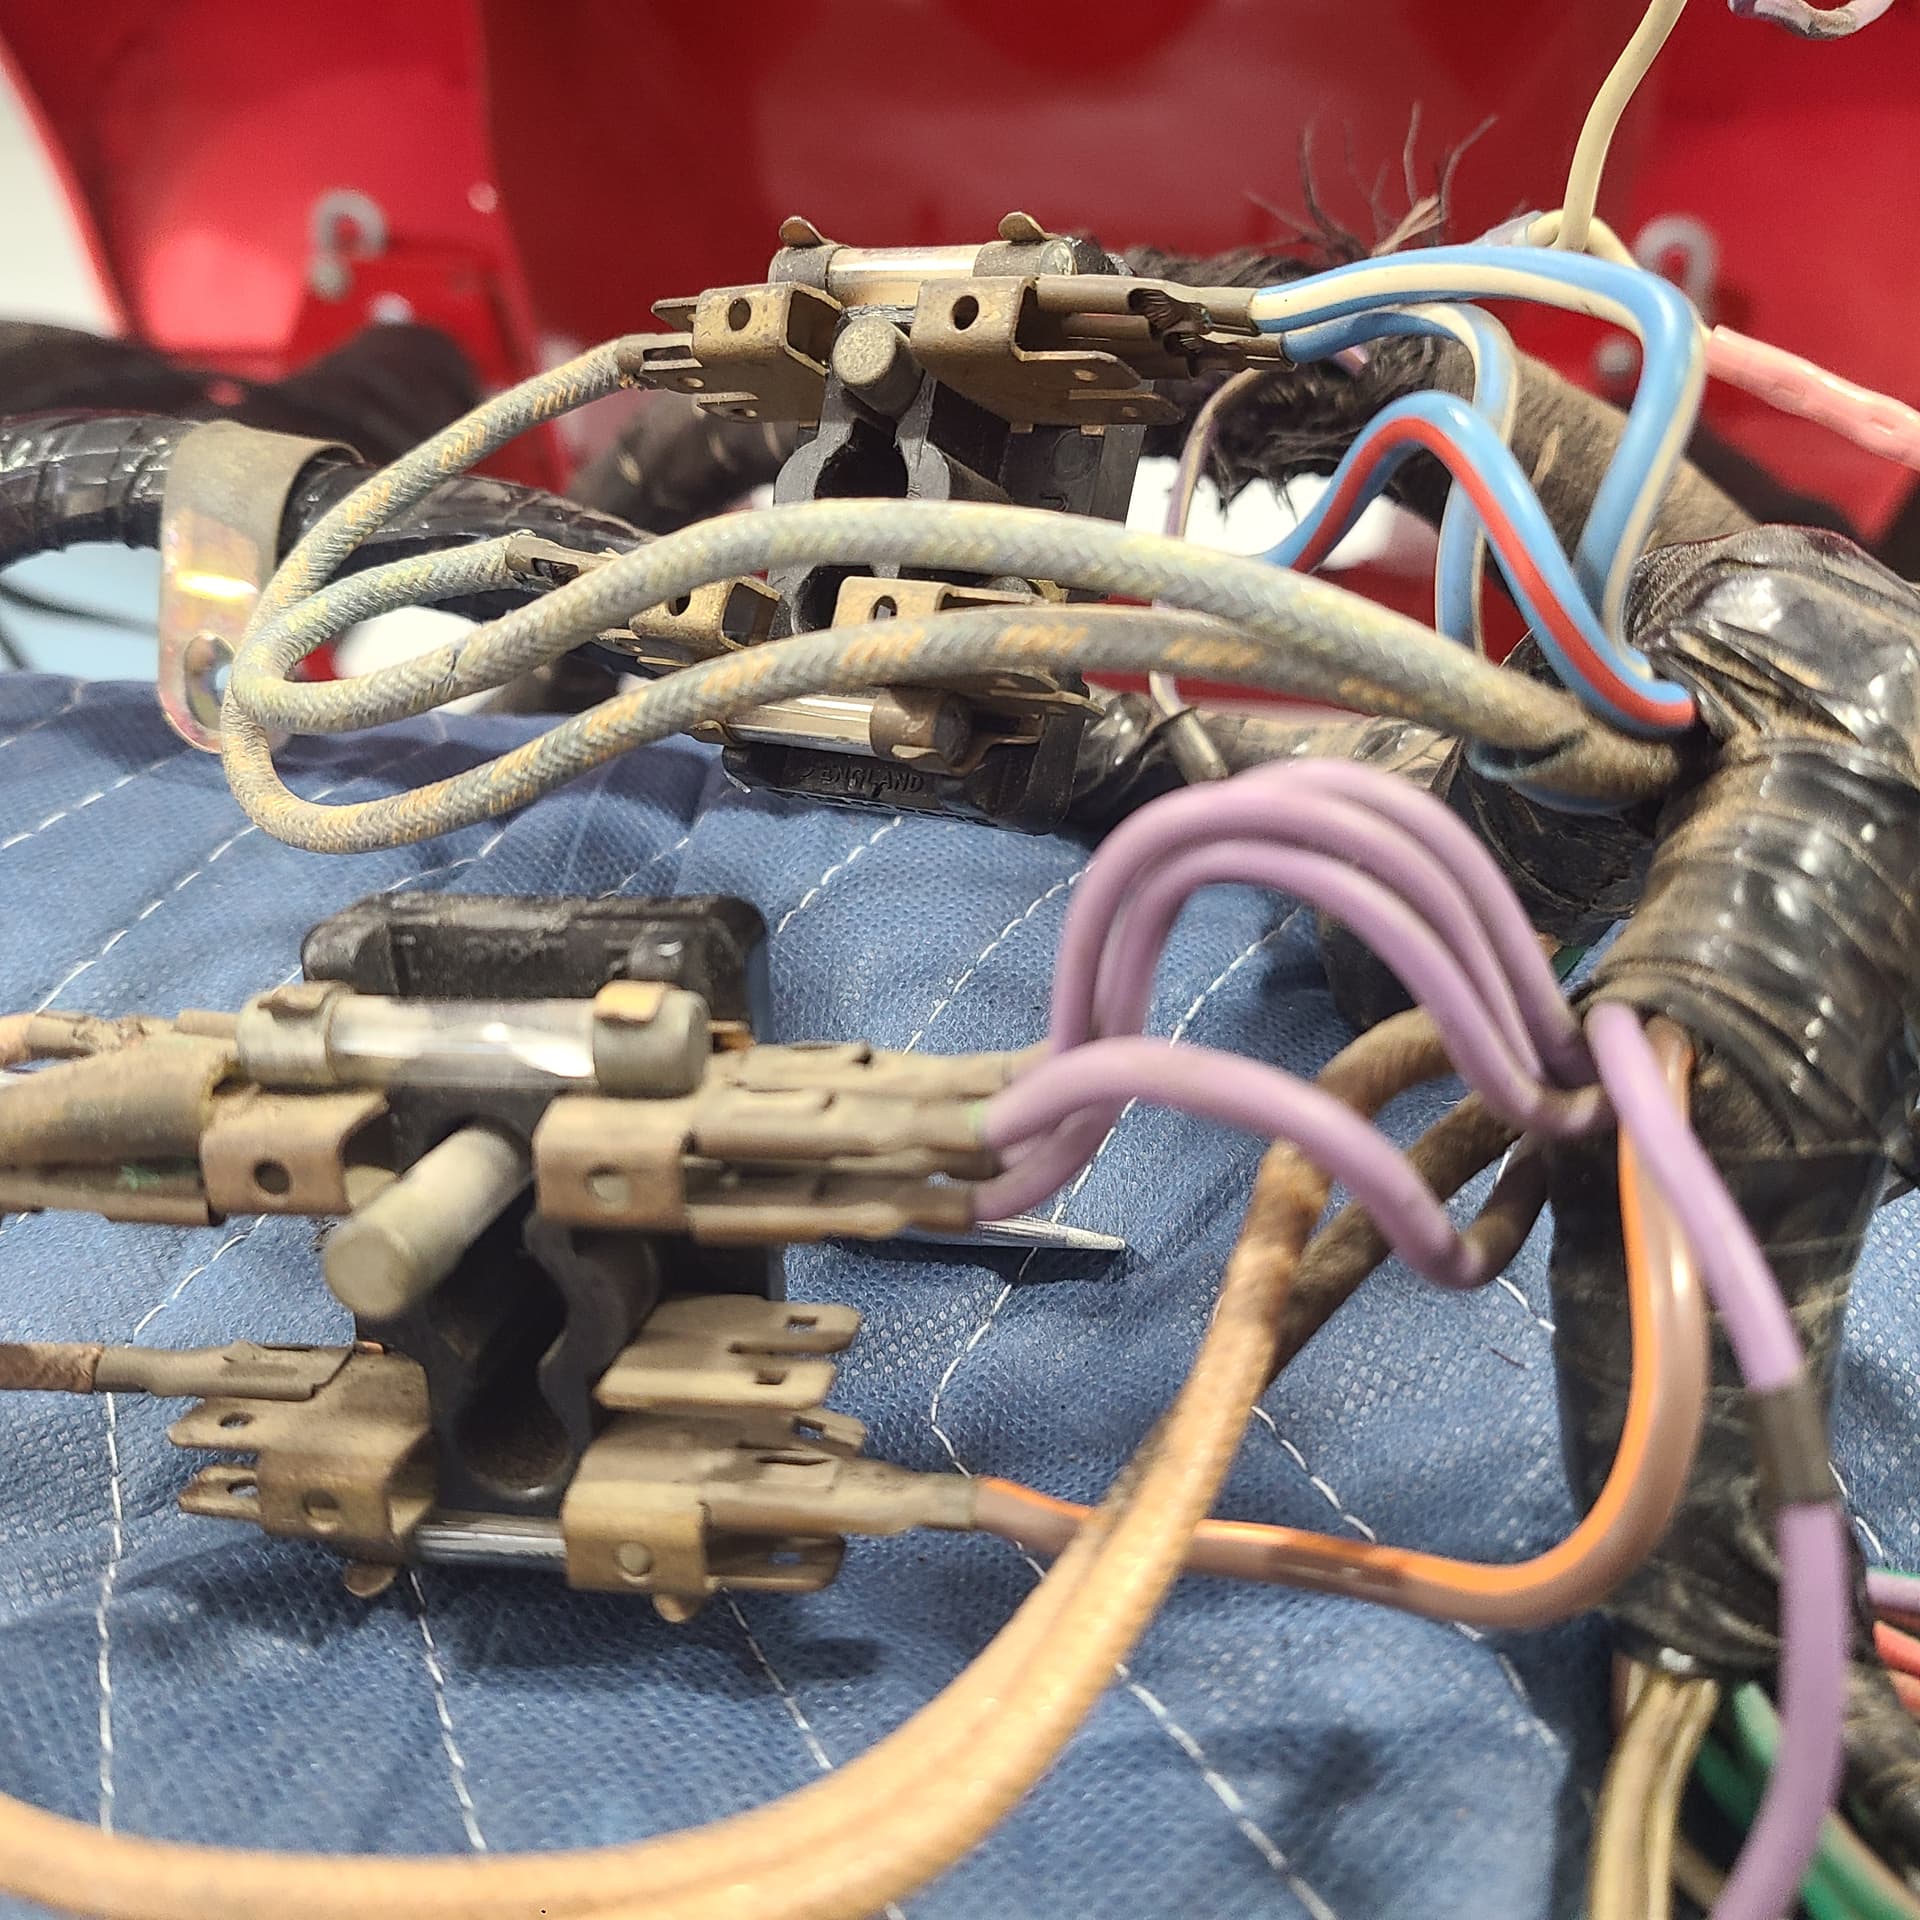
This afternoon I just about completed all the connections in the center of the dashboard – at least from the bulkhead harness. I installed the hardura (?) element which is held in place by the top two fuse blocks; also installed the other two fuse blocks.
I was gonna start labeling all the wires when it dawned on me that the old harness was laying right there and was a perfect template. Since I was installing 4x new fuse blocks, even the old fuse blocks were intact on the old harness. So – I laid the old harness across the scuttle and followed started attaching new wires.
Just about got it – just gotta chase down a few issues.
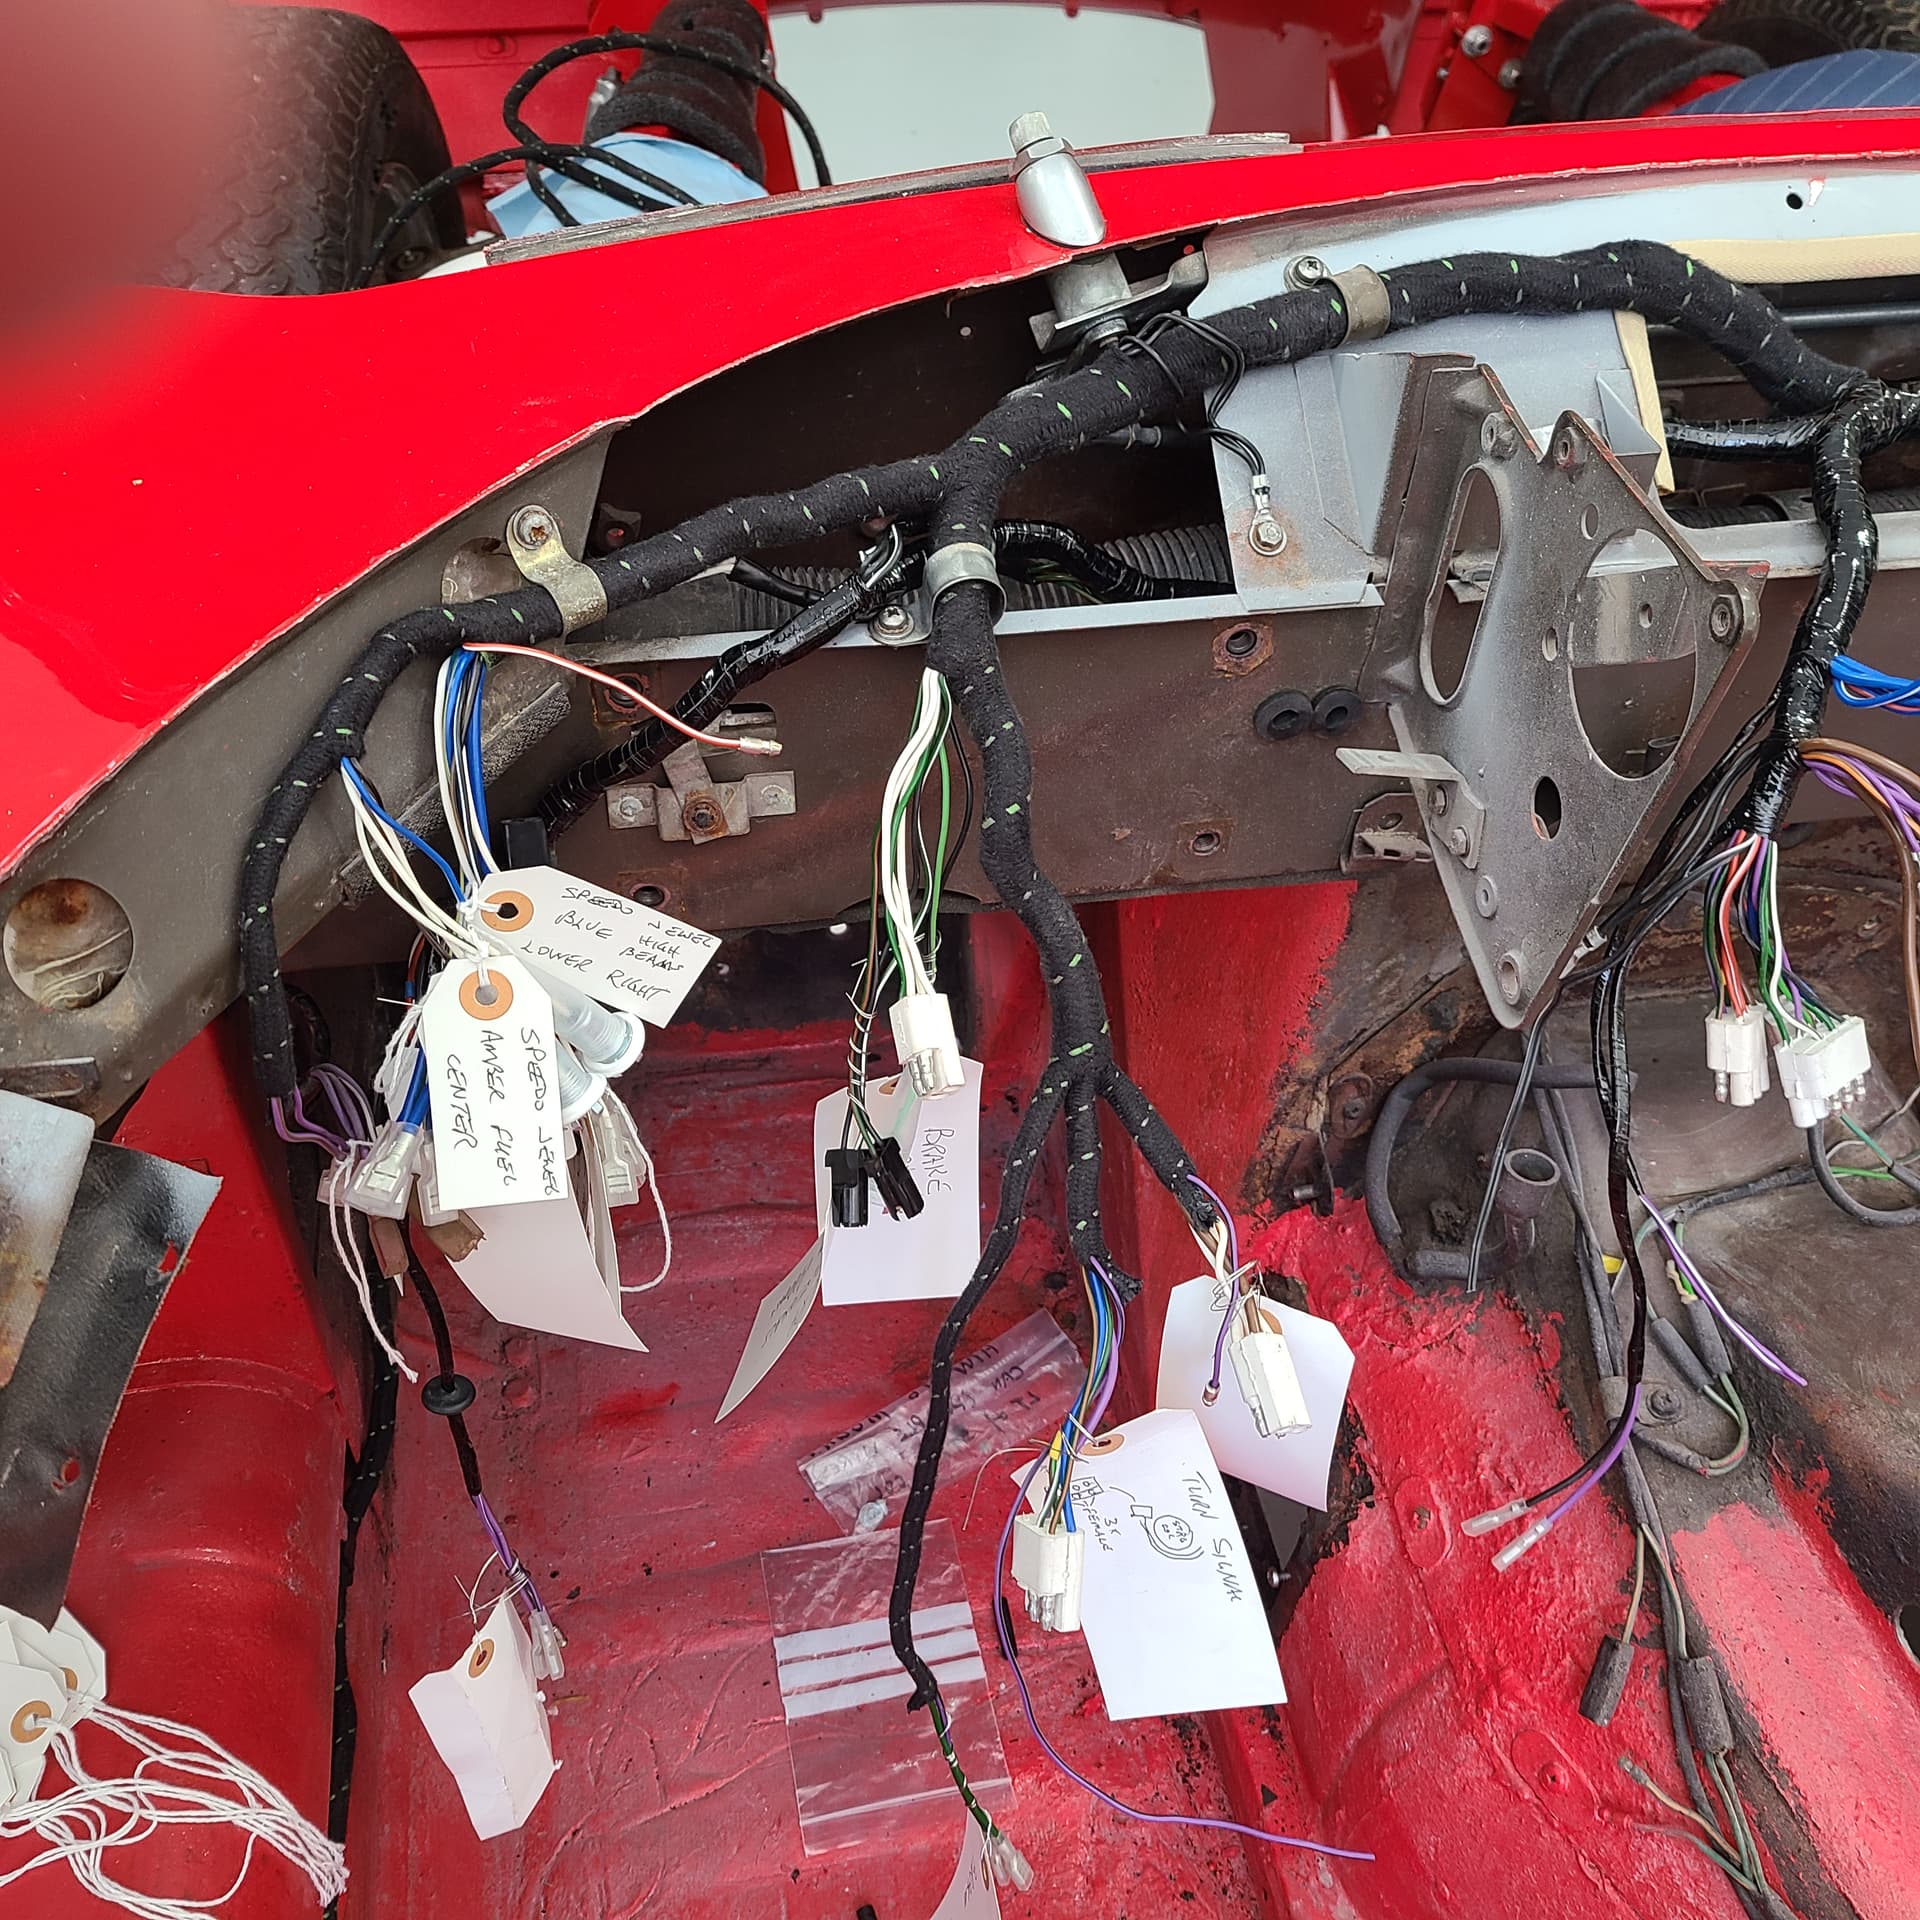
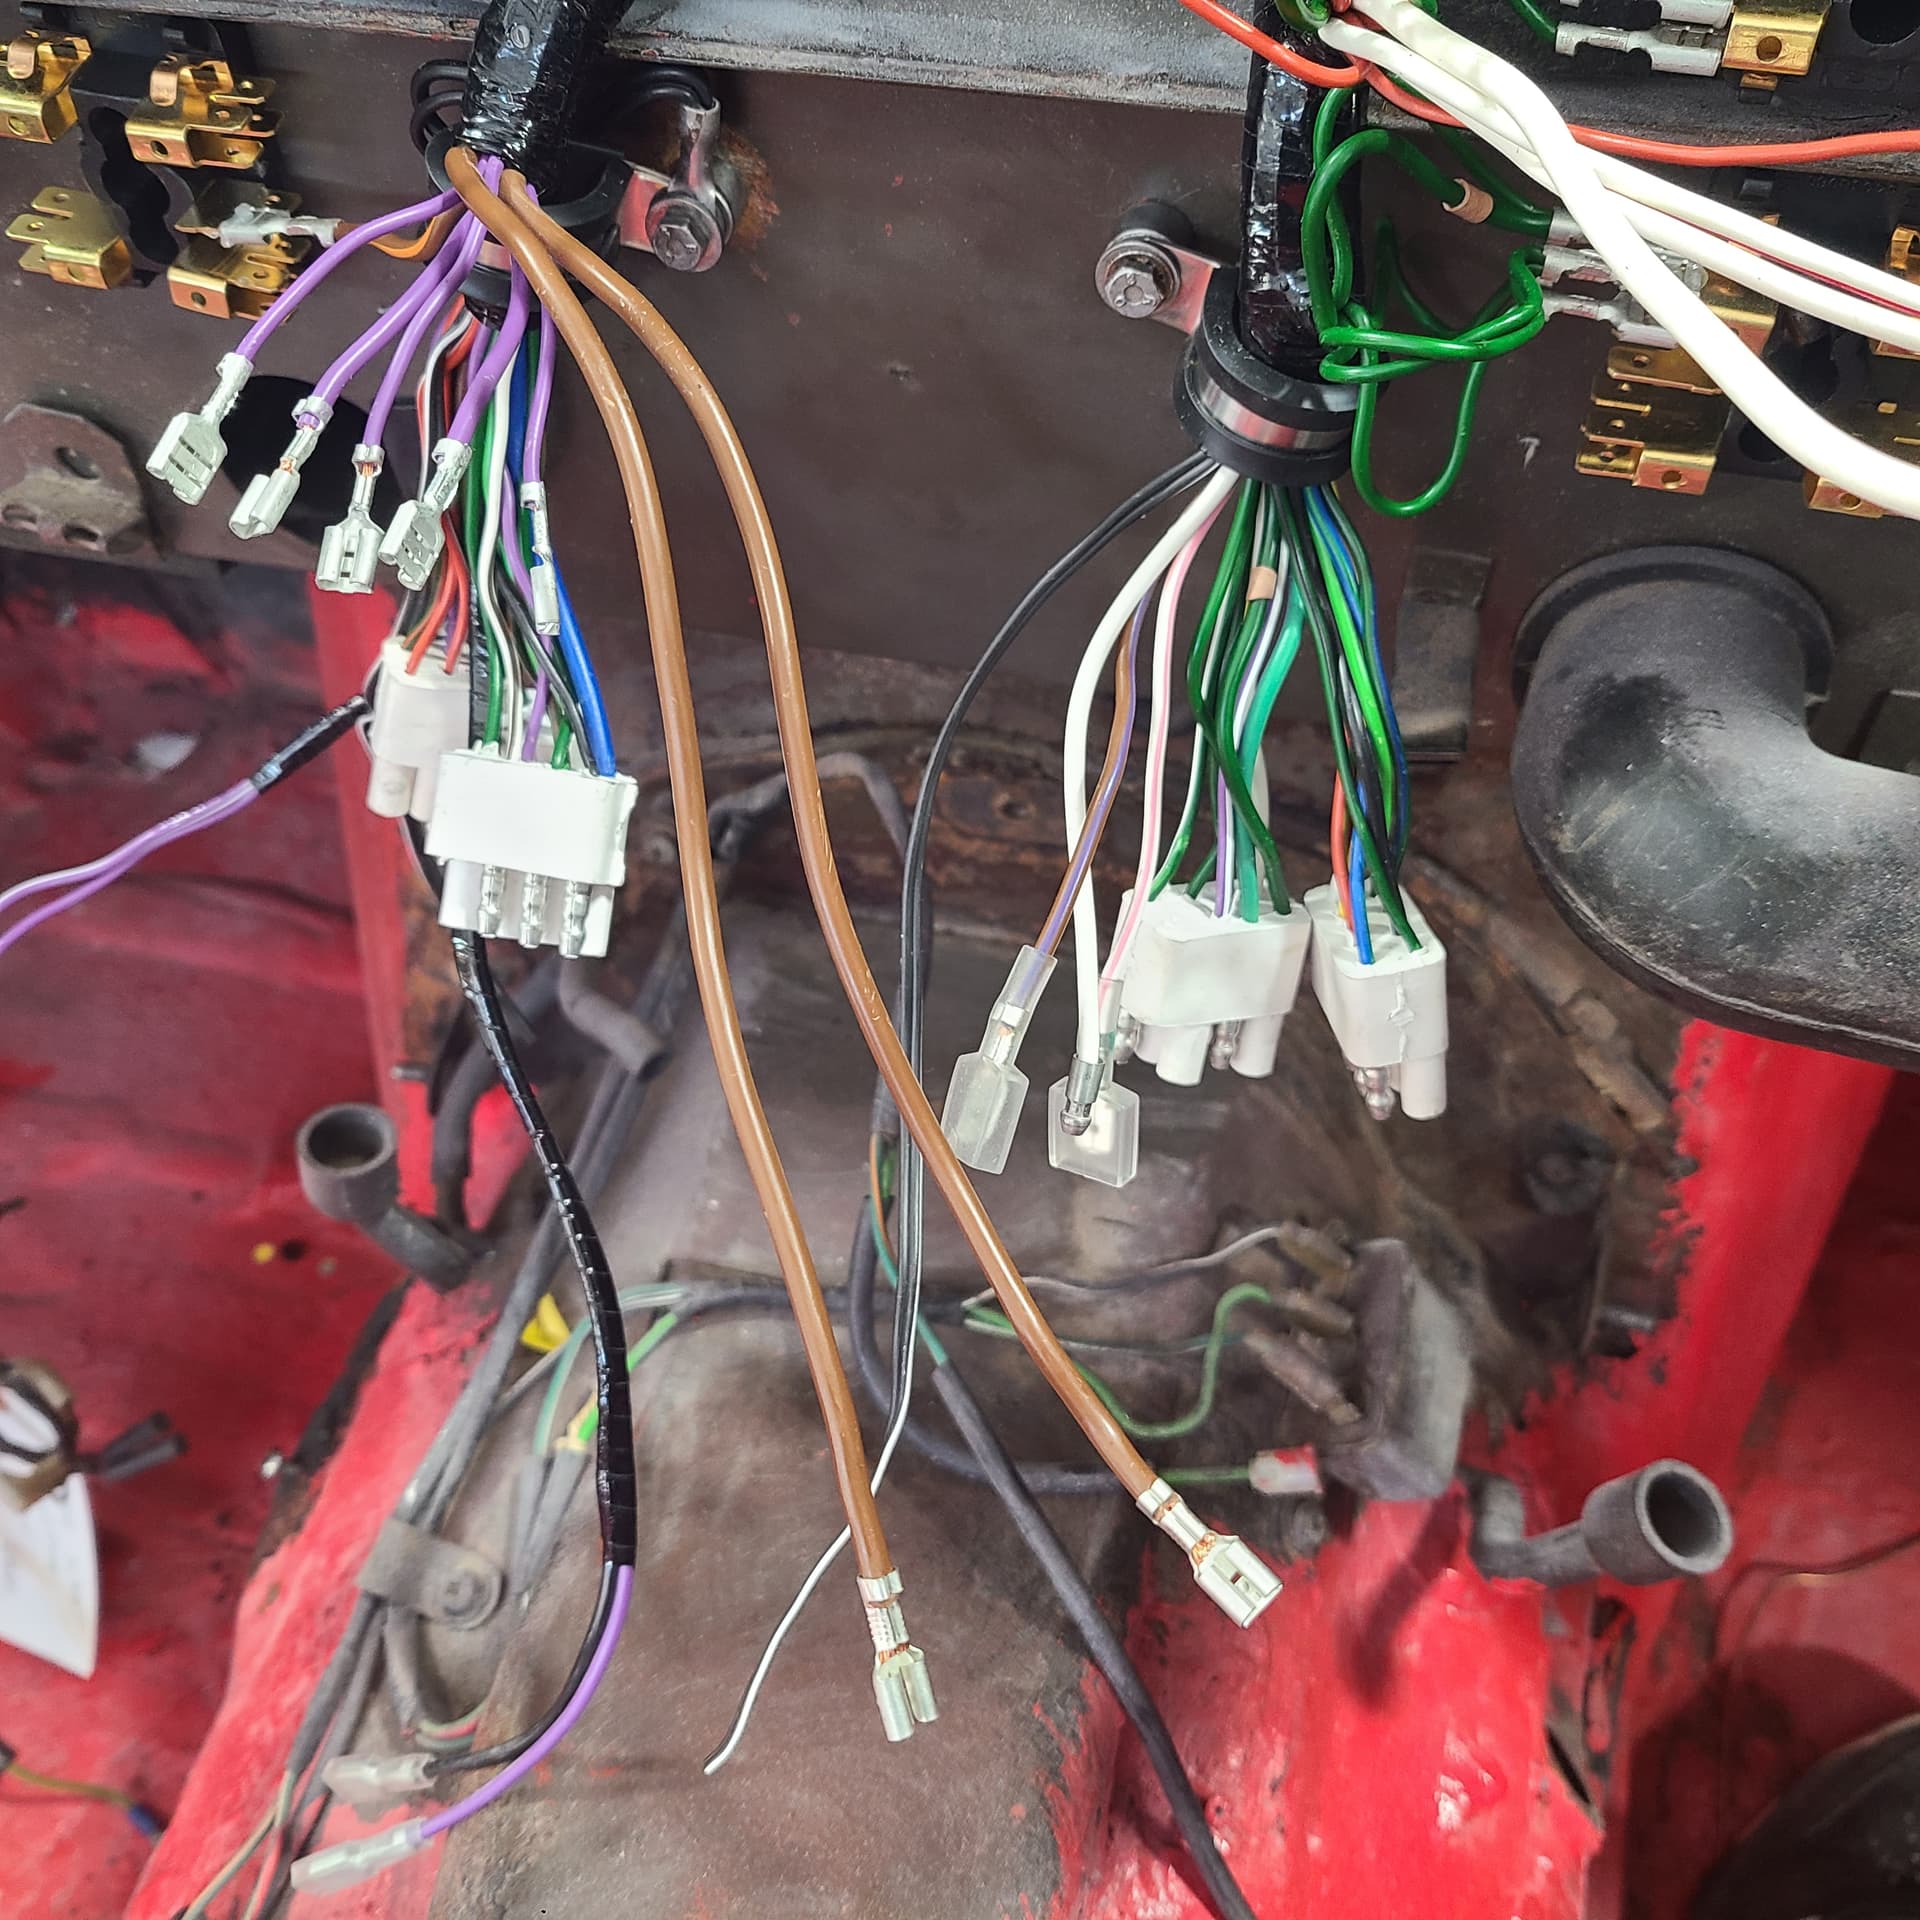
The first issue I need to resolve in the new harness has 5 relatively short purple wires implying they all connect to lower left fuse block
The old harness has the 5 purple wires but only 4 go to the fuse box; one is much longer and has black ring on it. Other wires have this colored ring on it so I know it is significant. Just haven’t figured out that significance yet.
The second issue is less daunting and other forum members who have replaced their harness may be able to answer it. The new harness has two long brown wires leading to one fuse box
Whereas the old harness has two equally long pair of wires leading to the same fuse box, but are whitish or a grey color. Are they the same pair if wires? Logic says yes, but . . .
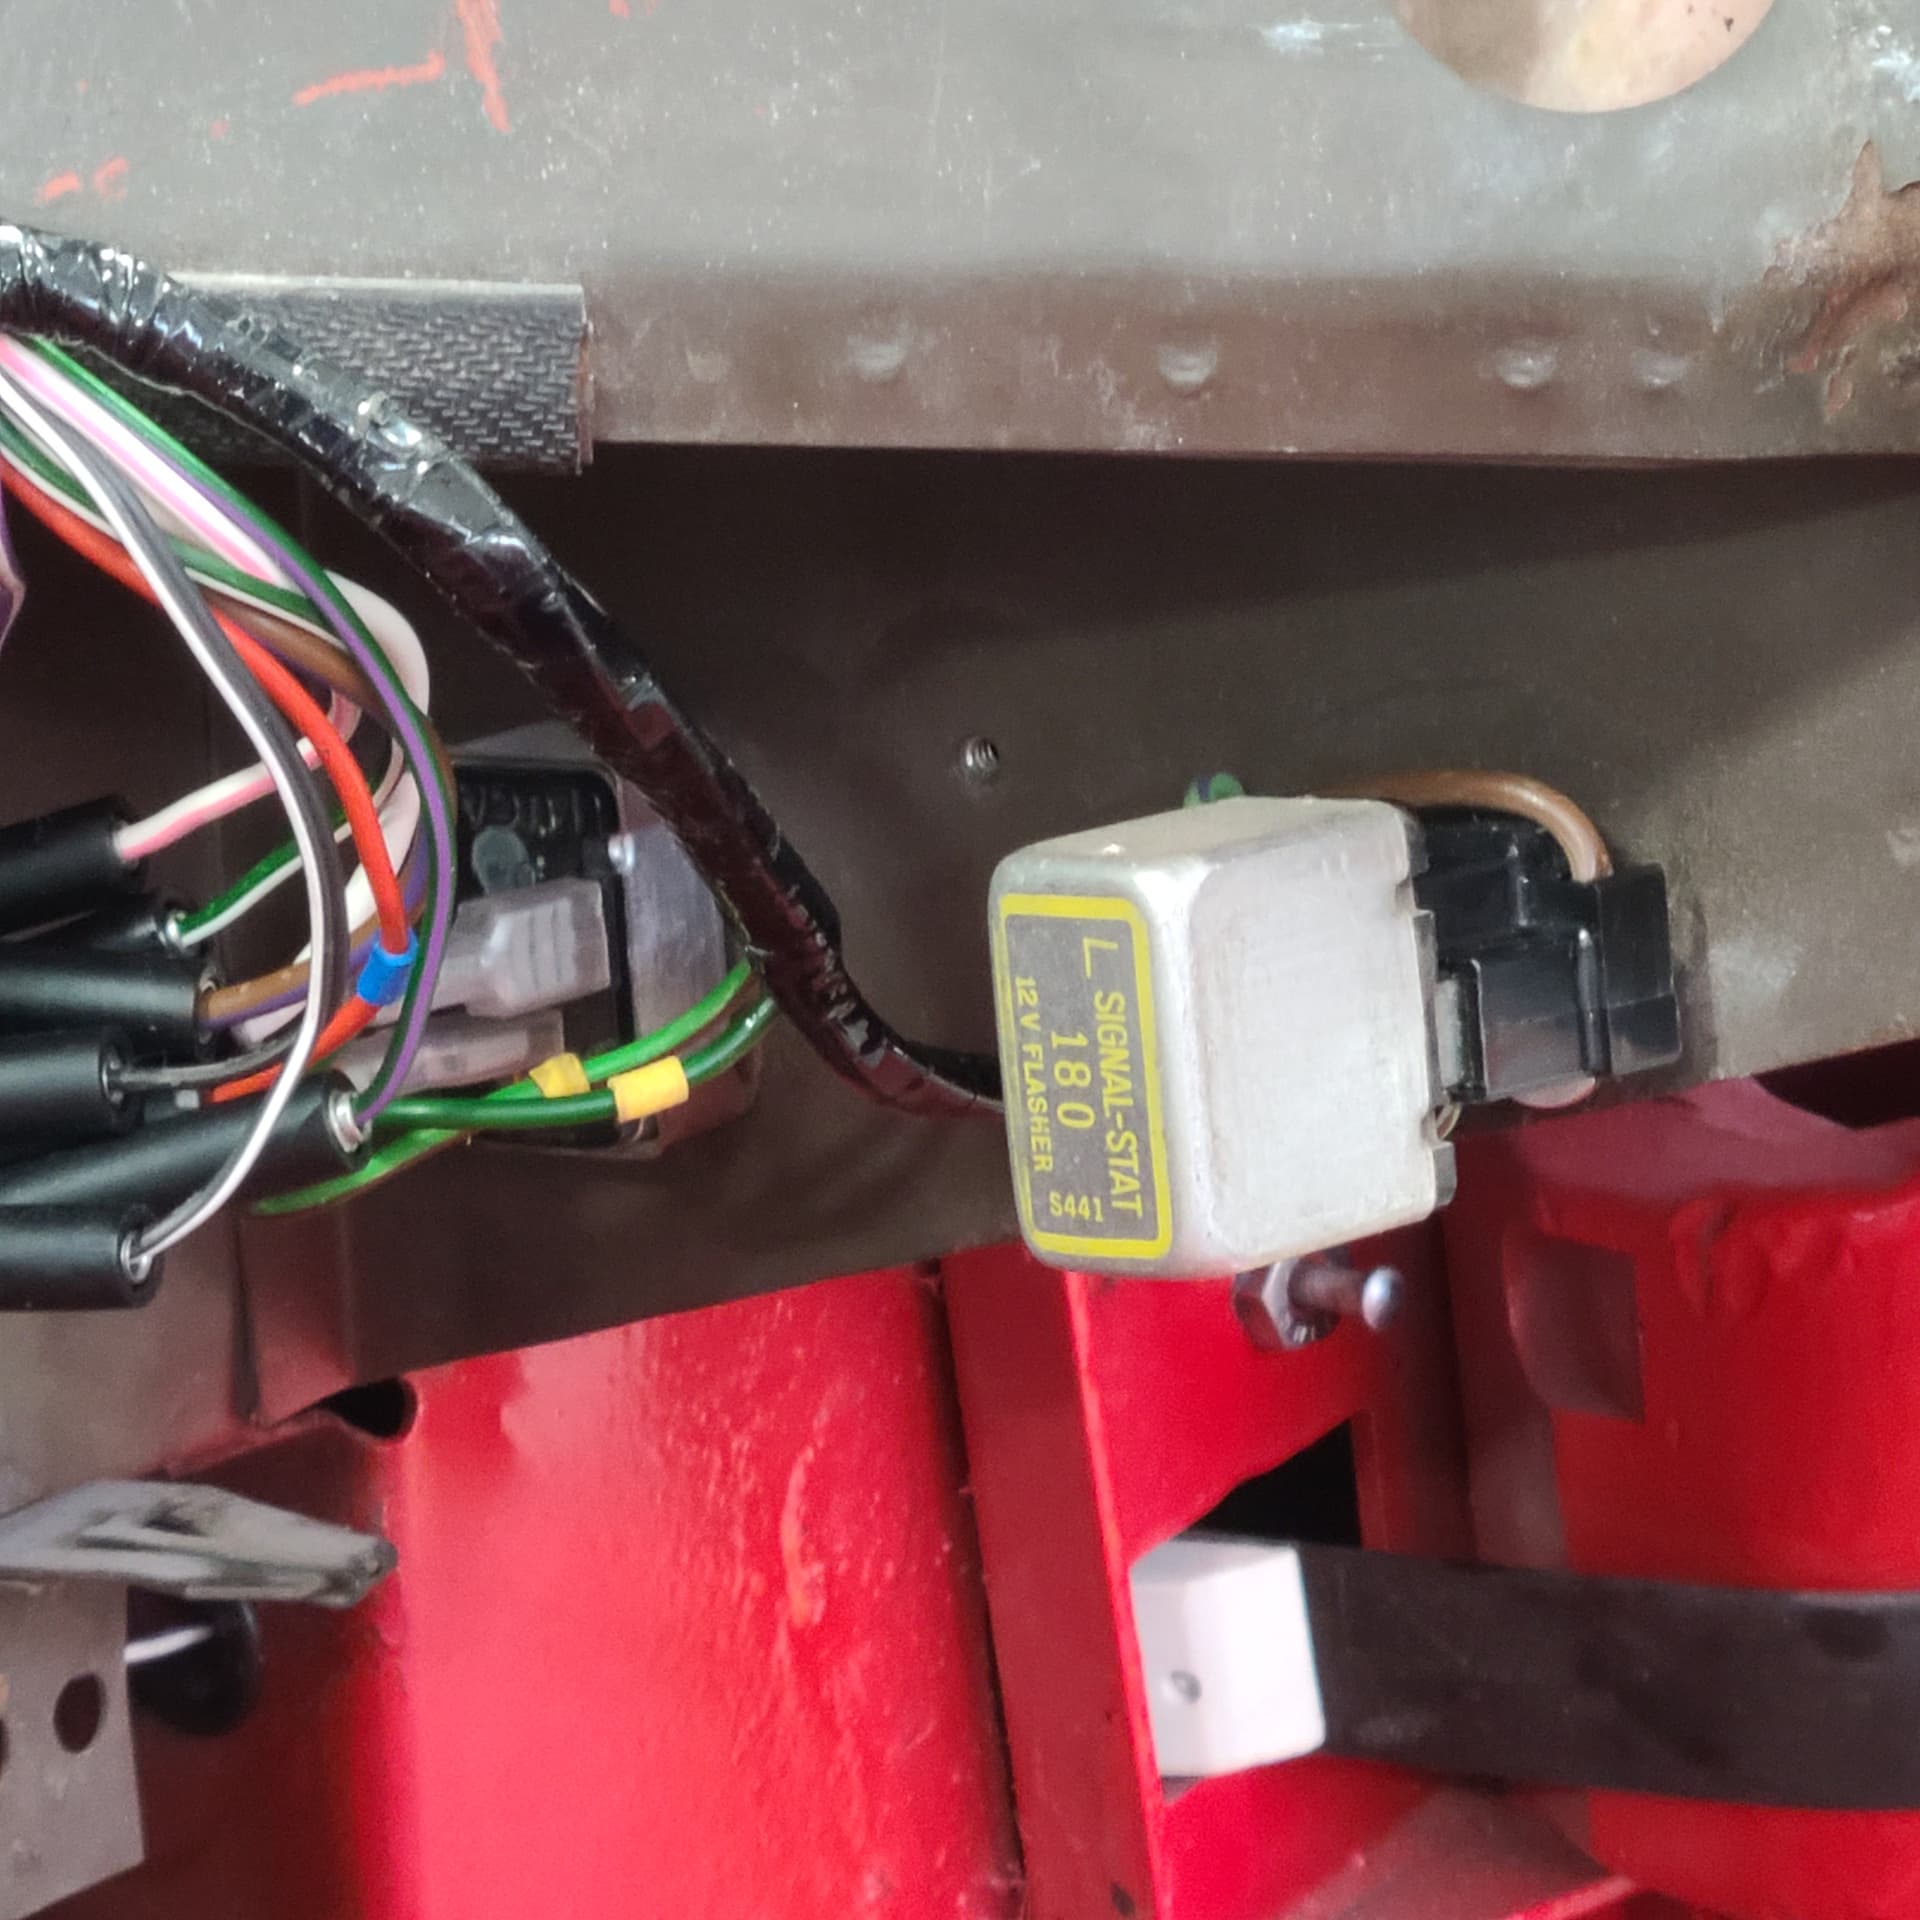
Also cleaned up some wires attaching to various cans and flashers in the passenger footwell;
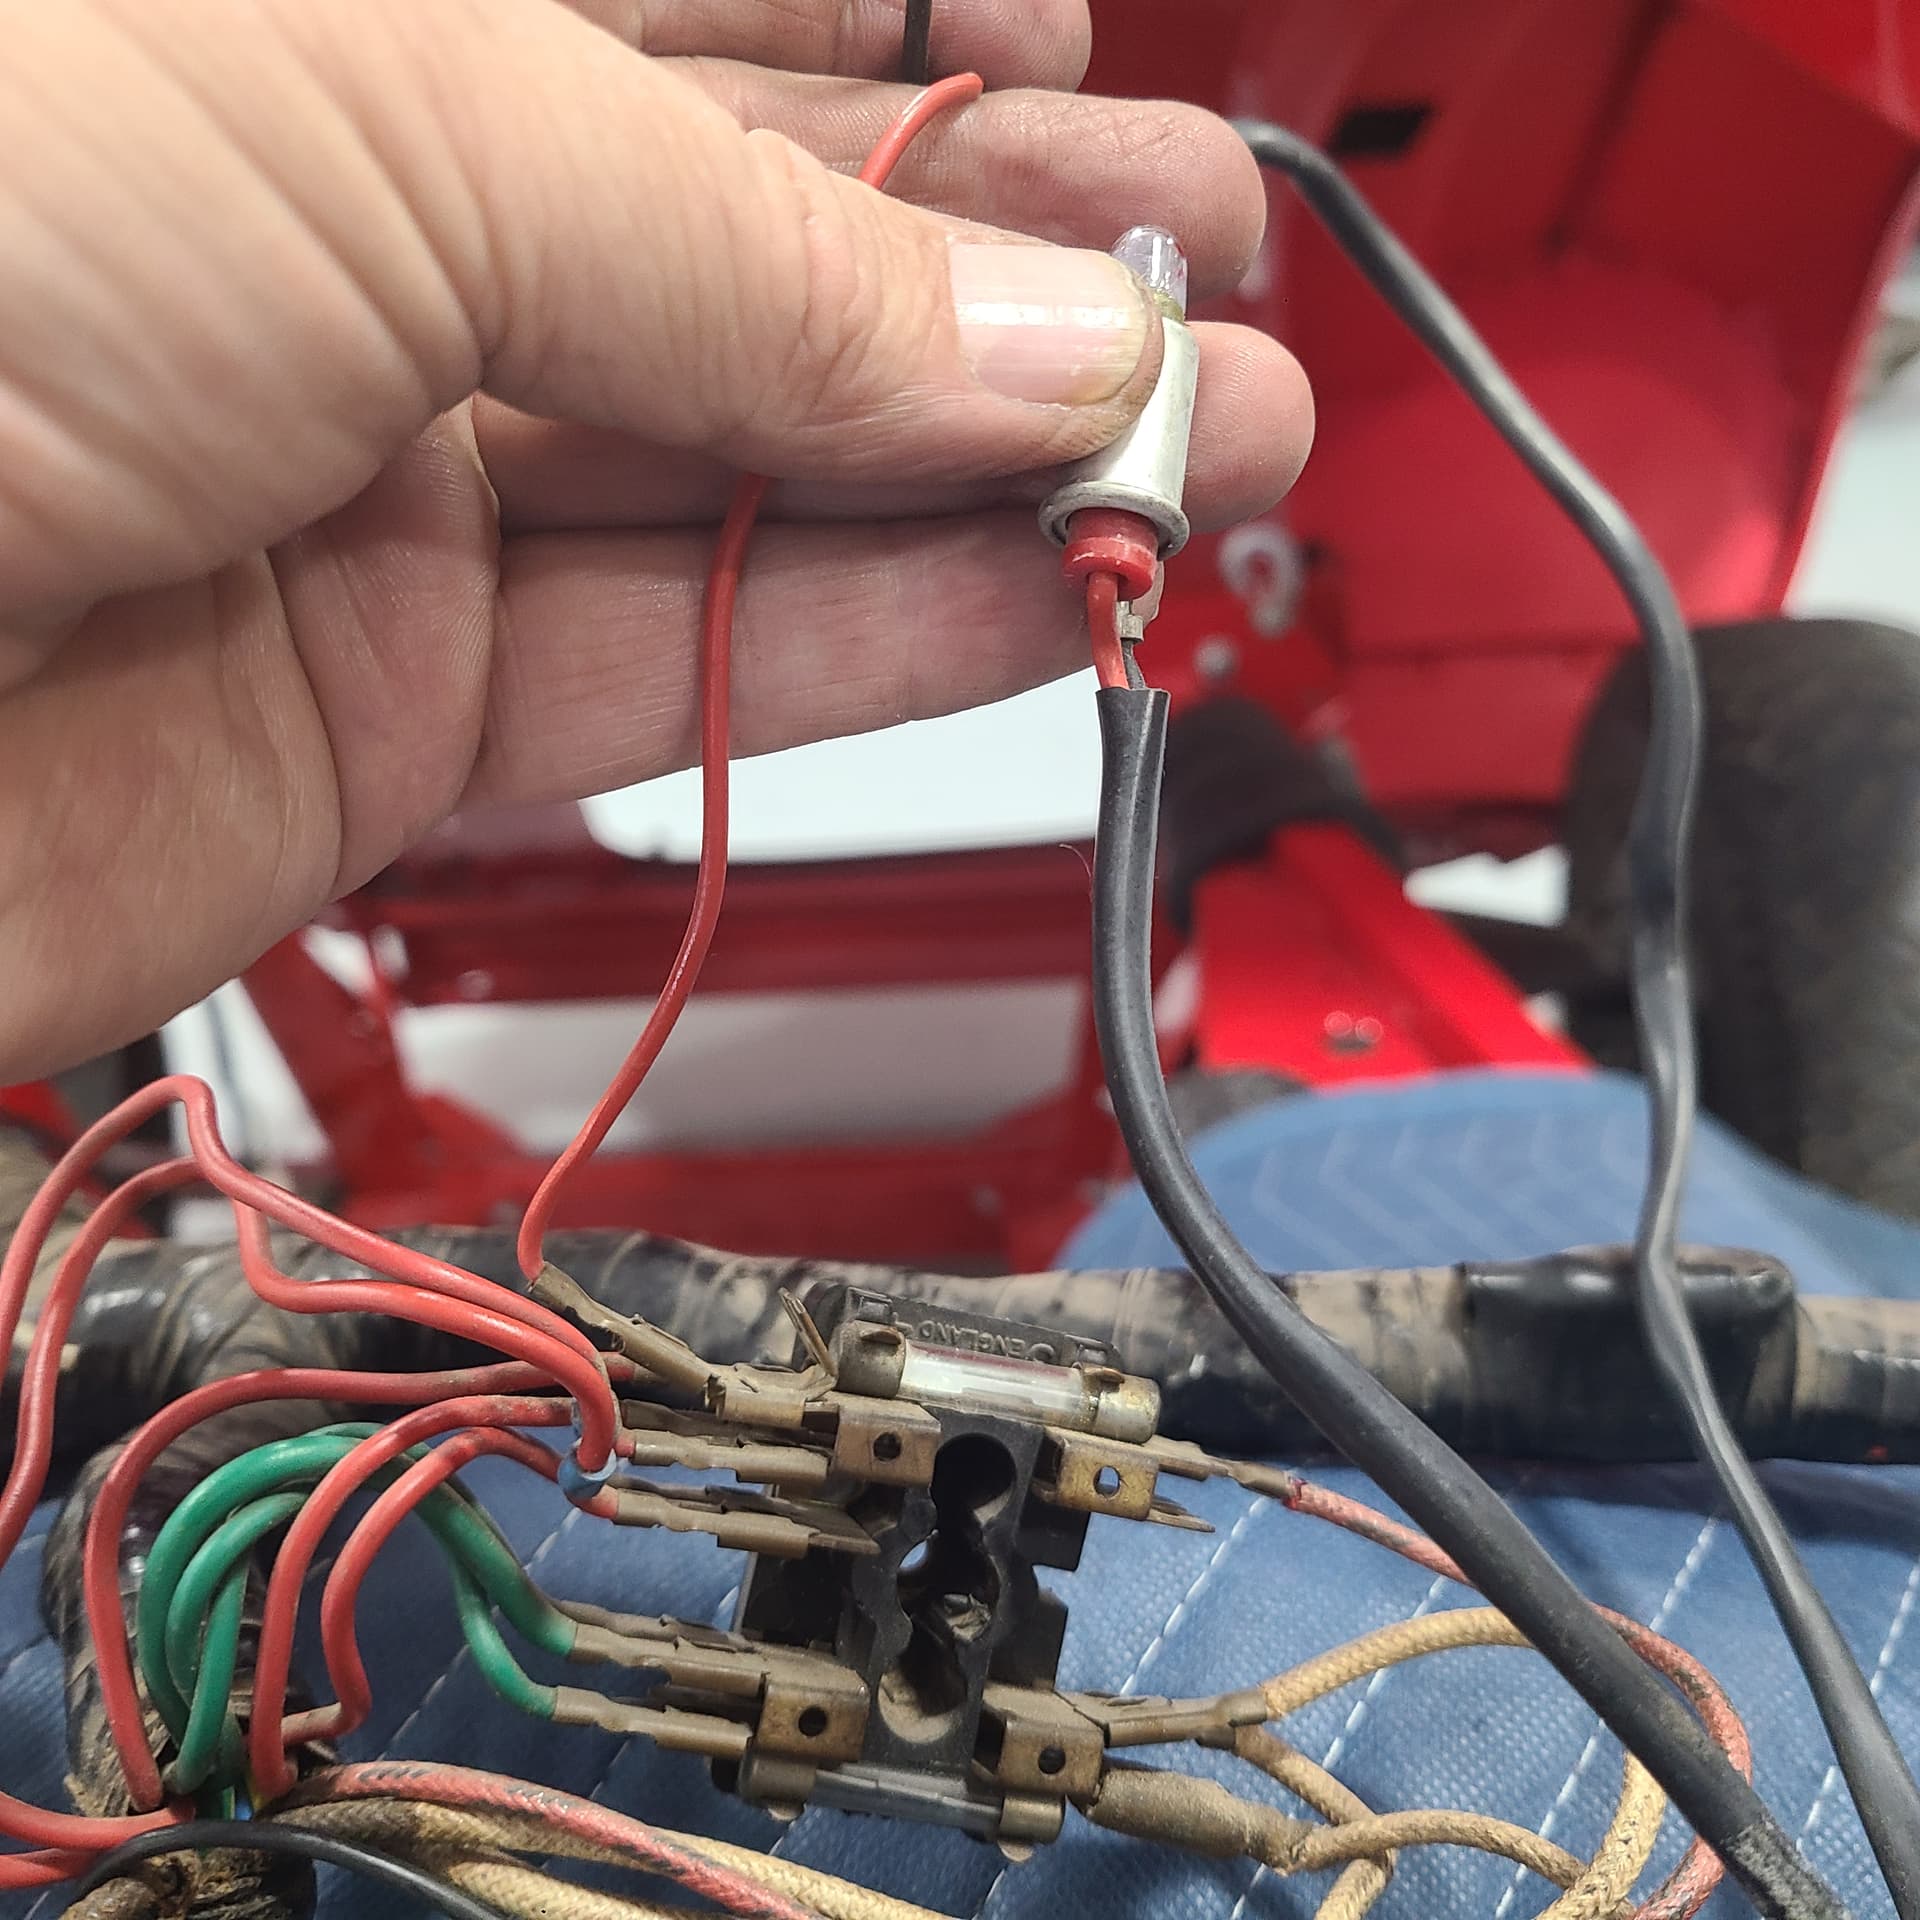
And I have 1 oops to trace down. This red wire is attached to the same fuse box with the other red wires on the upper right fuse box. I didn’t note where this red wire with a small bulb on the end goes.
I forgot to mention it – I was notified that West Valley instruments had finished all my gauges (Tach, Speedo, Voltmeter, Fuel Level, and Water temp {two months ago I ordered a mechanical oil pressure gauge from a UK vendor}). West Valley received them on Monday 09MAY22.
I also received e-mail notification that Mike Eck had received my Keinzle Clock.
The amazingly quick turn around from West Valley was an error by them in my favor. A technician grabbed my gauges out of sequence in error. Their 7-10 day turn-around (plus shipping time) was what I was expecting.
I’ll have the gauges by mid-next week. I should have my clock from Mike shortly thereafter. So that means I will enable to rewire the gauge panel. I have a new switch strip and will move/clean up the switches, install the refurbished / new gauges and wire them all together. Easy-Peasy.
I’m in the midst of replacing a gear in the odometer mechanism from my 911’s speedo. I’ve got it apart and I’m waiting for the new gear to arrive. I’m only saving about $150 doing it myself and really questioning why I’m trying to save that money. Any tiny mistake and the speedo is likely ruined. Oh well, past the point of no return now.
Somewhere that is dark…!