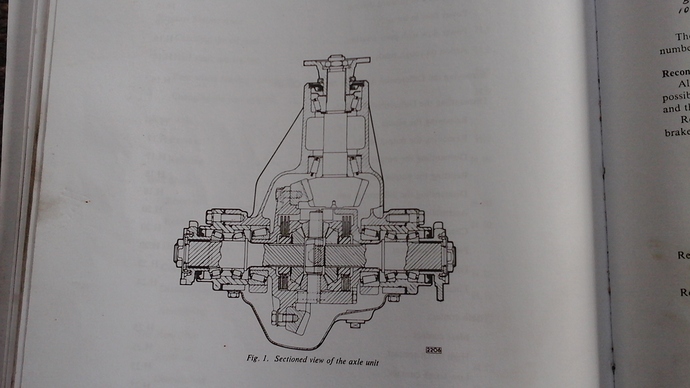
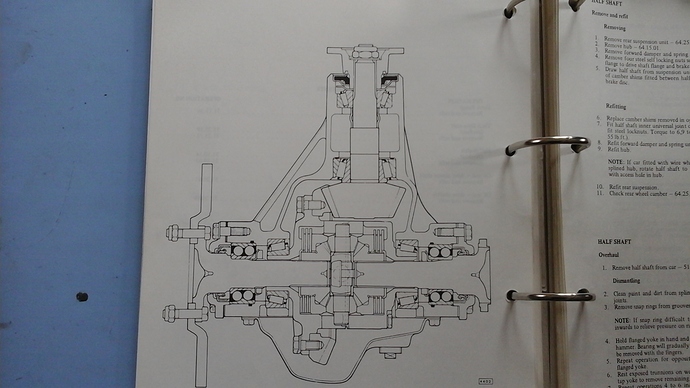
One more thing. Backlash,measured against the crown wheel is 6 to 10 thou in the XJ manual, and not to be less than 6 thou. I see it’s less for the first diff, and I have no info on any others.
hey bro, you need to do some calculation to get this figure correct.
As I am not sure whether you allowed for it, please see attached video
go to 7.00min (not a Jag diff, but the principle is the same)
Hello Terry,
The Crushable Spacer is an abomination; there are so many ducks that have to be in line for that to work consistently. The spacer is between the two bearings; accordingly, the Preload only comes about after the spacer has crushed to the extent that the Cones of the Bearing Set make contact with there corresponding cups. I’ve seen many examples where the 140lb/ft torque has been reached and there was still considerable end play in the system.
There are many Jaguar examples that use the same Crushable Spacer System on the Output Shafts and its a well known fact that these can give up the ghost through spirited driving.
I replace the Collapsible spacer with a solid spacer and set the Preload on the bearings by determining the drag on the pinion system with an lb/in torque wrench. Correct is when between 9 and 12 lb/in torque is required to move and keep the Pinion Shaft rotating.
I have a Master Spacer of known length that will result in slight, but measurable end float when the system is assembled and torqued up. I then have a multitude of spacers of various lengths to choose from that will get me very close to my target torque required to turn the pinion shaft. I play from there to achieve a torque of between 9 and 12 lb/in to turn the pinion shaft. I do a lot of differential rebuilding and invariable can now select the correct spacer based on the measured end play and 0,05mm for preload.
I have the luxury of many spacers to choose from, but even on a one off basis, its not all that time consuming to make a slightly under length spacer and then use shims to adjust the correct preload. Put more shims in than will be required, so that measurable end play is achieved. Measure the end play and adjust shim stack to give the correct preload.
Prior to the Collapsible Spacer being introduced, the system described above was used. The shims used with these earlier cars can be used in conjunction with a solid spacer. The various diameters of the Pinion Shafts of the pre and post introduction of the Collapsible Spacer are the same, only the position of the shoulder that resists the spacer has changed.
I’m sure the conversation at the time didn’t include:
“Hey, I’ve got this great idea with a collapsible spacer that is going to make the Differential better”
but more along the lines of:
“Hey, I’ve come up with this cheap and nasty collapsible spacer idea that is going to save dollars in our production.”
Regards,
Bill
Hi Steven…the figures your looking for should be etched on the end of the pinion and on the edge of the ring gear…looking at your photo we can see the bearing is sitting too high…is it actually being held up by the crush spacer…if so something looks wrong as Terry suggests above…the bearing isnt a loose fit on the shaft and im sure when you dismantled it you had to press it out…is this the problem the bearing needs to be pressed onto the pinion but only till it meets the spacer…full details of set up of the 3rd type of diff (crush sleeve) are in the E type S3 service manual…however as Bill mentions above replaceing the crush sleeve with spacer and shims is a far more elegant and precise solution…and well worth you considering now befor you bolt everything up…Steve
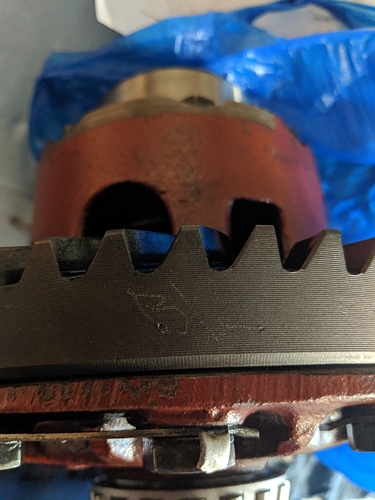
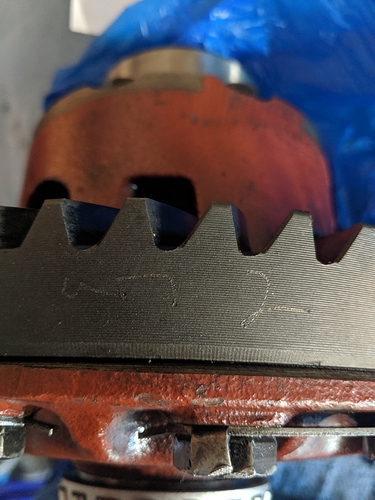
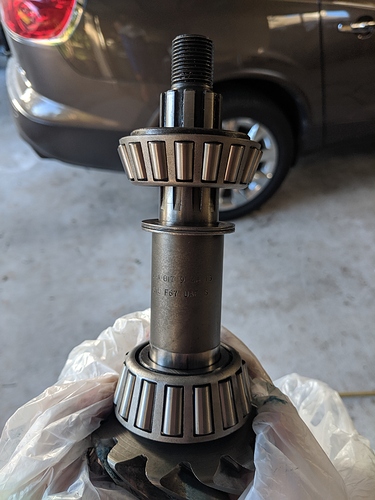
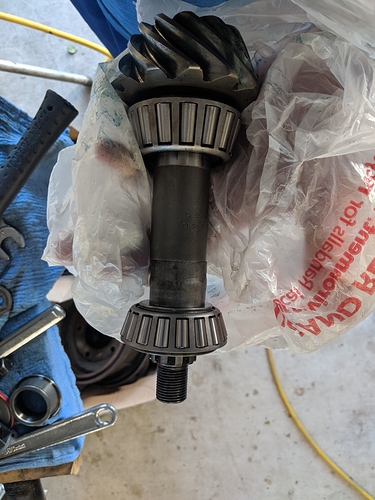
Here is my setup. Either sng sent the wrong crush sleeve or I have a spacer and am to blind to see it. Here are some pics. For the life of me, I can’t see if the pinion already has a spacer. I see no demarcation line and it looks machined. I removed no spacer or crush sleeve when I took it apart. Without the crush sleeve, the outer bearing presses on and seems like everything fits together as it should. Just want to make sure. Also, one of the pics shows the ring gear number. It looks like a horizontal squiggly line then a 7 and a 2. Is that .007 backlash with .002 +/-? Just guessing at this point. If that’s the case, I’m dead on at .007 backlash.
Hi Bill I’m no expert on diffs - my success rate on rebuilding them has been mixed to say the least. I agree with your observations on the crush sleeve, it’s a crude solution, and frankly 30 - 40 inch pounds of preload seems very high. You can barely turn the pinion by hand, but it’s definitely what the manual calls for. As for the torque needed to crush the sleeve I’ve found that the high torque is only needed to start the sleeve collapsing (same with the hubs) - once it starts the torque is quite a bit less and very uniform until preload is reached. I can’t directly comment on your observation that it continues to crush after installation - but the diff definitely gets easier to turn with time.
Hi Stephen Is that as far as the bearing will go onto the pinion - it’s not even clearing the splines in the photo? I don’t recognize the washer looking item below it in the third photo either, but I don’t purport to have “seen it all”. I agree that there isn’t room for the crush sleeve, suspect your diff uses the spacer and shims arrangement - maybe Bill can comment. After 50 years there is no guarantee that your diff, or for that matter pinion and crown is original to the car. Older diffs, with spacers and shims, have big nuts on the flange of the output shaft between the studs - that is they were 2 piece, on later diffs the flange and output shafts were 1 piece.
Actually the more I look at the photo’s the less I understand your situation. There is actually no room for the bearing between the end of the splines and the “bump” in the shaft that holds it.
Hi Stephen…looks to me that your pinion isnt the type that uses the crush sleeve…see photos 1st from S1/2 E type manual showing diff that uses shims/spacers…2nd photo is from the S3 manual that shows diff with crush sleeve…look at the diagrams close and you can see the difference…re etch marks you clearly have bacjkash B/L…you just need to identify the other …service manual gives an example ov B/L .007
Ok. Sounds like I’m not using the crush sleeve. If the spacer is on my pinion, it’s either so tight I can’t tell, or it’s just a machined shoulder on the pinion. I’m going to put it back together and stop banging my head in the wall. I’ve heard of some guys putting some sealant on the outside of the pinion seal?? Seems to me, if it’s going to leak, it will do it on the inside part that the pinion is spinning against. Wasn’t sure if there were any tricks. Thanks everyone for your help.
Hi Stephan I suspect that your pinion doesn’t have a spacer and you shim directly between the perch for the inner bearing on the pinion and the inner bearing to achieve preload and torque. If you don’t have an appropriate amount of torque on the nut it will probably loosen in use and increase bearing clearance. It probably can’t loosen enough to come off because it’s captive in the drive shaft flange.
Hi Stephen…your spacer/shims will be what look like washers that you have on the pinion in your photo above…look close at the 1st photo i posted you can see them in black under the bearing…you just need the correct size for your preload…the pinion seal usually has a thin gasket under it…sealant on outside shouldnt be a problem…Steve
Hello Terry,
120lb/ft to I40lb/ft is the torque you’re supposed to end up with, as stated in the S3 Repair Manual. Without the Collapsible Spacer in place, if the preload associated with 120lb/ft to I40lb/ft torque being applied to the Companion Flange nut was applied directly to the Bearing Cones and Cup, you wouldn’t turn the Pinion Shaft. The purpose of the Collapsible Spacer, being between the bearings, is to absorb most of that force so that its not all applied to the bearing preload, yet still have the 120lb/ft to I40lb/ft present in the Pinion System to apply the stretch required to keep the system from loosening (that’s the reason for torquing fastening systems to a particular figure - to use the natural elasticity of the system to resist loosening).
There are two conditions that shorten the life of Taper Roller Bearings; too much Preload and End Play. This type of bearing prefers preload, but not excessive preload. In my opinion, 30 - 40lb/in to turn the system is excessive.
To Stephen,
Your differential uses solid shims, not a Collapsible Spacer. The difference between the two systems is the position of the shoulder on the Pinion Shaft that will respectively catch the Shims, or Collapsible Spacer as mentioned in an earlier Post of mine.
Your procedure will be:
-
Use a stack of Spacers between the shoulder on the Pinion Shaft and the Bearing Cone closest to the Companion Flange sufficient in thickness that will result in End Play when the Companion Flange nut is Torqued to120lb/ft to I30lb/ft (as specified in the early E Type Repair Manual) (use the mid of 125lb.ft) .
-
Use a Dial Indicator to measure the amout of End Play present.
-
Remove shims equal to the End Play measured, plus 0.002" (0.05mm) and re-torque the Companion Flange Nut to 125lb/ft.
-
Using a lb/in torque wrench, determine the amount of torque required to turn the Pinion Shaft. It should be between 8lb/in and 12lb/in, as specified in the early E Type Jaguar Repair Manual. Adjust as necessary by adding or removing shims untill the correct drag (preload) is achieved.
What you end up with is the correct preload on the bearings and a torque of 125lb/ft being applied to the Pinion Shaft.
This is a far better system than the use of a Collapsible Spacer.
Regards,
Bill
Hello Stephen,
The original seal used was leather and a rather large oil slinger was used inboard of the seal. With the newer lip seal, the slinger is not so important and has been superseded by a smaller diameter disc of the same thickness. Don’t, as many do, leave either the original oil slinger, or superseding disc out of the assembly
The new seal comes with a sealant applied to its outside diameter .
Regards,
Bill
Hi Bill The diff I was working on came out of a Ser III XJ12 and is, I believe, a bit different from the Ser III E Type in that the diff carrier pre load is set with shims under the bearings - something that can be work intensive enough to blow away the time saved with crush sleeves. Anyway the factory manual does not specify a torque for the pinion nut - it merely says it may take up to 130 ft pounds to start to collapse it. It seems to me to be torque independent as you are setting the pinion bearings to a certain pre load, and stop turning when you get there. I noticed that once the collapse process started it seemed much easier to turn the nut, but because I wasn’t using a torque wrench I never saw what the torque was at any stage. Getting the sleeve to start to collapse was a real gut buster I must say.
Ditto: long ago, I gave up being hero mechanic and just sent diffs to the specialists.
Hello Paul,
That doesn’t always work also. Recently I was asked by a client to speak to a very prominent Jag Parts supplier and Service Centre on their behalf to have a solid spacer used in the diff instead of the Collapsible Spacer. He already had the diff with this company before he knew of me.
When I suggested that to the company, the reply was “why, that’s how we’ve been doing it for 40 years”. Well, I wasn’t having a good day that day and retorted “and I’m the stupid bast… that has to fix your stuff-ups”. Further, I have 11 of the 12 Collapsible Spacers purchased from you some years ago, now sitting in the scrap parts bin, because at 140lb/ft torque, there was still 0.5mm end play".
I asked if they had ever measured the preload on the Pinion Bearing when using the Collapsible Spacer. They replied that they checked the preload on every differential they worked on, When asked how they measured the preload, the replay was " we test it with a dial indicator". My reply: “you’re unique in the World, being able to measure less than no movement (my definition of preload) with a dial indicator. You sir, are a bleeping idiot”. At which point he hung up.
Regards,
Bill
Hello Terry,
There was a mixture of Dana and Salisbury differentials used. I’d suggest that it was the Dana differential that used that type of assembly description.
As far as achieving the desired preload on the bearing, ignoring the torque required to tighten the Companion Flange Nut and concentrating on the torque to turn the Pinion Shaft is the way to go, except that you may end up with insufficient torque to keep the system tight, or, you may exceed the natural elasticity of the shaft and it will again, not keep the system tight, in addition to the shaft now being stuffed.
Before abandoning the Collapsible Spacer System for all time, I experienced many assemblies that still had in excess of 0.5mm (0.020") End Play when the maximum specified torque of 140lb/ft torque of the Companion Nut was reached.
Regards,
Bill
Bill. Thank you very much. I think I was pretty much there before I pulled it back apart. At least the second time around it will be easier. Actually considering rebuilding my defender front diff now that I have some “experience”.
Amazing, how those millions of diffs with crush sleeves, ever made it more than a mile…
I don’t completely understand the problem here with the crush sleeves. You tighten them down until you have the desired preload - that’s what the manual says to do. I watched Paul Cangialosi’s (Medatronics) video on rebuilding the same diff as mine and he used an impact driver to tighten the pinon nut to pre load. https://www.youtube.com/watch?v=OurJHaiy6kI
No torque was ever measured in the process. I did a 3:77 diff out of a S Type 20 years ago and used a crush sleeve, vintage raced with it for a full year, and have been autocrossing with it for the last 10 years - no issues. There are millions of Dana 44’s out there with crush sleeves I suspect.
Had a look for maximum torque values for a 13/16 fine grade 5 bolt - it’s well in excess of 140 ft pounds

