Hmm, that’s odd. I’ve managed to buy one good condition used hinge from the US, I’ll dummy assemble that at some point and check. Shouldn’t need countersunk bolts. I did find I can’t get the two forward bolts out of the hinge with it still connected to the car as they foul on the wing just before they come out. Anyone know if that’s normal?
Normal on mine . It’s surprising how many time I forgot to put them in first while trial fitting !
I’m dreading the trial fit etc. when I eventually have the car painted - they don’t half make a mess of the front wing if you forget to push them through when you swing the hinge shut!
I am redesigning the hinges on my 140 with needle bearings for the bushing so they will never wear out or need replacing. I am thinking of making them for sale do you think there is a market? I have a laser and Waterjet cutting business and all my panels are drawn on auto cad and cut on the Waterjet so all are a perfect fit
Peter
1 Like
I’m not sure I’d want needle rollers in a hinge application, personally. Could be a risk of Brinelling? Door hinges are not a rotating assembly, they’re more of a pivot - I chose to go the oilite greasable bush route, with a grease slot cut into the pivot pin. The pin size is up to 3/8" (or 10mm if you want to go metric). I welded bosses on the upper and lower plate of the hinge box and reamed to align. The top one has a grease fitting in it, and an anti-rotational lock arrangement to the head of the shoulder bolt pivot.

Roger
This is the approach I took. Low tech but quick and easy. I used grade 8 5/16" bolts for the pivot pins. First step was to drill down the middle of the bolt through the hex head to a depth of 1¼" followed by a lateral hole in the side, where the middle of the hinge arm locates. Then cut a spiral groove above and below the lateral hole. 45 degree grease nipple fixed to the bolt head

This is what it looks like in place
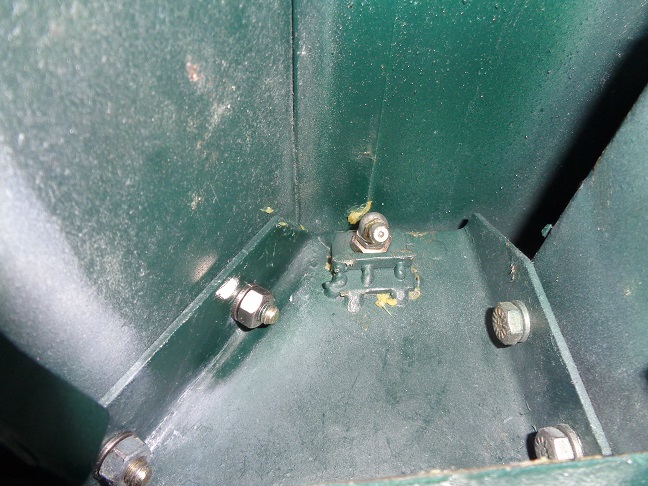
I tack welded 1" squares of 1/8" steel top and bottom of the box to add some meat to the pivot pin mount, then added a stop that sits snugly against the side of the hex head to keep it from rotating. The nyloc nut allows you some greater leeway to adjust the tension on the hinge arm pivot.
1 Like
Low tech: high efficiency!
I have a novel solution to the sagging door problem. In 1968 I bought my 140 DHC to use as daily transportation. XKs were not yet collectible and there were plenty around and cheap. The doors sagged badly, maybe 1/2" or more where they met the rear of the body. I simply laid in 1/2" plus of Bondo to make everything line up. Now do not look down your noses at me. I’m sure some of you have done similar surgery way back in the day whether or not you will admit it. I still have the car.
1 Like
Hi All…just raising this thread again. …some of you may be following my “Door droop” thread on my xk150…well hinges are out and i need to re pin/bush…so cant quite understand how this will work…the original hinge has a steel bush pressed in the movable half of the hinge (flush both sides)?..a bolt/pin then passes through the hinge box and hinge then tightened…now if you fully tighten every thing is clamped tight and nothing moves so are we trying to clamp the bush tight so the hinge moves around it or just leave the bolt loose so the hinge and bush move as one on the pin…shouldnt we be looking at a shim/washer either end of the bush/hinge so it turns easier…hope this makes sense to you…thanks…Steve
Steve, that’s why I used shoulder bolts. These have a set length for the working surface, with a reduced diameter for the threaded end that takes the nut. That way you can tighten it all right up so the hinge bearing surface is held firmly, without the two plates gripping the sides of the hinge tightly. You also need to weld a stop on the top hinge plate surface, with a flat on the head of the shoulder bolt. That hinge pin must not be able to rotate. I wouldn’t use a steel bush, I’d use an Oilite one - I did all of mine at 3/8", which I consider essential for the weight of a fully-glazed DHC (or FHC) door. See post 25 above for details.
Hi Roger…i already looked up shouldered bolts and oilite bushes…same as you …but what im still not understanding is im assuming the bush is flush with the hinge…so as it fits into the box the steel of the hinge thats around the bush will be wearing on the steel of the box…its a fine line in tightening to the shoulder and not tightening the box to the hinge…is that correct…thanks…Steve
Yes - I welded a steel bush on the outside of each box, to give a stronger and more positive location for the pin, and machined everything up to give just a few thou clearance for the hinge when everything was tightened up. The shoulder bolt butts against the lower bush welded to the lower plate, so the structure cannot crush onto the hinge and tighten it. I can’t remember any of the actual dimensions I’m afraid, but that’s the general idea. The ‘end’ of the hinge (top and bottom) will bear on the inner surfaces of the hinge box plates, but I don’t see that as being a real problem. If you’re going to redesign to put a thrust washer in there, you’ll need to either widen the box (tricky, given how it bolts in) or reduce the height of the hinge arm, which I think needs all the ‘meat’ it can get.
2 Likes