David,
Thank you for your questions.
The two exhaust manifold gaskets were cracked and torn and in very sad shape when I removed the exhaust manifolds. I wouldn’t draw any conclusions from the colors other than it was due to bad exhaust manifold gaskets. The engine starts nicely, runs strong, and has good compression. I will find out how clean it runs in my 1984 XJ6 Vanden Plas when I get it running and I take it in for a smog check, hopefully before the end of January.
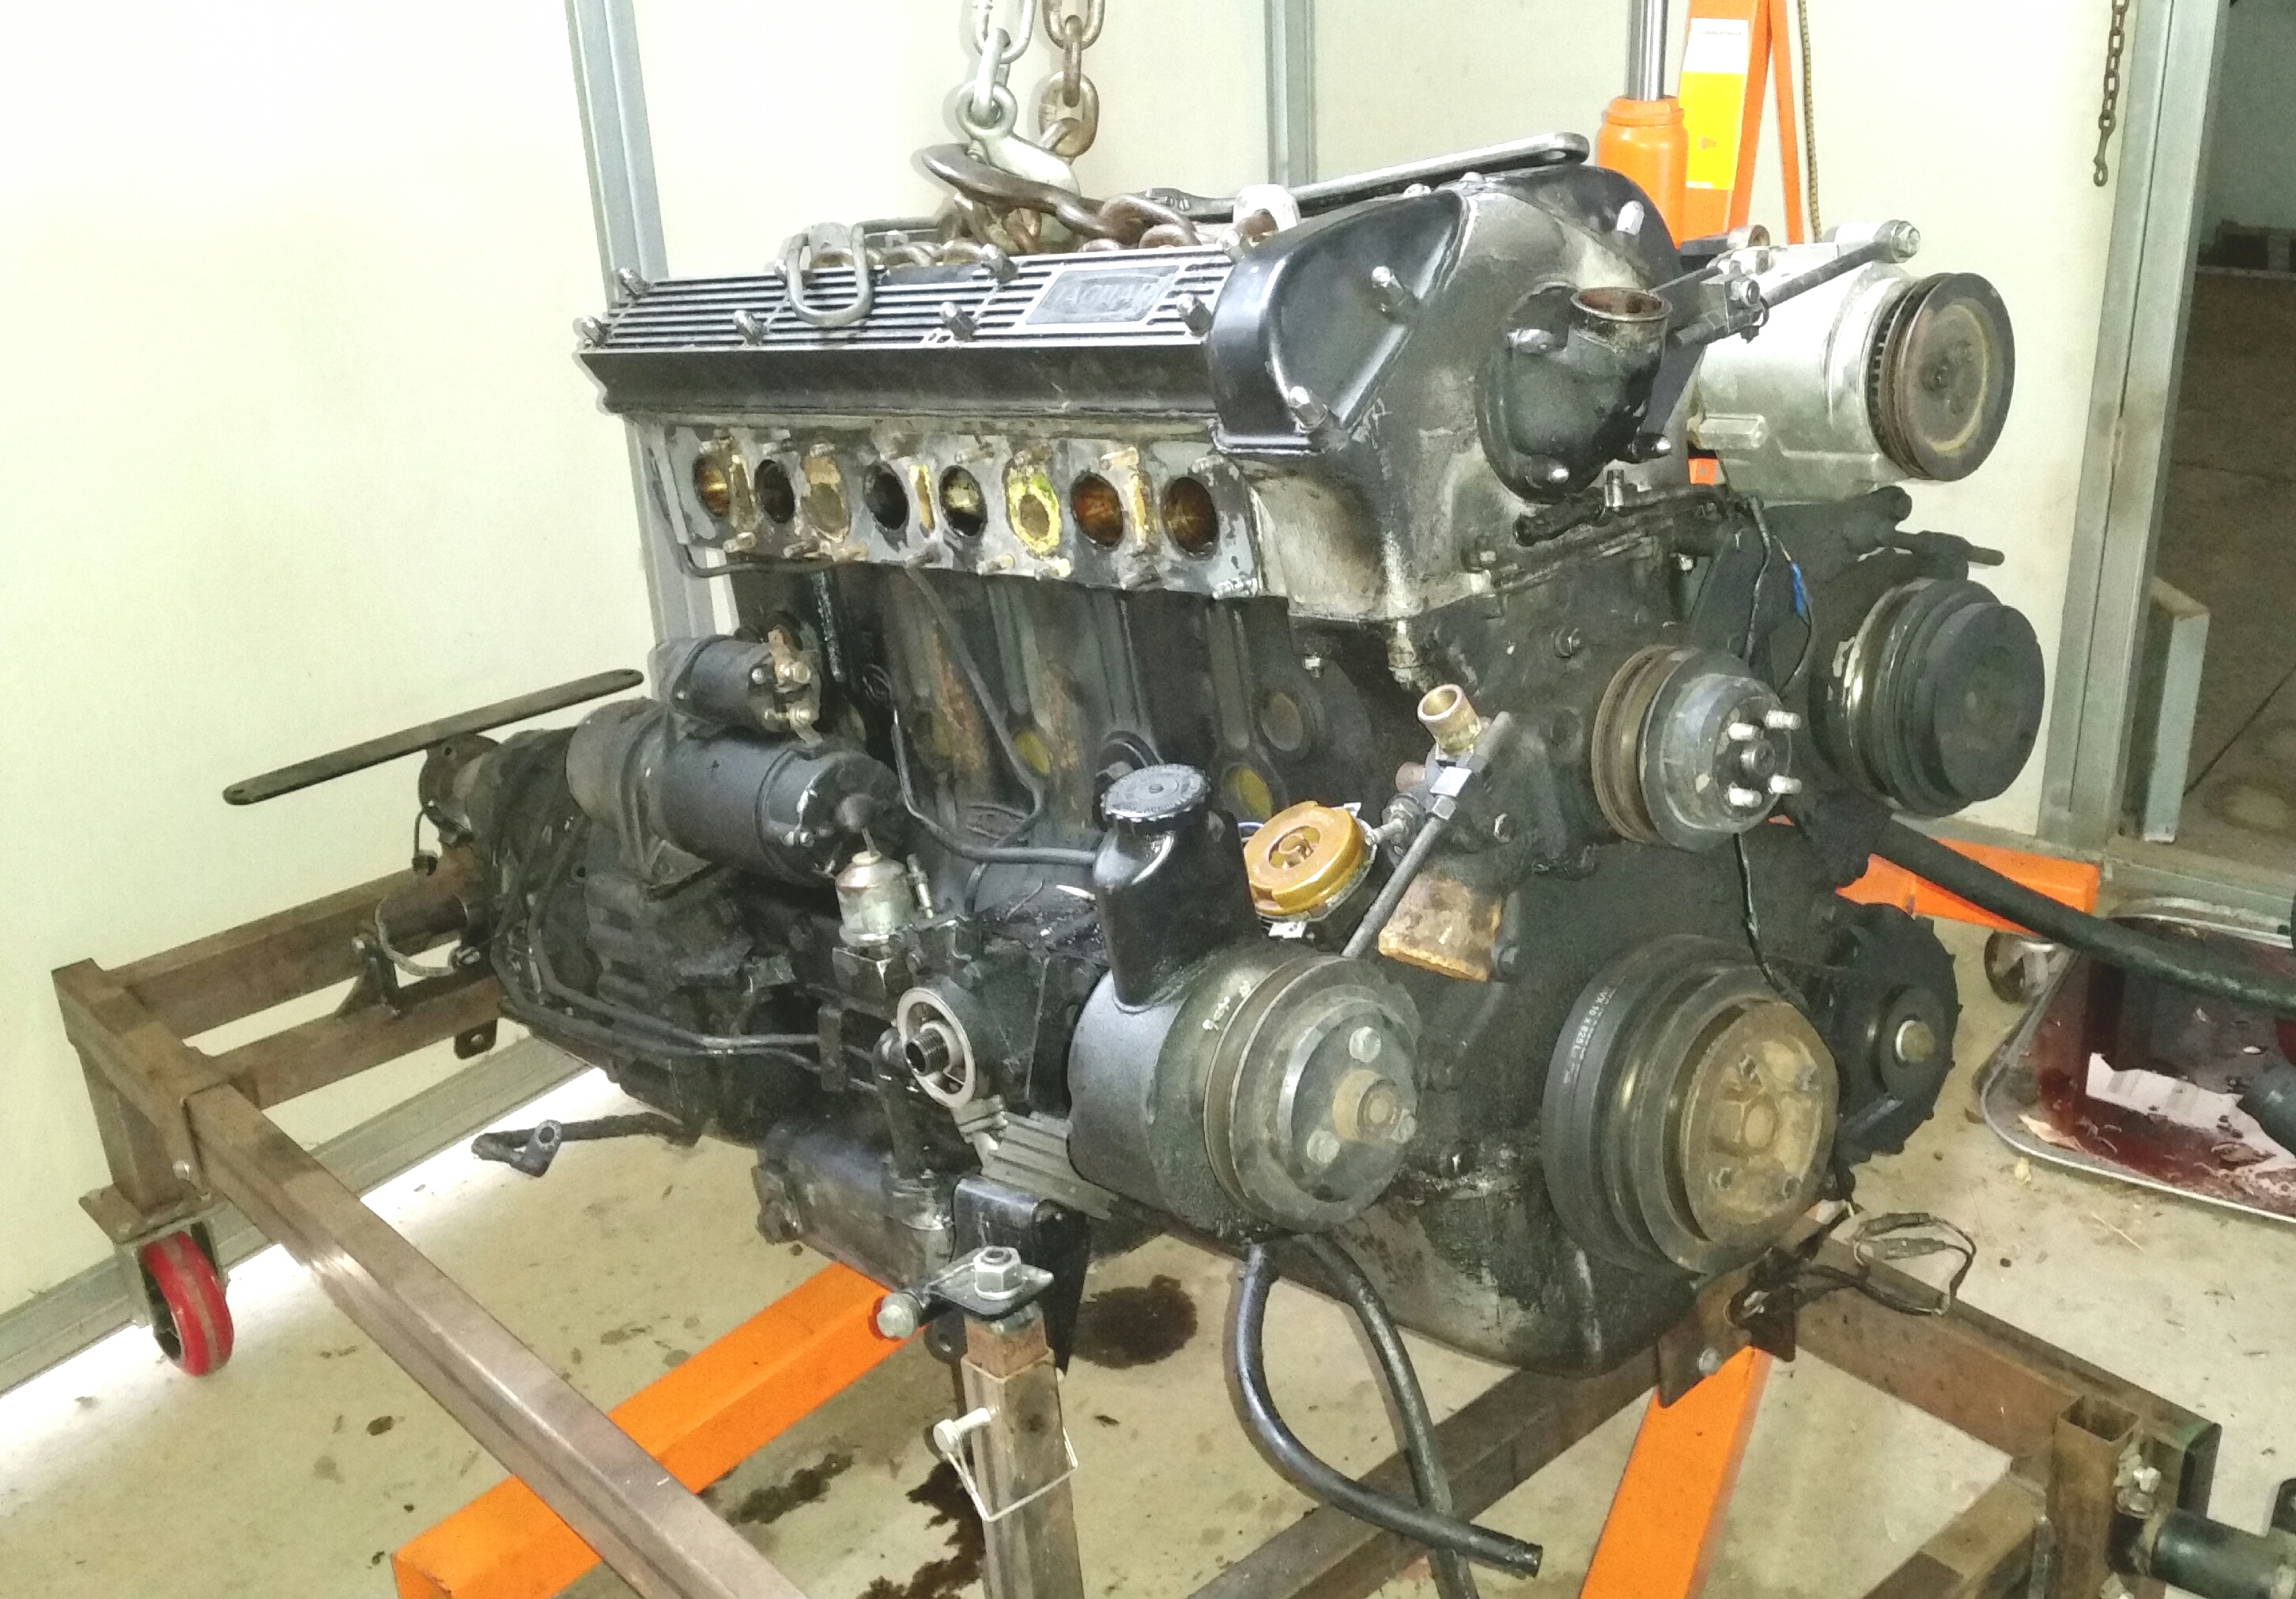
I considered leaving the intake manifold on until after I removed the engine from the car, but decided to remove it first for three reasons. Firstly, i wanted to reduce the lifting load before removing the engine and transmission together. Secondly, with the intake manifold in place the engine would tilt to that side making removal of the engine a little bit trickier (and it is already a challenge with all the hoses, wires etc). Thirdly, I was going to remove the intake manifold anyway and install the original one from my 1984 X6 Vanden Plas when I install the engine in that car because that intake manifold is still very nice looking from the restoration I did to it about 10 years ago. The intake manifold on my 1987 XJ6 parts car was in considerably worse shape with some rust and lots of greasy dirt.
Removing the intake manifold is a real PITA to be sure, especially some of the bottom nuts. But I was going to remove and replace it anyway, so I decided to remove it before I removed the engine. In this case the intake manifold separated very easily from the headso I was lucky there. I have had difficulty separating the intake manifolds from the heads before on other Series III XJ6 engines and had to resort to heavy pounding with a large mallet on a block of wood to tear the intake manifold gasket in the past. This one was very easy to separate from the head once I got all of the nuts removed.
BTW, I did remove the front bumper from the 1987 XJ6 parts car before I removed the engine and this made the lifting somewhat easier, but I still had to raise the engine/transmission pretty high because the transmission end hangs lower and I needed to get everything to clear the power steering rack and front subframe. I am still trying to decide whether or not to remove the front bumper from my 1984 XJ6 Vanden Plas when it is time to install this engine in it. I have some more time to think about that while I am working on the engine.
Hi Paul,
I’m new to the list and just found this thread…You are living my dream! I am hoping to find a clean, mechanically needy XJ6 this summer to work on. I will remember your removing the front wheels to reduce the lift height. -nice idea. I am wondering, were you able to detach the AC compressor and lay it to the side with hoses still connected? -to avoid having to recharge the system?
From your photos it looks like you have the same HF engine hoist as me. On mine, the 2000 lb rating is good for the lift arm fully retracted. It is derated for extended positions and good for 500lb at max extension. That would be a good reason to remove the bumper to get as close as possible to the load.
Anyway, this looks like a good meaty project, I will be following your progress!
Tony,
Thank you for the kind words. Since I do most of the work on my five Jaguars by myself I enjoy sharing what I do on Jag-Lovers where others understand what I am doing and can appreciate the complexity of this work.
My 1984 XJ6 Vanden Plas had a number of serious issues that needed my attention, but it had to wait while I restored the engine bay of my wife’s 1990 XJ-S convertible and my 1990 V12 Vanden Plas. With those projects complete it was time to get my 1984 XJ6 Vanden Plas back on the road again.
The air conditioning system in my 1984 XJ6 Vanden Plas worked great for many years but it stopped blowing cold air about the time that the very low oil pressure and head gasket issues happened. There was no refrigerant in the system anymore when I did a pressure check, so no freon was released when I disconnected the A/C hoses. I had to remove the A/C condensor and radiator to get the engine out the front. I suppose that a shop with an overhead crane might be able to lift the engine straight up and avoid breaking the A/C system fittings, but I can’t. So I removed the condensor, some of the A/C hoses, and the A/C compressor before removing the engine in my 1984 XJ6 Vanden Plas. The A/C system did not work, and there was no refrigerant in the A/C of my crash damaged 1987 XJ6 parts car when I purchased it in early 2018. I removed the condensor, and disconnected some of the A/C hoses, but I left the A/C compressor attached to engine until after I removed the engine from my 1987 XJ6 parts car. Since removing that engine I have removed the A/C compressor, cam covers, core plugs, air pump, power steering pump, and alternator for a thorough clean and inspection before reassembly and installation in my 1984 XJ6 Vanden Plas. I have a lot of engine work remaining, but I plan to install the engine all cleaned up and with all accessories attached, when it’s ready.
I think we might have similar but very different engine hoists. My hoist, Harbor Freight SKU #35915, has a 2 ton (4,000 lb) capacity. It sounds like your hoist has a 1 ton (2,000 lb) capacity. I used the 1 ton (2,000 lb) position of the arm on my engine hoist to lift the engines and transmissions safely out of both cars.
The AC in my car was working great circa 2001 when the catastrophe took place circa Stockton, CA. It sat in my garage few months before, I began it’s transformation. When I did the AC system had lost all it’s Freon???
As a part of the refurb, I had the condensor cleaned and bought a new dryer. for one reason or another, I’ve never charged it!!
My car was low enough with the wheels on for the DOHC to clear on the way out. I laid a mat on the bumper. It was close…
I am reasonably sure that the HF “cherry picker” used was the 2K version. It worked.
4… I note the “bridge” atop the beam on your 4K unit. And, it seems the hydraulic cylinder is taller.
Back in the day, we were lucky to have access to a “chain fall” aka “blocks and tackle”
when I did my 40’s project, I used a reinforced swing set and a hydraulic “come along”. Much less #'s !!!
Paul, Thanks for clarifying, mine looks identical (including the reinforcing strap atop the beam)but has stickers on the beam indicating 1Ton, 3/4, 1/2 and 1/4 ton. I will have to carefully estimate the weight of whatever I lift out of my future car. I bought the lift to change a clutch on a Subaru and it worked well for that. Also used it on my Jetta engine but the XJ engine may have to have the cylinder head removed to not exceed capacity.
Carl, I also used a swing set for my first car: a 948cc Morris Minor!
Carl,
When I removed and replaced the cylinder head gasket on my 1987 XJ6 Vanden Plas in early 2018 the A/C had also stopped blowing cold air. While I was doing the engine bay cleanup on that car I also removed all the old A/C system o-rings, lubricated the new ones and installed them. I also replaced the receiver drier with a new one. Most of the o-rings (about 8?) that I removed were old and broken, but the hoses appeared fine. The A/C had worked well in this car before, and I was hoping that I could get it working again without spending a fortune. As I worked on the rest of the engine bay I tightened up all the A/C system fittings and applied a vacuum to the A/C system with my vacuum pump to check if it would hold vacuum. It held about 29 inches of vacuum for about three weeks while I continued the rest of the engine bay cleanup and testing.
Once I got the car running again, and passed CA smog, I took the car into a local shop to get the refrigerant recharged. That was in July and when I spoke to the new owner of that car last week (6 months later), everything on the car was still working nicely including the A/C system which was still blowing cold.
My conclusion from this and similar A/C work I have done on my other Jaguars is: A/C system o-rings don’t last forever and some times all an inoperative A/C system needs are all new o-rings, a new receiver drier, and a refrigerant recharge. Having a vacuum pump to verify that the entire A/C system will hold vacuum for weeks at a time was helpful to me since I have been disappointed before after getting A/C systems profwssionally recharged only to have them stop blowing cold a few days later.
Maybe your A/C system can be put back in working order again?
I reached another milestone in my engine transplant project today. I am at the point where I have pretty much taken every thing apart that I planned to, and cleaned up the 1984 XJ6 Vanden Plas engine bay (except for the painting) as well as completing the removal of the engine accessories and cleaning up the engine and transmission. There is now light at the end of the tunnel! From here on out I will be adjusting things (valve clearances, transmission bands, etc) and installing all of new parts that keep arriving daily in preparation for installing the replacement engine. Most of the really grueling grimy work is done and the fun part of putting everything back together begins today.
I hope you enjoy the “before” and “after” pictures of this engine.
I used Simple Green, a lot of different kinds of brushes, and a lot of time to achieve this result. I took the “before” pictures on 15 January and the “after” pictures today. It is very helpful for me to have this engine test stand. It holds the engine safely at a convenient height and makes it very easy for me to move the engine around my garage.
This is the second time that I have done this kind of work and hopefully there will be no surprises as I put everything back together again and get my 1984 XJ6 Vanden Plas back on the road again.
Paul,
I agree that you should verify that the donor engine runs nicely in the current vehicle, including a compression check and a vacuum test, before you remove it. I made sure the donor engine started nicely, idled correctly cold and warmed up, and ran at temperature for a good while without any coolant leaks before I removed it from the donor car.
This is my second XJ6 engine transplant and this time I decided to leave a bread crum trail, like Hansel and Gretel, on Jag-Lovers for those looking to do an EFI 4.2L XK engine transplant themselves. The last one I did worked out very nicely and that gave me the courage to share the major milestones and some pictures publicly this time around. I hope that you find this thread helpful.
Paul,
I originally purchased my engine test stand to run the 3.4L XK engine from my 1957 MK VIII outside the car before I install it. The engine test stand has a mount for a radiator, a fuel tank, a battery tray, and an instrument panel to mount gages. I haven’t finished the work necessary to do that yet, but I hope to in the next year or two. In the meantime I used the engine test stand to help me with my two XJ6 engine transplant projects.
The MKVIII’s 3.4L carburetor fueled engine is very simple by comparison to the EFI 4.2L engine and I am pretty sure I can get everything on it to run the engine outside the car. I can see that it would be a much bigger challenge to run the EFI 4.2L engine outside the car. Good luck.
Paul,
I don’t see any reason why you can’t get the XJ6 4.2L EFI XK engine to run on an engine test stand but it seems to be an unnecessary step to me, unless your goal was just to prove that you could do it.
If want to make sure it works properly before you move it over to your hot rod, then get it to run properly in the donor and then move everything over from the XJ6 to the hot rod. In my opinion getting it to run on the engine test stand is an unnecessary step that will be a lot of extra work. What do you hope to achieve by getting the engine to run on the test stand that you can’t achieve in the donor car?
Some time back, a guy bought an engine from David Boger and installed it in a scratch built estate wagon, early style, wood. Folks here coached him in getting the DOHC to run well. But, carb or EFI, I do not recall.
The EFI pump, a Bosch, in the FI Jaguars is capable of 100 PSI ! Then regulated to35? Mine feeds my LT1 perfectly.
Tis said that an LT1 can be fired, on the ground. It’s PCM has many wires, but short ones!!! Housed in the engine bay. Not in the cabin or boot…
When I built my roadster, I fired the flat head V8 on the ground. Then cleane dit up and added the alloy heads, carbs and a better distributor and Oh I cheated, an alternator.
One of you hardest task will be extracting that very long harness that leads from the boot to the engine bay!!!
Looking forward to the adventure: in all my years, this is only the second time I’ve transplanted an EFI engine into a project car: I have zero doubt the collective, here, will be of great value to me!
To that end: I’ve have no issue cutting the harness in such a way that I don’t have to take out the seats and interior…questions:
–Are impedances of the long wires important to the operation of the EFI?