Many thanks Dick, I looked for years for this information, nothing like an advise from the expert ![]() I now see it is feasible , I will do that after my next job, carburetor servicing .
I now see it is feasible , I will do that after my next job, carburetor servicing .
A big thank you again !
Rui
Many thanks Dick, I looked for years for this information, nothing like an advise from the expert ![]() I now see it is feasible , I will do that after my next job, carburetor servicing .
I now see it is feasible , I will do that after my next job, carburetor servicing .
A big thank you again !
Rui
a “top tip” to get the ball and spring back, which would be almost impossible from below without knowing.
“overcrank” the lever just past its “maximum” position, and this will leave a tiny space to push the ball and spring back up into place, then relax the pressure on the lever and it will slip over the ball. I just used a medium shifting spanner
take digipics of the pipes, as one goes to nowhere (its an oil sprayer)
Hi Guys
Some really useful info there.
I still have a problem though.
Do Series 2 E Types have the same access plate on the tuunel to get to the gear selector?
I have looked and felt underneath with my fingers but cannot find any seams or screws to indicate the access panel.
Was this something they added for Series 3???
Nick
Many thanks Tony. Kind of anguishing - Will something go wrong and the transmission will have to come out. This is why I have been procrastinating for so long, I have no pit or lift (low garage ceiling).
I had a similar issue when putting back the pin for fixing the hand cable after rebuilding the IRS, there is no space but eventually I devised a way.
Do you happen to have any photos you could share or send by mail? That would help a lot.
I also found it impossible to have a workshop manual for the BW12 , which is quite odd considering how spread its use was.
Rui
Don’t know if this will help or hurt, but here is an entirely different perspective of the opening. Note how it is tucked into the “turn” of the transmission tunnel where the bell housing would sit. I spent the last 2-3 days with a heat gun, scraper, and carb/brake cleaner trying to get the underside of my transmission tunnel clean enough to accept the DEI self-adhesive heat shield material
The removable panel is in the lower right corner of the photo. There are 4-6 small bolts/screws around the periphery of the rectangular opening - you may have better success feeling for the head of them vice the seam of the cover (IIFC it is recessed into the outer face the transmission tunnel).
Thanks, from the interior, opening the inspection trap is quite straightforward, if one looks iside at the level of the shaft .
You can do this job on jackstands…but it isnt very nice
Are you able to drop the trans pan without disconnecting any exhaust parts ?
There is excellent information regarding the BW12 in the relevant Jaguar Parts and Service Manuals
The relevant parts that you are working on are the same as BW8 (and Ford FMX)
I looked in my XJ manuals
I took many pictures of my BW8 strip down, including changing that seal out
I can post some more pics if you want, but its surprisingly straightforward following the instructions I gave
You must 1st find out if there is an access panel to allow the ~4" clearance to remove the selector shaft
This job is in everyones future that has a BW8 or 12, (any auto trans)
You will be fortunate not to be charged by a workshop for a pan gasket job, when this little seal is the culprit
It can? Don’t think so plus it needs to go in from the outside. With access hatch it should be no problem, although not fun at all!
Nothing critical can go so wrong that the transmission has to come out. The one difficult bit can be getting the detent ball back in.
The BW12 section of the XJ manual is comprehensive.
Thank you @awg Tony.
Removing the exhaust is the very least, I think by now I have done it over 10 times, 5 min and it is out . There is also the inspection hatch, see photo above on the thread, so the shaft should come out without problems.
Now the difficult bits: The layout (so the procedure for taking out) of the valve block on the 8 model is different from the 12th. On the E-Type workshop manual, there are detailed instructions on the different elements but no allusion on how to take them apart ! The valve block instructions are for disassembling, tearing it up but not for removing it as a whole. That would be a catastrophe would iIdo it upside down
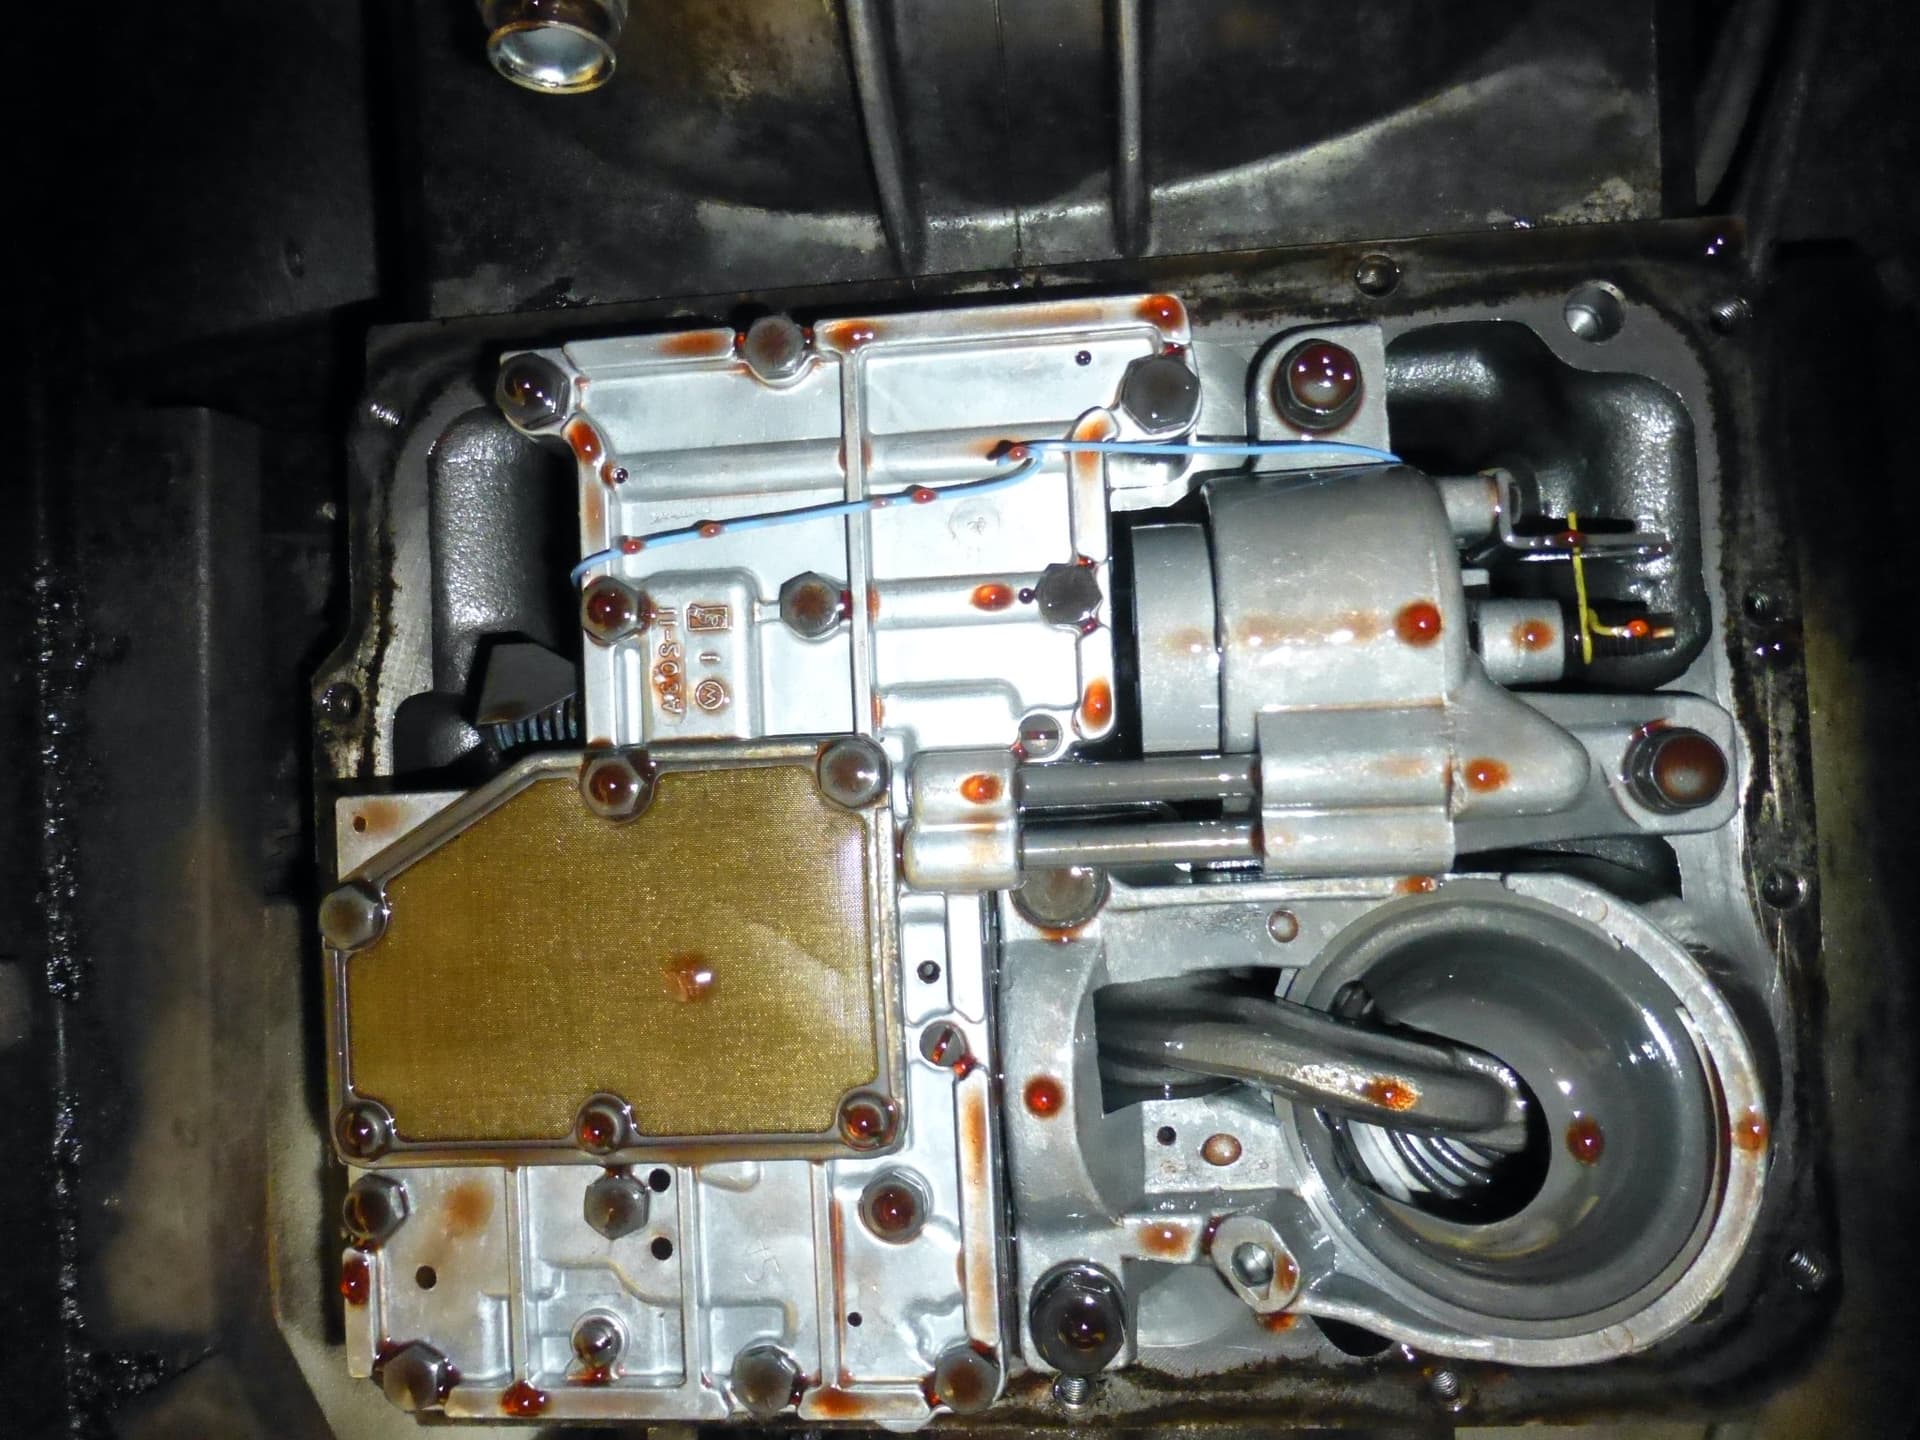
(1) Which bolts on the first picture would allow me to remove the valve box keeping it as an united part ? Far form clear …
(2) it seems difficult to take out the valve block without the part it is connected to by two pipes. Would that be possible ?
(@Dick_Maury Dick, I am sure you best placed for 1 and 2, I just see myself unbolting a few bolts and parts falling on the floor with me having no clue where they came from - I worked on manual transmissions but never on automatic onez )
(3) if the valve block can be removed easily then i see what you mean , in photo (2)
Thank you again, In can you could post a few photos that would help a lot, or send them to rui.m.a.meneses@gmail.com, much appreciated , or photos of the related pages on the XJ manual, I only have the Series 3 XJ workshop manual and it is a GM box .
Rui
Valve block : which bolts for removal and not dismantling not clear
If I remember correctly, the top three bolts and the bottom three bolts on the valve body. As far as the two pipes, you loosen the two bolts holding the servo in place. Do not take them out!, just rather loose so that you can tilt it enough to take the valve body down and out.
No pics of BW12 valve body removal in the XJ early manual either, but is says exactly what Dick said, loosen the servo bolts and take out 6 bolts that hold the valve body
It should be possible to loosen of the one you believe are the 6 and see if the valve body has any movement. I advise sequential digipics and vids
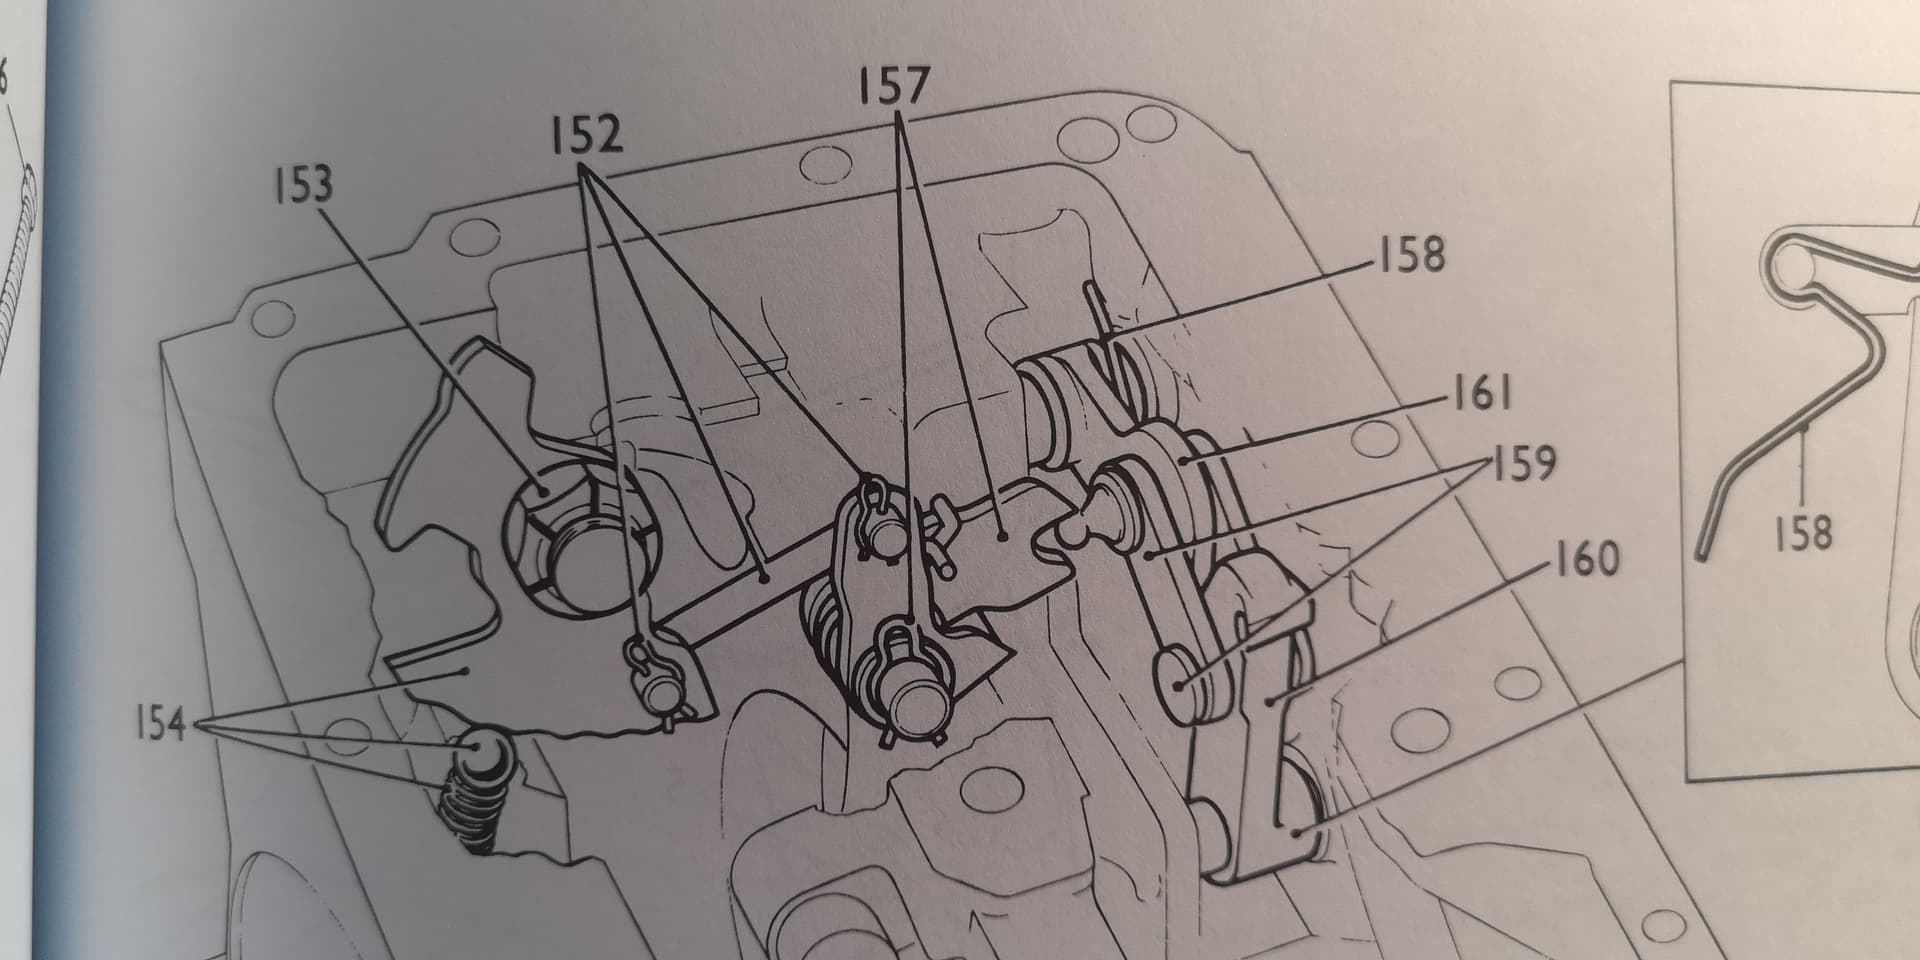
Once the valve body is down, you will be able to see the parts 153-4
That is time to check and see what I said about moving the lever (or 7/8" nut) to take it past the furthest stop which allows the spring and ball to come out & in easily
Once you are sure on that step, its just a matter of talking it apart, replacing the seal and putting it back together
I am 99% sure I used a Ford FMX seal, just took it to the auto trans rebuilder down the road from me, it was only a few $
I dont think you need a magnet on stick to get the spring and ball back in
I have seen where someone made dummy shafts, but I dont think you need them, so long as you can get the ball and spring the way I said…if you cant, you would need dummy shafts
There is no way that I know you can push the shaft back in while the ball & spring is “retained”, so make sure my idea works for your trans before removing the selector shaft
Hi All,
I’m following this thread with interest as I have noticed a few spots of transmission fluid on my garage floor and a need to top up the fluid.
I’ve not been under the car yet to determine where its coming from, however it closest to the RH, UK driver’s side.
In respect to the parts Dick & Tony are referring to once the valve body has been removed, check out item number: 223688791821 on UK Ebay - the vendor has pictures listed with the sump & valve body removed and you can see the nut, notched plate etc. exposed.
I hope this helps.
Andrew
73 OTS
Kent, UK
Greetings All,
Reading this thread makes me think how fortunate we are to have experts, in this case Tony and Dick, who are willing to share their hard earned knowledge about these cars! My thanks go out to all of you!
Cheers,
LLynn
Thank you again @awg Tony and @Dick_Maury, indeed the 6 bolts keeping the valve block in place are the ones you indicating, as comparing my gearbox (left) with the picture of a rebuilt one on eBay (right) shows.
Interesting to see that even if they look identical the valve block differs, see left side ![]() :
:
Even more intriguing, I found this one also on eBay, adverted as model 12 for a XKE and there are significant differences, here it seems that the shifting shaft can only be removed form the interior and many of the components seem different, although similar, with a valve box with a different shape ![]()
Tony, how would the dummy shaft work ? Also, is there no gasket between the valve block and the case, how is the oil flow continuity between the valve block and case ensured, only metal-to-metal contact ?
Thank you again ! I’m almost there, under a theoretical viewpoint . In practice i maybe turning the car upside down to fit the detaining spring and ball ![]()
Rui
Many cars used the Type 12, but, I believe only Jaguar\Daimler used the solenoid electrical kickdown mechanism, the others used mechanical means. Also, while both the XJ6 and XJ12\S3 E used the Type 12, I believe there were internal differences to cope with the extra torque of the V12. AKAIK, the 6 cyl E Types used the Type 8. If your 'box is leaking out the RHS, it will probably be either the pan gasket or the connector for the kickdown solenoid; I don’t think there’s anything else on that side.
Kevin, thanks, so there were variants of the BW12, good to know. Will you read carefully the thread you will see that it is the o-ring on the shifter shaft. I fixed the other two leaks, years ago, the kick down seal was tricky already - reported in a post of mine a few years back ![]()
Sorry, that response was for anrdrewkowalyk.
Andrew, in addition to what Kevin said, check first sump flange for high spots when replacing gasket, flatten out carefully if needed, put everything back but don’t overtight bolts, clean everything and put some paper under the kickdown plug and selector shaft to see where the leaks come from - wait a good week.
Only metal to metal, slight leakage is not a concern as it just drips into the pan. Slight losses don‘t affect operation.
Thank you again ! I’m almost there, under a theoretical viewpoint . In practice i maybe turning the car upside down to fit the detaining spring and ball
I thought it would be easier upright once I dropped the ball and it fell into the gears. Had a hard time shaking it out!
I either used a little metal tube or a steel ruler with a hole in it to push the ball in during assembly. Took a moment to figure out but then it was alright.
I did not see it in action, but photos it was a home made set, for a few trans, allegedly made by a pro, but I couldnt understand how or why they were needed, other than to say i assume the slip through from the inside, thereby holding all other parts in place.
They appeared to be cut off original selector shafts
The selector shaft seal is a lip seal, not an o-ring
Its fairly important to use an inch pound torque wrench to re-seat the valve body bolts if you have one, otherwise nip them up carefully, as it can leak internally, meaning your car will lack traction due to low pressure
The BW12 would have slightly different internals, especially for the V12 variant
(The BW8 had 3 different valve body part numbers for MKX/420G, I recently have got my non-kickdown problem seemingly solved after 20yrs, thanks to a tip from this this list)