From the beginng date I had my car I always lubricated the
rubbber guydes for the windows with silicone and had no problems.
WalterFrom the beginng date I had my car I always lubricated the
rubbber guydes for the windows with silicone and had no problems.
WalterThanks, Walter, I will be relubricating the channels as part of this round of fixing this window and the door locks which all need lubrication.
David
I’ll try the pencil eraser on the next one.
David
David, cleaning should do. If you do want to add relays, you need two per window and both need to switch; it is a little counter intuitive. Was it Aristides who made that nice, small PCB?
You know that you will be well off taking pictures, but do take a few more.
As I said cleaning should do, but greasing linkages and lubricating the channels will help operation. Don’t forget to free the drains in the bottom of the door if needed.
I hope and am certain that cleaning the switches will help. A break in or near the motor shouldn’t be too likely…
David
Yes, that is a neat trick!
In theory you could clean them in situ without disconnecting them, just lift them from the console and pop out the rocker. Be very careful not to loose any parts.
Yes it was me, and I also put them under the center console.
The A pillars are very convenient for the front windows, but will need two feed lines from the battery, and will still need to figure out the rear windows…
The ideal would be to bring the battery feed cables and relays inside the doors, but it’s waaay complicado.
I have chosen the center console as the best compromise, between the amount of work involved and functionality. One feed line to the relays and then tap into the existing circuit. Works very well.
Even installed a 20sec delay relay, so one can work the windows for 20sec after you turn the ignition switch off. My Range Rover has this feature and I like it a lot.
XJ Windows Relays upgrade.pdf (94.6 KB)
Thank you, Aristides. The S3 window switches not only have physically different pins that attach to the harness via a plug but use different pinouts to operate the windows than my S2 switches. This caused me a lot of confusion last night working out how I would install relays if I end up doing that. I think I have that resolved now but I am a bit surprised that you say you use 8 DPDT relays when I think 8 SPDT would do it and that is what is shown on the SKJagtech schematic. May I send you my drawings for you to review?
Also, with regards using a pencil end eraser for the switch contact cleaning. I suspect there must be a difference in the layout of the contacts in an S3 switch too because in the S2 switch there are only 2 contacts that seem accessible by the pencil end. They lie in the bottom of the switch, flush with the casing and are marked A on the pictures. The other four are upright and can be seen (and I have cleaned them with strips of sandpaper and cotton buds) via the holes in the sides of the casing. They are marked B on the pictures.
You‘ll need 2 relays per window; one grounds while the other powers and vice versa. As I said before it is a little counterintuitive…
Keep in mind that at rest, both leads are positive. To run the motor, you will need to unpower and ground one lead. To run it the other way, you need to do the same to the other lead!
Hence I have four DPDT for two windows and a big fuse in line.
For the A pillars power would be easy to find, maybe even at the firewall posts, with a fuse of course; and the rear windows could still be wired under the armrest? I‘d like that.
David
Here’s my thoughts on relay wiring my S2. One of these sets per window. Physical location to be determined. Please correct as needed.
David
Not familiar with the SII setup, but if the existing switches do the same as with what you show in your diagram then this will work.
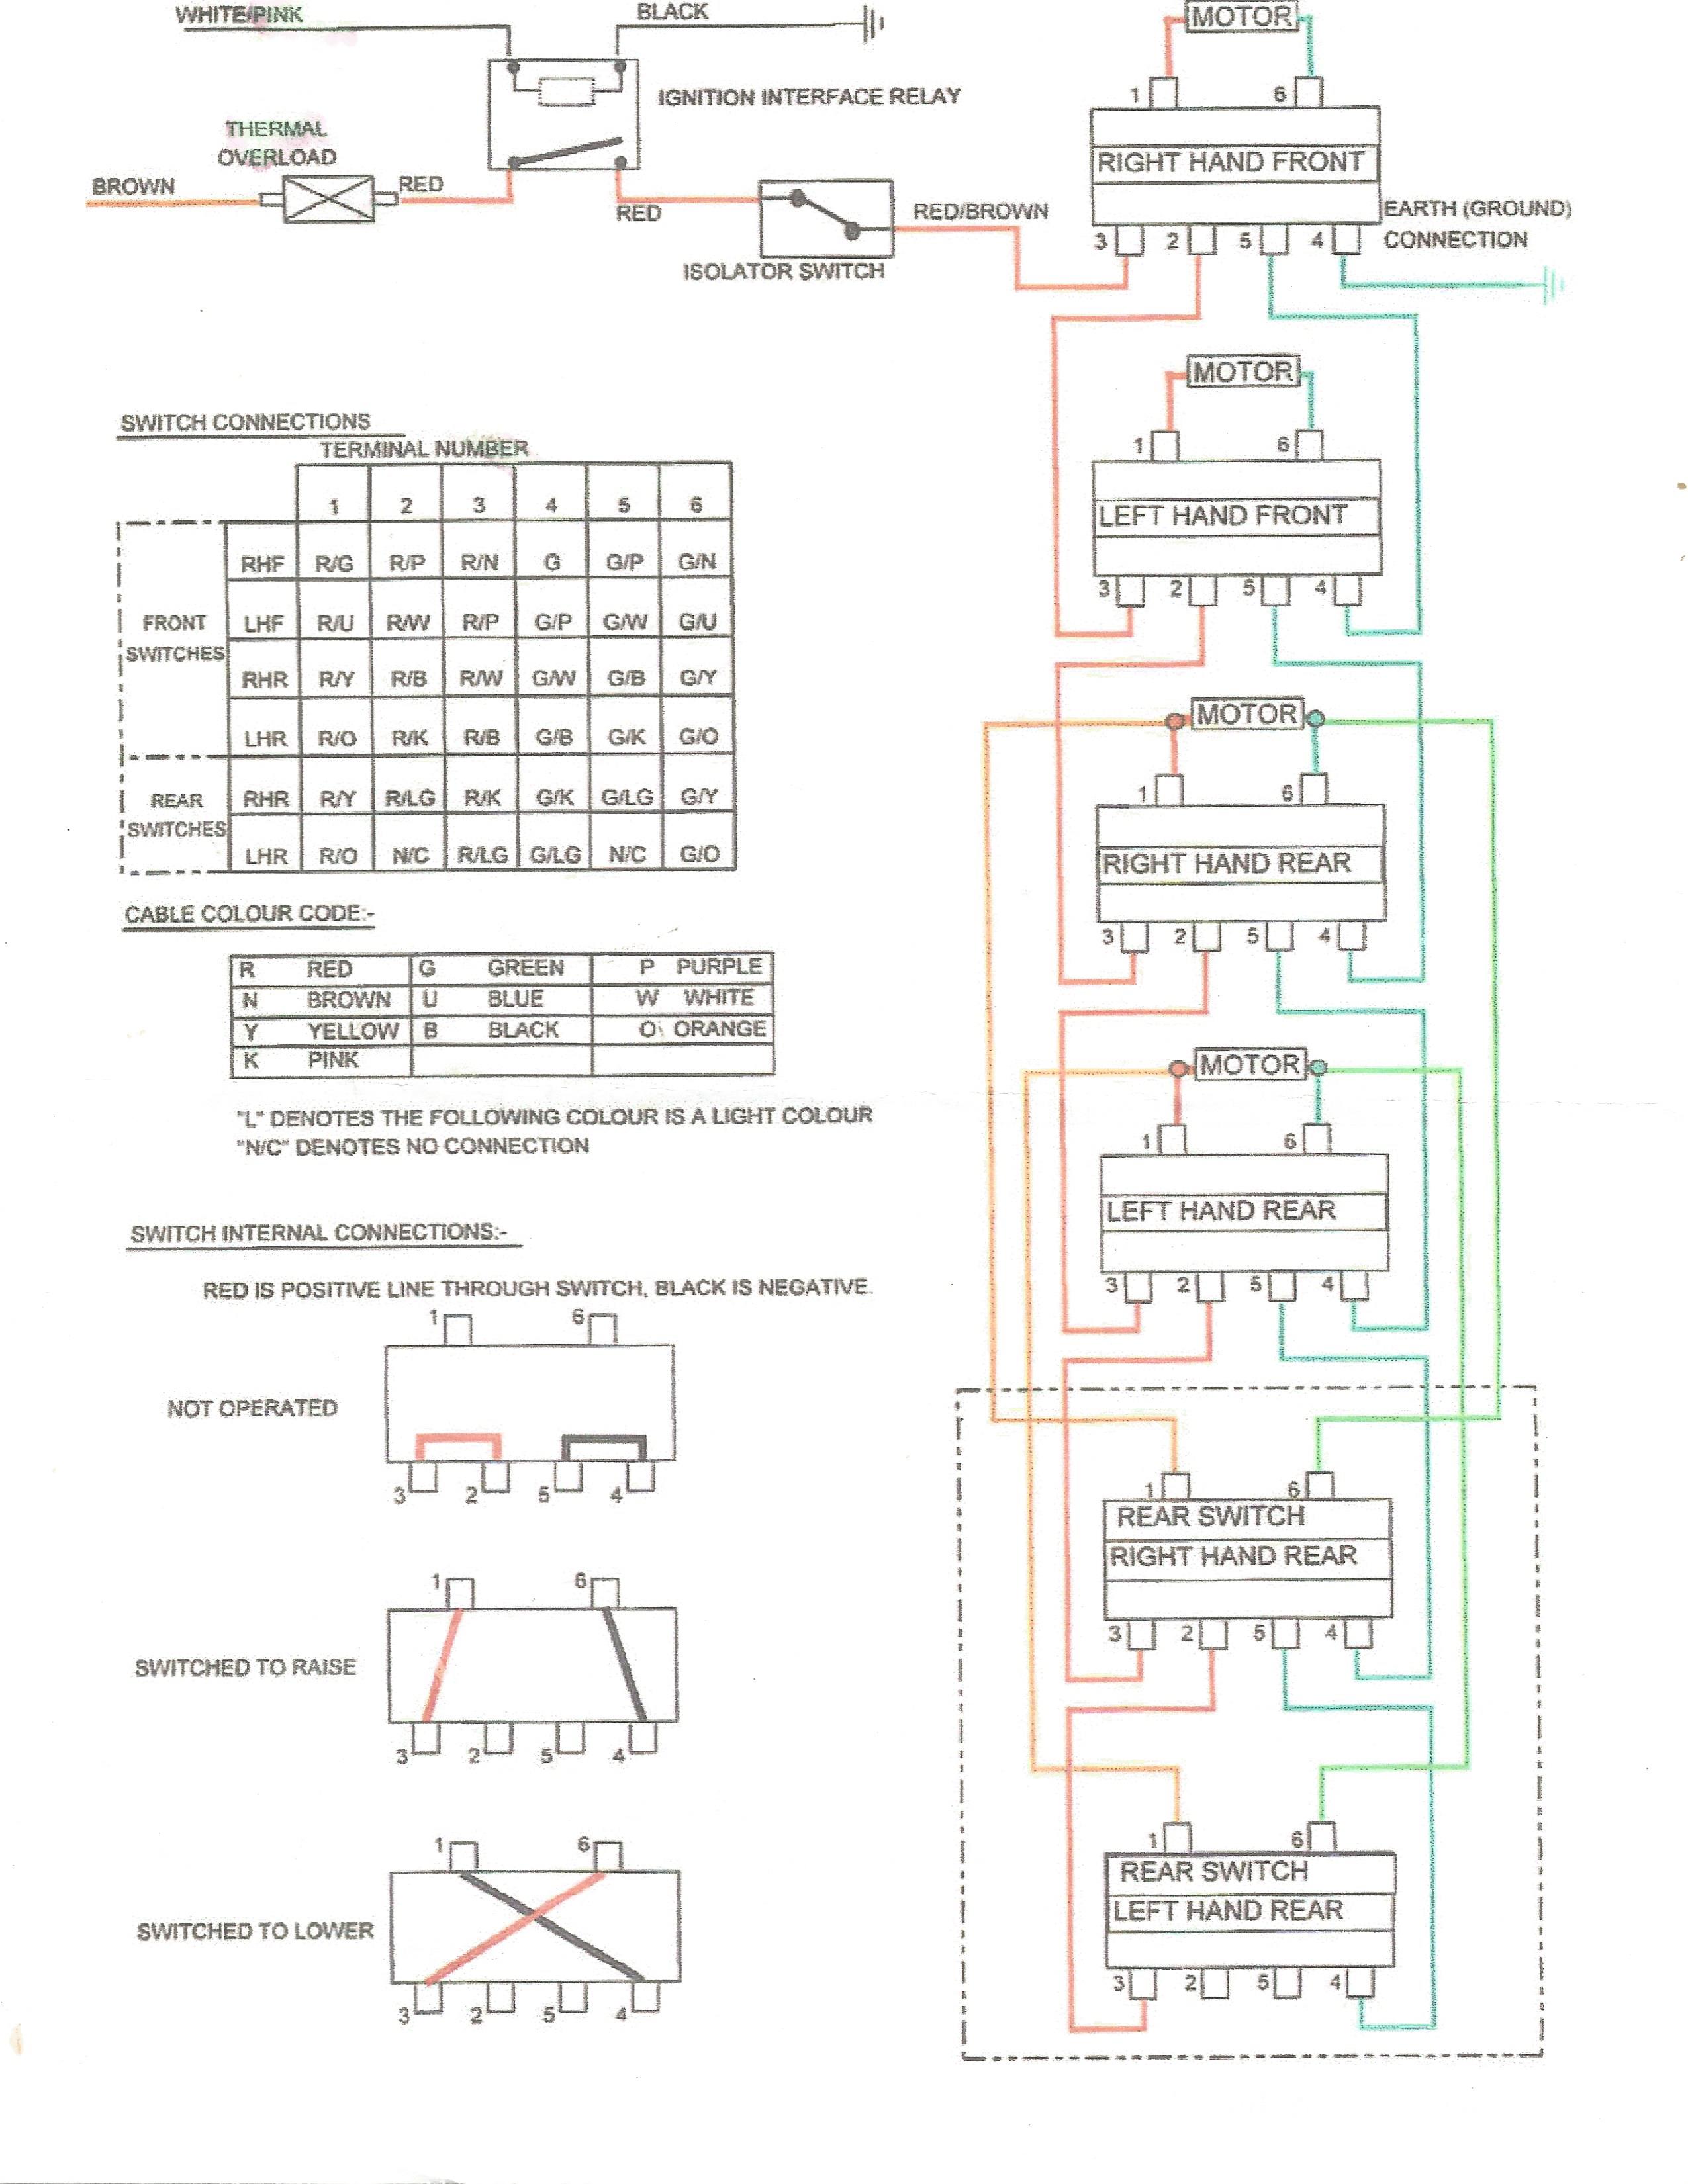
Thanks, Aristides. I can no longer find the soft copy or source for this diagram so I have scanned my printed copy. It is the wiring for S2 power windows and I know it’s correct because I used it to reinstall all the switches once.
David
That isolates the motor when not in use, but your diagram looks solid nevertheless. You can use that.
David,
My, what an interesting way to power the electric window motors. 
If I am reading your diagram correctly, in order to power the left rear window motor using the front switch for the left rear window the power needs to travel through the right front switch, then the left front switch, then the right rear switch, then the left rear switch in order to reach the motor. It is even worse if you want to use the rear switch for the left rear window. Resistence at each switch will reduce the voltage at the window motor.
Based on this info I recommend that you remove and clean all four of the window switches in that path. If it was me, I would remove and clean all six window switches and then expect everything to work fine for the next 40+ years. 
Paul
David,
the pic you posted @29 is the same as I linked @3 and it is courtesy of Dave Collishaw and used to be available on the old site under http://www.jag-lovers.org/include/iv3.php3?zx=SdADygsIiM8ED8ZK%2FZfkxwTLEASfnM8Kzwc41s2j3L1HN6OXvET8PwvO2gpCvAwPi5jc98kfRd3dxDz4QPvS1Qw3CUz81dj998kfQdTHBkW8CxTZ1PdC9kwzx9j5OvxL%2FNbOBvj6REHTo80z0A7%2ByJ3OBMdJBpyezwsREgeXmMkKyFEEmZbGAskLL4ih
Good luck
Jochen
75 XJ6L 4.2 auto (UK spec)
Sorry, Jochen. I didn’t spot that link when you first posted. Thanks for identifying the source.
David
Don’t worry - I’m just happy you saved it as the original link to the full pic seems to be broken and the wiring pattern as illustrated by Dave is so much more intuitive than the original wiring pattern!
The sketch is safe, at any rate - now you just need to make voltage take these paths!
Good luck
Jochen
75 XJ6L 4.2 auto (UK spec)
Counterintuitive, but your problem with your Rear LH window seems to be at the Rear RH switch that fails to power the Rear LH switch.
According to this diagram, very different from the SIII setup, the Rear LH window motor has to pass from all four switches… last on the line indeed, and must be the slowest of all.
Also I see that you can’t operate two windows at the same time, is this correct?
If I was to put relays, I would do the following modifications:
Connect Terminal 3 in all four switches in the center console in parallel from the original power source via the Isolator switch. Like this all the switches in the front console will have constant power.
Connect Terminal 2 of Front console Left switch to Terminal 3 in Rear console Left switch, and the same for the Right side. This will deactivate the Rear console switches when the Front ones are in use
Then connect Terminals 1 to +V ‘UP’ Relay and Terminals 6 to +V ‘DOWN’ Relay.
Relay -V permanently to ground.
I think this would work.
You should also somehow retain the circuit thermal breakers. Either add new or rewire the old ones to your new supply line from the battery.
**
That’s right, Aristides…
The one thermal fuse had limited capacity - allowing, or forcing, the series connection of motors. The S3 has two fuses, permitting parallel connections…
Frank
xj6 85 Sov Europe (UK/NZ)
**
That is correct. When one window is in motion on my car, none of the others will move.
Thank you for the suggested changes too, Aristides.
David
Aristides, I have a couple of questions on this, please?
I see that this will give all the centre console switches power without any losses as the power passes down the line of switches but does it also mean two or more windows can be operated simultaneously and might that be too much for the thermal breaker?
Shouldn’t it be Terminal 6 that connects to the +V ‘DOWN’ relay?
Thanks again.
David