Hardtop alignment and fit

I picked up what I believe to be an original S1 hardtop, though not original to my car last year. Guy had it sitting in storage, but did not know much about it. The fiberglass was nice, but no window and the interior was all coming off the edges. I put in rubber, a plexi window, and re-attached all the interior. Need to paint the fabric at some point, but that’s another project.

Getting prepared for the winter, I’m finally trying to attach it to the car. The front brackets all land and latch well, but having trouble with the rear brackets.

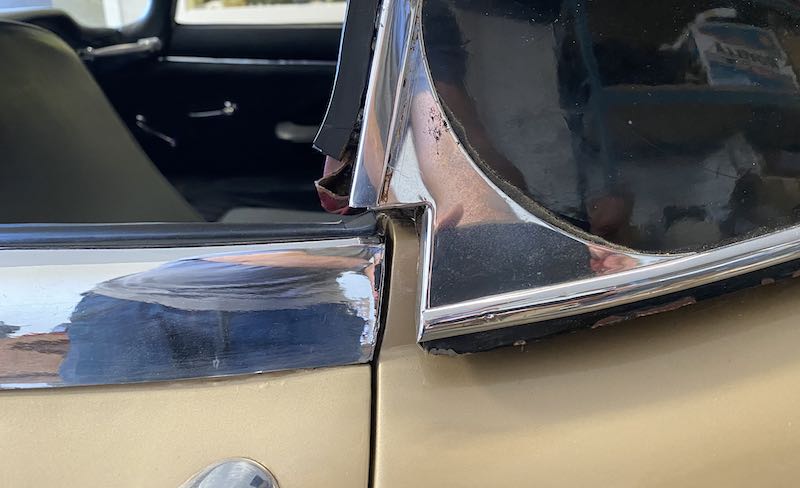
I had to sand a bit off the back right side of the top to make it possible to attach, but the back left was already curved out and sits a bit higher. With the rubber on there’s no noticeable difference, but I’ve attached pictures without the rubber for reference. The left sides with the brackets unattached – the gap closes when I push the top down to get the brackets aligned.

I had to mill the holes on the left bracket attached to the top vertically about 1/8" to get that side to attach.

Besides having to do that milling, here are my problems:

First, there is a gap between the top and the back of the windows that can be seed in the pictures. Is that expected?

Second, I removed the lower screws on the bracket that attaches to the hardtop to align/attach everything. The left side will accept the lower screw but it does not have the small screw attached from behind. On the right side, you can see from the fabric that the bracket is angled versus where it was previously attached, so the lower screw won’t fit unless I mill it. It appears the reason the bracket attached to the car is pushed forward is because of the small screw attached from behind.

So as to the small screws/machined holes…

Am I supposed to use a screw on the top right from behind? For the machined hole on the bottom left, what’s that used for? The brackets that attach to the car came with the top, which came with a nipple piece screwed into it, but it doesn’t appear to serve a useful purpose.

pin

Could this be a top from a series 3 car (which I now are longer) – not sure if there’s a way to tell/measure the difference.

Or is this just a pain everyone goes through marrying the top to the car?

That gap appears excessive. On my car the chrome trim closely aligns with the wing shut face.

The upper screw is meant to position the chromed receiver bracket to effect a close alignment of the hardtop. It seems to me an indication that the hardtop itself is a bit too far back. The overhang you have over the windscreen is not as great as mine, which could indicate the need to shim back the three clasps up front, but you ultimately need the hardtop to achieve a good fit with the door windows, such that you can open and close the doors with the windows rolled up and have a close fit with the cantrail seals. In my case the rearmost edges of the windows just barely clear the chrome. That lower nipple is a fixing point for the convertible top boot (which, incidentally, must be removed before the hardtop can be fitted).

This is a video I posted some years ago. A view of how the hardtop should fit begins around 1:20.

Your hardtop appears to be an original S1 item. Definitely not from a Series 3.

Here’s a shot of my gap, pay no mind to the black tape protecting the paint. It appears to be just a bit smaller than yours.

My rear brackets are installed different than yours. Basically reversed so the fold is parallel to the top. I’ve no idea if it’s correct but it might be why yours appears different. I rather doubt it though. You’re constrained by the locating pins on the front catches. I suppose you could try shimming those catches out which would have the effect of nudging the shell forward. You could maybe gain 3/16" or something that way.

1 Like

Sorry, convertible top “boot”? Are you saying I need to remove my convertible top before putting the hardtop on? I didn’t touch the convertible top, it seemed to fit fine over it. Could that be my problem though?

I’m having trouble visualizing what you both mean by shims in the catches? Failing to see how that could help while keeping the pins in the holes.

If you shim the catches back with washers or something like that (behind them), then the catches are the same relative to the pin sockets, but the shell will be shifted forward relative to the car. I’m not sure how much you could shim it before it started to look odd.

Edit: you’re also constrained by the window since it doesn’t have adjustable segments as the soft top frame does. So I’d do my experimenting the the glass rased.

Sometimes referred to as the hood envelope, here is one that happens to be on eBay:(no affiliation): NEW JAGUAR XKE ETYPE SERIES 1 ROADSTER BOOT COVER BLACK CANVAS | eBay
The lift the dot nipple on the hardtop bracket secures this envelope at the side when the soft top is stowed, and the hardtop absent.

Erica, interesting that your brackets are backwards from mine. Hopefully that’s not causing a difference, but if others have it that way, it would be good to know.

Sounds like I can ignore the nipples since I don’t have one of those hood envelopes.

The front looks pretty good when looking at the windshield. It could certainly look odd if I push it forward, but it’s worth a shot.

Sounds like I’m the only one who had to mill out that bracket. Given the different fit on the left and ride side in the back, it’s possible the previous owner had something less straight on their car overall, so maybe that’s part of my problem…

Yes, and it’s completely non obvious. There is a small threaded hole (8-32 I think) behind the rear car side hardtop bracket. It’s on the reverse face of the top knuckle. I found a matching hole behind the top end of the vertical rubber door seal.

By adjusting these two screws you set an in/out position for the rear quarters of the top shell, once the shell has be tightened to the brackets using the the big conical bolts. This prevents the inside surface of the hardtop from totally destroying the outer body paint.

Mine was very tight in back. There was no room to even install a seal as it sat right on the paint. Rather than elongate the holes, I simply sanded the rear lip until it fit with a perfectly even gap. Either way could work, or both could work, dealer’s choice.

I sanded a tiny bit, but in the center, the fabric is pretty much up to the edge and if it weren’t for the weatherstrip on the bottom, it would be touching the deck before anything else.

Oh what fun…

I noticed the middle clasp pin was actually slightly setback from the hole, so I machined some shims for the left and ride clasps this morning.

Added 3/32" shims to the left side and got the gap (pictured) down to 3/16".

Added 1/4" to the right side, but the gap is still 3/8" on that side. Then I found this:

I’m guessing that missing screw will give me the difference. :grinning:

Erica, how large is your gap? I measured hardtop to door sill.

Your right side looks like mine does. Definitely you need that screw in the cap or that zinc pot metal screen cap will crack from the pressure. One warning I forgot to mention, as you tighten the side clamps, stand outside the car and watch that the leading lip of the top doesn’t come down so far that it makes contact with the the screen cap. If it does, that thin fiberglass will split. The rubber seal needs to be thick enough so that the clamps are under tension but at the same time the fiberglass is supported above the metal cap.

Sorry, do you mean your left side looks like mine does? The picture I posted tonight was my left side.

By the screen cap, do you mean the chrome on top of the windshield? Do you mean the fiberglass on the hardtop?

Also, anyone happen to have a part # for the rubber across the front? Mine appears to be coming apart unless someone tried to glue another layer for a foot or two on one end.

Can only find rubber for the window and bottom edge against the body, but parts book/sites don’t show rubber for the front of the top.

Sorry yes left, and both are the same. Wide enough to see the red but not so wide as to be offensive.

It’s this and it’s garbage. It’s oblong, hollow, and insufficiently thick to support the front edge of a hardtop. You’re better off sourcing a generic square profile solid core auto gasket. I have a couple of these junky ones sitting around.

Well if you have a lip on the inside like my repro use this.


The original is a square profile channel like the soft top. The leading lip sits in front of the screen’s chrome top strip and is kind of fragile. It can’t support weight.

so there no place to secure this to on the original top

There is a leading lip, bit it’s fragile, and it has it’s own chrome bead attached to its face. which wouldn’t allow that to clip over. It simply a needs a square piece of rubber to lay within the channel on the top.

1 Like