Heater core replacement...its never gonna fit

Im nearing completion of a climate control unit refurbishment including a repaint, new foam seals, new expansion valve, etc for a Series 2 xj6.

I had the AC evaporator pressure and leak tested and all was fine.

The heater core had lots of green corrosion and failed testing with several small leaks.

The local radiator shop could not source the wide core material to build a new unit…so I went to the usual Jaguar sources.

The first heater core purchased was described as fitting a series 2…and required modifications for series 3.

This had me curious because other than some minor changes in component mounting (servo and vacuum actuators)…the climate control box is the same Delanair MK II unit in series 2 and series 3.

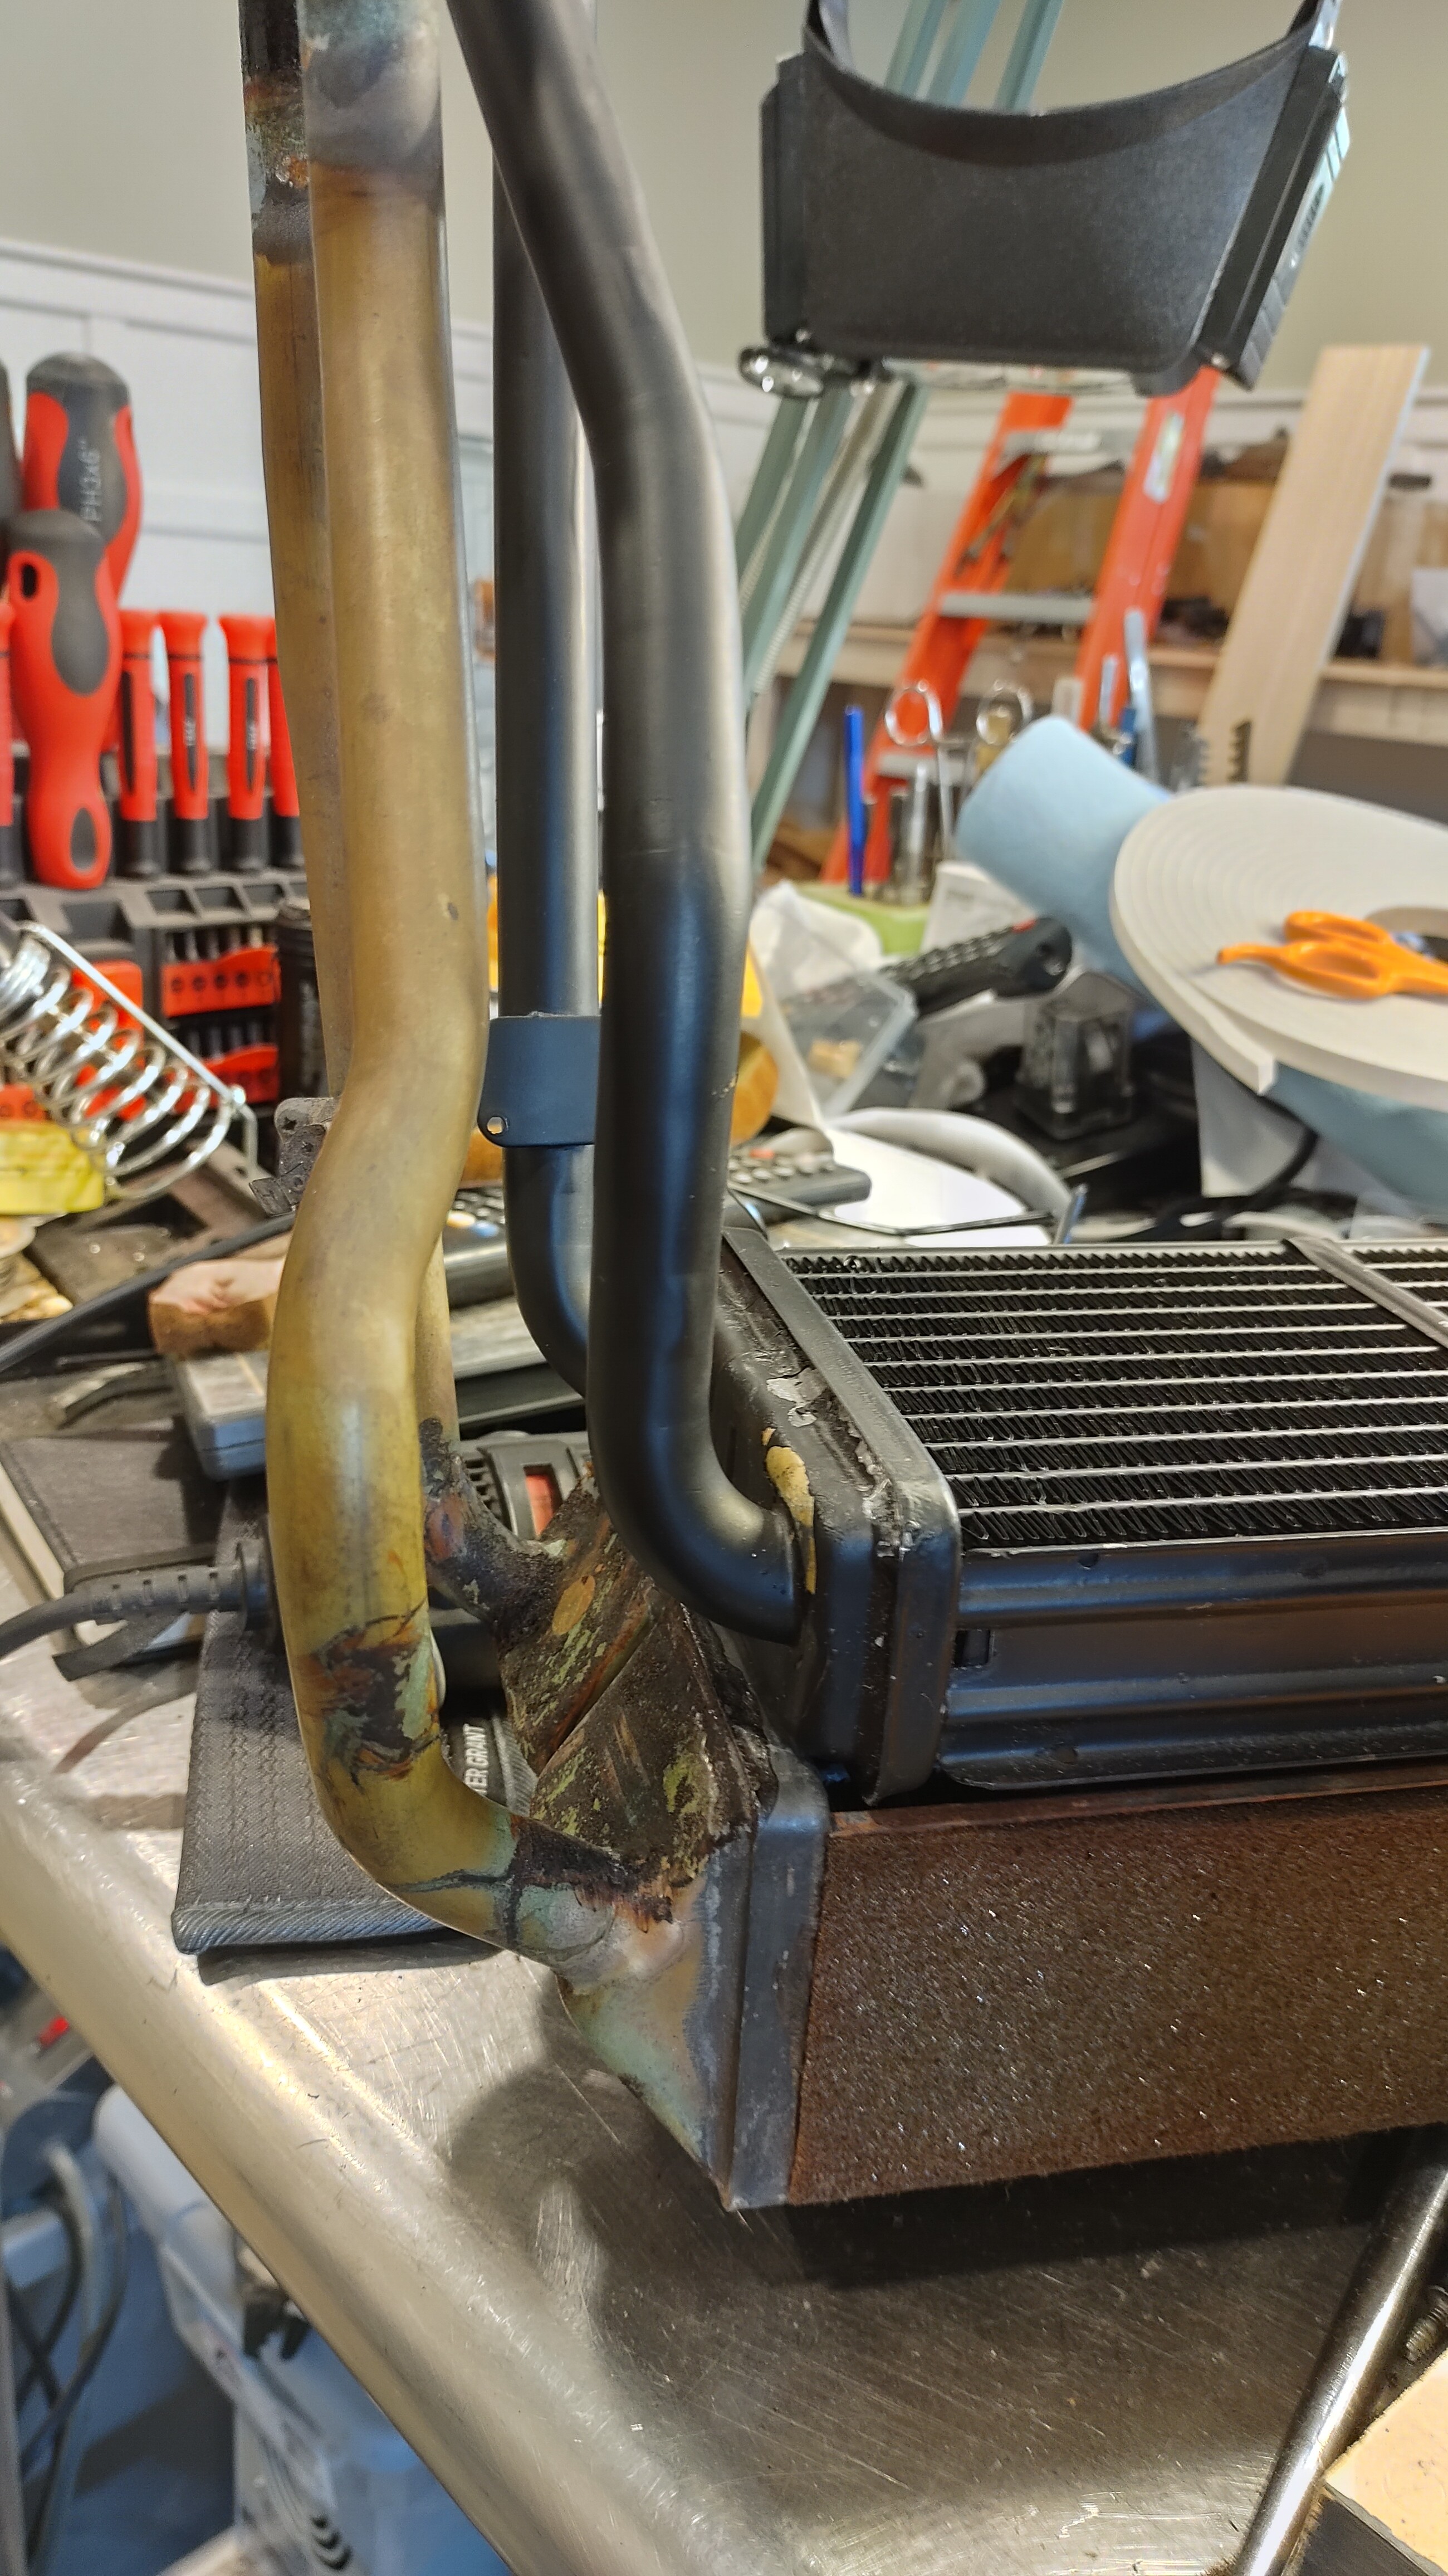
The first unit arrived with a minor downward bend in the pipes and some flaked paint…but otherwise ok.

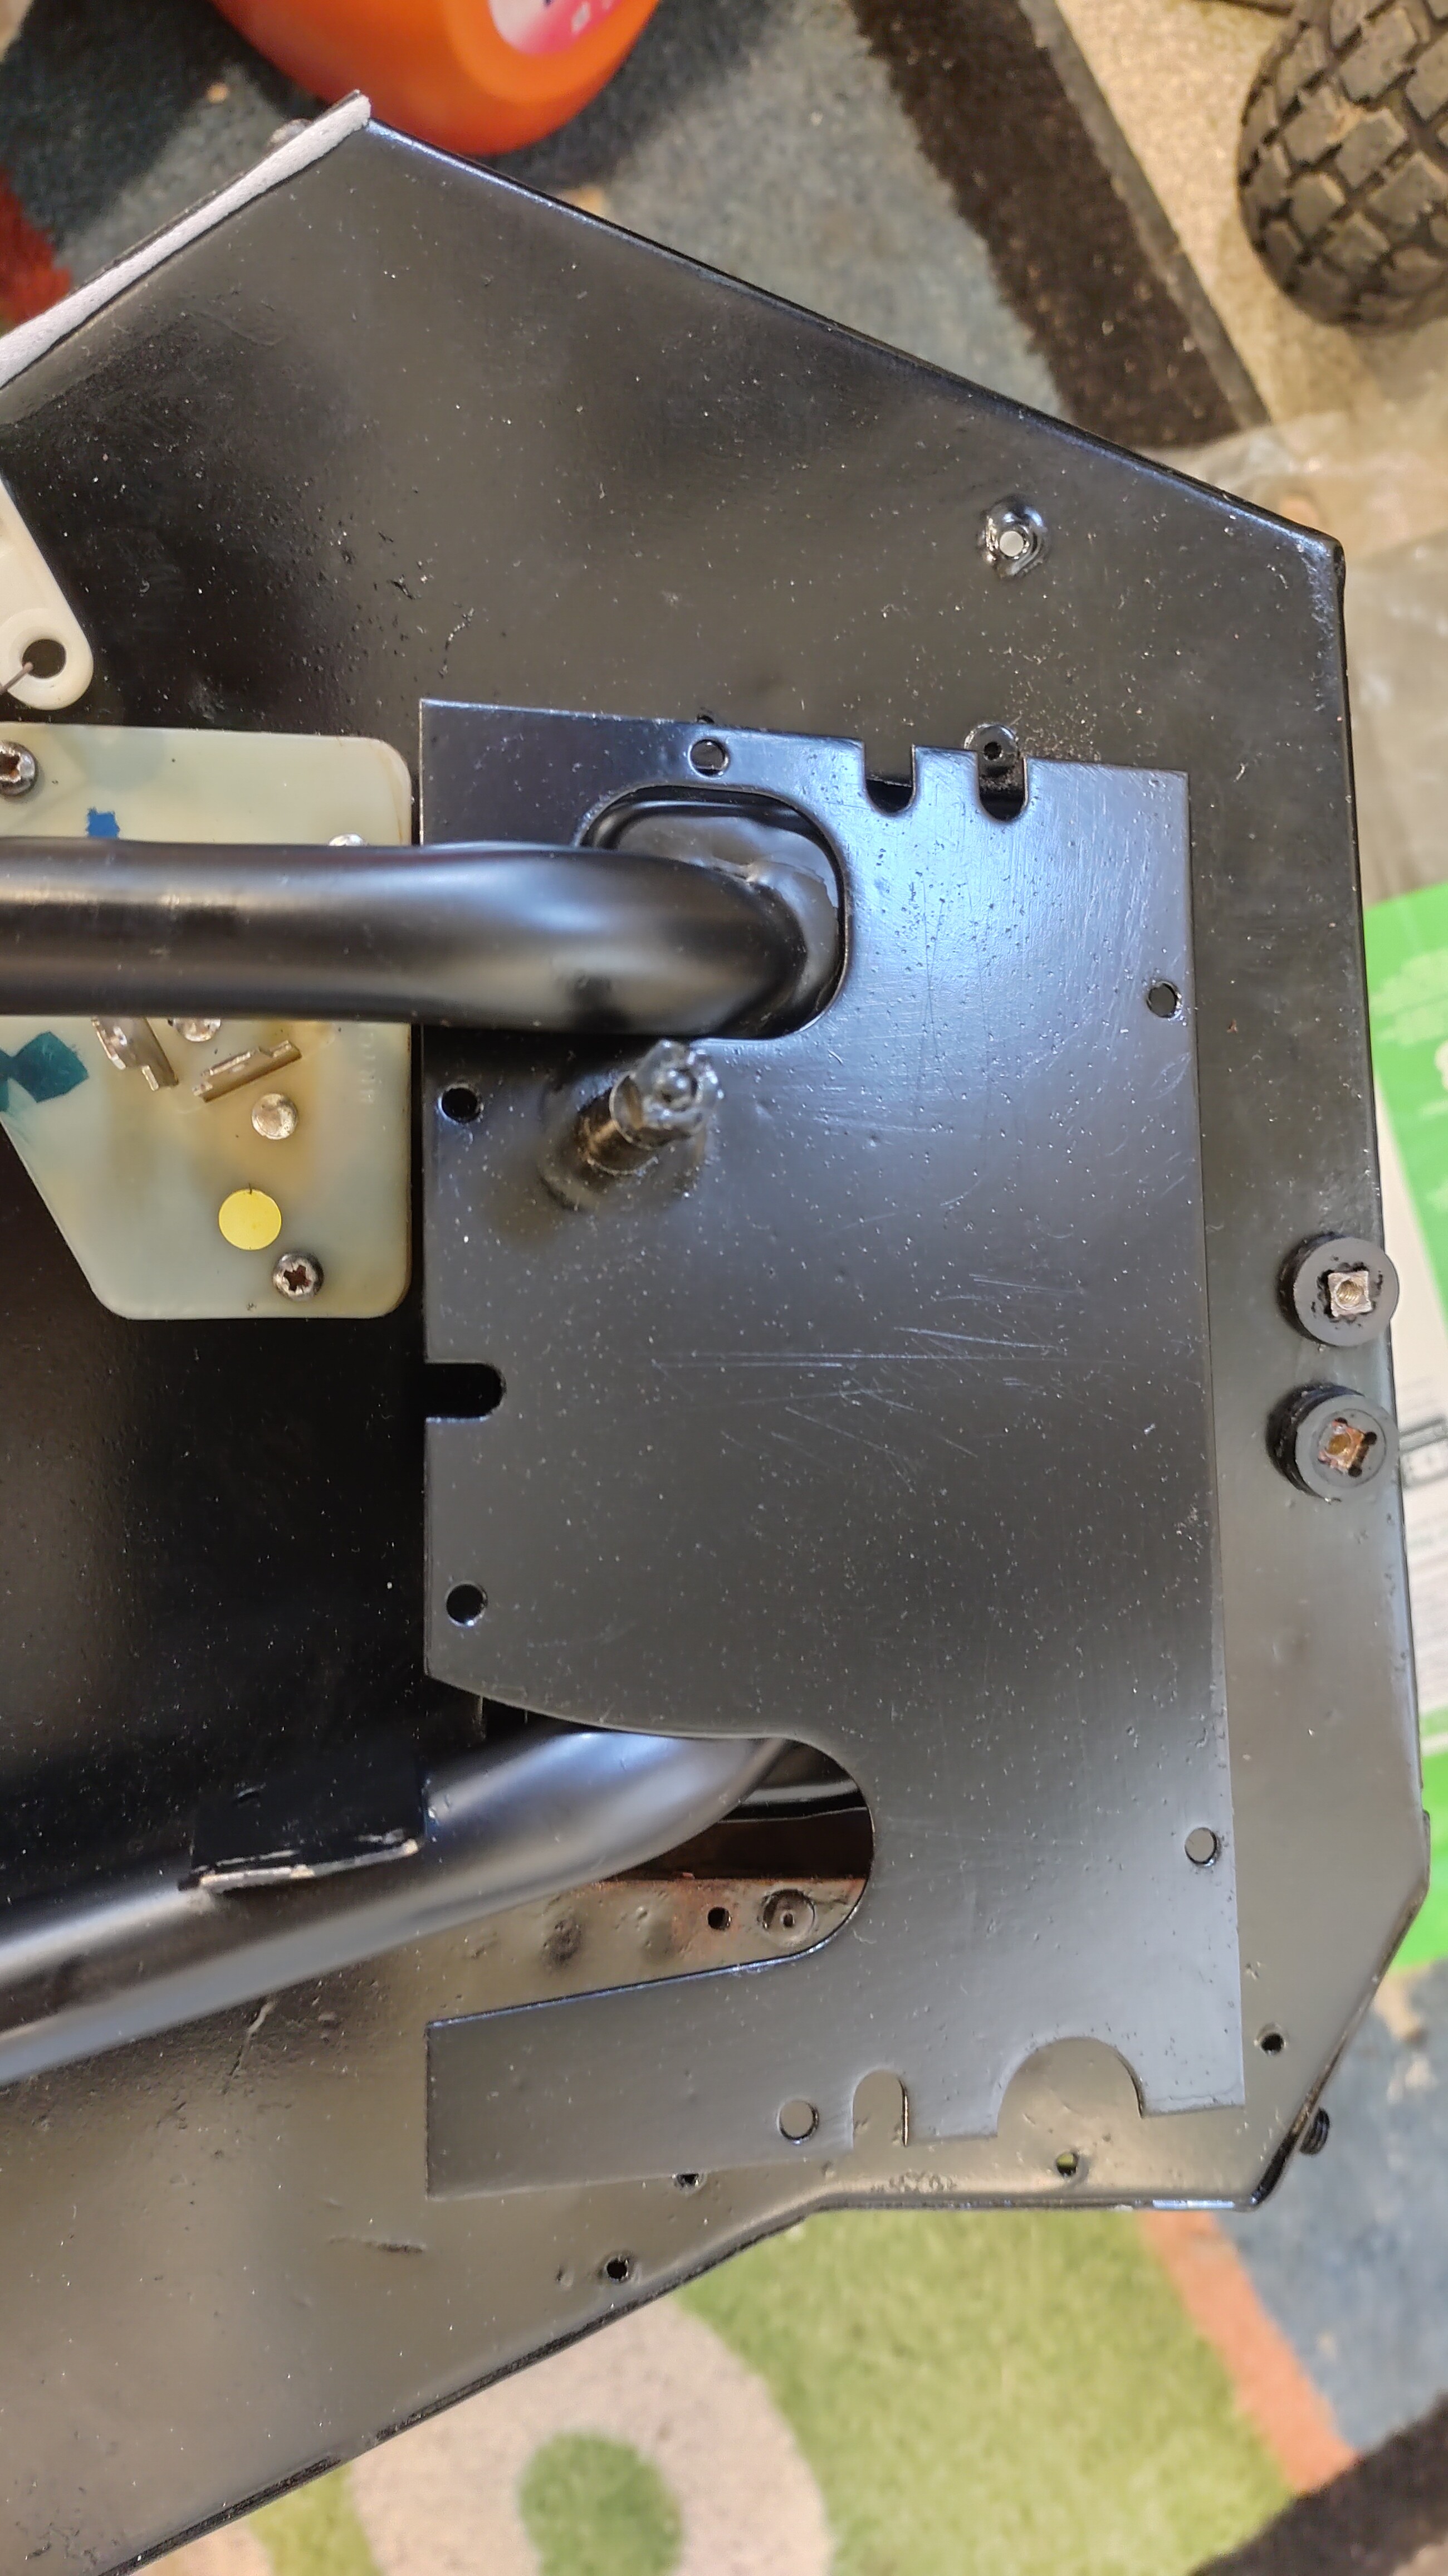
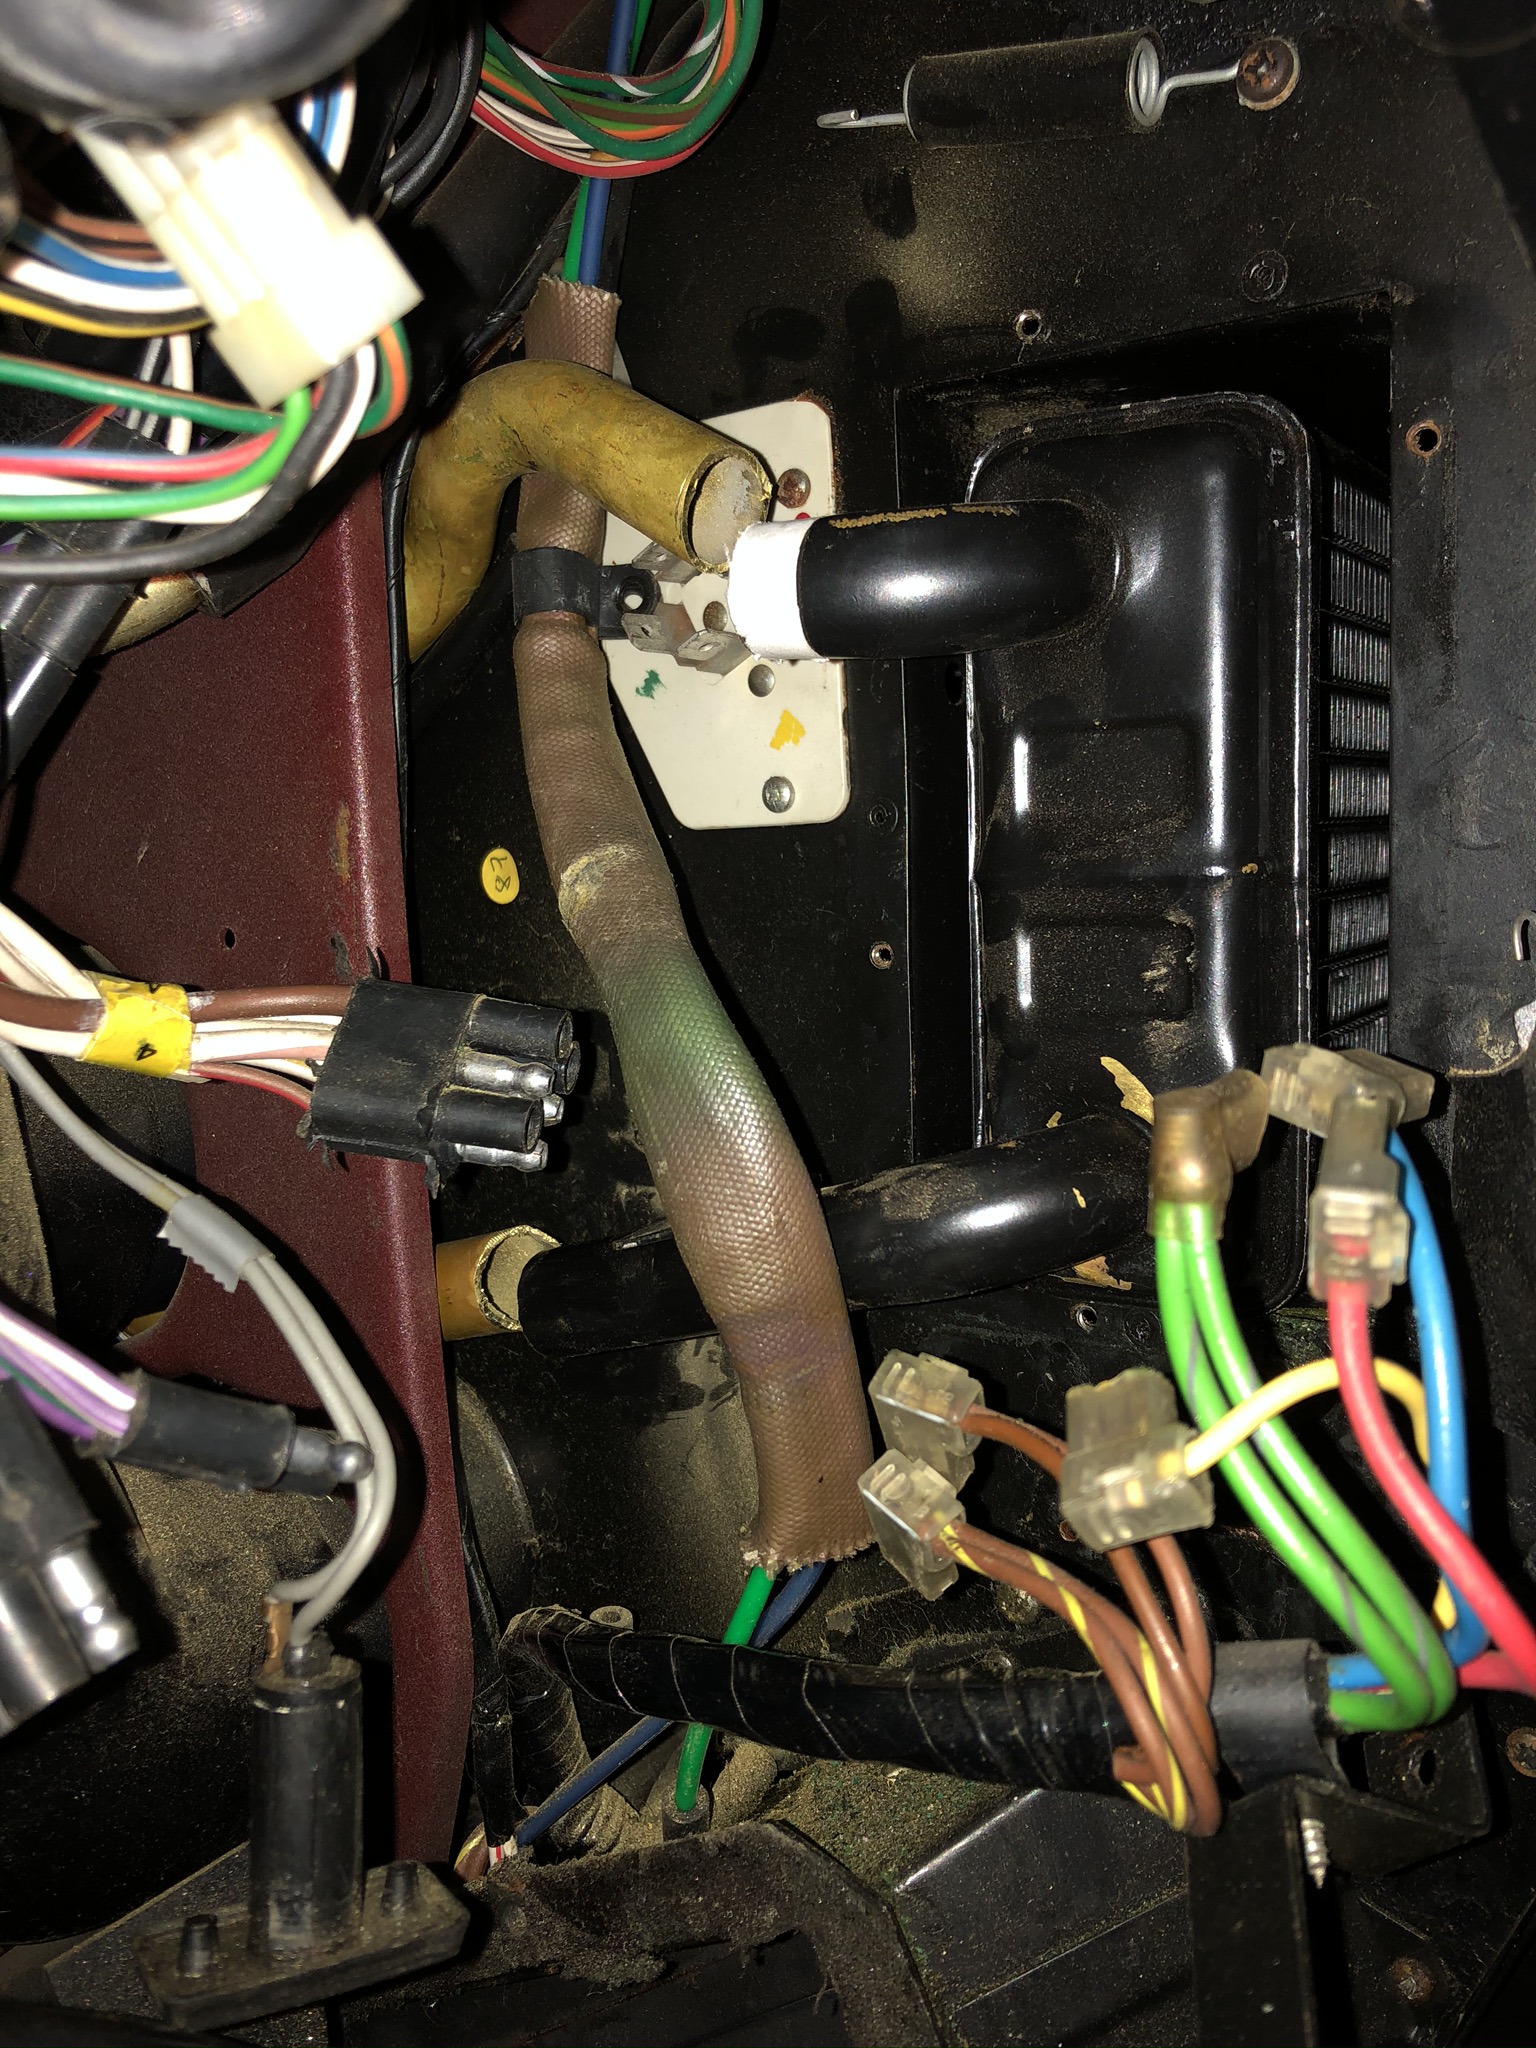
It quickly became obvious that the new thinner heater core was not going to clear the fan resistor pack.

A phone call to the supplier was generally unproductive. The recommendation was to cut off the offending pipe and replace it with a rubber hose.

I don’t see this as a viable option since the required stub to attach the hose would still interfere with the fan resistor pack.

I checked a second vendor who seemed confident that their replacement would fit and advised I reference the picture on their web page as a good actual picture of the product.

The picture seemed to represent the necessary offset angle and bends on the offending pipe. The tech advised that they have sold numerous units and only had 1 returned. I was hopeful. So being considerably less money than the first replacement…I decided to go ahead and purchase.

The second replacement arrived today…and there is no way this is going to fit either.

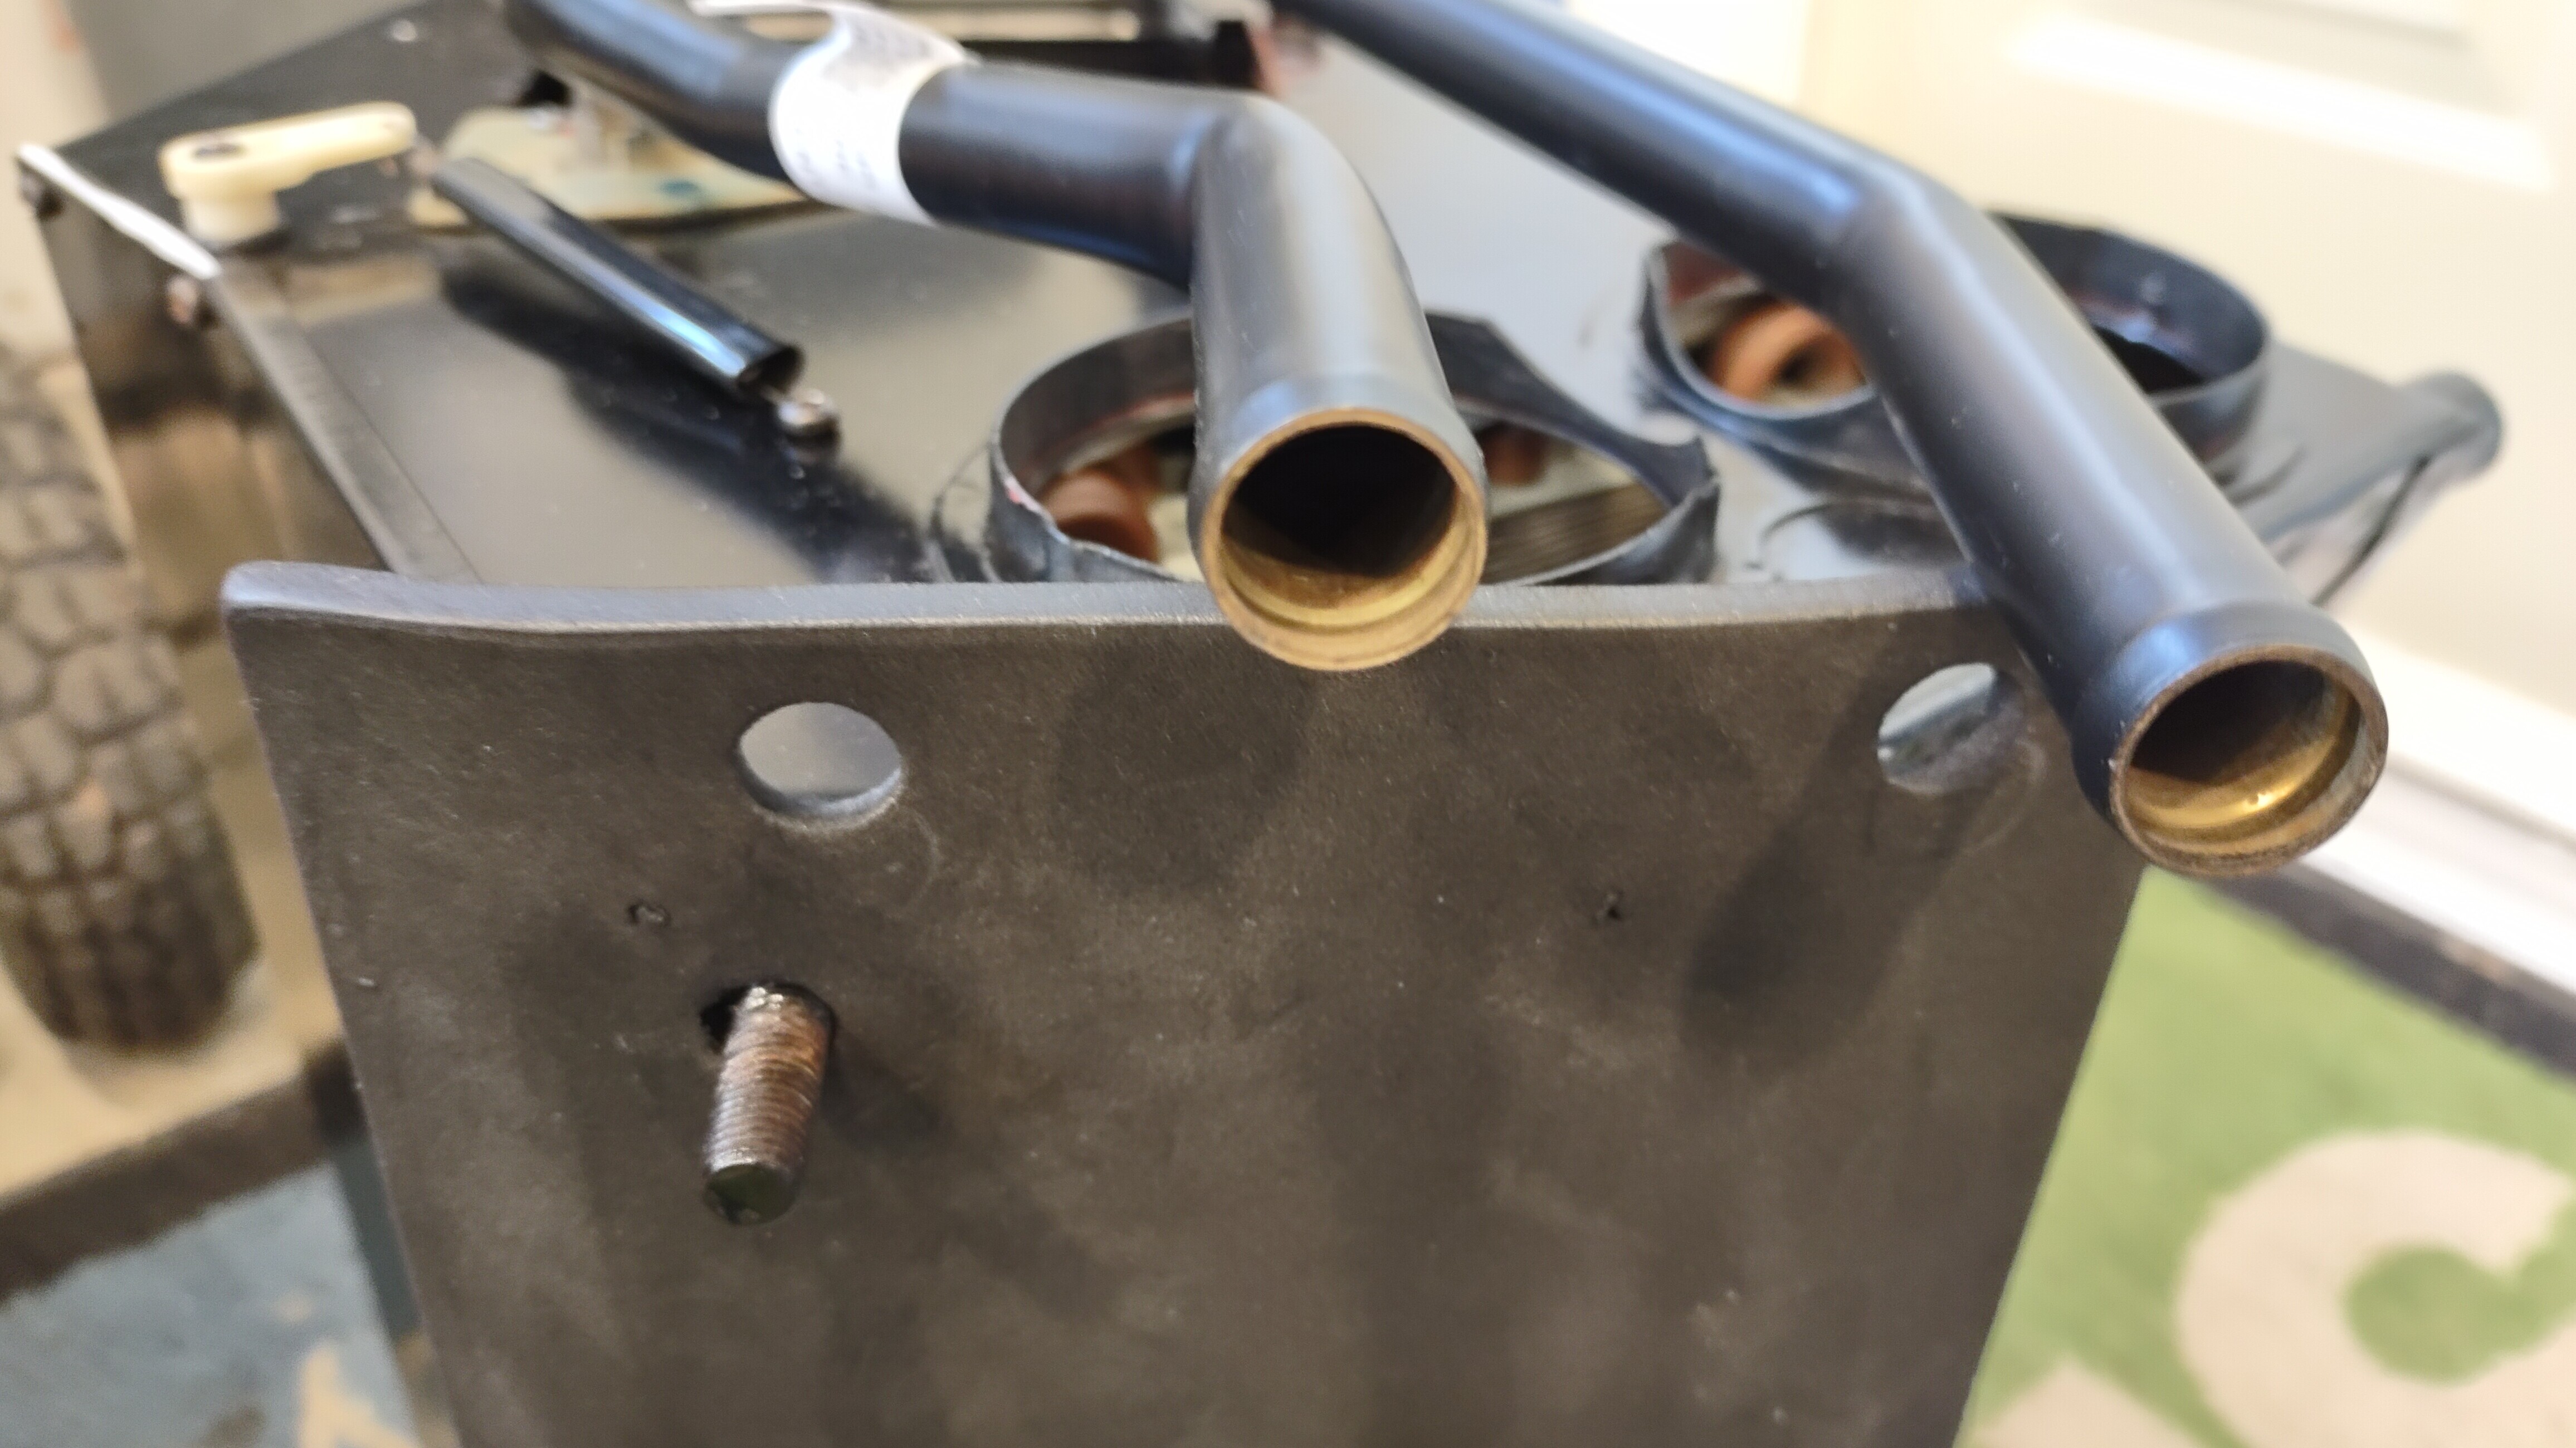
It appears this is the same design as the first vendor…

Not only is the top pipe not angled correctly to clear the fan resistor pack, the pipes are set too close together in the end tank to allow the heater box end cap to fit.

As reference, I have heater boxes from series 2 and 3 cars and a later Delanair MK III box…and the supplied heater core is not a fit for any of them.

I am wondering what previous members have done to deal with these issues…or has there been a change in the parts supplied?

Good photos. I would have liked to have seen the old core laying in position, to see how it clears the resistor pack and the ducts.

I recall on my XJ-S that resistor pack being a PITA to access. Struck me as odd, since it can go pretty much anywhere in the ductwork as long as it gets airflow over it; it shouldn’t have been difficult for Jaguar/Delanair to locate it somewhere more accessible. You might consider doing that yourself; just fab up a blankoff cover for its original location and cut a new hole somewhere else.

Kirby,

That is an interesting idea about relocating the resistor pack. I will look into that possibility.

Below is a picture of the original core in position and the new core for comparison.

Cheers

I think I get the dilemna. Two ideas:

  1. Take the old and the new to the radiator shop.
    Use the tubes from the old one and affixe them to the new ones after removing the ones with the wrong bends.

  2. Use your tubing bender and bend the new pipes to fit the openings.

1 Like

Heck, if that kinda thing was acceptable, he didn’t need to buy the new core at all. Just take the old one to the radiator shop and tell them to fix it. With the benefit of 20/20 hindsight, that would have been a much better plan. You’d think a new part would be better than a renovated part, but in this case the new part is obviously cheap garbage, renovating the old one would have been much better.

BTW, ever since someone (I think it was Michael Neal) suggested cutting the pipes and connecting a new core with hoses and clamps, I have advocated that method for shortcutting the heater core replacement without pulling the whole dash apart. But that scheme presumes the new core is the same configuration as the old core. I pity the fool who removes his old core using a saw and then tries to fit up the new core that you got.

1 Like

I should also note…based upon the core closing panel…the new core must be brought tight to the side of its housing closest to the fan resistor pack.

You might think you could shift it…but the closing panel has several flap actuator picots welded on…so that panel myst go back in its original spot or else the flap linkage will not work.

I will follow up with the vendor tomorrow as well as heads back to the radiator shop.

It would be nice if I could get feedback into the hands of the core manufacturer so they could tweak their product slightly… It could make a world of difference for future replacements.

Cheers

I did mine in situ with a replacement from Welsh, using the cut and rubber hose method. The catalog warned modifications would be needed.
I had trouble with it cleaning a door actuator and had to relocate a spring I think. I had to hack up the cover plate quite a bit. It wasn’t pretty and I cut one of the pipes on the new one shorter than I should have. But it makes enough heat and I haven’t had any leaks.

It looks like your replacement from Welsh is very similar to the one that Gary got. And I guess you used an elbow hose to connect that upper pipe? Either that or you just flexed a straight hose a little bit.

Did you do anything about the fact that the core itself doesn’t fill the hole? Perhaps a little foam or something? Does it just rattle around in there?

Gary, those heater cores are all made by the same manufacturer. I had the same experience with my Delanair II, including the assurances from multiple venders. Carls suggestion of a radiator shop either repairing your original core or swapping the offending tube is better than the rubber hose solution, in my opinion . The other issue you can’t change is the core thickness, when I was cussing the new core, I don’t remember liking the fit of the thinner unit. You might try DAVID BOGER at Everyday XJ for a proper core. Good guy with fair prices.

Dave

I put some pipe insulation under it both to prevent it rattling and to shim it up as high as possible. I think that helped clearing the resistor pack and other things. I think I had to very carefully bend one of the stubs away from the core a little too.

Today I spent some time talking thru the challenges with my local radiator shop.

Due to the spacing issue of the pipes exiting the header tank…and the fact they are silver soldiered, and the difference in angles on the two different tanks. I have chosen to have the old tanks and pipes flitted to a new “wide” core.

The cost has been estimated between the low and high priced replacements already purchased and being returned.

I will provide an update once I receive the re-cored unit back.

Fingers crossed.

2 Likes

Sounds good. The spacing and angle of the pipes certainly is fussy.

Just out of curiosity Gary:
Couldn’t de-solder and re-solder the offending pipe, or even bend it, to the right orientation?

According to the input from my radiators shop tech. The pipes are usually silver soldered…so the amount of heat necessary to UN solder this joint would cause all the other joints to come apart.

While he could remove the header tank and then work on the pipes…the holes for the pipes are still not spaced correctly in the tank.

In the end…we agreed this other company can custom build a new heater core to original specs for basically the same money as the aftermarket cores.

This allows me to return the aftermarket cores for refund.

Cheers

MY theory was new core with old pipes. Little shaky with relying on a patched core.

Decades ago, I removed the core from th heater of my F150. A bit fiddly, but compared to the Jaguar, a walk in the park >

I water tested the old one with an eye to solder any leaks, Short lived idea when I water teste it. Leaked like a sieve… The new unit fit perfectly…

Carl