OK, I’ve done a search but not come to any great conclusions. There is no mention in the Jag workshop manual, or the owners’ handbook, on how to adjust the brake pedal pushrod in the Girling/Lockheed single circuit brake master cylinder. My brakes appear to be fine, with a firm pedal, but at only about 1" off the floor. The rear brakes are adjusted correctly and the self-adjust mechanisms at the front are all fitted out with new parts and set up as per the book. The pedal is just in the wrong place - so just back off the locknut and turn the rod until it’s where I like it? Or is there a set requirement?
Does the pedal hold a higher position after a few quick successive pumps? A quick test from the drivers seat, set the hand brake, apply the foot brake a few times and release, then depress the pedal. Is it higher? If so the rear shoes are misadjusted. The front automatic adjusters should ratchet to the correct position unless something is not set up correctly. The rod from the pedal should have ~ .020” give or take to ensure the primary cup does not block the fluid return port.
1 Like
The pedal push rod should move about 1/32" before it contacts the piston.

You can figure that’s equivalent to about 1/2" of travel on the pedal.
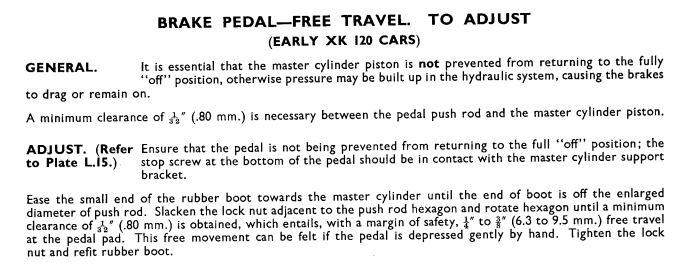
Thanks for the tips. I do have this in the manual but wasn’t sure if the manually adjusted early 120 would be the same as the auto-adjust 140.
I’ve checked the pedal free play with the springs and rubber boot removed and it’s actually about zero, but the brakes are coming off OK.
I have done as J.E. suggests and applied the handbrake, a good few pumps of the pedal, then a solid press - it’s in the same place, no change. One more click on the manual rear adjusters and I can’t turn the drums by hand.
The pedal goes down about 5-6" to a solid brake, about 1-2" off the toeboard. Does the system need more bleeding, have I misunderstood the pedal free play (maybe extent the pushrod against the cylinder internal spring a bit more), or is this normal XK140 with new shoes all round and I need to learn to live with it?
I suspect the front slack adjustment nuts are too loose, allowing the spring clip to retract(slide) all the way back to the next tooth(serration) on the adjustment bar. It would be highly unlikely that properly adjusted friction(slipper) pads would just happen to retract all the way back to any given tooth. Assuming you can’t get this excessive pedal travel sorted out some other way, you’ll have to remove the front drums, then press the brake pedal the better part of full travel, then go to the spring clip(s) and lever it/them away from the serrated bar. IF the shoes retract from spring pressure during this test, your friction pad nuts are too loose…in other words, the shoes should not retract once you take the spring clip/serrated plate out of the equation…the shoes should stay extended even if the spring clip/serrated plate mechanism did not even exist.
That might make sense, Lee. If the pedal is ‘up’ the hubs spin very freely, but if pressed down they lock as they should. However, I don’t think I dare tighten the small slotted nuts any further as they are fully tight, backed off one flat. Tightening further would have the bars locked up solid. Experiment needed… is ‘too tight’ possible? Maybe having them too tight means the bars are not moving in the pads, so the adjustment can’t happen?
Roger, if you have an assistant to press the brake pedal, with the wheels off the ground have him/her depress the pedal slowly in stages to allow you to rotate the drums at each corner with each specific pedal position to see which wheel(s) brakes begin to apply. Have them first note the pedal position when it becomes firm as a reference. Previously I should have mentioned to press the pedal “rapidly” in succession, by doing so the return springs will not have the time to fully retract the shoes and a higher pedal will result if shoe to drum adjustment is not set correctly. When I adjust drum brakes I always move the adjusters as tight as they will go thereby pushing all of the brake fluid in the wheel cylinders back to the master reservoir, not just enough to stop the drum from turning. The serrated adjustment bars on the front brakes engage to the next notch as the shoes wear that is their purpose and have no role in the application of the shoes. The adjustment bars are set so there is friction that will be overcome by the movement of the shoes to engage the next notch, which is what holds the shoes when the shoes return upon pedal release, if the bar is held fast then it would not advance to the next notch. There is sufficient free play in the design to allow application and return of the brakes but when the movement becomes great enough and exceeds the free play the bars advance to the next notch. That is why there a spring and split pin so the friction can be set correctly.
The best way to think about it is this way: the friction pad/bolt assembly is there to PREVENT the spring clip from sliding all the way back to the next serration…period. This concept is mentioned in the Principle of Operation paragraph in the later 120 brake section. Once thought of in this way, it is easy to grasp the logic and function of the system.
BTW, I would consider swapping out the old castle nut and cotter pin approach for a much more tension-adjustable lock nut.
I’m not sure the principles of operation are necessarily relevant for this problem, as they describe what happens under wear conditions. Nothing’s worn in my setup - it’s all new and unadjusted, so the linings have never been in proper contact with the drum. At the moment I don’t understand how the initial correct lining-to-drum clearance for this system when reassembling it is achieved - I have simply assembled everything as the manual describes, and have made no adjustments. I still have a suspicion that my friction pads may be too tight. At present, the only movement possible is that of the anchor pin and oversize hole at the other end of the adjuster bar. Could well be wrong, but the friction pads definitely are not too loose. I need to remove a drum and watch what happens to the adjuster bar when the pedal is pressed. With no drum restricting movement of the shoes, something should be moving in the bar, I’d think.
That anchor pin and oversize hole IS the adjustment…I measured it to be about .030". I measured the serrations to be about 1/16" apart so the serrated plate provides way too much slack IF they were allowed to handle the slack adjustment…and that’s why it is only an emergency back-up system. Now, if your shoes are already in slight contact with the drums, then any depressing of the pedal should produce a firm pedal right away since the shoes would not have far to move b4 drum contact. But that is not your situation as you say you have a lot of soft pedal or free movement.
However, since you seem to get a firm pedal, albeit after a long throw, it seems the shoes do eventually make contact with the drums. That’s why my 1st thought was loose friction pads which were allowing too much backward travel upon pedal release. You’ll know more once you get a drum off and test as I described earlier.
One more thing: there is no initial adjustment upon assembly…it’s handled by the adjustment system as the brake system is pressurized and depressurized…just like a pad replacement on a disc-braked car.
Yes, that’s what’s led me to believe the adjuster bar is not moving at all in the pads, as I would have expected the shoes to gain more contact with the drums as the positions settle etc. Both front drums spin very freely with the pedal up, despite rapid hard pumping, long, hard pushes etc. With the pedal near the floor they do lock but I have yet to check how hard this is, with a wheel on. So far I’ve only checked by hand on the drum. It may well be that this car simply has a very long pedal for some reason - but if I can get it higher, that would be good.
Coronation street party this afternoon, need to talk my wife/pedal pusher into a bit of work first!
Lee, I’ve tried your test with the drum off - gentle pressure on the pedal until the cylinders have expanded, and whilst holding pressure levering the springs off the ratchets. Nothing moves.
I then tried loosening the nuts another couple of flats, and when pressing on the pedal now the ratchets click to take up the movement. I have to release the ratchet springs and tap the shoes to close the cylinders to get the drums back on.
In this position, I have the nuts about 4 flats backed off from tight. Any tighter than this, and the adjuster bars don’t seem to be able to move at all against the friction pads.
I was hoping that this would now allow the bars to move to resting position closer to the drums, giving a shorter pedal travel, but it doesn’t seem to have changed much, maybe a slight improvement.
I get the feeling that (ignoring the ratchet mechanism and spring) the friction pads should grip against the shoe return springs, but be able to give when the wheel cylinder is moving the shoe. Do I have that right?
Give me a set of snail cams any day…
Trying to think this through.
For a new system, initial setup:
The drum-to-shoe spacing will be too wide at first as everything is closed up.
Pressing the pedal moves the shoes apart, dragging the bar with it as it slides through the friction pads. The pads grip the bar so that the 0.030" clearance on the bar anchor pin is taken up, and the drum locks. Whilst this slack is being taken up, the ‘fail-safe’ ratchet will click.
The shoe will now move under braking using only the clearance on the anchor pin. The bar does not move in the friction pads (or ratchet).
As the shoe wears, the anchor pin clearance is lost, and eventually the bar will now move slightly (and the ratchet maybe click) as wear is taken up, allowing the 0.030" clearance of the anchor pin to reset and the process repeats with future wear.
The pads do the job, and the coarser ratchet is just a back-up.
This is my understanding of the Principle of Operation on p.335 of the workshop manual.
Does that make sense?
I think it is possible to have the friction pad nut too tight, stopping initial self-adjustment from taking place.
Hi,
- From my own experience: you can tighten up firmly the castellated nuts, as the friction is easily overwhelmed by the (huge) pressure of the hydraulic pistons on the shoes, i.e.: the bars are not rails where the pads are supposed to slide easily. when there is some distance between the shoes and the drum upon retracting, the just move a fraction of a millimetre front.
- I had one loose fixing screw of one of the pad assemblies (I recall), which caused an odd feeling of irregular travel (sometimes it would brake with only 10mm of travel, sometimes it would take 20-30mm).
- Bleeding the (in my case) tandem circuit was a pain. Yours is is single, which I guess facilitates things, but I had trapped air and it was really nasty to remove.
- The nasty nasty nasty flexible lines (looking new) had collapsed in my car. I substituted for braided. Note: the collapse meant that the shows retracted slowly and irregularly, creating an irregular travel.
My take:
- Check that ALL bolts are tight (look I thought I had check 10 times in mine until I found one loose)
- Self-adjustment mechanism should be tight
- Bleed according to Jaguar sequence → pipe submerged in fluild, pump pedal, and open bleeder, continue pumping until no more bubbles
- Do NOT trust the outer state of flexible lines.
My two cents,
Ll.
Thanks Ll - yes, single cylinder system - bleeding with all new parts was actually incredibly straightforward, very clear with no bubbles at all from a very early stage. I put another 1.5litres of fluid through to be sure, but only the occasional thread-induced bubble from the nipples during all that despite tapping the unions, cylinders etc. to dislodge air. The flexi hoses are all new Delphis, I’m well used to collapsing hoses too. I’m not a fan of the rigid braided feel but each to his or her own. However, as said above, with the slotted nuts done up tight nothing moves even under heavy pedal presssure with the drum off. This can’t be right - it might as well be bolted up without a slot and no provision for movement.
It should move Roger, mine certainly do under hydraulic pressure.
That’s right - mine weren’t moving at all.
Roger, I had a similar problem when I refurbed my system and found that if I put the 140 in reverse and hit the brakes the front adjusters worked better. Also check the pedal arm for an additional adjustment for pedal play.
You nailed it…the friction pads must be tight enough to resist the heavy return spring, yet be loose enough to allow the dragging action needed for initial adjustment and wear compensation. As another poster mentioned, the power generated in the system will overcome the pad friction rather easily unless that short, stout coil spring is in coil bind. I was hoping your long throw problem could be remedied by friction pad adjustments, but it looks like the problem lies elsewhere. However, just as with the standard drum set up you probably have on your cobra and mustang, I would expect at least a tiny bit of drag upon freewheeling given the tight, .030" slack due to irregularities in either the shoe surface or drum surface.
Thanks Lee.
Er… drum brakes on a Cobra? Transverse leafspring front and rear, with outboard disc brakes at each corner…
I like the nyloc idea rather than the split pin btw, much more sensitive.