Whoever said the E Type was built around the fuel tank lied…its built around the lower heater pipe!
I cannot fathom how to remove the lower pipe. The dash top is off, the wiper linkage is moved out of the way. I have easily removed the 2 other pipes but cannot get the bottom pipe out. The vacuum pipe is also dismounted (can’t get that out either)
What is the knack please? It must move to the left but vacuum and lower heater pipe seem to jam.
Think for a moment about how hard they are to remove and then consider what awaits you when you go to put them back in. Yowza.
I do not know how to explain other than to say there is a sweet spot where you can get the long one enough to one side to swing the other end thru that little opening in the cowl.
This is the point where Lloyd (errr… Joe) starts waving his hands.
Check out this youtube.

I have watched this video many times!!
It is the only source which mentions a void high up on the left. I guess thats the key. I still can’t maneuver mine up and high in that corner 
Back to the garage again all day today to try again
You need to get the left end of the pipe up and high, pointed to the inside hole where the external heater box is mounted, so the right side of the pipe can clear the center support arch.
I posted this several years ago. This is to install the lower pipe. Just follow it (in reverse) word for word to remove your lower pipe. (the key…)
"I replaced all of mine with stainless steel ones including
the vacuum pipe a couple of months a go. With engine in
place. The job wasn’t that bad, just take your time because
it’s a little tight, I have large hands.
I did take the dash top off for ease of access. Removed
wiper motor and arm (don’t loose the clip) but left internal
wiper rack in place. This way you can swing the wiper rack
over and give you more room to install/maneuver the pipes.
Also now is the time to replace the windshield washer hose.
Mine were old and brittle. Also before removing old upper
pipes, note the routing of the pipes through/around the
heater control cable.
The key to an easy installation is to first maneuver the
lower pipe (right to left) into the center square hole, then
under the control cables, (then up and to the left) towards
the heater box. This gives you enough room to then drop the
right end of the pipe down, under, and then through the
center bulk head support.
Before pop riveting the pipe in place, I ran some safety
wire through the pipe, which allowed me to pull the pipe
tight against the firewall, then pop rivet them in place one
at a time. I was able to pop rivet all pipes with engine
in-situ using an old POP Rivetool gun Model K110."
1969 SII OTS
Painfully!
Find the person with the smallest hands , its a bear, when done its for life though.
Slide the long side in first , then all the ways across.
I remember moving the wiper motor arms on a series 2 as well.
Good luck.
gtjoey1314
Its a fun job, a little like doing a rubiks cube with a blindfold. I’m sure the video explains it but sliding them left, right, left they’ll come out the hole, put them back in the order you took them out. Someone here had the great idea to put a rubber hold down strap through the pipes to help hold them flush to the firewall for rivet install, others have used screws instead of rivets.
pauls
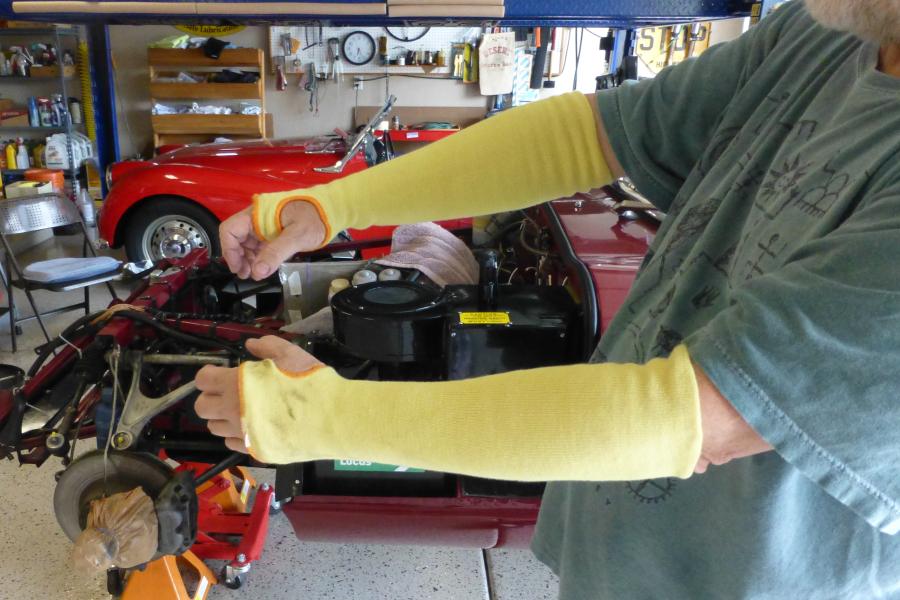
I’ve posted this before but will repeat - a pair of Kevlar sleeves (Amazon) helped minimize the blood spilled when my old fragile skin worked in those tight sharp places:
2 Likes
Success!! Got it out by manoeuvring the LH side up high and then across. Very fiddly, but once you know where the void is (above heater intake box section) its not too bad.
Riveted the new one in place. The vacuum pipe looks ok so a refurb will be fine (no corrosion)
Happy days as I think this is the worst job so far…WHAT CAN POSSIBLY BE HARDER?! (Im sure there are some ideas out there)
1 Like
throw out bearing. requires removal of power train.
1 Like