New to the forum; first time to post, so this may have been posted before by someone else. I am trying to remove the instrument cluster to check/repair/replace the oil and temperature gauges and am having a time getting the cluster to budge. Already removed the surround trim, but will not budge. What am I missing? Thanks in advance!
Carussell,
Did you remove the small plastic finishers, (AAU3364 for the Right Hand side, and AAU3363 for the Left Hand side) located in the upper corners of the instrument panel fascia and remove the two screws located beneath them? I circled the finishers, as well as some of the other screws holding the instrument panel in place, in the attached picture.

Regards,
Paul M. Novak
1990 Series III V12 Vanden Plas
1990 XJ-S Classic Collection convertible
1987 XJ6 Vanden Plas
1984 XJ6 Vanden Plas
1969 E-Type FHC
1957 MK VIII Saloon
Ramona, CA USA
1 Like
I have not done that (remove the screws behind the two finishers); will do that later today. Thank you.
Guess it’s time to break down and get that over-priced shop manual! I can honestly say, this has proven to be the most frustrating vehicle on which I have had to perform maintenance. I have owned numerous Triumphs and MGs, never before a Jag. This one has proven to be un-necessarily difficult and over-engineered, to a point that the engineers should have been made to work on the prototype before sending the cars out into the field. The cars would have never reached the unsuspecting consumer market!
1 Like
Carussell,
I would agree that the 1990 XJ-S convertible is a very complex machine, perhaps too complex for some.   But if it was a simple car to own, operate, and maintain and if anyone could work on them, then I probably wouldn’t be interested in owning one.  ;-)


I have found that having a comprehensive technical library for each of my six Jaguars helps take a lot of the mystery (and misery) out of working on them.   I don’t do everything on my cars, for instance I don’t do air conditioning, body work or full paint jobs.  But I have removed and replaced engines, transmissions, cylinder heads, etc as I have restored, maintained and serviced them.   Having the correct manuals makes this a possibility for me, without them I would probably not be a happy camper.


For the 1990 XJ-S convertible my technical library includes the following:
-
Jaguar XJ-S convertible Owner’s Handbook -
Jaguar XJ-S Repair Operations Manual -
Jaguar 5.3L XJ-S Parts Catalogue -
Jaguar S57 Electrical Guide -
Jaguar XJ-S introduction Publication -
Kirby Palms “Experience in a book”Armed with these documents I have been able to research and complete many significant tasks over the past 10 years and achieve 65K miles of driving pleasure for my wife and I (as well as other family members) in this car.
Regards,
Paul M. Novak
1990 Series III V12 Vanden Plas
1990 XJ-S Classic Collection convertible
1987 XJ6 Vanden Plas
1984 XJ6 Vanden Plas
1969 E-Type FHC
1957 MK VIII Saloon
Ramona, CA USA
![]()
carussell . . .
MGs and Triumphs are a whole different thing - very, very basic automobiles, and fun to drive, but nowhere near the same experience as an XJ-S. I know because I also own an XJ-S as well several of those basic British cars.
It helps if you realize that, no matter what part of the XJ-S you are working on, it is that part that started down the assembly line and the entire car was then built around it.
Ron McLeod
'90 XJ-S Convertible
1 Like
Paul M. Novak:
Found the screws behind the two finishers and removed them; the instrument cluster came out easily after that. Thank you. However, I stand by my original assessment as it has been reaffirmed while looking for the inline fuses for the radio (and peripheral related parts such as the radio relay inside the console); the so-far phantom fuses cannot be found. Why the need to place a relay and fuses(s) under the console, where it has to be dismantled to replace plug-in items that are prone to failure, is just premeditated stupid. It is those types of things that have made the XJS (and others) less desirable in the classic car owner/collector market.
With the exception of the “Repair Operations Manual”, I have all the listed manuals either in hard copy or digital format. I know that particular one is all-important; this Jag is the only vehicle I own that a full repair manual does not exist in my library (and I have been rightfully shamed into buying one).
Just an update:
Instrument cluster removed and at first glance the problem looks to be fairly obvious - corrosion on the screws that hold the flexible membrane circuit board to the gauges; I presume the screws are part of the circuit and must be replaced; the membrane contacts cleaned and/or repaired (to get a good electrical connection). I will post more when the deed is done.

Tested the corroded screw heads to the appropriate plug end connectors with a VOM and found open or resistive connections on all. The screws need to be replaced with a different type, less succeptible to corrosion. I would think the copper/nickel washers - used with the screws - should be replaced at that time as well. What you see on the screw heads is also happening under the head of each screw and between the copper washer of each screw, causing a bad electrical connection. I will try and find a source for better screws/washers and post more later (if I succeed). It looks like simple oxidation and not electrolysis (but could be). I do not know why some are affected where others are not at this time; could be heat/current related or simply random bad plating on the screws from the manufacturer (looks like zinc, could be wrong). NOTE: All of this becomes moot if the connection to the instruments is actually made via plated feed-thru holes on the flex circuit and not the screws. I will know that answer soon.
RonMcLeod:
Understood, but I have also owned a number of Corvettes, an Avanti, and other collectible vehicles (even a Cosworth Vega) and have never seen this type of afterthought engineering and self-inflicted electro-mechanical misery. Where were the engineers when these were being assembled? A blind man could have seen that train wreck coming!
Please do not get me wrong. I have looked at Jags since I was a teenager (a long time ago) and had always wanted an E-Type and later an XJS. I now have the XJS and want to restore it as best I can without going broke in the process; additionally, I do not want to own something worth less than half of the amount invested at the end. I have resisted doing an LS conversion on this because I believe the V12 engine is technically sound and I want to keep it original; I do like the smoothness of it. There are bugs in mine and I will work them out. But if to accept owning a Jaguar XJS requires the total suspension of disbelief, well, that is a bitter pill to swallow.
The phantom 20 amp and 2 amp fuses have been located. The 20 amp is underneath the carpet, forward of the console, behind the passenger side air register panel (fuse-holder shown, brown wires coming out each end).
The 2 amp is further back in the bundle of wires below the radio, rear, curled underneath. With a crook of the neck and a good flashlight, you can see the 2 amp from the same side where the panel has been removed (look hard, red wires coming from each end of the fuse-holder, taped to a large black wire insulator).
What a pain to change two simple fuses (or three as there is another under there I have not yet identified; maybe later)!

1 Like
Latest update:
It appears the screws are the electrical connection to the gauges from the flex-circuit and it appears there is resistance built due to oxidation or fatigue. Time to replace those pan-head rolling screws with another type not as susceptible to oxidation or metal migration. I am not sure at this time what the correct screw material should be (certainly not what is employed now), but I do not believe copper - although electrically better - is strong enough to handle the required torque. I tried to get a picture of the location of interest on at least one of the gauge connections (where the screw makes contact), but it has proven to be difficult with the tach and speedo in the way. Nonetheless, I will supply a picture, below.
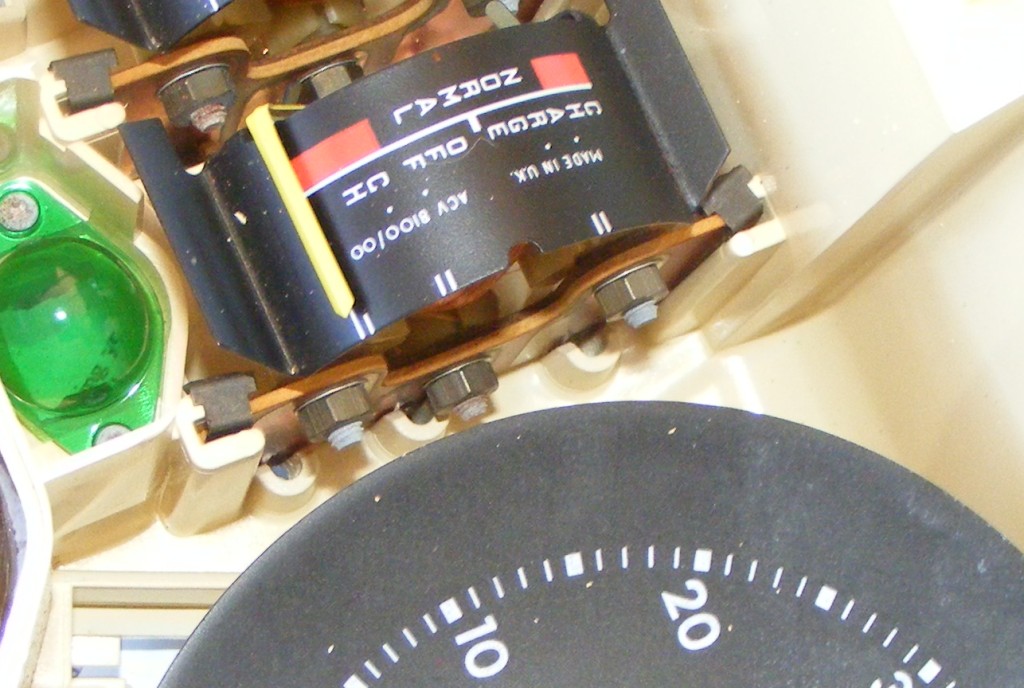
You can see where the screw-holes (screws removed) are to the right of the voltmeter, below the three nuts that hold the gauge together; this is where the screws come through the plastic and make contact to complete the circuit to the gauge - via copper connector - to the inductor (the part that makes the gauge move up and down). If you look real close, you can see where the screws make contact with the copper and that location is charred. I am going to try to clean those contact locations and replace the screws with another type to verify my hypothesis. I might add, the screws to the voltmeter were not heavily oxidized like the screws on the other three gauges (fuel, oil, temp); the voltmeter worked, the other three did not. I will post more on the progress later.
Just another image showing how the screw makes contact with the copper laminated on the phenolic board. The screw completes the circuit between the copper laminate on the board and the copper printed on the flex-circuit (reverse side of the instrument cluster, see previous images) through the plastic cluster housing.
In my humble opinion - another bad idea (perhaps from Lucas), but certainly from Jag engineering as overseers!

This 1990 XJS Convertible has only 49,000 miles on the odometer.
I had the same problem with my 1990 XJS convertible when I bought it 10 years ago - also had 47000 miles on the odometer. I polished the copper contacts on the flexible circuit board with a scotchbrite pad, reassembled and have not had the problem reoccur in 10 years. It IS a bad design - an american car would have at least had a gold flash on the contact pads to eliminate the oxidation that causes the high resistance contact between the screw and the contact pad.
1 Like
svflyboy:
Thank you for the reply. I was beginning to think I was the only one to have found this problem in the wild - with the exception of Jag repair technicians and other mechanics with electronics skills. The gold flash may have helped but I believe the real issue is with the screw material(s), not to mention the pressure a thread cutting screw applies when wedged in between a piece of plastic (designed to bio-degrade) and a piece of sturdy phenolic. The plastic will give way and the physical connection weakens. I was taught early on that without a good physical connection there cannot be a good electrical connection. Simple physics/electronics.
Further research has shown the selection of a galvanized or zinc plated steel screw mated to a copper strip was a bad choice of metal fastening due to their distinctly different properties.
On the Fastenal website is some very good information and this particular paragraph pretty much covers it:
“In the case of galvanic corrosion, the combination of two dissimilar metals with an electrolyte is all that is needed to form a reaction. The use of dissimilar metals in structural design is fairly common, particularly cases where the fastener material is different from the structure being joined. Furthermore, the electrolyte may be present in the form of rain, dew, snow, high humidity, ocean salt spray, or even air pollution. Thus, designers must take into account the reactivity of the metals being joined.”
Kind of covers what might happen in any vehicle, most certainly a convertible! I am going to try a copper-plated stainless screw if I can find them within reason.
I have really been challenged by this Jag and - at age 63 - am both intrigued and dismayed!
“Interesting design choices”. That’s the phrase used most commonly I believe.
I understand your frustration, but I suggest you resolve yourself to accept the choices made decades ago as done and done.
They are simple cars. Simple systems. All repairable and durable once restored to a functional state. You mission, if you choose to accept it, is to undo decades of wear and get her back to a state where she can show you a good time. And she will.
1 Like
I realize this is an old thread, but for reasons too complicated to go through, I am away from my car, and am not keeping up.
This thread does point out that all engineering involves compromises, and British Leyland added additional compromises. Not helpful, but there it is.
I have some questions.
On the one hand, this car (like mine) was built over 27 years ago. While the design is not optimal, it’s not tragic either. That is to say, they’ve lasted this long. Wouldn’t a simple clean up and go last another ten years or so?
Failing that… or rather, improving on that, what if the corrosion is cleaned up, and then the connections sent to a jeweler for gold plating? While the material expense would be great, the amount needed would be small. Would this work?
I’ve read in other places (my other hobby is boats, where galvanic corrosion is well known) the process of plating using homebuilt methods: Electrolyte baths and 12 volt batteries. Could this be done with gold leaf?
I look forward to the day when I’m home and can play with the car again. This (along with replacing the lighting with brighter lights) is on the “someday” list, along with Cibie lights, a lower rear end, and a five speed. Oh, and a lot of work on those oil leaks, too.
If you can get that process working, please post a detailed diatribe! Better
yet, create a web page – possibly with a YouTube video – showing how it’s
done. We can probably arrange to host it on the jag-lovers server. There
are TONS of electrical connections in this car that would be vastly more
reliable if gold-plated.
– Kirbert
Consider replacing the Lucas alt with a modern GM alt like a CS130. The
Lucas, on a good day, charges at 13.6V, while the CS130 charges at 14.4V
when it’s reasonably cool. The difference in brightness of the lights in the car
is frankly astonishing. They go from pale yellow to bright white. And it
seems to do wonders for the condition of the battery as well; the starter spins
with more authority, etc.
– Kirbert
Don’t know if you’re serious, but definitely better to patch it up. That said, and assuming the '90 is like the '76, the biggest problem is the flex circuit. By this time they are delaminated to some degree, so just in taking it apart to clean the contacts you can make things worse.
Hey Hi Kirbert. New here and looking to replace an alt on a 1990 Jag XJS Convertible. Are you saying that a “GM alt like a CS130” will fit as a replacement, straight in the Jag? I would love that to be true, so say it is, even if it isn’t, lol - kidding… So, is that right?
Nonono! A GM alt such as a CS130 will fit as a nearly bolt-in replacement for the AIR PUMP! It won’t replace the alt without considerable fiddling.
Presumably, you have the later Bosch alt. There’s scarcely any reason to replace it with anything other than a rebuilt Bosch alt. It works well.
Note, though, that the Bosch alt is driven with a ribbed belt – the earlier Lucas alts were driven with a V-belt – and the crank dampers that have the ribbed belt grooves around them are prone to failure. The rubber separates allowing the outer ring to spin – or, more correctly, to not spin, the inner hub just spins inside it. The belt driving the alt moves much slower than it should, and the alt doesn’t charge like it should.
Easy to check. Easiest test is to simply grab the alt pulley with your hand and see if you can turn it. If it turns, turning the outer ring of the damper with it, you know you need to replace that damper. If that doesn’t provide enough certitude, use liquid paper to mark the inner and outer rings of the damper, run the car a while, and then see if the marks still line up. If not, new damper time.