I just measured my scroll again at 3.125. And @jagman66E says his tool measures 3.120. So I remain confused how the tool being smaller than the scroll can result in a gap. I must admit using the scroll as the sizing device has resulted in a pretty tight seal, not quite like the “freedom of rotation” mentioned in the manuals. I really expected the factory tool to be bigger than the scroll by at least the desired clearance plus a bit more for spring back.
Since I’m sizing the seal with the crank on the bench in a cradle, I could add layers of aluminum foil (at .0006" per layer) to increase the scroll diameter for sizing purposes and end up with a bit less friction. Might be worth a try.
For closure, I have decided to order the sizing tool from JCNA. I fully expect this to be an exercise in futility but I have been surprised before…in fact almost daily:-)
I have plenty of other engine work remaining to keep me busy!
I think I have an explanation that fits all the know data.
Firstly, the sizing tool: measurements from posts in the archives indicate that the diameter of the widest part of the sizing tool is 3.122", and that the diameter of the scroll is 3.125". The latest measurement of the tool here is 3.120". Either way, it is clear that the tool is slightly smaller than the scroll, so clearly the intention is to have the rope seal a little tight (3-5 thousandths) on the crank scroll.
Secondly, the statement in the Workshop Manual/Bentleys and Haynes manuals that states that the “clearance between the oil return thread cover and the oil return thread on the crankshaft should be 0.0025” and 0.0055". This contradicts the above paragraph if it is referring to the rope oil seal. BUT IT ISN’T. Remember, the early E-Type engines, just like the XKs before them didn’t have a rear oil seal at all. They just had the scroll to throw the oil back into the sump. The clearance being referred to above is for the seal-less early engines. Just like other sections in the Workshop Manual (eg the instructions on removing the bonnet by removing a hinge), it was never updated to reflect the new design of the rear oil seal. I’m pretty sure I’ve seen a manual somewhere that shows the use of the sizing tool, but it’s not in my copies. Maybe that version of the manual has removed the clearance statement, or maybe not. Either way, I think this probably explains the apparent contradiction…
Hi Dennis. My mechanic friend though it superior to having it flush each side - to prevent leaking. As I said I think it irrelevant in all probability. What I do think is relevant is that after you have tightened it up you open it and cut away any threads that have been squished flat between the halves.
Rick, I don’t think it’s good practice to size the seal off the block… you need to achieve concentricity with the tunnel bore. You might size it correctly, but that’s not what really matters…
I believe the rope seal should touch the scroll. If not then why did they add the seal. The earlier cranks e.g. on the Mk 7 had a much deeper scroll on the crank and no rope. I previously modified a Mk7 engine using a 3.8 S-type crank with it’s old rope seal and housing - and no leaks.
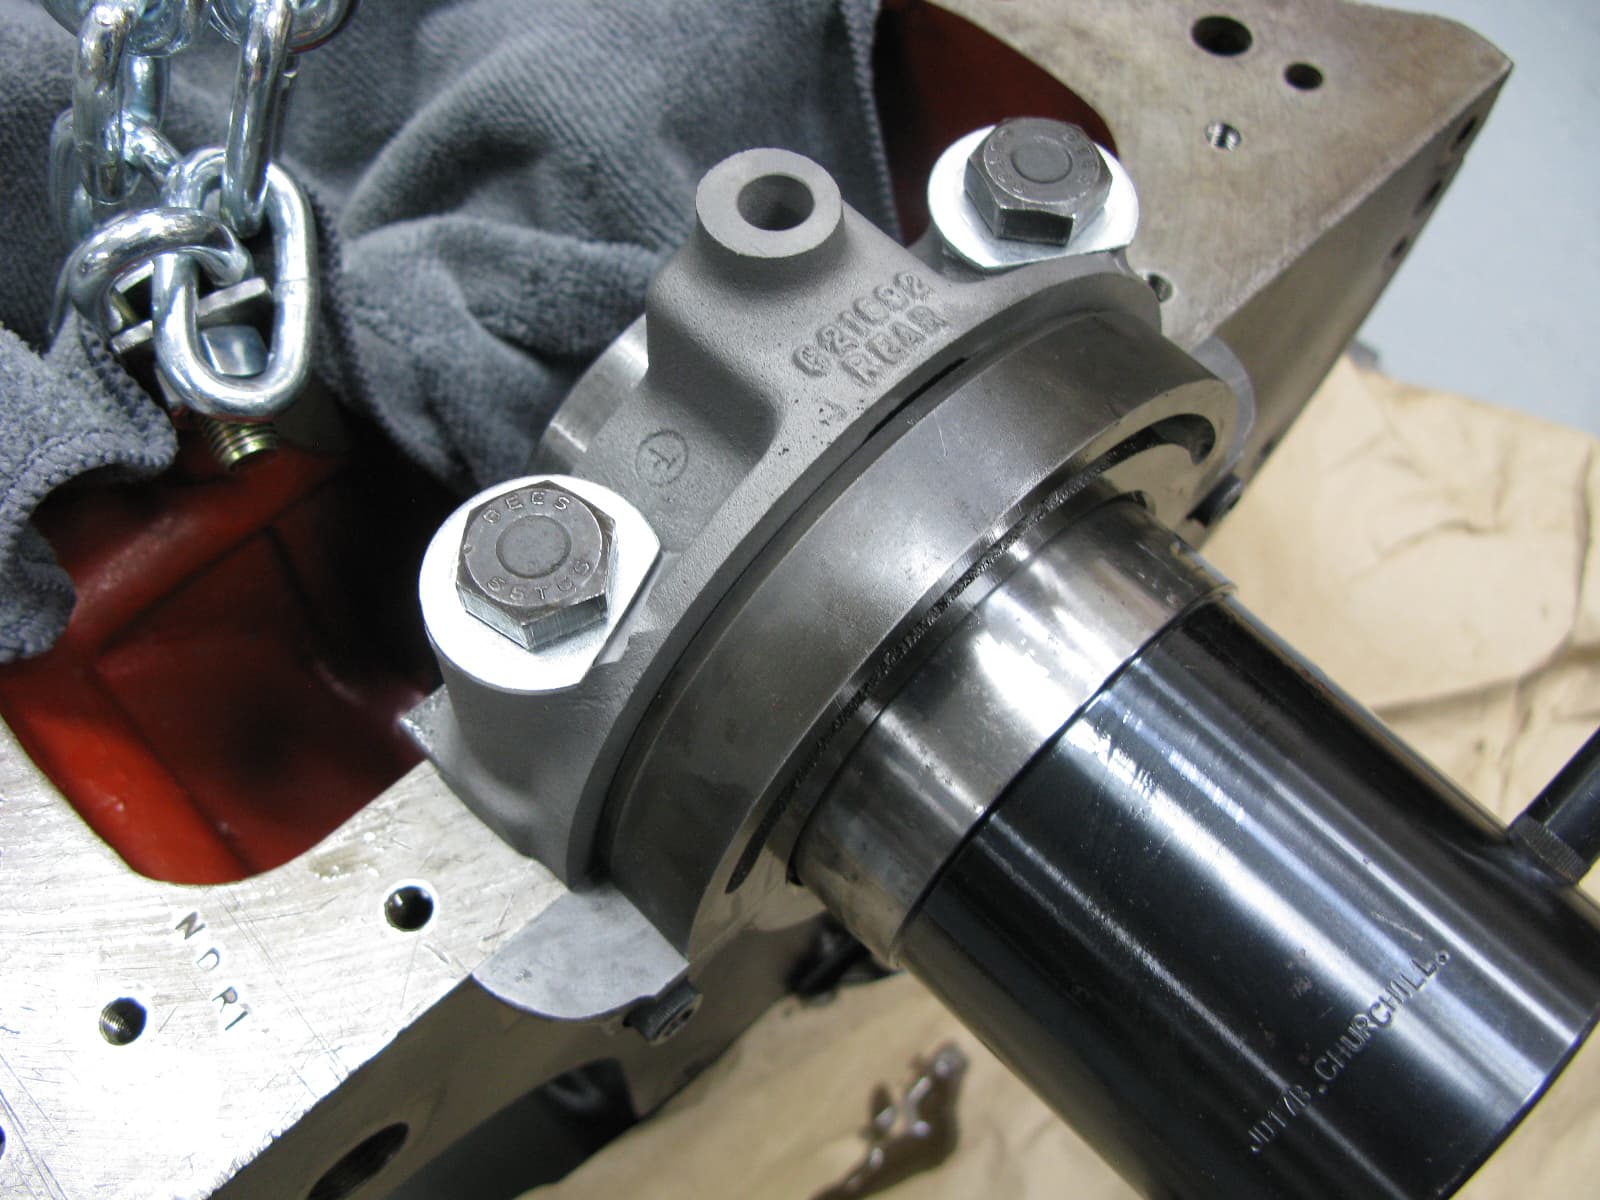
Here is a follow up on usage of the J17 tool I rented from George Camp and JCNA. He also supplied instructions on usage from an S-Type manual since the E-Type manual contains nothing on this. He suggested I soak the seals in oil while the tool was in transit. To use the tool, the rear cap is torqued down and the untrimmed graphite seal halves are first tapped flat and then inserted into the bearing housing halves. The upper half is bolted to the block and the lower half is bolted to the upper half. I think pre-soaking the seals might be a good idea since the oil comes oozing back out of the rope as it is flattened and pressed into the grooves with a hammer handle. Here it is ready for sizing.
The nose of the tool pilots into the cap with a very close fit. The tool is then twisted inward so the seal is forced up and over the chamfer to the final size. The whole operation is very smooth since the surface finish on the tool is polished.
So, is the J17 any better than just clamping the seal around the crankshaft?
Somewhat.
When I clamped the seal around the crank, I got a lot of stray rope fibers trapped between the halves. I think this is because you are enlarging the seal at the same time you are compressing the untrimmed ends. Using the tool, the halves are clamped free of sizing and I got far fewer (almost none) errant fibers. The ends are firmly contained once the sizing begins. So this seemed better, at least for me.
So overall, since the tool is so easily available I would use it. But as many others can atest, it’s not a requirement.
P.S. the dimensions of the tool exactly match the drawing supplied by Terry earlier in this thread, except for the sizing diameter which is slightly larger at 3.120"
Hello Rick,
I think so. I have a specific tool for each the XK and the V12 Engine; not the one tool with an adaptor for the V12. Shown in the following pictures is my version of the J17 tool for the V12 engine and is 165mm longer to pick up two rear Main Bearings.
Using this tool, as opposed to the Crank Shaft is much more convenient, IMO; normally the crank shaft will be removed and replace at least once (to trim errant strands that will get caught between the two halves of the Bearing/Seal housing, etc). I copied the original version and had been using that for quite some time, but when I made a specific tool for the V12 engine and made it longer to pick up an additional Main Bearing, I can safely say that it seems to work better than the shorter version with an adaptor for the V12.
Following, a better picture during manufacture of my version of the J17 tool for the V12 engine, showing the extended nose to pick up a second Main Bearing.
I used the tool from the “club”. I measured at the …“123” rather than the …“120” reported elsewhere. My contribution is that it took about 45 foot pounds to turn the crank at first, reducing considerably after it sat and checked maybe the next day? (long time ago, in dog years). I think “somewhere” it was said you should be under 45 foot pounds - odd that mine was almost exactly this. Perhaps someone should mention the torque to turn the thing, as this is a darn good check if you were way off somehow…
Circa 25lb/ft torque measuring the torque to turn the crank only, without Pistons attached. The sizing Journal is the same for XK and V12 engines, with this Journal of my J17 tool measuring 79.2 mm (3.118"), which is 0.001" smaller than that shown in Terry’s drawing. We finished fitting a crank to a V12 engine yesterday and the torque to turn the crank was 25lb/ft.