I have done quite a lot of lead work, but I am no expert; I have only done it on both my Jaguars.
Your work looks good to me. I have found that it is very difficult to end up with a finish that has no faults at all.
Like you I was trying to avoid using plastic filler, but I have sadly concluded that I have to use some.
If your lead is falling off your panels, you are using too much heat; try turning the torch down a little.
I tend to heat up the tip of the lead, while it is adjacent to the surface and at the same time flash the torch onto the tinned surface. When the lead is hot enough and just starting to soften, I push it onto the surface and apply a little heat slightly up the bar to enable you to twist off a bit, then move on and do another bit.
When I have what I think is enough lead on the panel, I heat it up again and spread the lead over the surface with the wooden paddle making sure it is well lubricated with tallow. You should be able to see at this stage whether you have a relatively even surface. If not, now is the time to refill it, not after you have filed it down. It is very difficult to refill low spots in the filled surface because you tend to get depressions when the surface is heated, but it can be done.
I expect you are using the Frost lead sticks. They are good, but quite large and therefore you need to use a lot of heat to melt them. I reuse the droppings and filings and melt them into thinner sticks (you have to make sure all the impurities have been removed); this makes them more usable for those small low areas, but you have to decide at what point your surface is good enough, because of the law of diminishing returns.
I would advise you not to lead low crown areas; you will just distort the panel.
Make sure your edges blend into the surrounding metal; you don’t want any ridges that are not attached and holding impurities/tallow.
Make sure the finished surface is VERY clean, otherwise you will get adhesion problems later.
When you butt weld with a wire welder, even with the proper wire, that area will not metal finish very well. Some pinholes are a real possibility also. I think lead is better when high stress, twisting and even some extra strength is needed. Granted, the lead isn’t very “strong”, but it has some strength.
Lots of issues with lead. Your whole shop will show steel corrosion due to fumes from the tinning. All of the exposed steel on the body ditto. This cleans off easily but not in nooks and crannies. “Laps” are an issue wherein cold lead is spread over like a hair ‘comb-over’. Tinning is just a bi**h. I used acid core solder as tinning paste just didn’t work all that well for me. Man, does the steel ever need to be clean for tinning.
The areas on mine were all where I feared twisting would compromise plastic filler. All areas then covered with 3M fanciest body filler. Used baking soda and stainless brushes to try to get acid residue from repaired areas, then cleaned with ppg metal prep, cleaned again, then filler.
There is a learning curve with body solder, much like anything else. Muscle memory comes into play, like TIG welding aluminum - once you coordinate what your eye is seeing and what your hands have to do it’s not too difficult to maintain the plastic condition of the solder and spread it. It goes to what you see. The tinned surface will take on a certain shine indicating it’s ready to accept the solder. Alternating the flame from the torch - I use propane though an acetylene rosebud works well too - between the tinned surface and the solder stick until both have just assumed that particular shine then maintaining the shine by modulating the flame through distance is what works for me. You also absolutely need to use a maple wood paddle shaped correctly for the application and keep it lubricated with either beeswax or mutton tallow - I prefer the latter.
I don’t use bondo as a rule but I do use polyester glaze. From what I can see, Paul, that is all you really need to finish what you’ve done, which looks rather good. Polyester glaze - I use a product called Icing - is not the same as body filler and can be applied only in very thin coats - maximum is 1/10". It spreads, feathers and sands better than body filler.
I personally don’t know what those superior properties might be but I acknowledge the advantages of filler, like ease of application, reduced risk of health and environmental hazards and zero risk of heat distortion on large, low crown panels. But there is really no better product for some situations, like finessing edges or areas around the doors, bootlid/hatch and bonnet that might be exposed to chipping if plastic is used - Paul’s application above a good example - or for finishing over seam welds.
The objection I have had to plastic fillers is they are very easy to abuse and we’ve all seen examples of quarter and half inch thick bondo on E-types. But I’ve also seen excessive use of body solder too.
The best objective when doing bodywork is to avoid using fillers at all, and that requires getting the metal straight. Where you can work both sides of the panel and know how to use tools to shape, stretch and shrink the metal you can get away with little or no lead and maybe just a smidgen of glaze. In some situations, again like Paul’s above, where access to the backside is either impossible or limited then you’ll almost certainly need some kind of filler.
It is possible to add more solder to an already leaded area with flaws like the pics at the top but it’s a little tricky. You have to heat the stick and the surface simultaneously per usual but instead of pushing the plastic state stick into the surface once “the shine” is just reached you actually melt the stick so that the solder drips onto the shiny surface below. Timing is everything. Get the leaded area too hot and you know what happens.
I did have another go at filling the dips and most came out better but a couple ended up no better as i just moved the problem. I have accepted that with my limited skills I’m never going to get it perfect so I’ve skimmed it with filler and I’m pretty sure it won’t crack as I open/close the tailgate.
I’ve seen that Classic Jaguar only use lead but then they spray polyester filler over the whole car which is just filler in a spray gun!
I’m a bit of a perfectionist so I often get the urge to rip it all out once I’ve done something to try and get it better but I’ve got to be realistic about this as I do want to drive it before I die hahaha
I worked years ago with a highly respected panel fabrication shop. They refused tolead on account of health. They would lead load panels if specified by the customer but charge extra for it. Personally l believe lead should be used between body joins ie rocker to A -B pillar etc. It shouldn’t be used for body shaping
Hello Robert,
The main health issue when using lead as a filler is when the operator uses a sander of some description to bring the surface of the lead to blend with the surrounding surfaces. This results in airborne particles. Using a panel file avoids this, nearly completely, if not completely, and sensible use of an appropriate respirator circumvents health risk. There is potentially more health risk with inappropriate spray painting procedures.
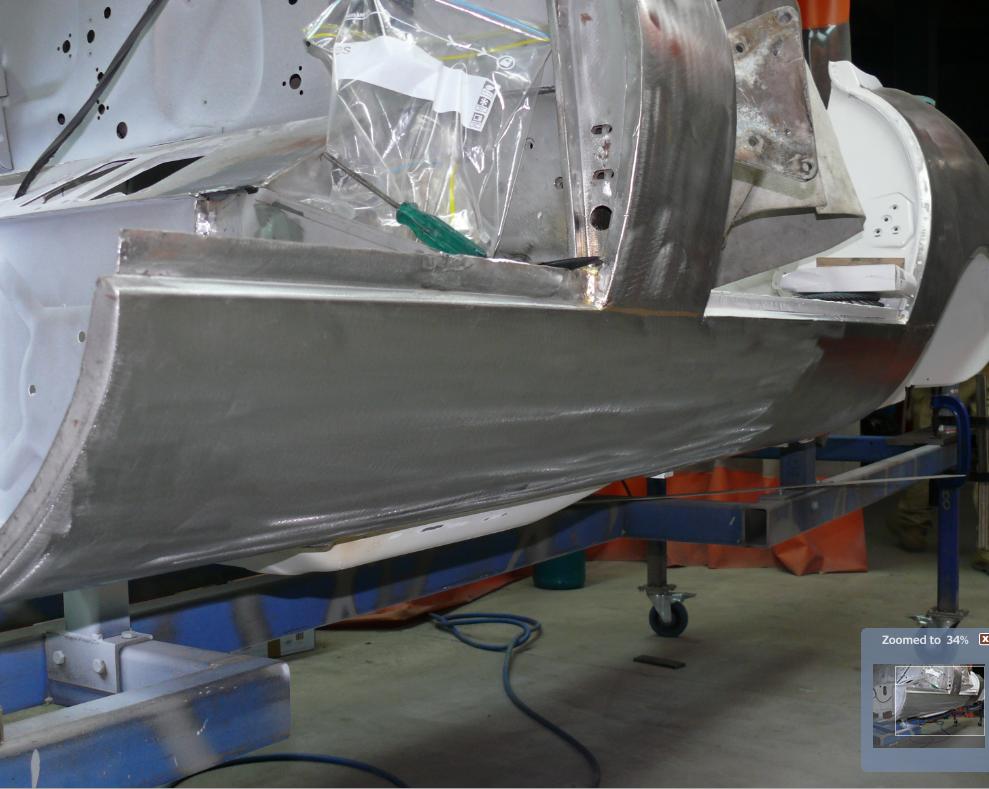
With regards the use of lead at the joints of the Sill - B Pillar and Sill - Cowl, if you’re referring to covering the joint that was typically only tack welded in the factory, that was a flawed method of joining those panels in the first place, in my opinion. The following picture, although not taken to show the joint specifically, shows the result of the method we have employed at my works for many years. In any application where we have to address either of these joints, we TIG braze the joint. The result is a joint with practically no distortion and although we sometimes still use a minuscule amount of lead in these areas, in the majority of cases, no filler whatsoever is required.
I got a close look at a Jaguar Classic (Jaguar Land Rover official restoration) restored E Type tub, a couple of years ago at the Goodwood Revival. Interestingly all the spot welds on the rocker and rear boot area were all on show after final paint, which I kinda liked.
One year at Pebble Beach they had a number of Jaguar employees on the Judge panel. They thought it was gonna be a Jag white wash. However no Jaguar Car was awarded any top prizes. When asked what happened the Judges explained they were never that good off the production line!!! I don’t know if that is a true story, but I like it.
Hello Robert,
The mark of a good restoration, in my book, is one where its hard to tell if the vehicle has had major panel work carried out.
I’m rather Anal-retentive when it comes to original detail appearance. The two following pictures shows the Old School method of producing a Spot Weld lookalike. In both instances, the area of the replicated spots welds will be covered by seals and only seen if and when the seals are removed in the future. Then it will be hard to tell if the panel has been replaced or not.
The horizontal weld in the above picture is a TIG weld that comes within 14mm of the original lead that covers the join between the Cowl and Scuttle Panel. Nothing was used to protect the lead from the heat of the weld; you can see the extent of the heat zone just below the border of the lead.
There’s lead loading and there’s bondo-ing. A thin skim is ok. The problem arises when either is abused. Bondo’s a lot easier to abuse though. A quarter inch of bondo on redone cars isn’t unusual because it’s easy to lather on layers of the stuff … but to be able to sling a quarter inch of lead in one go takes some real skill, and diabolically talented negligence.
The key metric to a top quality paint job is depth of organic material in the finish. Layers of fillers, primers and paints and clears over the base metal. The thinner the better for an enduring finish. It’s why appraisers carry paint depth gauges. An eighth inch of 30/70 applied skillfully and safely over a welded seam or a slight depression Is a better paint prep starting point than an eighth inch of bondo. Flash organics are worse than catalysed organics but both take time to gas off their volatiles to become more solid - weeks. Even months. They shrink. The best polyester fillers are “low shrink”, not “no shrink”. They will shrink around 3% under the finish coat and the better the finish the more it shows. Body solder doesn’t shrink.
There are joins in the E-type bonnet and monocoque that are lead loaded specifically to add a measure of rigidity to the join. There are also flex points that are welded, brazed and lead loaded. Bondo will not perform as well. A modern epoxy product would be ok, and shrinkage is around 1% or less so not as detectable in a fine finish after a couple of years.
The best bodywork requires the least amount of filler, whether solder or organics.
I‘d suggest if you don’t want to use body solder where it makes sense then consider using modern, high tech epoxies rather than bondo and other talc fillers.
I enjoyed reviewing this old thread boy does it bring back memories circles on the hood panels marking highs and lows
IMHO most of the new paints and fillers require less skill to use by design ,less training,faster, more profitable
Older cars where made with heavier metal 18 gage and didn’t have the complex curves of a jag so they tolerated heat better sheet metal in a jag is 22 gage
Leading is a skill that you have to do it more than once the old guy that showed me could flip the lead around like it was soft ice cream dripping on a stick .I can drip it on the floor quit well …maybe put my part there and fill it like a ski base lol . Maybe hire an old guy to come and help you for a day or two
My take away was it needs to be clean clean clean and heat control is everything
Don’t think the torch matters it’s what your accustom to he used a welding torch with a soft flame
Sure some nice work labour of love
Jim
I have a 1968 magazine article sent to me by Bob Stevenson, describing in detail the complete finishing procedure that Jaguar used in those days, including that for E-Types.
Jaguar paid special attention to the lead loaded areas, so in between and after the three primer coats, they would apply several coats of heavy bodied cellulose stopper before the car was baked.
No one would dream of using that stuff these days on a premium paint job so the substitution of modern filler, whether polyester or epoxy has got to be better.
One other thing mentioned that many may not know is that the cars didn’t receive their final colour coat until after they were road tested.
Bumpers etc were fitted afterwards.
This really intrigues me!
I assume that the cars were fully painted in the body colour before all the trim and rubbers etc etc were fitted and the final coat after road testing was just a touch up of any imperfections. Is this what was done?
OK Clive, now you’ve done it. Anyway you can post the article you have? Crude but effective is to photograph each page with a cellphone and post the images as jpegs. Better is to scan the pages as a pdf and post the pdf, which will come in as an attachment to your post. Both methods use the little Upload link in the tool bar.
Harvey, it’s’ not that simple. The copies were very small and poor quality. I already scanned them and enlarged them but the letters are very broken up and hard to read.
I think it would be very interesting to a lot of members so maybe I’ll try to decipher it and post a precis in a new thread. The article mentions all the various steps from the bare shell, including application of sound deadening, undercoating, even listing all the names of the paint suppliers, type of paint etc. It would clear up a lot of myths.
I used this on an earlier driver quality restoration of an MG. Was easy to work with and sets up like metal so was a good option instead of lead loading on a driver quality restoration, obviously not for concorse. .