Good Morning , I got the sills and floors down but now I’m looking for the “how to” on cutting out bad metal over when wells and welding in replacement panels…
Joe B. '69 FHC
Good Morning , I got the sills and floors down but now I’m looking for the “how to” on cutting out bad metal over when wells and welding in replacement panels…
Joe B. '69 FHC
Lots of work here… You will likely also need to repair the internal panels in the wheel arch as well as what you can see. First time I did this area I made my own panels with a brake, sandbag, shrinker and stretcher and various hammers and dollies. I don’t recommend it. Second time around I bought patch panels from Monocoque Metalworks. Chuck has all the panels you need and they are properly shaped, unlike the SNG one you already have. He might also fabricate panels if the stock ones are insufficient. His site has a number of stories on restorations that provide very helpful commentary and he will talk.
http://www.monocoque-metalworks.com/main/e-type-panels/
John North
69 Coupe
67 Roadster
Just adding to what John typed, look through Chucks blog. He has step by step pictures of similar repairs. Someday my coupe will need the same. Tom
I did more or less the same as John did his first time, way back and the only panel I could get was the Robey outer repair piece similar to what you show. I made all the inner repair pieces and welded them in. If you can obtain these somewhere, it would save an awful lot of hand work.
I also took measurements and made cardboard templates to help preserve the shape, both the profile of the arch and the curve of the fender.
You’ll probably need to cut out a bit more than what you’ve marked so that you can properly access the inner fender in order to repair it and clean up the inner surfaces. After welding, I sandblasted and epoxied the inner surfaces.
At a repair shop; what would be the estimated $$$$ range ?
Patrick
'66 fhc
Chuck at MM, he will explain how to use a HF tool to create a small lip on the replacement panels, then use the tool to create small holes on the car panel and insert small screws to attach the panel to the body and then take out one screw at a time and put a spot weld (with a mig) in the hole.
The how to is pretty important toward a top notch result. My practise is to cut out the panel to be replaced leaving a half inch or so of a lip, then position the repair panel over the area to be repaired and carefully trace out its edge on the car. Then I use a dremmel tool with cutting discs to precisely cut out the lip. A bit of extra work but the only way I’ve found to achieve a really tight and accurate butt joint. From there tack welded in place.
Yes! Burned up 3 Dremels doing ours - one still on warranty (they took care of it no problem). Used one or two million cut off disks. Don’t use the heavy duty disks, larger kerf doesn’t work as well. Would load up 5 or so mandrels because you’ll stay more sane as they constantly break.
I got the Robey inner wells - very expensive and very hard to install. They didn’t match the outer Robey’s all that well. The stuff I got from Chuck is just better, but thank Robey for being there when no one else was.
I use a HF flange tool to provide a lip so that the new piece with the lip can be placed behind the old piece and welded in place. I not that good at butt welding.
All my patch pieces were made for me by Monocoque Metal works and they were all great fits. My lower valance from one if the usuals had a mouth opening that was off by almost an inch.
I never use Dremels for heavy duty work: instead, a better option is a Fordom tool.
I’ve taken to using a pneumatic die grinder fitted with a thin disc mandrel more often, though the much higher rpm seems to eat up more discs per foot than the dremmel type tools, and it’s noisier in the shop while the big compressor is running. I also use a 90 degree die grinder and a stack of 3 2” dremmel discs to finish grind my tig welds. I’ve found the quality of the discs is somewhat important and source these from an abrasives specialist (Keen).
I’ve done similar repairs. The step flange stiffens the join and helps to reduce heat distortion. If you want to stretch/shrink the weld afterward, though, it’s not ideal and not possible to achieve a filler free repair.
Back to butt welding and cutting out the damage and letting in the new panel, how you do the cut out depends on how you’re doing the join. If tig you cut precisely on the outside of the outline marked on the body so that it remains just visible and you get a tight butt. This way you’ll use very little if any filler rod, minimise heat input and grinding therefore minimise distortion and black grinding crap in your shop. If mig you cut right on the line to allow the use of panel clamps and present an even 1/16” gap for perfect penetration.
I would head to YouTube. Metal patching is metal patching it doesn’t matter what kind of car you are working on. Eastwood is a good source for tools to do the job.
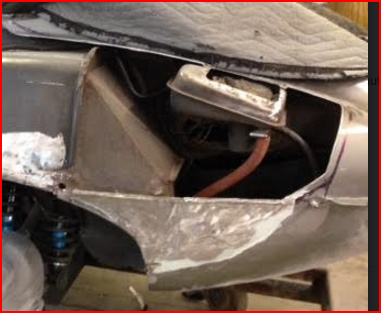
Not sure what you’re after but here’s a shot of the innerds of the rear wing taken off the car. I have other shots of the same area but at different angles if you need them. Also, it they show the routing of the wiring going back to the rear of the car…
Hi Less, Could you show the view from the rear looking down into this open area showing the relation of the three panels that come together at the rear wheel well…
Joe B. '69 FHC
Very nicely done!!!
Here’s another pic that might help…
Ah, I see that’s just a clip of what I sent earlier…apologies. Don’t have anything better.


