21/4
Engine bolted in , on all new Rubber mountings , took about 3 hours I guess ,
All ready to bolt things back on , will start that tomorrow !!


1 Like
On the circulation pump, you never know…might be a benefit.
When you put the engine in (from under I assume) we’re you able to leave either intake or exhaust manifold on? It’ll be a while before mine goes back in (engine is on run-in stand at moment)…but those manifold nuts sure are easier to get to while out of the car.
Tom
Hi Tom , I left the inlet manifold on , I used the XJ6 engine mounds bolted to the engine to lift it in position ,as they are set back more , you have to remove the 2 engine mount brackets bolted to the body , and it’s easier if the ones on the engine are off too , when you lift the engine up to just over the right height , bolt the body brackets on first then the brackets to the engine , then last the rubber mounts , found out the hard way that’s the best way !
Would make life a lot easier if I had fitted the gearbox mount , to the gearbox before We fitted it , as you have to compress the spring to do the bolts up !!
The centre engine mount was easy , once the front and gearbox mounts are in place , and the engine is sitting right , you just stick a screwdriver down in from the top and wind it up till it touches the rubber , then replace the top washer and nut .
On the Engine mount brackets that bolt to the body , they are left and right , not the same , so best mark them up as there is not much difference ,
My new rubber Engine mounts come with all new bolts , new bolts where a little bigger then original , so had to drill 1mm bigger hole , nuts are bigger to , where they bolt on to the bracket and the bracket to the body , there is very little room to do the body mount nuts up !!
Ps , make sure the centre engine mount is right down , and moves free up the thread !
The engine mounts bolted to the body , have slotted holes , for the rubber mounts to fit in , we had to do a bit of levering to get them to fit the same both sides , ie same amount of slot showing !


First problem fitting the Electric pump , the Elbow fitting cannot be screwed in , engine casting is in the way , need a straight fitting !!
From what you were describing it sounds as though you are pumping from the block drain to the heater? If this is to increase the output of the heater isn’t that the wrong place to draw from as the water would have just com from the radiator?
No Robin , using a heater pipe to pump in to the block to help circulation !
22/4
Busy day today , found a few issues !!
Fitted
Dynamo , had to use a spacer to take up the play in the bracket .
Exhaust manifolds , quite a easy job , only about 3-4 nuts could not be done with a socket !
Fan on water pump
Electric water pump , no pipes needed cutting , so can change things around if needed
Wires to gearbox
Water heater hoses
Carbs , lines up with MK2 linkage
Oil pressure gauge pipe
Temperature wire
Coil
Rad in temp !
Issues
Air filter housing is to wide to fit , will make mesh covers for now
Rad top hose out let , not a good line up to the inlet manifold , have a U bend on order , may work , if not will get the top hose outlet on the rad changed , so I can use the U bend
Think that’s about it !!
If I have missed something I will add it , like reconnecting speedo cable , just remembered:grinning:


1 Like
Pipes on cards are only there to cover holes , as they come off test bed
Starter motor wire connected ,
Wires connected to Rev counter generator
Wires connected to Dynamo
E-type clutch hydraulics is a confusing subject. Correct me if I am wrong, but this appears to be the longer 95mm slave, which is usually the self-adjusting type - this one does not function properly with a return spring. However, there were apparently some 95mm slaves that were not self-adjusting. Here’s a link that discusses the issue. http://etype.chrisvine.com/2015/01/clutch-cylinder-revisited/
When you drive the car, keep this in mind - if you develop trouble shifting after driving a few minutes and it feels like you are losing your clutch, remove the spring, and it should work fine. I found this out the hard way.
Ron , the clutch has worked fine for a good few years now , Gearbox is from a 240 , 1968 that has the 95mm slave , and a return spring , I know nothing about E-type issues !!
So I am not Confused 
23/4
One of them days today , car was fighting against me , nothing was easy , so it will get a thrashing once on the road 
Clip that holds the dis cap on had broken off the XJ6 , easy fix , bolt the MK2 one on , then found out they are not interchangeable , so ordered a new clip !
Fitted the S/steel 2 inch Exhaust , just enough room !
Wonder if it will sound the same ?
Turn your volume up lol
https://www.youtube.com/watch?v=Y-7vm5wgxX4
Added that as a reference .
Fitted new servo to manifold pipe , that’s under the manifold out of sight
White bit on the old pipe is a one way Valve , as I took the tank of years back !
Clutch pipe fitted
Battery back on
Made some temp carb shields , stop big stuff getting sucked in .
Re fit clutch housing cover plate
Sort pipe work out , engine breather to carbs


That’s great - just needs to work! It’s the same issue whether e-type or sedan, but you apparently have a non-self adjusting long cylinder, which I didn’t know existed until recently. My 68 and 69 e’s both came with self adjusting cylinders, and it gave me fits with a spring installed before I figured it out. My Mk2 with '66 4 synchro o/d also has no spring.
As for myself, I am frequently confused!
If as funny as this…video it, and post it!!

26/4
Few job’s done after work so far this week
Plumbed in the cards , had to get a reducer , HS8 fuel feed is around 5mm , pipe out the filter is around 9mm .
More or less rigged up the manual choke , works off the leaver that is in the car , that’s a 3 stage leaver , works great , off is the middle and choke is down , clicks in and holds , should be the other way around , but I am happy with it ,
Need to get a cable barrel clamp !


28/4
Electric water pump wired in , used the redundant electric choke switch and warning light !
Oil filter bolted on , with a new Jaguar filter !
Had a look at the lower steering column , 4 cap head screws hold the splined end on , the telescopic end , so took it off and had a look , looked a bit low on grease , so packed it with more grease , placed a poly bag over the 2 half’s before I bolted it back together , to stop the grease coming out !
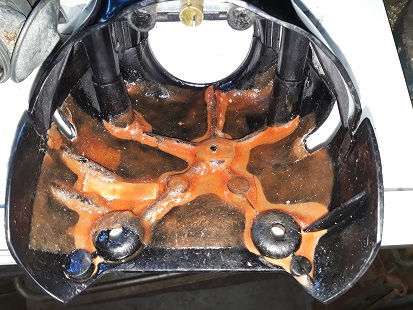
Bolted the subframe back on , will it fit will it fit !!!
Just , had to use the 2 alloy spacers together on one side , to keep the bar away from the sump .
Only about 5mm clearance , placed a jack under the wishbone and jacked it up , so the weight of the car was on it , there is a good 15mm clearance , bar to sump , so should be ok , unless I go over a humped back bridge at 100mph !!
Called it a day !
So if anyone has 2 Alloy spacers, that fit under the Anti roll bar , fitted to cars with alloy sumps , I am in the market for 2 !!!


I removed the front subframe mounts , and the subframe went straight up in position on the Jack !

Did not realize you are using a Xj sump Ian, there is the problem.
Peter B.
1 Like
Not much of a problem really , have priced up some Alloy bar , around £9
Like I said , I did jack it up on the ball joint , a good 15mm clearance , still some weight to go on , bonnet , 14 pints of oil , water , and a few other things , plus the suspension will settle with the wheels on , so I expect the gap to go up 20-25 mm , so getting on for a inch , can’t see anything moving that much , but time will tell !
You should be fine, I have a similar large aluminum sump (perhaps also from an xj6) and a thicker sway bar from an S type. Needed 1" blocks and the bar fits perfectly.
Thanks for that Theo .
1/5
Well , in the box of bits I come across the earth strap , would have made life easy if I had remembered to bolt it on the back of the gearbox before refitting , but its on now , still in very good condition for being over 50 years old !
Bit of a job to do the top steering pinch bolt up , life made easier with a tube on the ratchet on the bolt and a spanner on the nut
Noticed the holes in the lower steering cowl are starting to get big and oval , so stuck s/steel thin washers over the holes , fiberglass I added inside a few years back is holding up well , it was just cracked in a few places , and it’s stable now
Had another distributer come yesterday ,e-bay find for £10 , so will clean that , and add the new points , condenser , and uprated rota arm !
Turned the ignition on for the first time , to make sure all the dash lights are working , all ok , turned the fuel pump on , and have fuel dripping out the air intake on the HS8 carbs , I guess the needle’s are not seating right !


This is a great write up, and I’m really enjoying the progress. ![]()
Your earth strap comment reminded me of when I changed an engine in an MGB, and forgot the strap. I was leaning over the bay, cranking it and wondering why it was turning over so slowly. I leant on the metal outer choke cable and burnt a track in my arm! It was the return current path in lieu of my earth strap!