Is there anything of which I should be mindful when I remove the steering wheel from my MKV. It needs to be refinished (re-plasticized?). It’s in very sound condition aside from the dull finish. I’m sure that people will have had those, “If I only I had thought to… before I removed the wheel?”
When you disconnect the manette wiring attach another length of wire to it so that you have something to pull it back through the tube when re-assembling.
Do a sketch of the wiring connection at the junction block as sometimes the colours don’t always match the circuit diagram, or have changed due to age. Make sure each bullet on the end of the harness is staggered before pushing into the tube to avoid jamming or squeezing. The harness is made this way for this purpose, but it may have been changed by a previous owner not caring too much about repair quality. I wrap the bullet bunch in masking tape to avoid abrasion on the insulation and to tie the draw wire onto the harness. Once I pushed the harness down the tube without using a draw wire and it went easily without a problem.
I agree to that, and always do the same when pulling things through longer structures, like the scuttle or sills etc. You get the correct routing for things like speedo or tach cables, bonnet opening cable (not on MKV though), oil pressure or temperature gauge etc.
Yes, that’s true. The majority of the harness has only three coloured wires! The Manette wiring is original, thankfully. One of the next jobs is to replace the wiring harness. Once that’s done the car will be near perfect. Hasten slowly, I guess? At present I would be thankful to just drive the car beyond the 5km radius we are allowed to cover, for essential purposes, at present!
Hi Tim, along with the sketch of the bottom connections, use a paint pen to mark each wire and the corresponding plug , as most of them will be a uniform black from years of oil impregnation.
You might want to get the manette and the chrome cleaned up at the same time, as it may look scruffy against a fresh wheel.
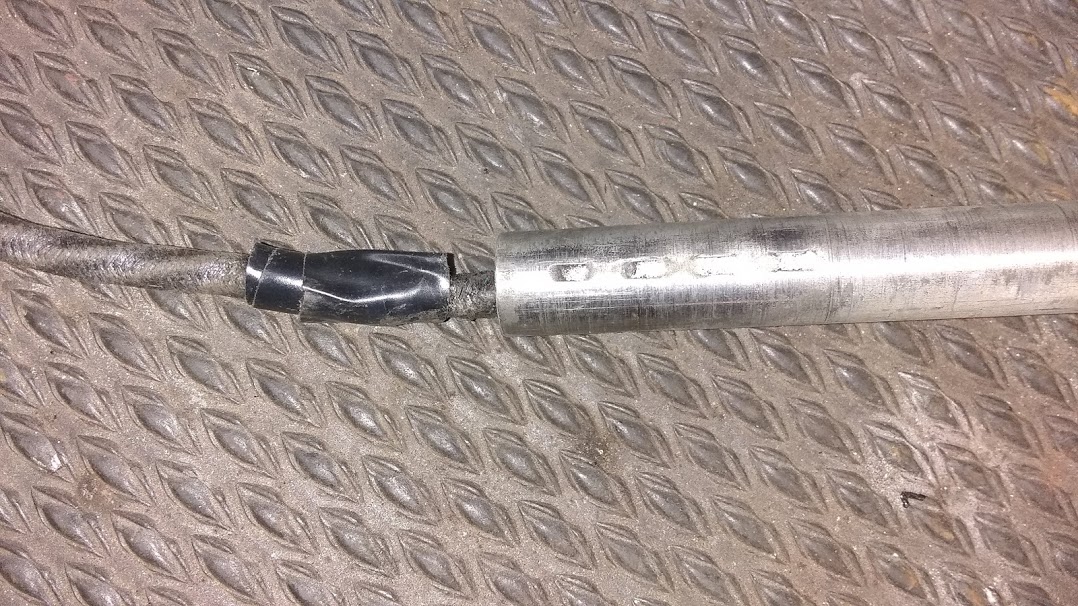
In addition to the above good advice, I would add that that where the inner stator tube inserts into the manette tube is an abrasion location, where the wiring harness gets worn through when you pull the wheel in and out. I would put a length of shrink tube over that area of the harness and shrink it down with a heat gun.
My XK120, which is the same setup, used to blow a fuse every time I signaled a left turn, and it turned out to be the harness was worn through at that point from 50 years of owners pulling the wheel in and out, and the left turn wire was grounding out inside there.
The same thing can happen at the forward end where it comes out of the steering box.
I had difficulty removing the snap ring or circlip holding the wheel in, had to modify some snap ring pliers to get it off.
Then there are 2 slotted grub screws which were corroded and hard to remove. I let the penetrating oil work for a week before I tried them.
The wheel is the same coating as XK120 though larger diameter. XK120 people should know what that coating is. It’s not just ordinary paint.
Three! You lucky, lucky… Sorry, I’m not deliberately trying to sound like Monty Python’s Flying Circus, it just comes naturally.
On my MKV DHC there are TWO kinds of wire, all thick wire is black and all thin wire is white. A nightmare to debug. I have replaced the missing and useless wires with correct coloured fabric covered wires and I do have a complete set (almost $3000 USD IICR from Rhode Island Wiring) but it’s waiting for the body off complete restoration to original colours and spec.
The manette and a few things had kept their original wires, but not even the dash (instrument panel) so the directional indicators and a few other things have really given me a hard time.
One other thing Tim. Check the integrity of the junction block to see if any of the myriad insulating dividers are broken or missing. A colleague was in the final tasks on his car and upon testing the electrics, the left headlamp flashed in lieu of the flasher lamp, but only occasionally. We double and triple checked the order of connections at the j.b. and the manette but the problem was part of a dividing barrier missing in the j.b. This allowed the flasher and h.lamp sleeves to make contact occasionally. It had us laughing for a while. A new one was sourced from Worcester.
Just a few notes on steering wheel restoration. On the Mk IV the spokes are covered for about 3/4 their length, terminating with a small integral collar. Some of the spoke covers were debonded and some collars missing. I successfully reattached the cover strips with epoxy glue and made replacement collars using suitable diameter copper wire. I used copper because it bends easily and can be pinched to snugly wrap the spoke. They were attached with epoxy applied carefully with a toothpick.
I repainted all the black with two part marine enamel. It gives a beautiful finish but the downside is that it is high gloss. I have a spare wheel that I might try dulling down with something like 0000 steel wool.
Thanks for the tip of the paint pen. I have a new Chrome piece which thankfully was readily available because it’s the same as the XK120, as is the turn lever.
Thank you Pekka. I imagine that when the cars were undervalued that cheaper solutions had to be found. I have to admit that I nearly fainted at the price you paid! This place in the UK is fabulous. https://www.autosparks.co.uk The cost for your car is 415.00GBP (inc VAT). https://www.autosparks.co.uk/finder
Thank you Rob. The lovely fellow in Australia knows what he’s doing. He has restored my MKIV wheel beautifully. The only issue is that he’s in his 70’s so I can’t really put it off!
Yes, thanks, I have used them (Autosparks) for many needs, engine harness for XJ6C S2, and various alternator harnesses on my E-types (I think those wires should be in top condition always), but the problem nowadays is that for instance on E-types etc as the original instrument lighting bulb holders are not available and the new ones. are plastic, you would need an earth wire for each bulb etc.
I nearly fainted too, but the quality and instructions are top notch, every cord looks correct and has correct connectors, even the in-line fuse holders are there where applicable. It was actually the Swiss restorer Georg Dönni who recommended Rhode Island Wiring and I have to say their service was really good and from what I have seen so far the complete wiring harnesses (including also all the instrument panel wiring, as mine was completely replaced by some nifty do-it-yourself mechanic), are really 100% like they would be from the factory in 1950.
Now if I can still find the time and money to actually do the complete body, interior and hood (convertible top) restoration. I am still missing the correct kind of hooding material, but Dönni had some ideas about how you can get it with a special order from Haartz, not easy nor cheap. Mine was and should one day be again: Birch Grey with a Pale Blue interior (I have 12 meters of Rexine in “Pale Blue” and a French Grey hood. (very light grey).
I’m very pleased that it is for that money. The old adage, “You get what you pay for” is probably true. We do have a terrific wiring loom manufacturer here on Melbourne however he can take over a year to complete the task because he is so busy. His loom is $1’400.00AUD. He made the one being fitted to the MKIV.
Dear All
MKV 640290
Help if you could please.
Finally the steering is all back together and the wheel alignment and geometry is all within the tolerance.
With the road wheels in the straight ahead position and the steering wheel centred the manette control is off centre.
Does this mean that the manette tube is not aligned properly with the stator tube.
Can the clip at the lower end of the steering box be undone and the stator tube turned slightly.
Or is it likely that I have other issues.
Any replies will be appreciated thank you.
Regards
David
I think there is a bayonet action for connecting the stator on the manette to the lower stator tube. You can just slacken the clamp at the foot of the column if needs be.
Peter is correct. There is a slot in the lower or forward stator tube, and nubs on the manette tube which fit into them. You loosen the clamp at the front end of the steering box and then rotate both tubes together so the turn signal lever is at the top.
Peter, Rob
Thank you for your fast replies, excellent photos - very much appreciated.
I will loosen the clip at the front and give it a try, report back will follow.
Regards
David,
Dear all
An update, all back together, Peter and Rob’s instructions followed, Manette now sits as it should, very good result, Thank you.
Regards
David