Not so. They are fitted to match the folded layer of picture frame next to them, thereby giving a flat surface so there is no twisting. The orientation would still be governed by the full thickness part of the joining area, which remains unchanged.
That does make sense. Thank you for correcting that.
Would it make a difference for Manfred if the engine is installed or not? Just curious. Assuming the the engine is out, will nice gaps change after painting and installing the engine?
Martin
If it made a difference it would be to make it worse unfirtunately. Manfred’s gaps are too small. Added paint or slight frame flex from engine weight would make them smaller still.
A bit overwhelmed by all the responses, I have been fighting with the bonnet during the last week. Bonnet 1: Manfred 0  So I think it is time now to report back, what I found and where I am at now.
Let me recap: I have bought the car with a dented bonnet and a broken bonnet support frame, so I don’t know anything about the fit before the crash.


I have dis-assembled the bonnet, stripped it down and primed it. The lower valence and Center piece have been repaired by a (BMW) body man, the bonnet support frame is new (after five month waiting for the part). Regarding the valence, the attachment points for the hinges are a little skewed which lowers the bonnet by 3/16th of an inch.

The engine frames are (to my eyes and measurement) perfectly straight, the attachment points to the firewall look and measure undamaged. The lower tubes of the engine frames are perfectly in line with the floors/datum line.

On both sides, the hinges are shimmed both vertically and horizontally to the maximum.

In addition, I have shimmed the lower attachment points of the bonnet support frame to the picture frame by 3/8th (1 cm). That moves the bonnet in addition to the shims at the hinges forward by an additional 3/8th and upwards by 5/8th inch.


The center piece of the bonnet is centered and perpendicular to the body. Both sills are square to the firewall.


On both sides, the lower corner of the fenders are NOT square to the rear edge of the bonnet. They are off by 1/8-3/16th inch, one side at the front, the other at the rear.


This is the fit as it is now. On the LH side, it is quite good with a gap of 3/16th inch. On the RH side, the lower edge of the fender still touches the sill, although the upper end of the fender is aligned to the upper edge of the firewall. The front lower corner of the fender is 1/2 inch in front of the sill edge.
The big problem is that the shims are at their maximum and in addition, I had to shim the bonnet support frame. For a good fit with some room to maneuver after engine install (three shims max), the bonnet is by 11/16th inch to far backwards and 7/8th inch too low.
I would understand the miss-fit if the bonnet was from another car (which it isn’t).
Is there anything I overlook?
How do I continue from here?
Thank you, Manfred
The fit on the right wing suggests that side of the bonnet hinge is too high. To get a perfect fit, you may well need to cut off and re-weld the lower edge of the wing, and/or even slightly trimming the rear edge of the right wing and center panel. Keep in mind, these things were NEVER fitted perfectly by the factory. By modern standard, average panel fit when brand-new was pretty poor. Expecting a perfect fit without re-working some areas is just not realistic. I’d say yours, as-is, is actually pretty good, compared to many other unmolested cars I’ve seen.
Regards,
Ray L.
1 Like
I’m looking at the lower valence where the hinges connect and I can see some rumpled metal where they were likely bent and straightened but I’m not seeing obvious deformation. How are you coming up with the 3/16" lost figure? Have you considered replacing the entire bonnet baffle? It’s not super cheap but not super expensive either.
How many shims was it packed with when you took it apart in it’s pre-accident state? I’m wondering whether the new bonnet frame is out of spec because I’m not understanding how you could have lost so much? Is it a Robey part or E-Type Fabs?
I’m not thrilled with the shims there TBH. As a last ditch effort (and I’m sure you’re getting tired of this) it might be acceptable, but I wouldn’t do it with washers. I’d rather see you do it with solid aluminum. It would look less bodgy and would support the whole frame pad, rather than in just 4 spots.
On the sill joints, by how much is the bonnet out of square there? Is it small enough that it could be ground without losing the rolled edge of the wing? What happens if you remove 1/16" top shim on the right side. That should close the gap on the front of the sill and leave the back alone. The back would still be too close but a bit of grinding would help. Alternatively you could lead in the front of that gap to close it up.
2 Likes
Hello Manfred,
I would be confirming that datum faces of the Engine Frames and the pivot point of the Bonnet Hinge Frame are in the correct position, longitudinally.
Just because the Bonnet Hinge Frame is new, is no guarantee that it is geometrically correct. I recently had a new S3 Engine frame where the Top, Inner Tube was short by 6mm.
I have a jig that the body, complete with frames, goes on to check all original jigging points of the body and frames, but the Old School method using a Plum Bob to transfer the location of these points onto the floor works well and will cost you only the price of a good Plumb Bob, if you don’t already have one.
-
Find an area of your floor that is fairly flat and level
-
Place Body, with Frames attached, on stands and adjust so that the floor of the body is parallel to the floor.
-
Use the Plumb Bod to roughly locate a transfer point on the floor. Use chalk to mark a 1/2" square on the floor.
-
More carefully now, drop points of interest down onto the chalk mark and use a Lead Pencil to mark a cross where the point is transferred to. If you encourage the Plumb Bod to sway very slightly in a direction perpendicular to the centre line of the car, this will give you an accurate mark Lengthwise along the body. Mark a short line perpendicular to the centre line of the car corresponding to the traverse of the Plumb Bob.
-
Repeat Step 4 with the Plumb Bod encouraged to sway very slightly, parallel to the centre line of the car. Mark a short line parallel to the centre line of the car corresponding to the traverse of the Plumb Bob. Where the two lines intersect is the location of the point transferred from the body and or frames.
Once you have the datum points transferred to the floor, a tape measure can be used to check the location of the points.
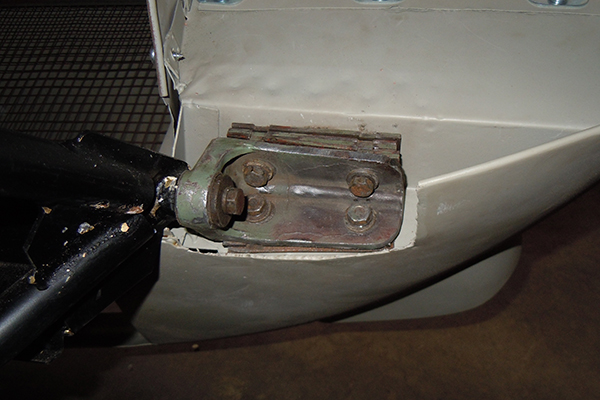
With regards to getting a good gap between the lower edge of the wing, aft of the wheel arch, and the sill, I wouldn’t be cutting the section off and reattaching it. A better method is to unwrap the wired edge and re-roll it. The factory, generally, did a fairly poor job of rolling the edge and in the overwhelming majority of cases, too much material is rolled over. The picture below, Wired Edge1 (the bonnet is sitting nose up, vertical), shows an original, factory wired edge of the lower section of the wing, showing an excess of material rolled over. If your gap is too large, you should have ample material to close the gap, by unwrapping and re-wrapping the wire.

Wired Edge1
The following picture, Wired Edge2 (bonnet also nose up, vertical), show the wired edge done correctly.
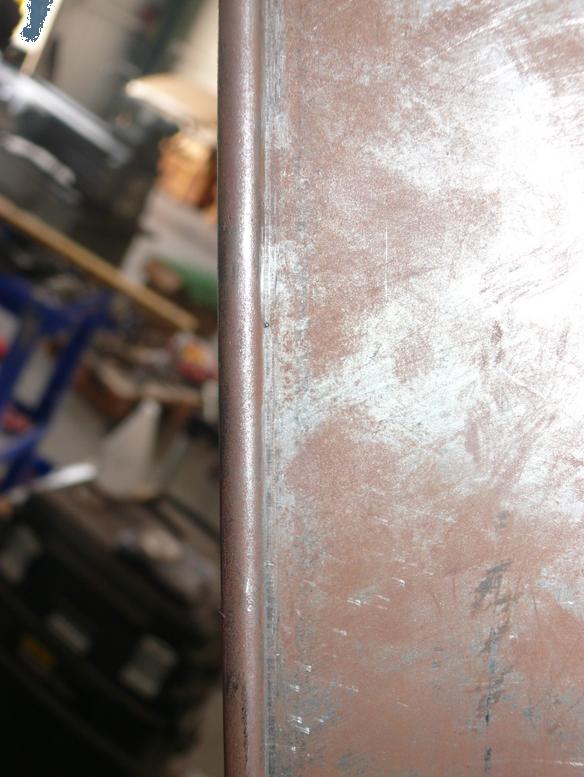
Wired Edge2
The following picture, Wired Edge3, shows the correct gap achieved by replacing the lower section of the wing with a section that had been pre-wired (the section was replaced due to rust). The wiring of the curved section shown in Red was done in place.
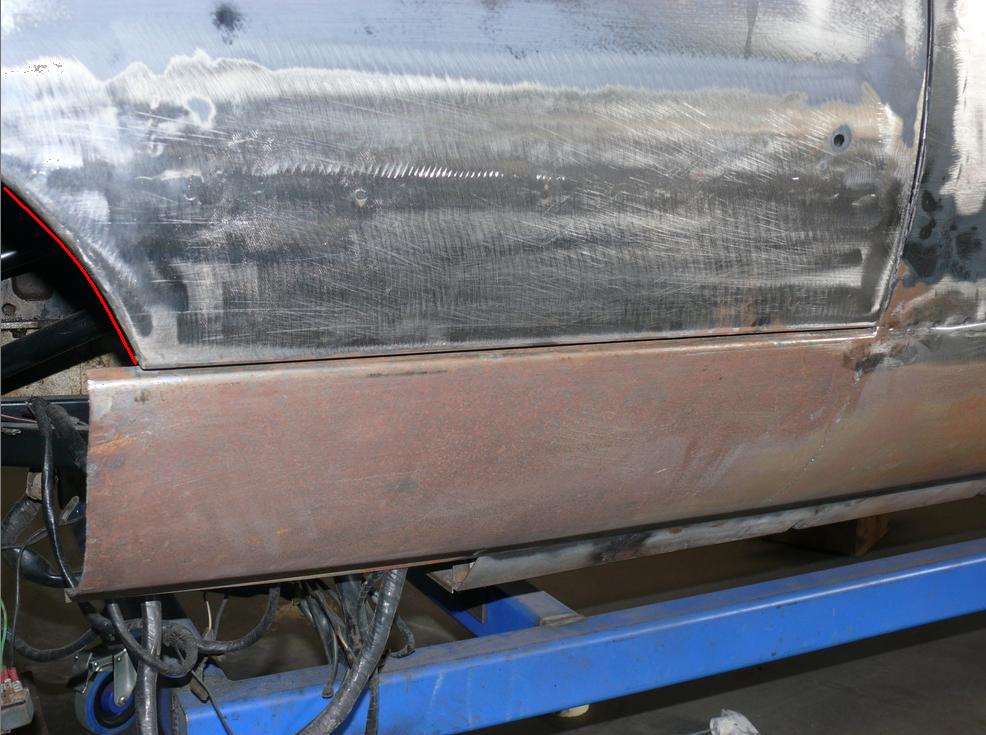
Wired Edge3
Up until very recently, this car was supported on a Dolly at the Rear Suspension Cradle mount points and where the Engine Frames attach to the tub chassis. Accordingly, all weight forward of the Engine Frame mount points would tend to open the gap at the top line of the bonnet. For a semi-final fit of the bonnet, we install an old engine that has ballast added to simulate the weight of the engine, plus all other parts that would be in place when the car is finished. Support for the front of the car is moved forward to where the suspension would locate.
Regards,
Bill
2 Likes
Hi Ray,
yea, I understand and have accepted that I will need to alter the height of the RH fender. However, the fit pictured in my photo is with the maximum number of shims in both directions and an additional shimming of the bonnet support frame. In other words, to reach a good fit with, lets say, three shims at the hinges each 1/8th inch and no shimming of the support frame, the attachment point of the hinge on the bonnet support frame is half an inch too far back and another half inch too low. In other words, I see no way to get a decent fit without additional shimming of the bonnet frame. And I really don’t understand, how this has fit before.
Thanks, Manfred
Erica,
thank you for your reply. Is baffle the same as the lower valence/front bonnet underpanel? I am not that fluent with English terms. The valence costs €1.500 which is indeed not cheap. However, I would consider that If I would be sure that tis is the problem. Tomorrow I will carefully measure the height between the hinge attachment and the upper edge of the valence where it is bolted to the fender. Hopefully, someone can compare that measurement to another S3 bonnet.
When I dis-assembled the car, the bonnet was shimmed:
LH horizontal 7/16th", vertical 7/16th"
RH horizontal 5/16", vertikal 1/2"
The new bonnet frame is from SNG Barrat and manufactured by Martin Robey. Again, I will take measurements and ask others to verify.
At the sill joints, the lower edge of the fenders on the LH side is off by 1/8th at the wheel opening. On the RH side, it is off at the firewall by 3/16th". And I have no idea how that could be corrected by grinding?
What is TBH? Like you, I see the shimming of the bonnet support frame as a last resort. Instead, I want to pinpoint the root cause and correct that. I added the shims to the support frame to find out, how much in addition the bonnet needs to be moved. And yes, If I would go that route in despair, I would fabricate a solid shim that would look like it belongs there 
Regarding your last paragraph and removing a shim from the hinge on the RH side, that would not help. Actually, the fender is touching the sill, but it is not obvious in the picture.
Best regards, Manfred
I have nothing else to offer on this subject, but I believe TBH is “to be honest.”
1 Like
Manfred, I was referring to the part that actually has the fixing points for the hinges. Is this the component that you believe to have been deformed by the wreck? This is however not a S3. I’m not familiar with the later bonnet’s construction and maybe it’s part of the lower valence.
To be clear, are we both speaking about the horizontal line that is created between the sill and the bottom edge of the bonnet? If so, then this is where I was saying that removing a thin shim should help. Removing an up/down shim has the effect of lowering the front of the bonnet and tilting the back of it. So it should slightly reduce the gap at the leading edge of the sill. The grinding I was referring to is if the process of tilting it down throws off the vertical line struck by the bonnet/bulkhead joint.
But if the back of the horizontal line is touching and you can’t raise the rear fixing points without ruining the appearance of the joint along the top of the bonnet and the bulkhead, then you’ll need to do the work that angelw describes very well. There is wire wrapped in that lower seam and if you grind there it will just mess it up. That sort of correction is well beyond my abilities but it seems like it could be done.
I’m kind of wondering whether this is actually the original bonnet for the car. If the rear wing height is so off that it would require re-rolling the bottom edge, then that couldn’t have been caused by a wreck. That’s built into the part.
Shimming the bonnet can be counter-intuitive and adding or subtracting a shim at one of the four points affects the other three in ways that are not immediately apparent. Because the bonnet is so long and wide, any slight angle adjustment at one of the four points will be multiplied at the skuttle and tops of the inner sills. If you seek to correct a resulting misalignment you will introduce another variable and compound the problem.
May I suggest you undo everything you’ve done so far and do a clean start? I used four, small wooden blocks to support the bonnet to its correct gap and elevation against the skuttle and then fiddled with the hinge shims.
1 Like
Hello Manfred,
With regards to buying a new Lower Valance, it would depend on the manufacturer (there are a few). Some are just a downright rubbish fit and you may end up in a worse situation than you are now. If it eventuates that the issue is with the Lower Valance, the Lower Valance Support Panel advertisement posted by Erica, is from Monocoque Metalworks and his parts are a good fit. If the rest of your Lower Valance is in reasonable condition, I would be getting this panel from Monocoque before purchasing a complete, Aftermarket Lower Valance.
However, before buying items like that, you need to determine the cause of the poor fit of the bonnet. A knock on the front of the bonnet hard enough to damage the Bonnet Hinge Frame as shown in your pictures is highly likely to have displaced other datums. I would be checking the dimensions of “B” and “D” shown in the Alignment Check of the S3 Repair Operaion Manual. Particularly, I would be checking the dimensions of your new Bonnet Hinge Frame.
Regards,
Bill
Manfred;
I don’t know if it would make a difference but your picture of the bonnet support mounted to the frame rails does not have the top support rail installed for the ‘picture frame’. I don’t know if it would make a difference or not.
This is my only observation as the other suggestions have been good.
Good luck, Joel.
1 Like
I had a slight difference in bonnet fit from shimming and adjusting w/o engine and sending off to paint and when the came back and I fitted the engine. Just enough to make the bonnet close a little less effortless than before. One day when I’m reeeealy bored I might correct it.
Hi Manni,
maybe just to be able to rule something out, here are the measurements I took before I fitted the bonnet to my S3. All measurements in mm, like all measurements should be 
My measurements were only to to check squareness of the frame after disassembly and re-fitting since it was what was on the car when I bought it.
However, both your frame measurements but maybe especially your bonnet/radiator frame measurements should be the same or very close to mine.
Cheers … Ole

1 Like
The fix for this is relatively simple, and is the easiest way to fix the problem. I have restored over a dozen e-types although only 1 series 3 v12.
First a question for you.
Have the sills/rocker panels been replaced?
In order for your bonnet gaps to look correct, they should have the same gap clearances as the doors otherwise the gaps will look odd. Fit the doors and catches to the car. With the doors correctly adjusted, and the bonnet up, take a long sturdy straight edge and run it from the back edge of the door and past the panel between the bonnet and door, keeping it parallel to the top of the sill.You are checking that the panel in front of the door does not taper in at the front edge where the bonnet would meet it. These panels were often not fitted well at the factory, and have to be sometimes leaded or filled to maintain a straight body line, which will affect the gap at the bottom of the wing.
Run the straight edge along the sill, keeping it parallel with the top of the sill. Make sure that the sill does not taper in towards the center of the.car. In fact, if you need more gap at the bottom of the wing, the sill can be set out slightly using a block of wood and hammer. Around all of these areas, lead was added at the factory in various amounts. to line up with the bonnet.
The first place to start is at the wiper scuttle panel.
Add washers/spacers to the ones you already have in place until you have the required clearance between the back of the bonnet and scuttle. Then add the same amount to the top of the bonnet support frame , and recheck the bonnet to scuttle gap. Also check the sill front to wheel arch alignment.
If the bonnet is sitting too high to the scuttle then lower it on the adjustment pegs. if you can not drop the bonnet enough because it touches the sill, then undo the adjustment bracket on the back of the fender/wing and pull the bottom of the wing away from the car and re tighten the bolts to hold the wing away from the sill. You will have to loosen the bolts that hold the wing to the mud guard as well The wing will then be sitting away from the car.
The bonnet should now fit with the correct rear gaps.
You need to take measurements of the washers you have added between the bonnet frame and picture frame, and the amount of shims you have on front of the bonnet hinge. Add the 2 measurements together and deduct 3 shim thicknesses.
Remove the bonnet and bonnet frame. You need to remove the bracket and hinge point that is brazed into the front of the frame. Carefully grind away most of the braze, then melt the rest away wile pulling on the bracket. It will come apart.
Next using your calculations, you are going to re position the bracket further out, and re braze it in a couple of spots each side
Fit the bonnet frame back to the car without the washer shims you previously added. Remove the shims at the front of the bonnet hinge, and refit the bonnet. When you are happy that the fit is good, tip the bonnet up or remove it, and finish the brazing properly. If you need to re position the bonnet before finish brazing, support the bonnet and heat the temporary tacks and re position again.
Hope this makes sense.
1 Like
Hi Jerry,
thank you for the suggestion regarding a low profile hinge. However, visually comparing pictures of my hinges with the photo of the CJ hinge shows that mine looks like the original one. I will however remove one tomorrow and look for a casting number as suggested.
- Manfred
Erica,
thank you for your reply and especially for the picture of the lower valence. The S3 valence is constructed a little different, but in principle the same. I know that in case of my valence, the repair was such that the orientation of the hinge attachments (at the cage nuts) are not perfectly parallel to each other side to side. These areas a slightly towards the front which moves the “eyes” of the hinges 3/16" in the same direction. But that is only a quite small contribution to my problem. However, i will correct it before touching anything on the bonnet itself.
- Manfred