Rear Main Seal - Engine Pull Down

Garry yes it’s been done before, but did those folks ever respond later in time as to the results? I still have concerns about sizing a rope seal properly in a case of the V12. If it’s not sized properly and is too tight is can burn not only the seal but the chrome on the crankshaft itself.

When I rebuilt this engine over 20 years ago I borrowed the sizing tool to do it right. I had to have help holding the crank several times in the process. That thing is a monster.


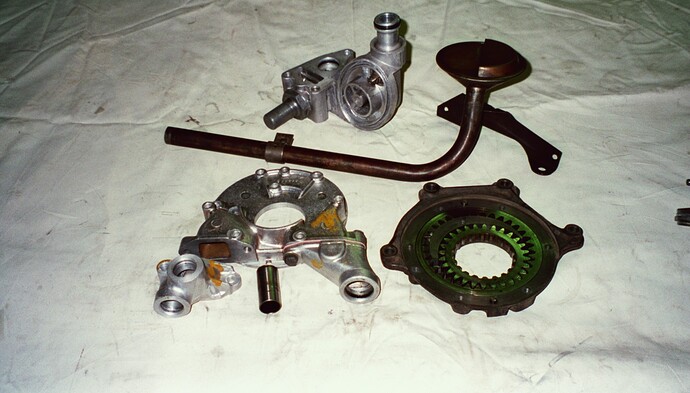
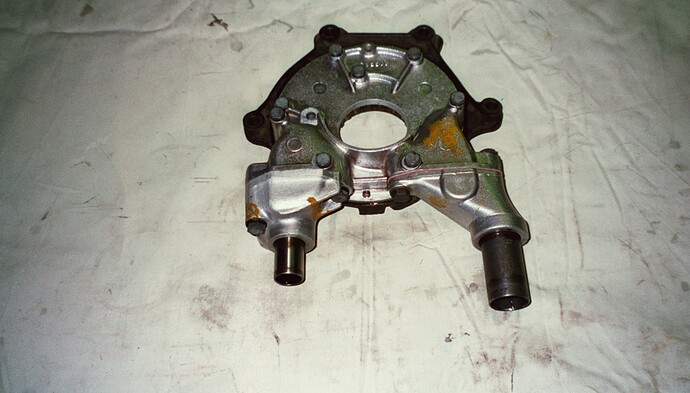
When I took it apart recently to fix the oil leak I didn’t know if the seal was the problem or not. It wasn’t. It was in excellent condition. In my case it was the side seals(hockey sticks) and the absence of sealing at the top of the cap to the block. Thanks to Kirby and the Book, I got it solved. I dreaded this task for years until finally got time(& courage) to do it.

I’ve done GM engines(283CI) before in-situ but those seals were the 2 piece lips seals designed with proper clearances and no sizing needed. The early V8’s(265CI) had rope seals and the “Sneaky Pete” tool and picks are used for those also, but as I recall those seals are already sized.

I’m a little unsure after re-reading all of your posts how much of the engine is disassembled, or is this all in for speculation in preparation for the possible task?

Regardless, I suppose you could try to change the rope seal on the V12 as you’ve described. Somehow you’d have to size it in “on the bench” with some kind of a mockup of the block/cap dimensions.

If the main concern is the timing gear movement I’d think by design the timing chain tensioner may allow enough movement at the angle needed to get main seal access. Of course the oil pump would have to be removed too.


Word of caution… I would NOT attempt to release the timing chain tensioner(using the tool). Once a old in-use-for-years tensioner is released it usually breaks at the plastic pivot joint.

But one thing to keep in mind, if you have this thing upside down with the heads still on and front cover off, etc. You’re really just a little further away(I say little kiddingly), from a complete teardown and rebuild.

If you decide to do the seal please post your process and results.

Rich
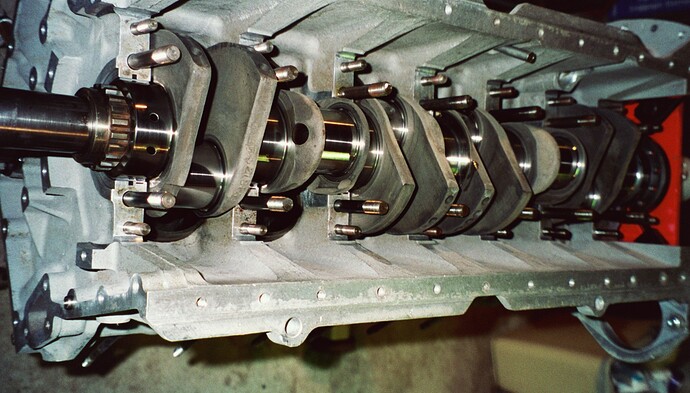
1 Like

Rich, thanks for taking the time to put up your pics and commentary - most informative.

Thanks

Garry

Garry, Maybe all you need to do is what I did. Pull, clean, and reseal the main cap like I did recently. Since you really don’t want to tear the whole bottom end out, it wouldn’t take long to do the cap and add a level of confidence when you reinstall the engine.

Rich

If someone would be so kind as to measure the diameter of that sizing tool, I believe the crank itself with the correct thickness of shim stock wrapped around it could be used to size the rope seal. And that might mean it could be done in situ: Wrap the shim stock around the crank first, then use the Sneaky-Pete to pull the new piece of rope seal into place, then remove the shim stock. No need to remove or even lower the crank, timing chain can remain unmolested.

Several have suggested not using the Jaguar OEM rope seal, though. They recommend the rope seal from a Ford 460. It’s apparently similar except it’s graphite-impregnated and a tad longer so once in place you need to cut off the excess.

I wish I did measurements when I borrowed the tool.

I’d imagine its OD is only a few thousandths bigger than the crank journal diameter. Hmmm, or would it need to be smaller?

No, it’d need to be bigger. How much bigger is the question.

The reason I second guessed myself is because I recall reading someone stating that the seal actually does NOT touch the journal by design. That the PCV system actually will draw outside air from the dry side of the seal, keeping the oil inside the crankcase. Thus if the PCV system is faulty… Oil Leaks.

This has always confused me. If in fact there is no direct contact of the seal to the journal, after shutdown the residual oil would then fall and leak past the seal until it either ran out, or until the next startup, no?

Please educate me on this one. Did I read it wrong?

edit… When I took mine apart, the seal was definitely contacting the journal, as it was sized on rebuild. This told me that the seal was fine and the cap was the root cause of the leak.

Rich

I think it does contact the crank, just lightly. If it weren’t sized properly, it might contact the crank too forcefully, resulting in the rope getting hot and charring. Might even damage the crank.

The oil may not leak after shutdown simply because the level in the sump is lower than the journal. But if that were the only thing preventing leakage, it’d leak like a sieve when parked nose-up on an incline.

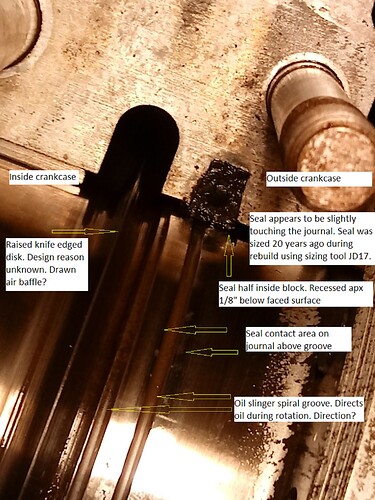
Ok thanks. I took some detail photos when I did this task. I added a few notes to one.

I think you’re right… slightly touches. I can see evidence of contact on the journal but looking closely at the contact face of the seal it’s not tightly against it.

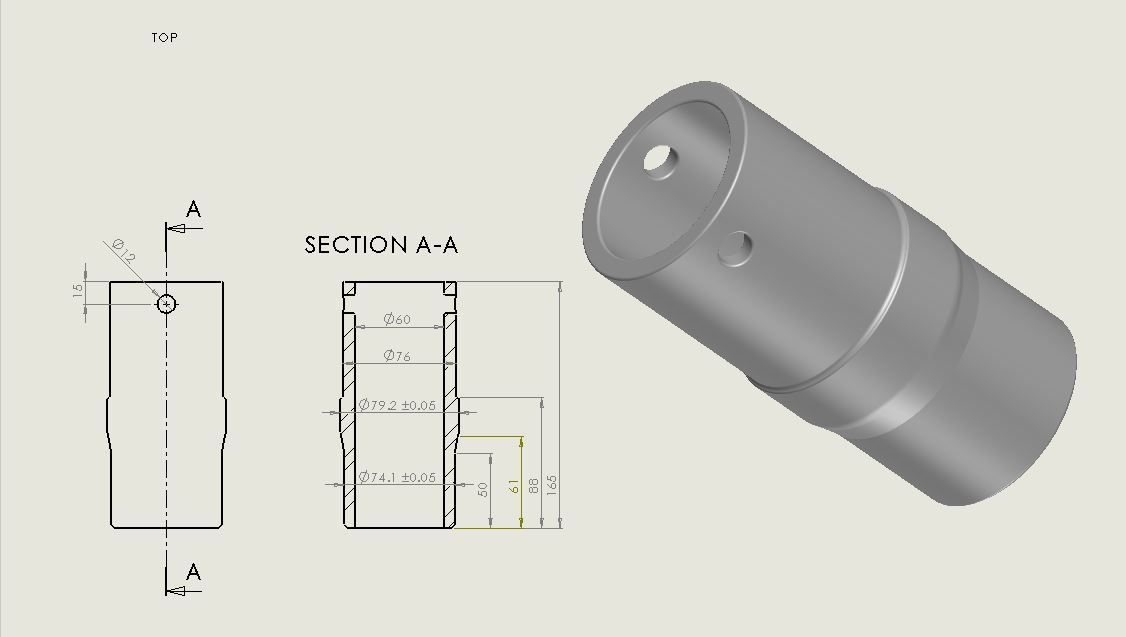
I found dimensions of the JD 17 sizing tool… up next.

Rich

Found this thread over on the UK site…

JD17 Dimensions

And borrowing a few images to keep here. Kudos to the posters there for this.

Notes:
"My Zelenda J17B measures 3.1194
A crank I have measures 3.1252 so the tool undersizes the
seal by .0058"

So it appears that the space between the seal and the journal is apx 0.0029".

Now, with that in mind, as the crank itself AND the seal expands with heat, contact likely ultimately occurs, as evidenced by the shiny areas on my journal after 20 years of use(apx 15k miles)

So using shim stock, 0.003" thick, to size the new seal might suffice. Good idea.

Rich

The crank journal is bigger than the tool? That doesn’t make any sense! Installing the crank would size it beyond anything the tool would accomplish.

I guess I read his “undersize” wording but neglected to realize which was bigger, the tool or the journal. Since the tool is smaller it’s leaving more seal to be sized when the crank sits on it.

This is saying the seal is left 0.0029" tighter against the crank and not spaced away from it. I need more coffee.

Rich
PS Just found this too… from THIS post…

In reply to a message from MarekH sent Sat 16 May 2015:

The ‘‘factory’’ tool sourced from the Jaguar Club of North
America is SMALLER than the crank scroll by quite a few
thousandth’s of an inch. Sizing with this tool and using the
‘‘black’’ rope seal (‘graphite’ and sized so NO trimming is
required - sourced from one of our usual suppliers who is a
Jaguar dealer) will result in considerable drag. After all,
it is like an external brake. If you try to put a ‘‘white’’
seal in, the crank will barely turn if it is a ‘pattern’
seal which requires trimming as the one first supplied to me
wasn’t a very good fit in the groove in addition to being
too long.
Get a hold of a factory tool and measure it with a
micrometer, then measure the crank scroll. You’ll find that
there is a problem with either some of the tools or some of
the urban myths, some of the crank scrolls or all of the
above. I don’t sweat it as the crank turns, I used the
tool, it spun the same after each bearing was installed and
it ain’t gonna ‘‘burn the bearing’’ like some say.
Maybe I got the only defective Jag tool in the world,
maybe Jag changed the spec, maybe a lot of things, but no
way was the tool I got bigger than the crank scroll.–
The original message included these comments:

> The rope seal is not supposed to touch the crank. It works by
> having a tiny gap (~2thou) between it and the crank and running
> over a spiral groove cut into the crank. Any oil attempting to make
> its way out is pulled back into the engine by the Archimedes screw
> which is the oil groove and mild crankcase vacuum ensures that
> To achieve this, this seal has to be sized using a special tool
> which is essentially the same size as the crank plus a tiny bit.
> Failure to do this means that the seal will be sized ‘‘on the
> crank’’. This has the consequence that it will be gripped by the
> crank and and rather than pushed into the groove, can be pulled
around, rotated and concertina’d around the crank. This means that
there may be a gap between the two halves of the seal and oil can
escape if it has got past the metal to metal contact at the back of
the engine. A leak free engine is thus not guaranteed.

This is also the reason why the ‘‘sneaky Pete’’ method sort of works,
but sort of doesn’t work 100% of the time:- pulling a seal around
the crank necessarily deforms it and damages its ends.

It is also important to make siure that none threads of the rope
get caught between the housings as they come together. It is
surprisingly difficult and a skilled job to correctly size the rear
seal.

Aside from properly sizing the seal, you could attempt to get a gap
by temporarily using a couple of layers of metal tape around the
crank and tightening that to seat the seal further into its groove.

kind regards
Marek–
The original message included these comments:

Rich, the knife edged feature is an oil slinger, it throws the oil off the crank, and the archimedes screw pumps what makes it past the slinger back inside.

Thanks David. Thought it was something like that. Looks like it could also double as a baffle since it rides inside the block/cap oval shaped cavity.

However a little uncertain about direction of the spiral flow. I’d think its design would be to keep the seal lubricated, but maybe not.

I’d have to recheck my notes about engine rotation(from front CW or CCW) and which way the spiral groove turns when running. 50-50 chance I’d be wrong, or right.?

edit…
My notes say… CW from front, CCW from rear. Looking at my previous photo with the notes, it appears to me that yes, the spiral/screw/groove end, the tip in view closest to the slinger, flips the oil back into the slinger/engine crankcase. I suppose a minimal amount gets to the seal. This also tells me its harder for the oil to leak past the seal, thus most oil leak problems are likely caused by cap leaks(mine) and PCV failure.
…edit end

Rich
PS Garry hope I’m not going too far and highjacking your initial questions but this may all be relative some day.

See above edits. Ok need 20 characters…

Hi all,
Youtube shows how to use the sneaky pete tool.
Very helpfull !

https://m.youtube.com/results?search_query=sneaky+pete+rear+main+seal+tool#searching

But how do you size the new seal if you do it his way?

Bonjour Aristides, as Kirbert proposed :
If you must replace the rope seal, many recommend the Ford 460 seal instead of the Jaguar part. It’s a little longer so it needs to be trimmed, but it’s graphite impregnated rather than simply waxy".

Yes, I’m not convinced about the gap theory. I think think the seal should lightly touch the crank surface, without squeezing into the spiral groove. Even if the sizing tool is larger than the crank dia, when it is removed the seal must spring back slightly to contact the crank surface. To check this re-insert the tool a while after removing it. Does it slide in easily or does it still require some force to insert it? The seal also needs to offer some resistance to crankcase blow-by pressure, which is always present despite the crank case breather system, even on a new engine. On other engines that don’t have an Archemedes spiral the rope seal is in contact with the crank surface, e.g. my old Merc W123 diesel, also the older xk engines front seal.

Whatever the designers did… didn’t work.

If a Jaguar V12 doesn’t leak oil,

it simply means there is NO oil in it.

Kidding aside, I concurr. The seal was meant to “seal” the gap. Hot oil likely expands tthe seal material, even if slightly oversized using the tool, enough to make contact at temperature.

I am convinced that due to improper sealing of the sides and top of the main cap is the major culprit of rear main leaks. I proved it by NOT replacing the main seal, only the side seals and adding a layer of aenerobic sealant to both top and sides.

Rich

1 Like