New member/owner here. Sorry for a seemingly basic question but I have perused the topics without success. My XK-140 headlight switch is flaky and gets hot. Obviously, it needs rebuilding or replacing (but it’s a 4-position with fog lamp so apparently, rebuilding is my main option). HOW DO I GET THE DURN THING OUT? Does it take a special tool to snake down inside the plastic bezel?
Also, is there a forum search tool that would have helped me find the answer within the existing postings?
Best regards and thanks in advance.
Uncle Pat.
Hi Pat,
Welcome!
On my '59 150, the knob is removed by pushing in a small spring loaded button on the side of the knob. Whilst it is pushed in, pull the knob off. The button is small, like 1/16". You will have to look carefully to see the hole it sits in. Use a small screwdriver or the like to push it in.
There is a good search facility, top right, look for magnifying glass icon.
Regards,
Clive.
Welcome Pat.
You are on the right track with rebuilding the switch. I did that last year with the switch in my '38 saloon. It was corroded, sometimes not working, and getting hot due to too much amperage through too small contact area, and finally the coil spring inside got hot and weak and it wouldn’t work at all.
It was held in by two screws in the back.

The center nut is soldered to the threaded shaft so you have to unsolder it to get it apart.

I cleaned up everything, stretched the spring to bring back the compression strength, put it all back together, resoldered the nut, and it works fine now.
1 Like
To add to Rob’s advice, I would recommend using relays to power power-hungry systems wherever you can…greatly reducing the amperage passing thru the switch(es).
Hello folks - thanks so far. I discovered the push-button “set screw” almost by accident after cursing that somebody stripped the head on a regular set screw, so I now have the lever on and off readily. And I appreciate the general advice about overhauling the switch itself. But how does one get it out of the dashboard? My mechanic is currently searching for his stash of special tools. I can imagine a long thin-walled tube with an appropriate shape at the end to engage a retaining nut that I can barely see - possibly with one flatted side? (One would expect a hex nut but I can only see one flat, but visibility is poor, there’s very little room inside the plastic bezel to see anything, let alone get a normal socket down there). - Pat
It depends on the model, a bit. What have you got? OTS, DHS Edit: DHC of course, coupe?
you probably haven’t got ‘viarts book’ xk 140 explored, as that will show you what you need. accepting this is model specific as previously mentioned my photos (xk 150 fhc) might help
!

So you probably have either Lucas 31426

or Lucas 31524

both of which have a hex nut holding them in. The hex size is 23/32" across flats or 7/16 BSF. You have to take off the front panel of the dash to get it out.
“Take off the front panel”. Got it. Thank you for the info. I am still learning the dashboard construction but this makes sense - it’s what I would expect (except for having to remove the wood fascia). Onwards and thanks to all for the rebuilding tips. There may be a headlight relay in my future.
Will order that book ASAP.
Pat
1 Like
So how is the leather-covered wood panel removed from the metal panel that the gauges are attached to on an XK140 OTS? I need to remove the headlight switch, since it no longer conducts electricity in any position. With a mirror I can see a LOT of phillips-head screws around the periphery of the back of the metal panel. Do I need to remove them to get the fascia off?
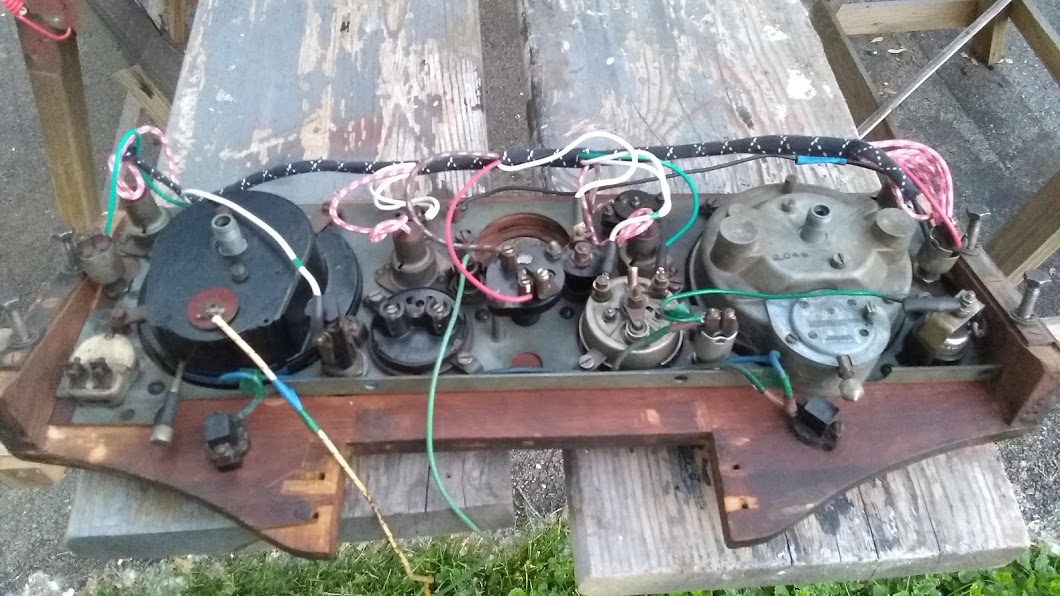
I would think a 140 OTS dash would be the same fastening system as my 120 FHC dash, which is four 1/4" hex head screws, two on each side, then the whole thing tilts out enough to loosen the oil/water temp gauge. Then you can see how to remove any switch. No need to remove all those metal to wood screws. You can see the hex head screws at the sides in this picture.
1 Like
The answer to my question is illustrated in Phil’s picture. The wood fascia has to come off the metal instrument panel in order to access the hex nut that holds the lighting switch on.
My mechanic and I had a “wonderful fun-filled afternoon” grappling with this job. All the gauges and their retention clips came loose when separating the fascia, we had to unscrew the speedo and tach cables, etc and access was still tight due to the oil pressure tube and many other wires keeping the panel from dropping very far. Replacing the switch itself was no harder than you might expect. Re-assembling the panel, trying to get all the gauges straight and centered, was quite a nightmare. And then I had an oil leak due to slightly loosening the oil-pressure tube trying to get this gauge level, so we had to fiddle with it some more. I hope never to repeat this job. The new switch is OK so far.
Pat Q
