Well I find that my right hand A/C blower motor on my '89 XJ40 (car is LHD) only works in the high and defrost speed position, not in the low or medium setting.
I checked the fuse and it’s good which makes sense since the fan does run albeit not in the first 2 speeds. Any quick checklist things to look at before I start seriously digging into this problem ?
Here’s an edit to this post. I went to the old forum site and found a lengthy discussion on this matter in the “XJ40 Book”. But any first hand advice would still be welcomed !
Groove - when my blower failed (high speed op only) I ordered the electronic bits, tore into the blower - and obviously did something wrong, because the new bits failed to restore operation. I ended up wimping out and ordering remanufactured units from Motorcars Ltd. I replaced both L & R units because the reman’d units use a different blower (motor, wheel, both?) that moves more air and the two blowers need to be balanced or the air won’t flow out the vents correctly (one blower overpowers the other).
So you ordered all the electronic parts that are listed in the E-book and it still didn’t work? Any idea what you may have done wrong? I’m all set to order the bits tomorrow and go that route first.
Since your replacement blower worked that would tell me the problem wasn’t upstream of the blower unit and it was those electronics bits that were at fault.
It’s been a long time since I used to repair these blowers but there should be 2 relays and the speed control circuit board.
Make sure BOTH relays work (one is isolation relay and the other is high speed).
The brushes in the motor can wear down and cause the blower to stop.
Put power directly to the motor first to see if you are wasting your time with the electronics.
If you are getting HIGH SPEED, then your motor is working but the speed control might have failed. The high speed relay will over-ride the speed control.
I don’t know what I did wrong - the circuitry IIRC did not seem complex (i.e. to a novice like me - there weren’t a ton of components) but there was evident corrosion on the components, wires, etc. My guess is a bad solder joint, either a factory joint or one of my attempted repair joints. But I really don’t know.
I replaced the transistors and the rest of the components on mine back in 2012 and I guess I muddled through ok because my blower worked on all speeds after that. (rapidly touches wood )
The fan motor definitely runs on high speed and defrost so I believe i can eliminate the fan motor itself as the culprit. Hopefully this also eliminates the ECU that sends the signals to the unit.
Mike & Larry …
I have a spare LEFT side fan unit which I took out of my car while it was still working (I replaced it with a brand new unit I purchased while I had the car apart). The resistors and the wiring all look like new so I think I’ll try those on my failed RIGHT hand unit to see if it works. If it does that will isolate the problem but I still think I’ll replace all the electronic bits just to be on the safe side. Digging this rascal out is no walk in the park.
Well I pulled out my right hand blower unit (what a pain). I actually find that removing the dash, despite taking a lot longer, makes the job much easier.
I replaced the Darlington transistor and then temporaily hooked up the blower unit and it works perfectly The control board looks great, no corrosion or visible damage. I even purchased the other electronic components that are mentioned in the Ebook fix, although they all look quite a bit larger than what’s already there, so it wouldn’t be an easy direct swap out.
So my question is this … generally speaking has anyone had a problem with these other bits or is it generally the Darlington resistor that is usually the culprit as in my case. I’m really torn because I’d had to put this all back together just to have a microscopic 5 cent resister go bad on me … on the other hand as my dear Ole Dad would say “better to leave well enough alone”
I changed the transistor and a few of the components (but not all of them) as the bits I ordered (also from specs in eBook) looked quite a bit different to what came off …IIRC it was a few capacitors that differed - but it was quite a while ago I did the job and I can’t remember much about it other than being upside down with the door footplate digging into by butt.
After the better part of a week of work I just finished putting my car back together. Now in all truth I was in no hurry and did some modifications along the way but still removing the dash top and pulling out the right blower unit is no walk in the park. There are a LOT of parts to remove and electrical connectors to (carefully) disconnect. It doesn’t help that Jaguar decided to use a different size screw or nut on almost every fitting !
I started this job because my right blower unit would only operate on high and demist. Sure enough it turned out to be the infamous Darlington transistor and when I replaced it everything worked perfectly again. Because the fan assembly circuit board looked great (very clean with no corrosion) I decided to just stop there even though I purchased all the other resistors and diodes. “Leave well enough alone” or “First do no harm” … you take your pick.
As far as the modifications…
I removed both demister door flap assemblies and reinforced them with long metal rods secured with epoxy. Hopefully this will keep them from cracking in the future, a common failure.
Previously I had removed the vacuum operated actuator on both fan assemblies that controls the fresh air/recirculation doors and permanently fixed the doors to the recirculate position.
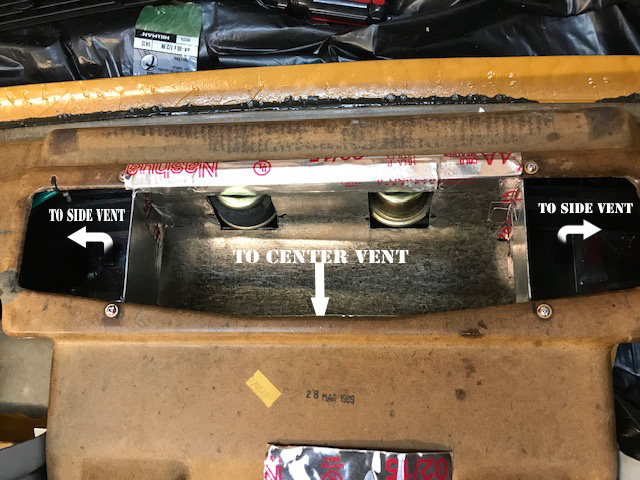
I completely removed the center vent vacuum actuator and door along with the large plastic baffle that they attach to. This resulted in much greater overall airflow.
The airflow out of the facia side vents has always been anemic at best, more like nonexistent. To increase the flow to the vents I fabricated some metal duct work which redirects the air. This resulted in excellent airflow out of both the center and side vents.
The picture shows the bottom of the dash top as if you were looking up from the evaporator, but If you’ve never had your dash top off it probably makes no sense to you at all.
 )
) The control board looks great, no corrosion or visible damage. I even purchased the other electronic components that are mentioned in the Ebook fix, although they all look quite a bit larger than what’s already there, so it wouldn’t be an easy direct swap out.