Mike,
Thanks for the tip. However, I found the reason when I looked at the construction once more: there was a round spacer which prevented the access to the bolts. I removed the spacer and the rest was easy.
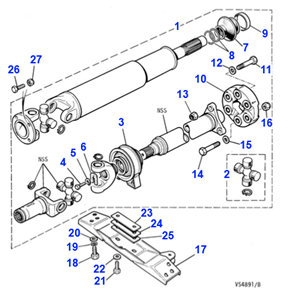
By the way, the thread of the nuts holding the half shaft to the flange is Unf 7/16”-20, and the correct socket size is 5/8”. 16 mm socket is very close to a 5/8” socket. I used both, a 12-point 5/8” socket and a 6-point 16 mm socket. I would prefer the 5/8” socket.
I have replaced the output shaft bearings. A hydraulic press is a must. I cut a suitable metal pipe to press the bearing and collar on. Additionally, I used a thick metal pipe under the flange.
The next step is to assemble the shafts back to the car. That should be relatively straightforward, since I have already cleaned everything. I have also acquired new nuts that attach the half shaft to the flange and bolts that attach the output shaft mounting flange to the differential. I will apply copper grease to the nuts and bolts.
I put the output shafts back to the car on last Friday. I drove the car on Saturday, but I started something new already on Sunday.  Namely I removed the mechanical fan and found out that it has some serious cracks, and the clutch was very dirty, too. I ordered a new fan (EBC4553) and a clutch NBC2215AA (Meyle). Thanks to Dennis’ advice it is not necessary to remove the belts when removing the fan.
Additionally, I have removed the flexible Jurid coupling from the propshaft/differential flange and ordered in a new coupling (CAC7576). Before detaching the bracket 17 I first marked its outer edges with a white marker. There is one empty hole on each end of the bracket. I painted a white dot to the chassis through that hole. This ensures that I can put the bracket back to its original position. The coupling bolts and locknuts were very tight, and since the rear of the car was on jack stands I had to use my imagination to have enough leverage to break them loose.

I should get the flexible coupling, the fan and hopefully the clutch, too, on Friday. Then I can install them to the car.
The flexible coupling and fan including a new clutch have been installed. It is much easier to rotate the new black fan than the old yellow one.
I also changed the differential oil. This time I chose 2 litres of Comma LS80W-90 GL-5. To pour the oil into the differential I did not use the “usual” hole in the trunk for the fuel filler cap drainage hose but I used the hole for the self-levelling suspension electric connector. It is above the other hole and on the right side. With a flexible 12 mm hose it was very easy and fast to pour in the oil.
I have been mainly driving and enjoying. Last week I changed the coolant. I had changed it previously three times in 2020.
Even if I had renewed the water pump / alternator belt it was squeaky in fast acceleration earlier. After installing the new fan and clutch the belt does not make noise.
I bought another set of original teardrop wheels. They came with almost new summer tyres by Hankook. I put the tyres on the shelf since my current summer tyres are still in good condition. Instead, I assembled studded winter tyres on the wheels. This means that I can drive the Jag on dry but possibly slippery winter days every now and then.
I did the brake booster conversion four years ago. I used a pre-owned S1 brake booster and it worked out fine. However, I recently had a good chance to get a brand new S3 booster. I fabricated a new fitting plate for it since the stud placement is different between the S1 and S3 boosters.
I could not fit the 8 mm clevis pin that attaches the booster to the brake pedal. The holes just do not align perfectly, even if I move the brake pedal towards the booster. Instead, I used a 6 mm bolt and a nylock nut. I will try to fit a 7 mm bolt, albeit the 6 mm bolt works, too.
The S3 booster came with an elbow with a sticker “Removing the check valve will void the warranty”. So the elbow should be a check valve. Nevertheless, I installed a non-return valve to the line going to the intake manifold.
In my opinion, the brakes feel smoother with the S3 booster.
I could use a M7 bolt to attach the booster to the brake pedal. A M7 bolt is not common, so it is not readily available in all hardware stores.

