No, not my bank balance now I’ve started restoring my 140DHC - the door timbers.
A very well respected supplier of panels has given me an excellent one-to-one tutorial on lead loading. During the ‘lesson’ I brought up the topic of wood timber, which I’m going to replace. He suggested using a good African hardwood, lent me some profiles for the endplates and advised me to screw the frames together, and not to glue them. He said that the timber would need some movement to avoid cracking or damage - yet a restoration book I have says things will work loose without glueing the timber as well as screwing.
Any opinions on this?
If you are talking about the panel the hinges fix to … I would not glue if using a solid wood , but I would use ply and glue it . But hey I am no expert .
With the work you are doing to your car Jim you will be very experienced, (definition of expert; ex an unknown quantity, (s)pert a drip under pressure) just for giggles 
Hi Jim,
I think I’ll be making a new frame as there are so many splits and rotten areas in the doors now. My question really asks what is the accepted method for a complete new frame - clearly when my doors were made there was no glue used, just screws. I’m wondering what current restorers do.
Roger:
Why not go with both, belts and braces? It is not a job you are likely ever going to have to repeat, if it was me I would guarantee that by using screws and a good epoxy.
Chris.
Greetings All,
I’m somewhat familiar with the whole coachbuilding process, I make the stuff.
First off, his wood suggestion, overkill. I’ll explain further along.
SS and Jaguar bought their wood from Glickstein’s in Germany. Ash or alder was likely used. Being that the wood was not sourced in the U.K. BECAUSE wood is scarce, SS was known to get the best yield possible, and then some.
Having worked on a few, I can assure you the 2 William’s directed their men to get their money’s worth from the wood imported. If the builder was able to fulfill the needed support of the metal clad body. This means that sometimes, the part may be somewhat “abbreviated” when compared to its template.
Seeing that my SS1 cowl need to be remade and is not easily visible, I “expiremented”. SS used glue and overlapping joints. I’m using finger joints, glue and threaded inserts. Notice the picture of my oak “mockup”, has ,two different corner joints I was playing with at the time.
Be careful if you use metal reinforcement as it’s placement can end up imprinting your metal work.
Had not done any hardwood work in a while, oak was cheap and readily available. The oak was stair blanks from Home Depot or Lowes. I used standard ply for the mock firewall. I utilized a special aviation multi-ply on the later version.
Strength and…lightness if preferred, would make me go towards an African mahogany. The finished product for me will be black locust, a ship building wood. Overkill but it’s free, I have a source. Being an open car it’s a good application, but still overkill.
Regarding screw and glue, most doors have a diagonal turnbuckle that is there to keep it square, and prevent movement. Glue was most definitely used though roadster construction rarely have intact glue, seriously, an XK is almost a 70 year old car. I like epoxies, but a good exterior wood glue works just fine.
Why do you think no glue was used?
Hardwood, for the hinge attachment point, please.
If you are reskinning the door, do not be surprised if your car is asymmetrical. There was an 1 1/2" difference between the left and right sides on the cowl I used for a pattern.
Now, if you want to do it yourself, PM me. You do need a decent bandsaw with a tilt table and your brain needs to work both in 3D and Reverse 3D to cut some of these pieces as you have multiple angles that need to be addressed and your saw probably only accomadates the parts on one side. Yes, I had some waste and made a couple pieces wrong.
Belt sander is handy, I rarely hand chisel anything anymore. I use my BPort, as I despise messing up a piece with a 30,000 RPM router. Set up a little harder but for me it works.
Screws, steel is nice red brass is nicer but purchase from marine store. The brass at the home stores has too much zinc and snap easily. Stainless has less tensile strength.
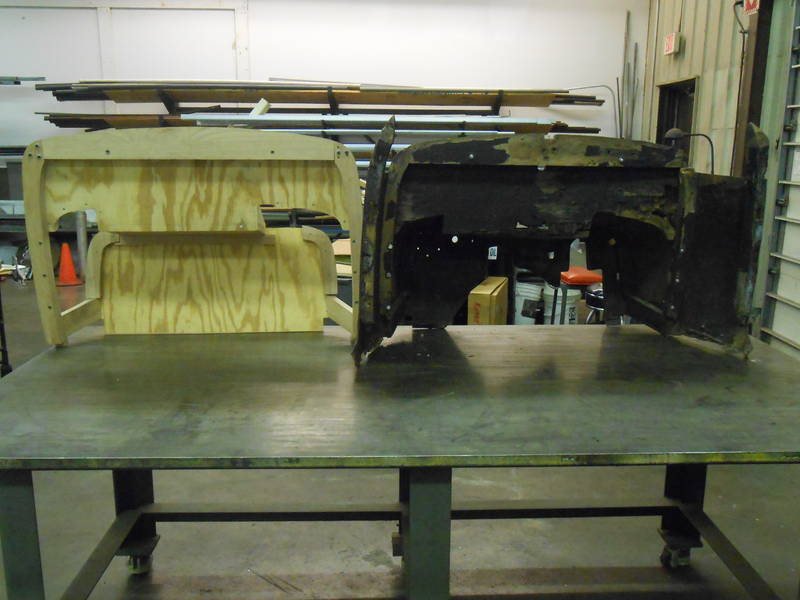
Here’s a few pictures.
The first a door, notice the turnbuckle going diagonal.
Pictures of front and backs of old and mockup.
Side view of mockup.

,


Greetings All,
Why do you think there was no glue used?
Hi Lovell,
I don’t believe glue was used, following close inspection of my 140 doors, the upper sections of which are in excellent condition - and on advice from Contour Autocraft who have been restoring and supplying parts for XKs specifically for a long time. Also the paint is intact, there is no staining from glue, all joints come apart easily once the screws are removed. I considered Oak but was advised against it as it can be very acidic, hence my choice of Utile.
I’m also quite used to assymetrical cars. I’ve restored several Healey 3000s, which were clearly selectively assembled when new - the biggest discrepancy I’ve found so far in those is 3/4" in door length in one car, and 1 3/4" difference in rear wing length in another. I have an aluminium-bodied car which isn’t even close from side to side!
We have been rewooding antique cars thruout our 40 years in the restoration business. Seldom do you find evidence of glue in wood body framing, not because it wasn’t used but rather because hide glue was used and bacteria love hide glue and over the years have feasted on any remnants of glue remaining in a body. In my 140 DHC I will use ash and most definitely glue.
I personally would screw together so you know everything is right then use a good glue even a sikaflex body glue and then screw using stainless steel screws.
Once altogether correctly there should be no movement.
The original doors of course did have the turnbuckle device in the bottom top hinge to lower back edge of door which did allow some adjustment on the frame of the door and maybe why they wern’t glued?
Thanks all. Before I get to that stage, it’s what do I use to get the upper part of the doorskin off to reuse it? I’ve considered sectioning the timber to remove it, but I don’t think that’s going to fly. I’m happy to reskin the lower part of the door but would really like to use the upper section. Some surgical precision needed here, I think.
In view of evidence and opinion, I probably will glue as well if I get to that point. In which case, I would plan to use Aerolite.
Greetings All,
If you plan on replacing the whole inner door structure, you are going to have to section the door, and somehow reverse engineer the frame to YOUR door. While it’s not impossible, keep in mind the door dimensions are no longer intact once you have accessed the wood.
Usually when timber repair involved, you have to take into account door construction. Sometimes you can cut the bottom, inside of the door and slide the wood out but Tig welding will be used to reassemble.
It’s almost impossible to to it “in situ”. Some manufacturers construction and design allow it though.
That SS1 frame has a sheet metal edge tacked to the wood frame and the formed door skin is then crimped around that.
How is the XK done?
Same method - a steel strip screwed (not tacked) to the edge of the front and rear timber panels (solid timber, 22mm and 26mm thick). Steel door skin then crimped over the steel strip.
When tacking the panels to the wood, it’s worthwhile using Monel Boat nails. Plain shank nails will work out with the movement in a car ,b ut the Monel have serrations which stop this. I fund out the had way when about 45 years ago I bought an SS100 body tub from a well know UK coach builder and about 10 years later they started to come out.
If using glue a gap filling marine glue helps. In the early days a system o fbody building called Weyman bodies in which there was a gap between the pieces of wood bridged by brackets. Was said to stop squeaking as the 2 pieces of moved.