Hey everyone, getting started on a DIY front end alignment for my initial settings. I know a lot has been discussed on alignment but I had a question. With setting links at mid-latent point, I Initially had LH at 0.75 deg pos and RH 0.25 deg pos. I removed all shims, 0.150" worth on LH and it’s now 0.25 deg pos. Can’t get it negative which I understand is ideal for running radial tires. I really don’t want to start machining anything and since this will be a street vehicle should I leave it and move on to Caster and Toe?
Also is having more negative Caster than the Jag spec still better with the Camber settings above?
Anthony

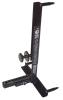
Can you share what tool you are using in the picture you provided?
The manual says adding or subtracting 1/16" of shims alters the camber by approximately 1/4 degree. Each shim is approximately 0.030" thick so if you removed 0.150" worth of shims, 5 shims, from the left hand side the change of about 1/2 degree would be just about right.
Hi John, this is it. It’s a common magnetic bubble Camber/Caster gauge. I mount it on a diy adapter to get past the hub. I silver soldered some left over fender beading to the bolts so it clips directly to the edge of the rim - makes it stable on the wheel. Spacers set the distance on the bolts and the bungees hold it solidly against the wheel. Seems to work okay.
Anthony
https://www.joesracing.com/i-21091898-joes-caster-camber-gauge-with-magnetic-adapter.html


I use the same tool - also bungees and a slightly different adaptation to get past the knock-offs. Seems to be a pretty accurate instrument with repeatable results.
Like you - there was one side in the front where removing all the shims left me with slightly positive camber (+.03° - not much but not negative). I just went with that and used shims to match it (0°) on the other side.
One thing you should probably do if you haven’t - is to do the measurements with the car fully laden. I put 220 lbs on the drivers side and 130 lbs on the passenger side. Having the weight similar to what will be there under road conditions makes a big difference in the numbers.
Edit - My mistake, I used the other popular tool:
https://www.jegs.com/i/SPC/827/91000/10002/-1
NIce.
The reason I asked about the measuring tool itself is I have spent the last couple of days making the below tool and I haven’t yet decided which particular gauge to buy to use on it.

I assume you verified your garage floor is level left to right and the tire pressures at equal on both sides.
I read the thread in the archives when you did this. Yes, setting links used at mid-laden and tire pressure good with floor quite level. Geo my gauge is very accurate but how on earth did you measure 0.03 deg? Is that a typo?
Anthony
Thanks John, I made 2 of them. I tried a setup like yours but found it was a bit wobbly due to the bolts resting on the inside of the rims where there they have an inside radius. And since the beading is softer than the wheel, it doesn’t seem to scratch. Maybe yours is better with 4 points of contact. It looks quite heavy duty. I also left it long on the bottom so it protrudes beyond the tire at the front and back. With one on each wheel I’ll use them for Toe. I initially had some trouble getting mine welded up to make them square and even. That’s an important detail. Yes, I’m lucky to have a level concrete floor. The bubble gauge I bought has 3 very strong neodymium magnets on it. It would work well on your jig.
Any thoughts on what I should do about the Caster setting?
With no shims on the left I was only able to get down to around 0.1 positive I removed the castings holding the upper arm to the frames and determined how much metal to take off of them. Then I clamped the belt sander in my Workmate with a 60 grit belt facing up, donned heavy leather gloves and used the belt sander to reduce the thickness of the castings. Constant measurement with a micrometer told me when to quit and that I was removing material uniformly across the face of the casting. IIRC the right side got to 0.4 by removing all the shims so I used that value as my target for the left side.
That’s the best way to do it. The effort is rewarded by a great driving car. Why just do enough to get by? Dont’ forget the rear camber and toe.
This tool is available with a large ring magnet at the base that is designed to attach to the end of the hub, requiring only that you take off the knockoff. The end of the hub is quite accurate at being 90 degrees to the stub axle.
You can only measure accurate camber with the car on the floor and all camber lock out of it - that is you need to drive the car a short distance, ideally hitting a few bumps - pushing it back and forth a few times is not adequate. Do not try to measure camber with the setting links and the tires off the floor. The torsion bars will pull the upper control arm away from the frame and distort the reading. With the tires on the floor the upper control arm is pushed into the frame giving more negative camber to read, and will be where it is when you actually drive the car.
What I suggest you do is to achieve a goal where one side has no shims and the other side has enough that it equals the side with no shims. That’s the most negative you can get without modifications. It probably won’t exceed 1/2 a degree - it may not actually be negative.
The manual states aprox 1/4 deg per 1/16 in thickness. My LH side is at 1/4 pos with no shims. Doesn’t that mean I need to remove at least 1/8" of material to get it below 0 to 1/4 neg?. Sounds like a lot of material to remove. Will the mounts tolerate that without me compromising them?
Nice. Is that teak stain under the polished urethane, John? ![]()
How I went about it. Have now gone 8,000 happy miles …
Unfortunately the old site had a hard time processing special characters. The “�” symbol in the text blotted out the characters “º”, “½” and “¼”.
Thanks. Sadly I can’t stain iron. ![]() It’s an ugly color of Rustoleum Metallic spray paint I had sitting on the shelf.
It’s an ugly color of Rustoleum Metallic spray paint I had sitting on the shelf.
Trivia. You can’t find steel channel in the metals section of the hardware store. But you can find angles and if you can weld you can turn two angles into one channel… Look closely and you can see the join lines.
Yes, it’s essential. I spent at least an hour with a digital level and a belt sander measuring, then sanding the tips of the legs until it sat perfectly square and level on a chunk of solid surface countertop I had left over from the kitchen remodel. I first had to shim the chunk of countertop to get it level.
That’s what I’m going to use, I just wanted to avoid removing the knockoff if possible.
I didn’t keep notes on what I did and how much I removed. But I believe I took off about that much.
Note to self. Start a garage journal recording what you did, when you did it, how you did it, and the outcome.
I was just looking at them on the car and the mount closest to the firewall looks like it it approx 1/4" thick where it’s bolted. To get mine to 1/4 deg negative, that would leave me with approx 1/8" of material left to hold it on the frame. In my younger more daring years I would have done it. But not now. I think I’ll live with it and play it safe. Too bad these mounts don’t have some sort of concentric geometry to them, We could fine tune dial them in.
So I’m back to my original question, what’s the down side leaving it as it is for a street driver and what Caster should I dial in?.. am I only giving up a bit of extra cornering ability with those Camber numbers slightly positive?
Thanks
Anthony
Hiya Nick, good info in those posts of yours. I managed to find them on my own weeks ago in the archives.
Thanks, Anthony
Not a typo but probably an optimistic notion of the precision of the instrument. I sat in the car (for weight) and my wife did the measurements.
Rather than record the numbers I had her take a photo of the reading each time:

Later I would look at the result on the computer screen where I could enlarge it and even lay a ruler along side the calibration:

The mid-point of the bubble is slightly more positive than zero and a measurement suggested it was 1/10 of the way towards the first mark which is ¼°.
The suggestion of a journal is a good one - along with the photos I have lots of detail about the task. I stopped short of modifying the fittings and settled for ‘good enough’ which seems to suit my purposes.
Hi Geo I get it, looks good. I have a journal that I use when I need to record something I don’t want to photograph. It’s helpful because sometimes I forget details from month to month.
I checked my caster and it’s 1.0 LH and 1.25 RH positive. I can crank in more which I think is recommended. What setting did you use for caster?
Anthony