Time to talk about rebuilding the fuel pump.
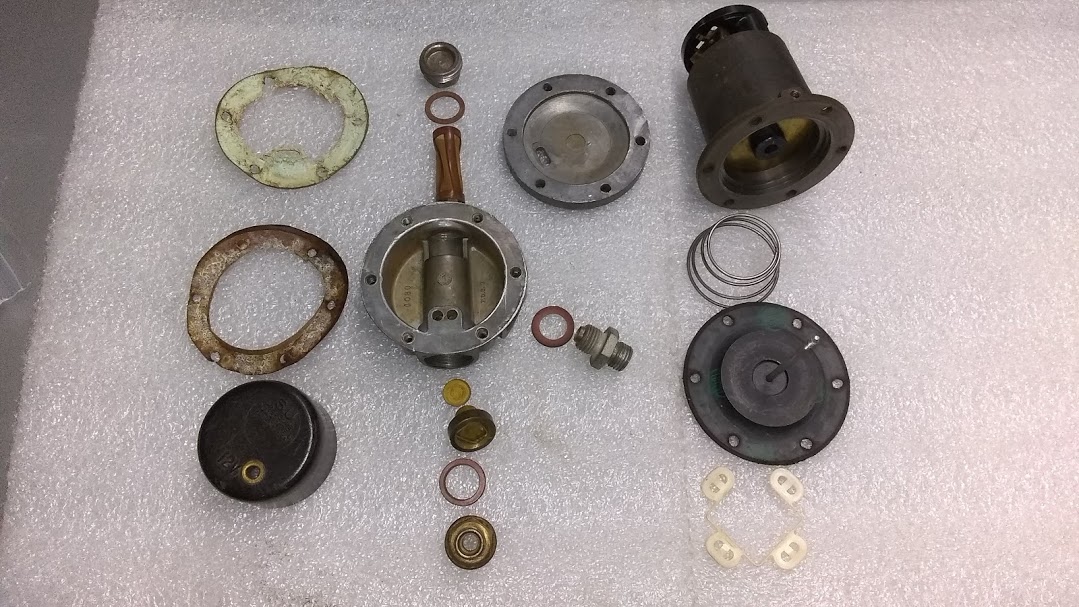
I have done a number of the AUA57 LCS square body pumps as used on Mark V, but this is my first of the earlier AUA25 Type L round body as used on my '38 SS.
It is stamped G12 on the sandwich plate, which I presume means the date is 1951 December.
Anybody know what’s going on there? Why three?
Mine currently has the flat disc version, but there is a plastic spider rather than the 11 brass roller discs it originally would have had, so I imagine it has been rebuilt before now.
From memory mine doesn’t have the flat disc and my return spring tapers to a smaller diameter so if you intended to change either the spring or diaphragm you probably need the compatible other. My advice would be to order the same diaphragm type as the one you are replacing. Pumps for use at the tank (HP) are fitted with stronger springs than those in the engine compartment (LP). If you currently have a contact set with just the single contact then I would highly recommend replacing it with a double contact set. They are much more reliable.
Thanks much, turns out the flat disc is the only one not on back order, so that’s what’s coming. Dual points also, single points no longer stocked as I guess nobody wants them anymore.
I’ll probably do the transistor electronic conversion as well when I get time.
Filled the gas tank for the first time and discovered two leaking solder seams.
Discovered this tank is not a rectangle, it’s a trapezoid.
Beginning to think they got all the rest of the problems worked out (more or less) going from coach-built to the all-steel body, of which mine is one of the first (acceptable) batch, then realized they forgot the gas tank, so they cobbled it up with about 20 little pieces of terne steel sheet to get it to fit in the available space. Wish they had used brass.
I have found you can buy used pumps off auction sites for giveaway prices, which can furnish plenty of serviceable parts - brass rollers, points, less chewed up BA set screws, etc.
Clive, thanks for the link to the liblc which I had not know about previously. A wealth of helpful information, not just on fuel pumps, but certainly very helpful for SU fuel pumps.
Well, my order says it’s an AUB6025 that’s coming, so I wonder what the difference is, guess I’ll find out in a day or two.
I went to download a page from liblbc and discovered I’d already downloaded all that stuff last year, good to have just in case that web site goes away.
Repairs to the gas tank went fine. Found the leak by sealing off all ports and connecting the air compressor blow gun to the vent port, 1 or 2 psi and brush car wash soap on the solder seams to see if they bubble.
You have to get the area totally cleaned to bare metal, then heat it up with a propane torch, then a bit of solder and acid brush flux to tin the area, then propane torch in one hand and electric soldering iron in the other, just delicately feathering in the solder to fill.
Looking at it as installed, it is supported out at the extreme sides, and not very tall in the middle where the hump for the spare tire is, and that’s where the solder seam leaked. How much does 14 Imperial gallons weigh? Maybe it flexes too much there when the tank is full.
For what its worth, few websites say that AUB 6027 is compatible with AUB 6097 which is for the HP pump, not the L pump (which I think is what you have). I bet the difference is for seating of the diaphragm spring.
unlike the Mark V tank which is supported all around the periphery.
Yep, I can see why there are dents at those four corners and it would be weak at the middle above the spare wheel hub.
SU Rebuilders in San Diego, that’s where my parts are coming from, I’ve bought from them a couple of times before, seem to be good people.
My diaphragm spring is tapered, I wonder if earlier versions were not, or perhaps had a different degree of taper?
Wow, that gas tank appears to have great trampoline properties in that mounting configuration. Imagine the jounce from a load of gas. Might be amusing to calculate the normal mode of the vertical vibration frequency with that load and to a do a time-dependent FEM simulation on the stress in the solder joints. The fundamental mode of the bottom side of the gas tank may be low enough frequency to couple well to jounce. And the corner mountings must put some load on nearby corner seams as well.
Daily check for gas leaks on the garage floor and before lighting the cigar?
Before accepting the cigar it’s worth looking at another tank calculation. Namely the equation comparing the torque required to unscrew the well filters relative to the torque required to spit the side seam of the well. Guess why I haven’t received that cigar!
Well, what came from SU-Rebuilders is a stepped disc diaphragm, and surprisingly with a Moss label on it. I suppose any of them will work.
Should be up and running again tomorrow.
I had to put some considerable torque on those two drain plugs to get them to stop dripping. Torque is measured by the creaks they made as I turned them the last couple of degrees. I guess we should make a habit of removing them and putting on a new gasket every few years.
I think I’ll stuff a folded up towel or a block of foam between the spare tire and the gas tank to support it in the middle, should keep the flexing reduced anyway. Could make a stiff cradle for the tank later.
I bought one of those rubber sleeves for it; found out it was too long, made for the LCS type pumps, so I cut off some of it.
In my pump investigations, I discovered that the blade part of the old points was bent and too close to the throwover part of the points, so I wasn’t getting full stroke on the points and thus the diaphragm. So it may not have needed a new diaphragm after all. Well, now I know it will be reliable.
Take the Bakelite top off and see if there are any electronics, like a circuit board or transistor. But it looks pretty old, so probably made before there were electronics, thus no polarity.
Some were fitted with a diode to stop the points arcing. These are polarity conscious. Those fitted with with a capacitor are not.
Both diodes and capacitors are now obsolete and you can now fit a Transient Voltage Protector instead.
However, it’s likely that this pump is so old it won’t have any of the above fitted. So no problem.