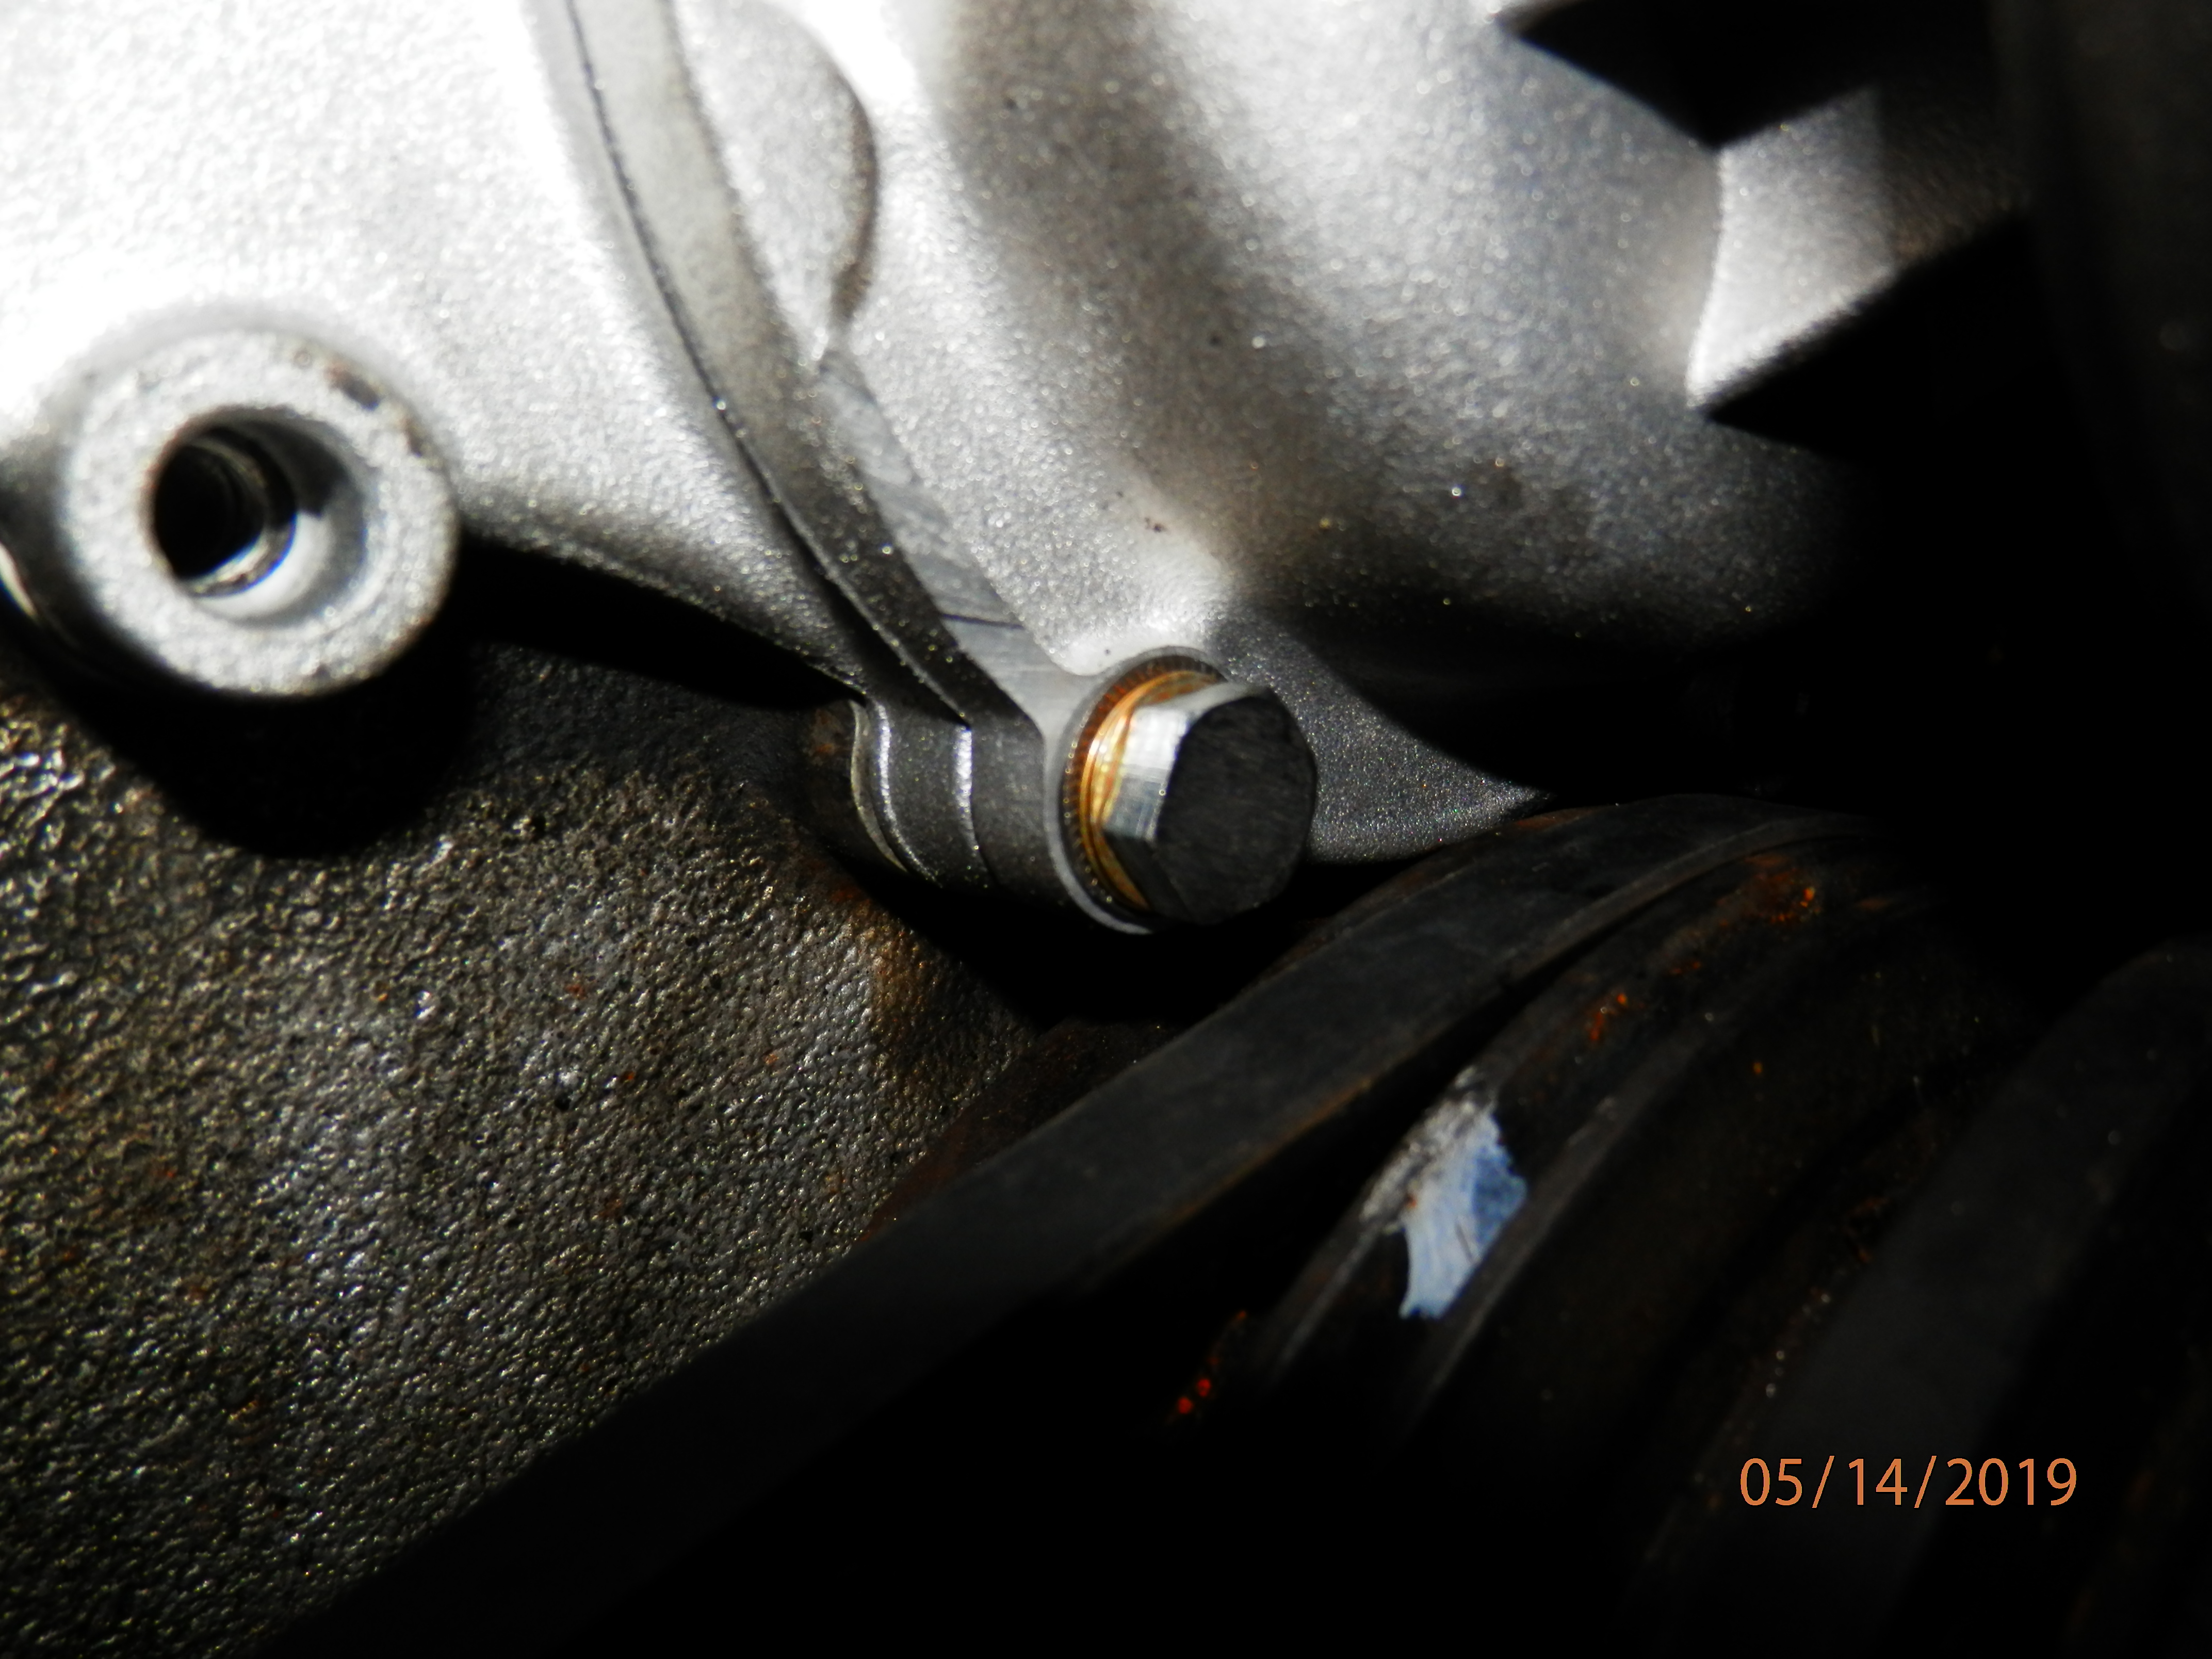
While doing other maintenance work had decided to replace the water pump due to squeak it made. Removed the water pump this morning and was very surprised to find that the impeller had been rubbing against the forward face. See the photo. Had previously posted that the clearance is to be 0.025 in.
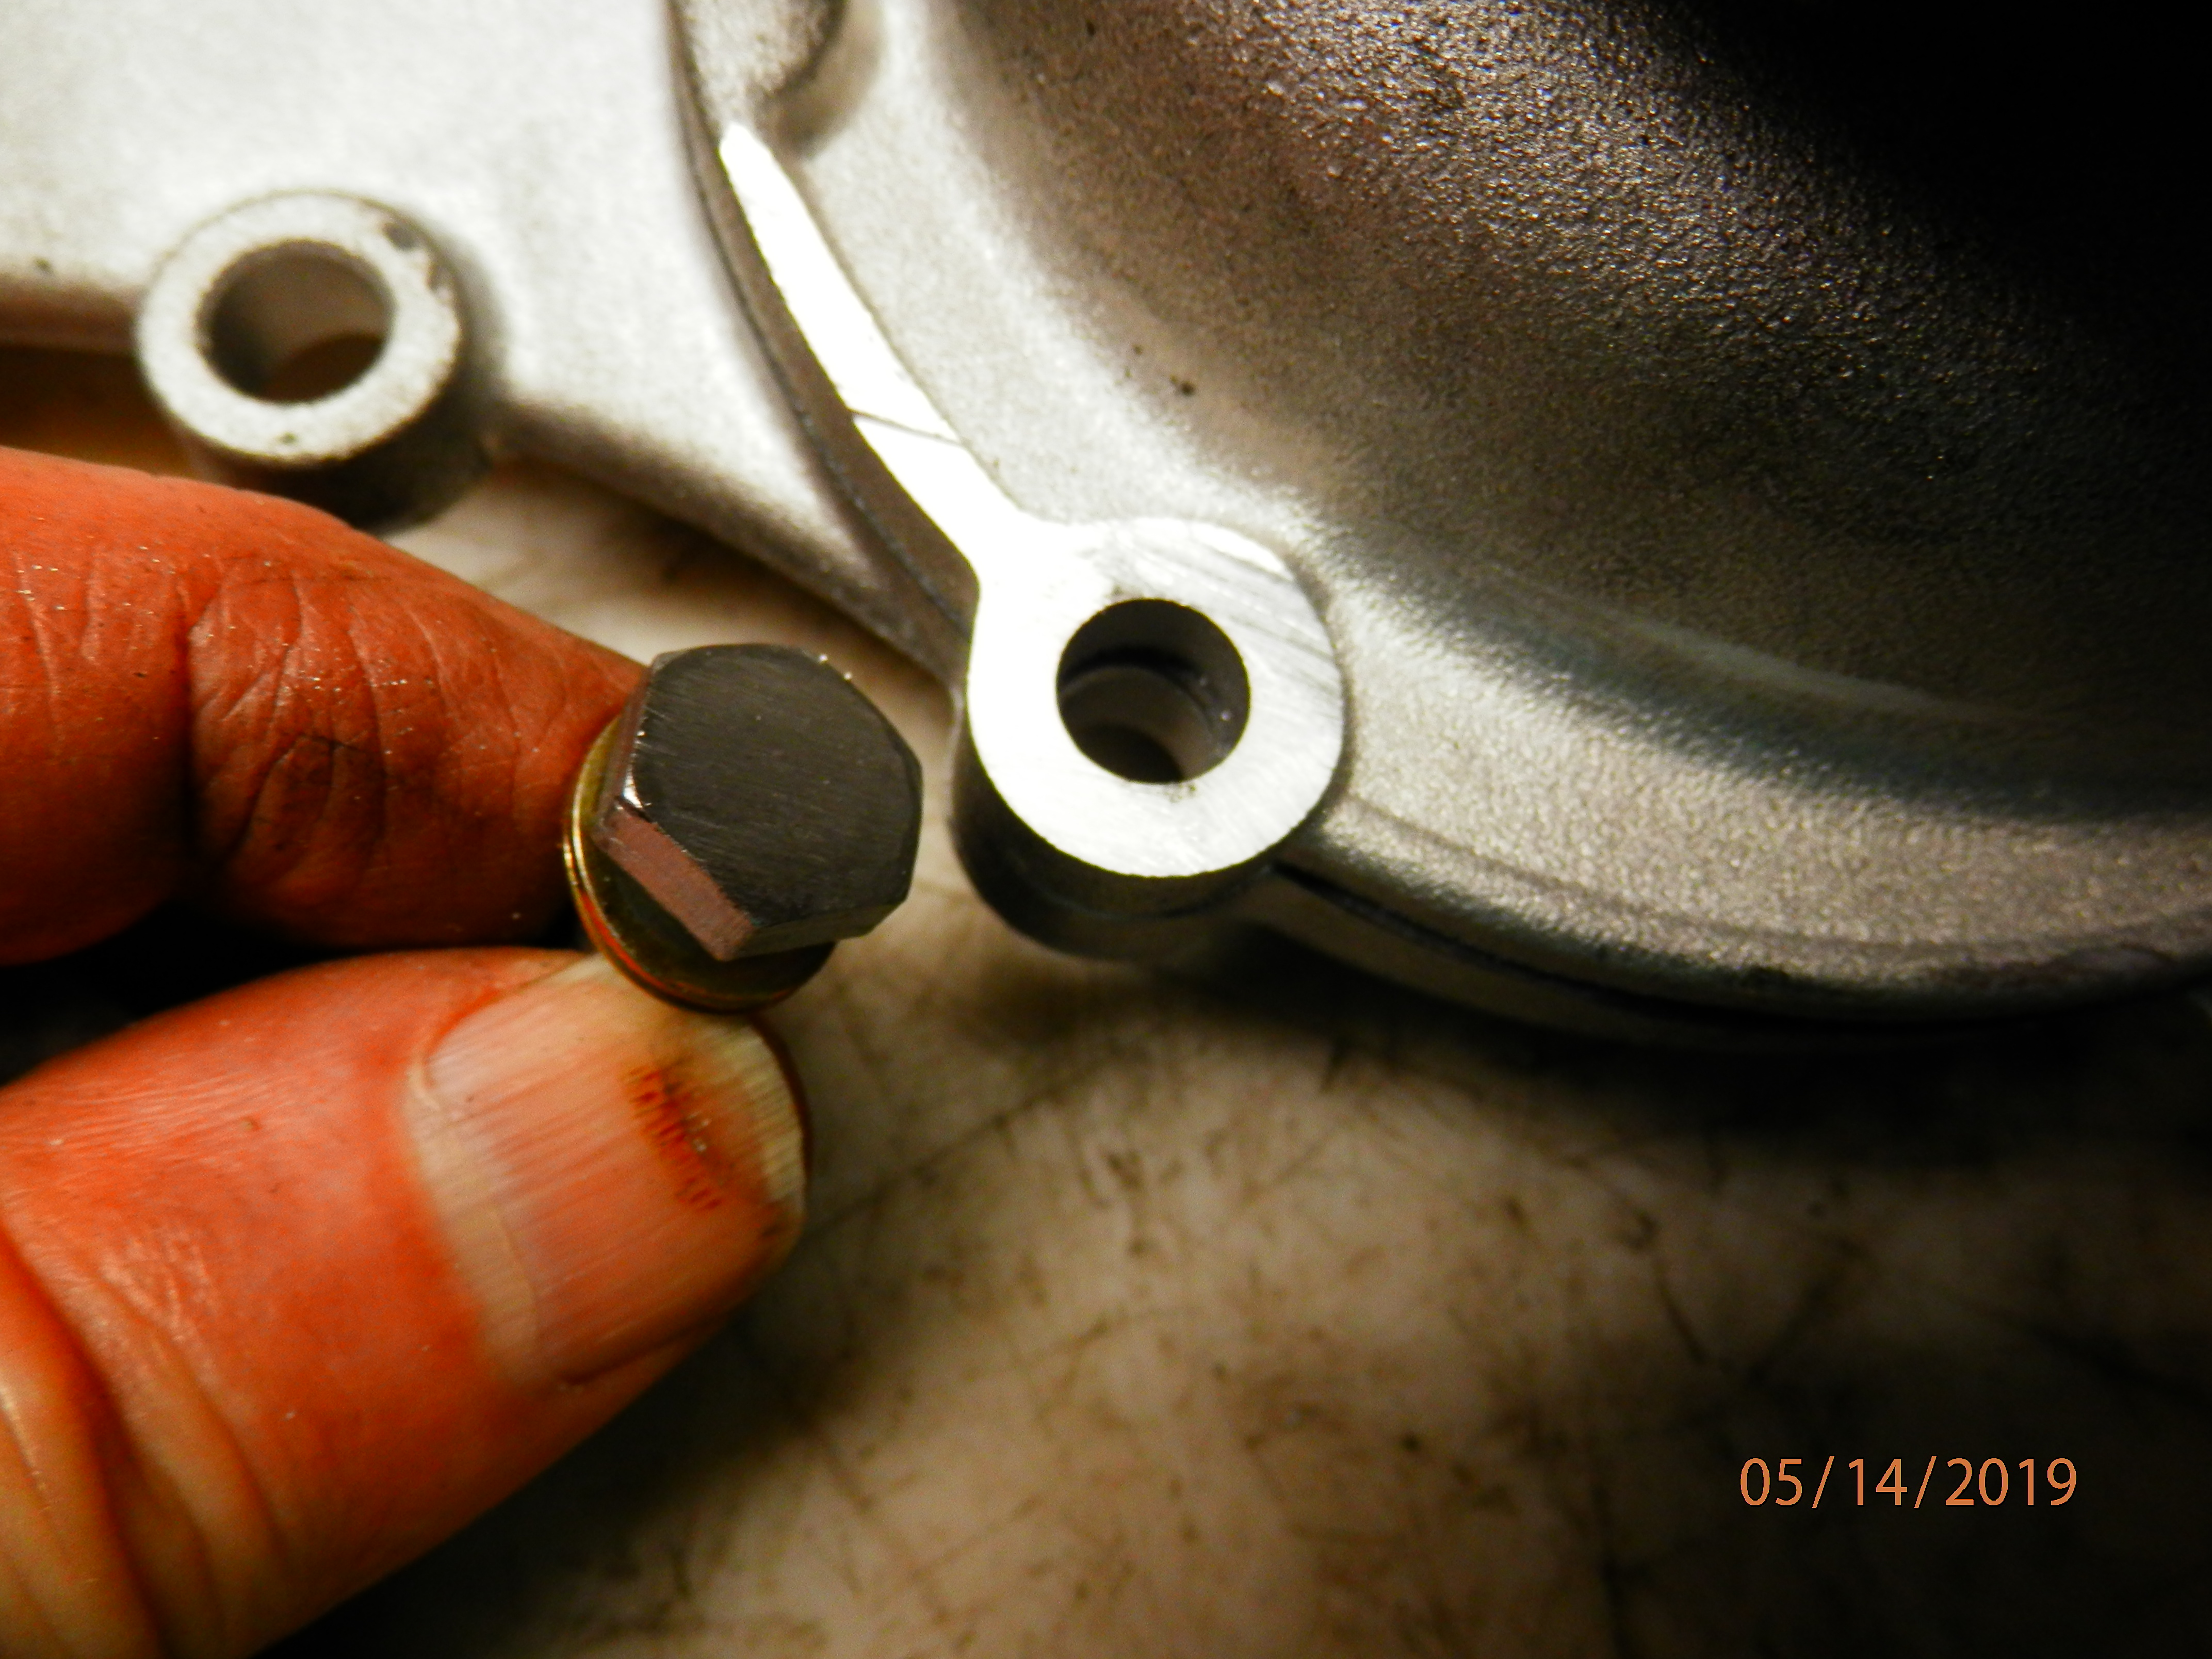
The new pump does not have a taper for the flat head screw, but the casting boss is the same diameter. See photo as to location.


If that pump had been installed correctly in the first place, either the bearing went bad or, more likely, the bearing slid within the housing. Wondering if the problem could have been corrected by simply pressing the front pulley and bearing rearward.
The original V12 water pump didn’t have a countersunk screw in that location, but it was changed to a countersunk screw later on due to a change in the pulley/belt arrangement that fouled the bolt head. If you really need to use a countersunk screw there, it’s simple enough to cut a countersink. Be careful not to overtighten that flush-head screw; it’s been known to crack the pump housing.
1 Like
I noticed that the particular hole wasn’t countersunk when I installed the new one as well. I still installed that screw however, and it still had enough clearance from the belt. Although I would have preferred that it was countersunk naturally.
I would prefer it was not countersunk, if it’s possible to get a bolt in. Perhaps a socket head screw with a flat washer under the head would work. Is the clearance issue one of height or breadth? And is it with the pulley or the belt?
I like “Allen” head screws. They come as “button” head as well. Smooth dome with the drive cut in.
Carl
Thankfully I took pics several months ago.
The clearance is there but just barely. This is because it the way that screw tapers. Another kind of screw may work better but not necessary.
I used Great Stuff sealant in addition to the paper gasket so I really have confidence in the way it seals.
Also, I used minimum torque on all of the water pump bolts and this screw.
There is a reason why, and I will write about it another day. (A nightmare!)

Those pics help, thanks James.
I was thinking perhaps the problem was getting the head of the bolt past the pulley, in which case a socket head (Allen head) screw might work because the head is narrower. The button head type are not as narrow, but perhaps as narrow as the flush head.
Socket head wouldn’t help with height, though. These photos make it look like height may actually be the problem if the belt comes past here. JamesLove’s car uses a multi-ribbed belt which perhaps is a bit wider than earlier V-belts. Perhaps that makes a difference.
I wouldn’t have assembled it as shown, though. Rather than just screwing that flush head screw into a non-countersunk hole, I would have countersunk it.
One other possibility, depending on where the belt passes here, might be to use a looong bolt with a sleeve around it and a flat washer, locating the head outside the pulley entirely. If the belt passes under it, it might be necessary to remove the bolt to change belts.
Another idea: A normal enough hex head bolt with the head cut down, filed to perhaps half its normal height and perhaps the hex cut to a smaller hex. Ideally used with a very thin flat washer. Or perhaps a socket head screw with half the depth of the socket ground off.
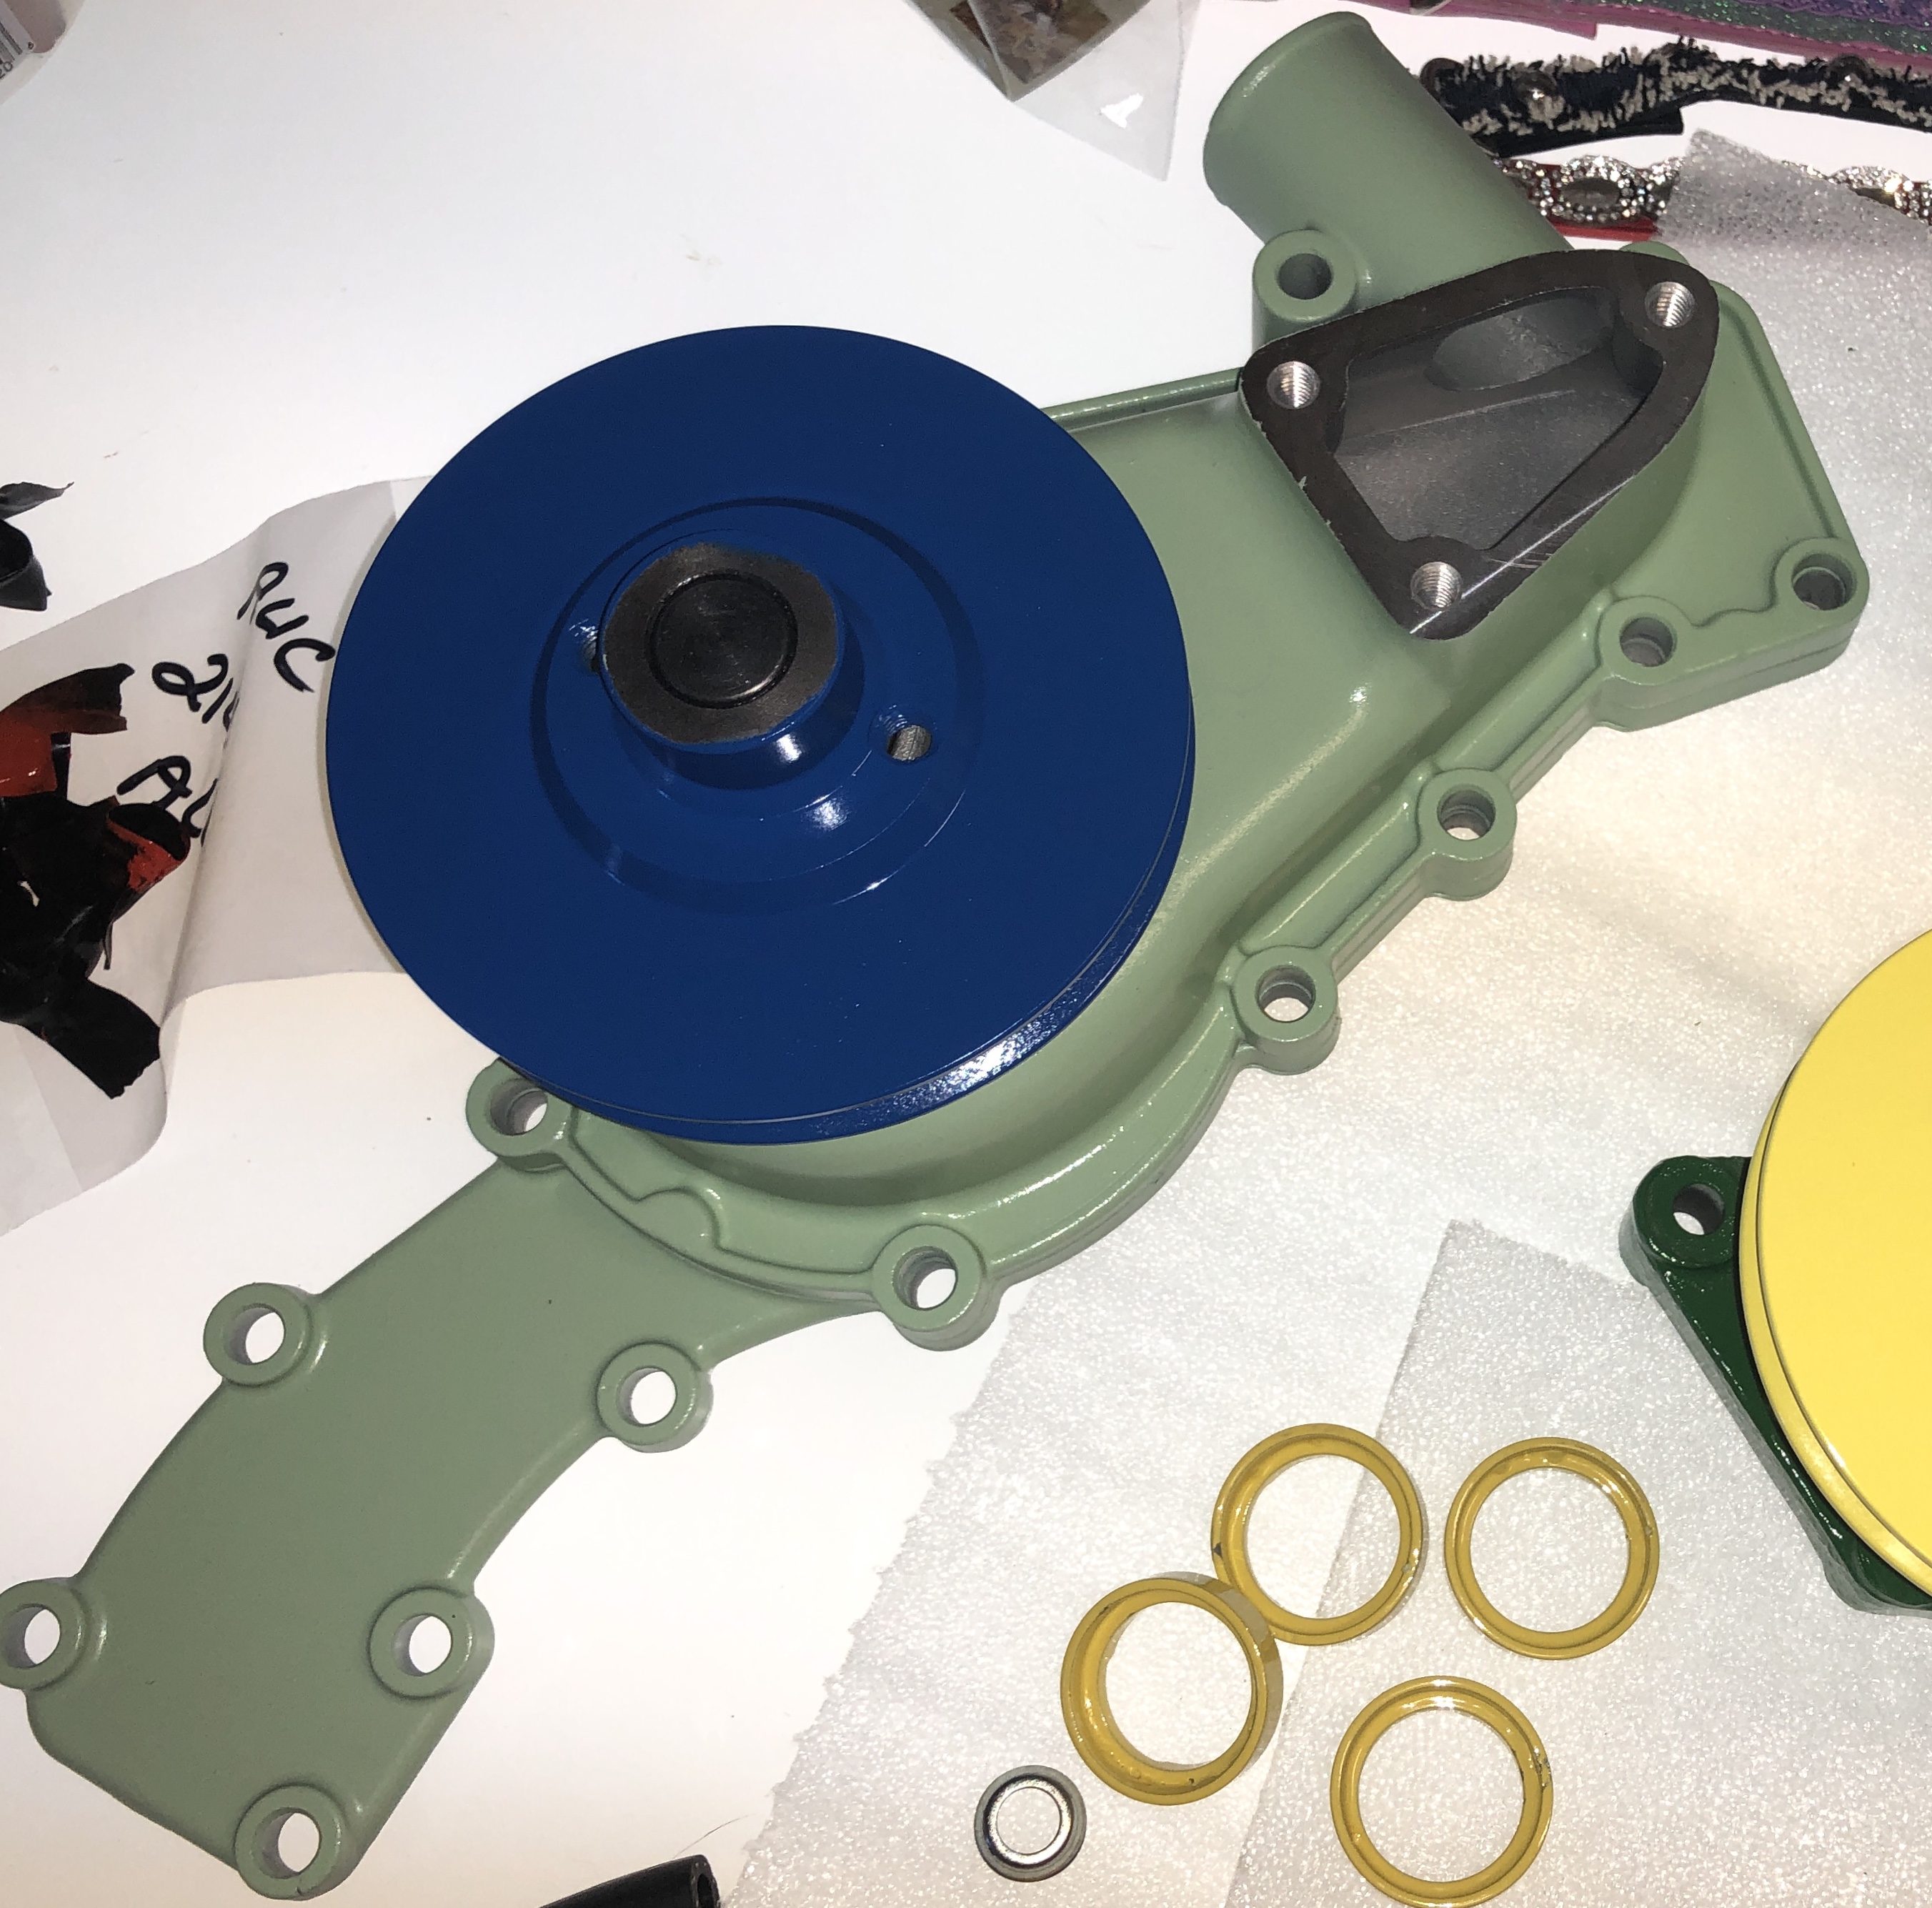
Modified the new pump housing slightly by filing down pumps bolt boss by about.0.040 in and filed new bolt head down another 0.040 inch. With bolt installed the pump case will be under compression only. With a tapered head bolt the pump casting might split.
Test fit with fan belt installed. Washers in picture are to make up the 0.040 thick gasket which was not used for test fit

Have an unavoidable appointment tomorrow but hope to install pump by tomorrow night.
Nice work Don looks lovely.
Kirby-When removing my old water pump last winter, one of the long bolts snapped off within the water pump/timing cover housing and when I went to extract it, I broke extractor off within, and ultimately cracked the interior housing.
I then had to weld the cast housing while it was on the car and that was…Nothing short of a good time.
Hence the minimum torque.
And from now on, I am only using an impact gun!
In the end. It was worth it though.
Better than tearing down half the engine just to remove the timing cover!

an impact gone isn’t going to save you from what happened. Speaking from experience. Fortuantely I was able to get the rest of the bolt out. I just snapped the head off, then used my TIG welder to heat up what was left of the bolt, let it cool, gave it a couple of taps with a brass hammer, then used a 90 degree drill motor, chucked up the rest of the bolt and reversed it out.
I’ve also done 3 XJ Saloon thermostats. there’s a 3 inch bolt that runs through one casting and threads into the casting on the other side; the bolt fuses itself to the center casting. The first two XJ’s I snapped the bolt heads off - one using a wrench / spanner the other an impact gun. third time is a charm, right? On the 3rd (I got smarter) I heated the bolt first, gave it a tap, and wrenched it out - no drama.
BTW, I saw you on Leno. That’s awesome - good for you!
1 Like
Exactly my thinking! If the housing had enough meat it’d be good, but that thing is too wimpy for a countersunk screw. I really like your fix.
Is that a V belt or a ribbed belt? Can’t really tell in the photos. I’m guessing the belt is the clearance issue, not the pulley, and that a ribbed belt might be a bit wider than the V belt and hence a bit tighter clearance here.
I hope you guys are using anti-seize compound during assembly!
1 Like
yes, I did use anti-sneeze.  the copper kind; and stainless steel nuts and bolts.
That’s the alternator belt, isn’t it? Can we presume this screw has been flush head on all XJ-S and XJ12 cars, was only non-flush on the SIII E-Type which had the alt in a completely different place?
So, one possible solution would be to toss the Lucas alternator over the hedge and install a GM alt in place of the air pump, thereby eliminating that belt.
Or…Keep your Lucas unit as I did and install an auxiliary alternator that can be bus-switched in case of failure while on road!

How would that help with the belt clearance problem?
Well now that I recollect, actually I did have issue w belt clearance now that I remember! GM alternator since having smaller pulley would hit idler mount so I had to put notch in it.

Gee, that doesn’t seem right. When I did that job, I used a pretty long belt to swing the GM alt waaaay out to the side to avoid some interference, I don’t recall if that was it. I also had to put a bigger pulley on the alt because the A/C compressor needs a 5/8" belt and the typical alt pulley is a 1/2", and the smallest 5/8" pulley is larger because you can’t bend a 5/8" belt that tight.
Has anyone ever had problems with “the copper kind”. I used to use it in the field and noticed at higher temperatures it becomes less of a lubricant and more of a powdery nuisance over time. I’ve since switched to mp-50 or a more specialized produce (ie, nickel or Au coat).
I’ve never had issues with the copper stuff. When I worked at P&WA on jet engines, everyone there used silver anti-seize. Then a Russian SST crashed, and the investigation showed the cause was a blade failure caused by the interaction of titanium, silver, and the chlorine in the upper atmosphere. Not only did they have to quit using the silver stuff, they actually established a policy that anyone caught with the silver stuff in their toolbox would be immediately fired.
But they didn’t switch to copper. Rather, they switched to nickel anti-seize. It was a bunch cheaper than the silver stuff anyway.
P&WA engines are awash in AN fittings, and these fittings are never assembled bare; there is always a little cup-shaped seal installed over the male end before the female connector is screwed on. I have noticed since that wherever such seals are used, they are typically copper – but the ones used at P&WA were not copper, they were silver colored, probably something nickel-based again.