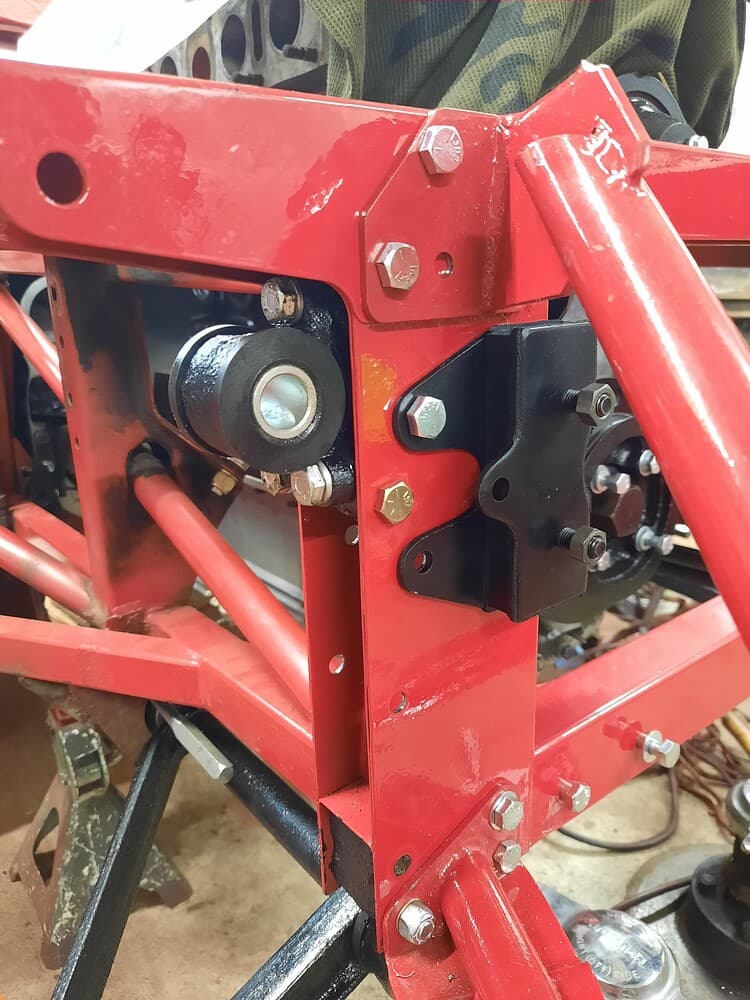
I’m installing the replacement picture frame and for the life of I cannot remember what goes on this bolt, just inside from the upper shock mounting? It’s been well over a year since I took it apart and can’t find a picture that shows enough. Spacer? ?


Thanks, I would have figured that out eventually.
Guess I need to prep more parts…
Tim, the attached pdf is basically the bible for subframe assembly, put together by Steve Kemp, one of our forum members. I have found it to be invaluable. I have also attached some photos I just took of my 1963 car, which is still in progress and thus easier to photograph than most. The bolting for the steering rack mounts is a little strange, as it incorporates some loose items that serve as a fail safe if the rubber bushing fails. Also around the angled bonnet support frame, keep an eye out. Some of these bolts only go in one way.
subframe bolt diagram-Steve Kemp.pdf (183.6 KB)


2 Likes
Thank you! I’m on the right track now. I wonder if I can put the steering rack in later?
The bolt pictured is only for alignment of the mount.

I think as a general statement, you want to get all the bolts that pass through multiple holes that must be in alignment (the engine frames, picture frame, and bonnet support frames) installed first, so as to identify and resolve any mis-alignment issues that may require “fettling” of the holes. Secondary to that is that the suspension mounting blocks should be in place, for the same reason. But no, I think the steering rack can wait. Assuming you have it on hand, you might want to test fit it just to make sure there are no surprises.
1 Like
Thank you! When I took it apart, it came apart in large peices due to corroded bolts. I did place all bolts in place and all suspension blocks first. Don’t know how I missed the upper fronts at first.
I need to rebuild the steering rack, but will clean it up some and try to fit it in now. I hope it goes in as I’ve already torqued the framework bolts.
Thanks again
Tim
1 Like
Tim, be aware when reassembling the subframe assembly you must pre-fit the two upper/outer bolts and radiator support brackets to the trapeze before offering it up to the picture frame and engine frames. If you otherwise bolt the trapeze in place the two upper bolts will not clear the tubes in the trapeze and you will need to disassemble and start over again.
2 Likes
Nick, what’s your saying sounds important, but I’m not up on all the names. Can you point them out?
It just sounds like something I should learn…

I believe Tim’s car is a series 1. The radiator brackets attach to the expansion tank.
Reusing David’s pic, my S1.5 radiator stays are attached to the upper outer bolt, red arrow (apparently different for the S1, per the post above). Regardless, this is the bolt you need to slip into both sides of the trapeze before offering it together with the picture frame up to the rest of the assembly

2 Likes
My car is a series one and I don’t think I have those brackets. I recall the radiator braces mounting to the bolts for the header tank bracket.
Bugger …… I forgot the brackets …… I’ll need to loosen off the suspension a bit and fit them …. Only worked on series 1’s before this !
If that doesn’t work I’ll make up new brackets to fit somewhere …probably using the redundant header tank holes
You only need to loosen the bolt holding the radiator bracket stay and slip the bracket over the bolt in-situ… IF you slot the bolt hole in the bracket (from the bottom). Like this (very rough sketch…)

Once installed no one will ever notice and if properly tightened with a lock washer isn’t going anywhere.
Ask me how I know…
1 Like
Thanks Doug … hadn’t thought about it really …great solution…. I just reacted when I saw the picture from David’s car without thinking it through… thanks for saving some brain cells