Pekka,
How did you get it apart in the end?
Pekka,
How did you get it apart in the end?
Hi,
By brute force method, at first with a slide hammer and then once there was sufficient gap with two wide pry bars. There was lots of damage, but fortunately ORS in Sheffield UK were able to rebuild it with a new gear, now it works great in the 1975 XJ6C in which it originally left the factory.
Cheers!
PS. Some horror pics of the insides:
That’s why I then also needed to replace the mainshaft of the gearbox. ![]()
But it’s all done now and works just as if it was brand new, well it pretty much is (all new bearings, new seals, new synchro’s etc. ).
Thanks Pekka,
When I roll it around there are no loose parts making any noise and the oil strainer was clean so  . I will remove the oil pump like Rob said and if that has no success then I may contact those guys in the UK.
Hi,
yes, the idea in removing the oil pump first is that it removes the possible tension between the oil pump plunger and the cam driving it off the gearbox mainshaft. Also when refitting, it is advisable to take great care, the oil pump plunger can get bent, if you use to much force, again ask me how I know. It’s a bit tiresome and expensive to learn all this the hard way. 
The surfaces are relatively big so the seals will hold the bits together, I hope it all goes well without damage once you pull it apart.
Cheers!
Well, I was wrong. It was in putting it together that the little pump shaft interferes with the cam.
Pulling it apart, the two long threaded studs interfere with two of the bolts going into the main case, so you have to separate the second and third cases about 1/4" so you can get those two bolts out.
Then it’s just a matter of wrangling it off. Nothing else should be holding it except friction or internal damage.
This is one my brother found in a hay field, so I don’t know yet what I’ll find inside.
Got it apart, found a lot of brown goo.
Matthew, you don’t want to keep prying it apart at gap A.
Yikes!!!
That’s some serious carnage…
Thanks Rob. Seems calculated force at gap B is the way to go.
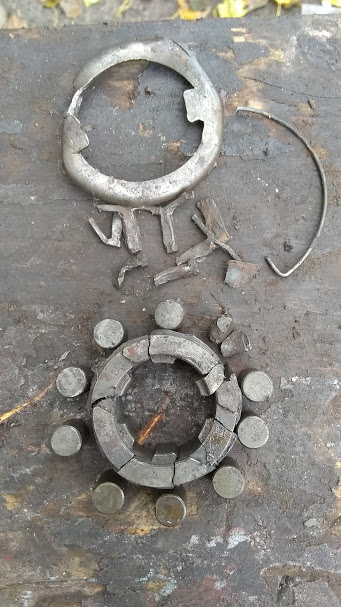
For your entertainment, the planet gear set.
Hard to guess what killed this poor kitty. Using OD in reverse?
A piece of the bearing still in there.
A Sprag clutch puzzle.
That’ll buff out.
Inner piece of the ball bearing still on the shaft.
How would you guys remove it?
Gotta love chinese tools that break the first time you use them.
Heat it up until it’s red hot then get a chisel underneath it to wedge it upwards. You could then get a a puller under it to get it the rest of the way up the shaft. There should be enough heat soak in the component to stop it getting damaged by overheating. You’ll need oxy acetelyene.
If you haven’t got oxy acetelyene, run a large fat arc weld around the circumference of bearing, this might cause enough expansion to wedge it upwards with a chisel.
Take it to someone who has one of those fancy induction heaters. They are really the business.
Angle grinding isn’t a great idea, one slip and it’s knackered, but would work if you’re careful and prepared to risk it.
I’ve had the same problem getting the remains of wheel bearings off stub axles.
Disc grinder very carefullly.
I have an oxy/acetylene torch and a disc grinder. I’ll try the torch first. I imagine the idea with the disc grinder would be to make two angled cuts not quite through, and try to break it apart with a chisel and hammer.
I’m dismayed by how much I’ve forgotten about these things. There is another big strong spring A53 in the side cover with two long screws to compress it.
The pistons A43 and A48 are stuck and rusty, even though I’ve had it full of oil for 20 years. It’s an interesting challenge, don’t know if I’ll be able to save this thing. Glad I didn’t pay anything for it.
Rob,
Two cuts with a grinder and chisel is spot on. Also one cut and chisel split is sometimes plenty to get it loose enough. First choice is always heat with oxy and hit it.
Always, always safety glasses with the grinder and chisel.
Matt
The torch worked, the bearing is off.
Rob,
Went out this morning and put a camera inside the gap B and all looked good with no apparent damge so I decided to apply full force to separate the OD from the box. Put in a lever bar and it popped straight off  .
.
I’ll strip it down and post photos later. It has the 12 springs like the middle one in your diagram. What vehicle would that have come out of??
Matt
That’s good. I assumed yours was from an XK140/150, but just now checked your profile and you don’t list one. Is there a serial number on the main box case or top cover?
Rob,
We discussed this one some time back. It is the original 120 gearbox with a replaced mainshaft and top cover. Car is a 1950 ots 120. Number on top cover is JLN22077 but that doesn’t mean it originally went with the OD.
Thought the 12 springs and centrifugal switch on top of the speedo gear may have been a give away. Original plate on the OD is missing a usual.
Matt
8 springs normally fitted to 2.4 / 3.4
MK 2 overdrive units, 12 springs to
3.8 models.
Matt,
There should be a brass tag on the top of the Overdrive with the Laycock number that (most probably) starts with Type number 28. See photo:
Here is a list with Laycock numbers for Jaguar applications.

But (in theory) it could also come from another car like one of the following examples:
28 / 1292 AH 100
28 / 1327 Standard Vanguard
28 / 1447 AH 100-6
28 / 1463 Humber Hawk
28 / 1502 Rover 60, 75, 90
Hope you’ll find the number.
Bob K.
Bob,
As is usual someone removed the tag, why do people do stupid things like that all the time. The spreadsheet is excellent, many thanks.
Matt