I’ve only a few months of body work left and was thinking
things would go better if I mounted the car (minus chassis, of
course) onto my E-type rotisserie. It would especially come in
handy for media blasting and painting the underside. Has
anyone on board done this? Cockpit bracing is easy enough to
figure out but I’m specifically wondering about attachment
points for the rotisserie and framework required. Again, your
advice please, oh whiskered ones. Photos would be great, too.–
Nick Saltarelli '68 Cdn mkt E-type S1� OTS, '54 XK120SE OTS
Niagara, Ontario, Canada
–Posted using Jag-lovers JagFORUM [forums.jag-lovers.org]–
Nick S;
Depends on the way the body is fitted to the rotisserie…
I’ve seen (and built) a rotisserie that bolts to the firewall and
the rear of a unibody car (like a '65 Mustang). I built a really
heavy-duty rotisserie for use with the Tri-Five Chevy bodies
that attached, via a unique set of six-way adjustable mounts,
directly to where the body mounts to the chassis (body was
lifted via two fork-lifts, then main support beams with lifted
and fitted into place on the front and rear pivots… “Balancing”
the assembled unit with body attached was a royal bitch!!..
Both these units could be rotated a full 360 degrees and
“stopped” (pinned) at the 12, 1:30, 3, 4:30, 6, 7:30, 9, and
10:30 o’clock positions.
The E-Type Rotisseries I’ve seen in photographs are built for
a unibody car, in that they fasten to the firewall of the body
and probably at bumper mounting points in the rear… This
will NOT work for an XK body of ANY body style!!! The
XK REQUIRES “frame support” to keep the unibody from
flexing and sagging!
I built two rotisseries for my XK120… one for the chassis
(a light-weight unit-- call it “LT-1” ;-} ) and the second for
the 120DHC’s body. On the “Body” rotisserie, instead of
building a “dual rail” system that weighed a ton, I opted to
build a single rail that goes thru the center of the grill opening,
crosses thru the g-box opening “just above” the bottom of the
firewall, goes thru the cockpit right at floor level, thru the
prop-shaft opening at the battery shelf then continues thru
the spare type well and out the back…
Some mountings on this rotisserie are six-way adjustable,
some mounts are eight-way adjustable and all “tee” off the
center beam of the rotisserie, . The 120’s body is mounted
to the main bar with five pair of mounts… basically at all but
one place the DHC’s body mounts to the chassis. I even
built special bars that not only brace the door openings to
maintain their “factory stock” distances but I made them
adjustable with heavy-duty guy-wire tensioners… This allows
the top of the door opening to be adjusted to within tenths
of a millimeter of accuracy. It is a rather stout set-up, there
is no “bounce” in the body during rotation and it is very
stable when rolling this rotisserie around in my shop. It
was an easy build but one MUST be very confident in one’s
welding skills before attempting such a project! Dropping
one’s XK body from four or five feet is horrible enough, dropping it on
one’s self might just be more than physically
and mentally painful!!!
I went thru some real photographs I have taken of “Things
Jaguar”, but found none of the rotisseries… I will need to dig
thru several 12" x 12" x 7" plastic lidded boxes that contain
several hundred(s) of CD’s and DVD’s that contain our family
photographs, and view EACH disc to find the photos… so
allow time for that… but then, you might be finished with your
Jag by then…
Charles #677556.----- Original Message -----
From: “N�ck”
I’ve only a few months of body work left and was thinking
things would go better if I mounted the car (minus chassis, of
course) onto my E-type rotisserie. It would especially come in
handy for media blasting and painting the underside. Has
anyone on board done this? Cockpit bracing is easy enough to
figure out but I’m specifically wondering about attachment
points for the rotisserie and framework required. Again, your
advice please, oh whiskered ones. Photos would be great, too.Nick Saltarelli '68 Cdn mkt E-type S1� OTS, '54 XK120SE OTS
Niagara, Ontario, Canada
In reply to a message from cb@XKTX.Org sent Mon 18 Jan 2016:
Thank you muchly for the detailed response, Charles. And
please don’t go through the bother of finding those
photos, your excellent description above will suffice. I’m
confident in my welding skills. I have already fabbed
cockpit bracing I’ve used to lift the body off and on the
chassis which will factor into a rotisserie arrangement
and will build additional bracing to allow the body to be
inverted. Remembering how much time it took to determine
the centre of gravity of my E-type monocoque, I’m most
interested in the locations of the two mounting points of
the XK body might be. Any idea how much an OTS body sans
bonnet, bootlid, doors, rear wings and floor boards might
weigh?–
Nick Saltarelli '68 Cdn mkt E-type S1� OTS, '54 XK120SE OTS
Niagara, Ontario, Canada
–Posted using Jag-lovers JagFORUM [forums.jag-lovers.org]–
–Support Jag-lovers - Donate at http://www.jag-lovers.org/donate04.php –
Someone else might know exactly, but when I was younger two of us lifted the
back clip off the frame and four of us easily lifted the front clip over the
engine and walked away with it. So based on that I’ll place my estimate at
no more than 150# for the rear and 300# for the front.
Mike Eck
New Jersey, USA
'51 XK120 OTS, '62 3.8 MK2 MOD, '72 SIII E-Type 2+2> Any idea how much an OTS body sans
bonnet, bootlid, doors, rear wings and floor boards might
weigh?Nick Saltarelli '68 Cdn mkt E-type S1½ OTS, '54 XK120SE OTS
In reply to a message from N�ck sent Mon 18 Jan 2016:
Hi I have made one for my OTS - but decided to use 2 sections
front to back and mount to the existing body mounts - it was
quite easy to make and stiff as hell - FYI I have put on my
blog a page for you to see what it looks like - hope it helps
Marc
http://jaguarxk150restoration.blogspot.co.uk/--
Gezzler
–Posted using Jag-lovers JagFORUM [forums.jag-lovers.org]–
–Support Jag-lovers - Donate at http://www.jag-lovers.org/donate04.php –
In reply to a message from N�ck sent Mon 18 Jan 2016:
Hi I have made one for my OTS - but decided to use 2 sections
front to back and mount to the existing body mounts - it was
quite easy to make and stiff as hell - FYI I have put on my
blog a page for you to see what it looks like - hope it helps
Marc
http://jaguarxk150restoration.blogspot.co.uk/2016/01/roll-
over.html–
Gezzler
–Posted using Jag-lovers JagFORUM [forums.jag-lovers.org]–
–Support Jag-lovers - Donate at http://www.jag-lovers.org/donate04.php –
In reply to a message from Gezzler sent Tue 19 Jan 2016:
Just what I’m looking for, Marc. Thank you.–
The original message included these comments:
–
Nick Saltarelli '68 Cdn mkt E-type S1� OTS, '54 XK120SE OTS
Niagara, Ontario, Canada
–Posted using Jag-lovers JagFORUM [forums.jag-lovers.org]–
–Support Jag-lovers - Donate at http://www.jag-lovers.org/donate04.php –
I am looking for a way to use a rotisserie on my FHC , without the chassis ? Any one got pictures of cockpit bracing and more importantly front fixing points , there doesn’t seem to be much there to fix to .
Thanks Jim
Been fabricating mine these past three days Nick, tomorrow (Sun) I
will mount the body. Will post photos.
Peter B.
This is one of two more recent threads
And this the other
I still owe the list a promised video with more detail. Other priorities.
Cheers,
Nick
A rotisserie is handy for a lot of jobs, but you must be very careful not to let the body sag. In rebuilding my rotten FHC, the body was already off the frame by the po (rip), and I braced the interior from subdash to rear cockpit corners diagonally ( let me know if you still need photos). I then did as much repair as possible with it in this state. Sometime, you have to mount to the frame to establish alignment, so I chopped the sills out, mounted the new sills to the frame, and mounted the body over the sills to finish the big repairs. At this point, you have everything shimmed and aligned. On my car, there was some sagging of the door openings because of the po’s “suspended” activity for 25 years, but that came back nicely with a bit of jack work. He hung the body from a timber with lifting eyes fitted in the front of the boot opening, and from the inner front wings just in front of the cowl - actually worked pretty well. I didn’t use a rotisserie until after the big work was done, but found it useful then for the smaller stuff. Worth the trouble? questionable to me on a non-unibody car. If you are reasonably agile, you can do everything you need after the sills are on from a fairly high rolling cart, which is where my body went after dipping. I wouldn’t mount a rotten 120 body on a rotisserie without major bracing, and that’s too much trouble imo.
I agree but for the too much trouble part. It took a day to weld in the bracing then another to mount the body to the rotisserie. I’ll get back a multiple of those two days going forward. However, I didn’t lift the body off the frame until most of the major repairs had been done, which allows you to integrate the inherent structural stiffness of the front and rear bulkheads with the supplemental bracing for maximum rigidity.
Agility is a valid point, but at 66 I am less agile than I was at 36, and the ability to rotate the body to achieve more comfortable working angles for final panel beating, shrinking and welding and lead loading to me is worth the investment. And when I get around to blasting the underside clean then paint prep, shooting colour and colour sanding, having the ability to rotate the body is going to save me a whole lot of contortions.
From my perspective, the best, and easiest, way to pull off a first class result.
Pictures are always good to see if possible. This is how I braced a Morris Minor I did a few years ago , but that would not work on an XK. I rolled the Moggy on one you bolt to the wheel hubs .
Sounds like you have a good plan - there are lots of good ways to get things done. Jaguar did it your way, so why not? For me, it was better to finish color spray the underside including fenderwells, boot, engine bay, and interior before final mounting of the body to the frame, then shoot the final paint when everything can’t possibly move (or get dented during mounting). I’m also in my seventh decade, so I agree with the need for enhanced mobility! Good luck.
Rotisserie or rotator, the former smacks of something used in a kitchen
or by ex-colonials on a Sunday afternoon, besides rotator sits hand in
glove with its companion inclinator, tiltisserie indeed!
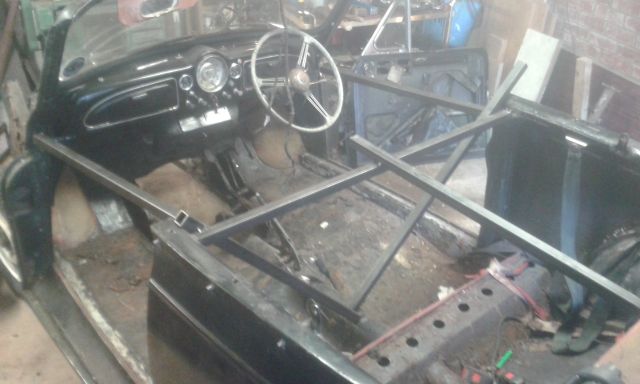
With suitable bracing twixt front and rear bulkheads I have utilized just
the sill mounts, front of the front wing mounts not needed in my case.
Static balance is achieved by placing weight as required.
Drilling holes in the mounting plates attached to the body mount, in my case 3/4"@ 1 1/4" centers,enables C of G to be established, and
therefore, dynamic balance. Holes drilled in the upstands
enable adjustment for clearance over the longitudinal member of the
main frame, to achieve 360 degree rotation. The primary use for this
rotator is to mount a ongoing MK1 bodyshell project, hence it looks
longer than needed for the 120.
I have a electric motor coupled to a reduction gearbox and am contemplating fitting it to the rotator to enable powered rotation
controlled by a Wah-Wah pedal 60s vintage, this will be dead handy
when painting the body. My method will be to tip the paint mixture
into a watering can equipped with a suitable " rose", then sprinkle
the paint over the rotating body, this will centrifuge the paint into
all those nooks and crannys so hard to reach with a spray gun.
On the exterior panels centrifugal force will flow out the paint resulting
in a finish without runs or orange peel.
Those posters with a doctorate in physics please advise on -
speed of rotation, paint viscosity and the size of the holes in watering
can “rose”.
Advice from other types of doctor will, no doubt, be forthcoming,
after all, one needs to be “committed” to take on some of these
restoration projects.
Peter B.


1 Like
Peter:
Bravo!
Chris.
Yea, including the use of a strait jacket, and massive doses of lithium…![]()
![]()
![]()
I wonder if someone, of say a alternative disposition, would object
to a " straight jacket", although judging by the Jeremy Thorpe thing
shown on UK television they might well go for the Lithium.
Peter B.
BTW I s`pose your locking tool will fit my Karmann Ghia cab.
1 Like
FWIW…”strait” is correct…
If ever I begin another full resto, Ill need one!
Paul, my previous post obviously flew straight past
It was not to correct “strait”.
Peter B.