OK, so I have to remove the ring out of the bigger, spindle part. The ring that somewhat indexes the lower cap, which I will drill & tap for a grease fitting. I will attempt this today, and report in later.
Many Thanks, RF.
I managed to mash the ring out of the spindle. I can’t really get a good measurement to shim the lower retaining cap. I guess that I well just grease for now (I did drill & tap for a zirc fitting), and keep an eye on it. If need be, I guess I could always remove the shims when the plastic cup mashes down?
Thanks for all the pointers, RF.
Fred,
If you can move the ball joint by hand and if there’s no “play” then that is good starting point. I had to add some of the thinner shims to get the ball joint moving. Without them, it was all too tight.
But I will recheck for any play after having driven some miles…
Bob K.
Bob, if you have ever replaced ball joints on a more modern car where they are a “self contained” unit rather than a built up (but serviceable) assembly like these you would have noticed the ball pin is very tight and barely moveable by hand. When the weight and extreme forces of the car bear down on a ball joint that stiffness is inconsequential. Set too loose and in a short period of driving time there will free play and you will have to remove some shims. Set them tight but moveable, then they will seat in to zero free play.
It’s all a matter of interpretation and/or definition… When I said “to get the ball joint moving” I meant that I gave the top nut a blow with my fist. Initially (without the shims) even that was impossible. So we agree!
Bob K.
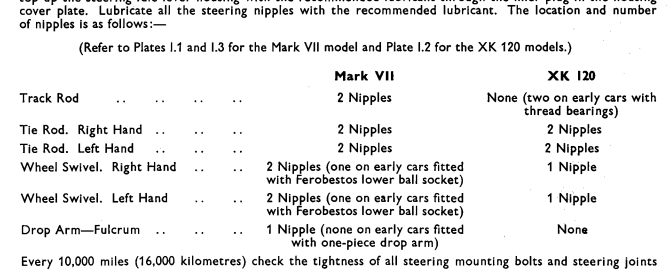
From the XK120/Mark VII Service Manual:

and from the Mark V Service Manual:

Why the difference in instructions?
Possibly related to the fact that during the Mark V era they were using Morganite bronze greased bearing cups, whereas during the Mark VII era they were using Ferobestos dry bearing cups.
Bear in mind this IFS was new to Jaguar with the Mark V, and still in the evolutionary stages some years later.

Yes I agree with you, while my comment was directed to you it was intended to support your comment to help Fred grasp what he was dealing with. As well the addition of the zerk fitting is essential to ensure this style ball joint is sufficiently lubricated.
Thanks All, Strangely, one side is “quite snug” with 3 shims, yet the other is rather loose! I will remove the shims on the loose side, but I wonder what happens if things are still loose with NO shims? I’m not liking this guessing game with the plastic cups.
On another note, the upper replacement ball joints have NO grease fitting. I’m almost afraid to drill & tap the pressed in plug on the top for fear of damaging/contaminating the internals?
TIA, RF.
OK, I took 2 shims out, and the plastic shell seized the ball. I then put one shim back, and there is a stiff resistance. I can’t take the suspense of this plastic crap.
Going backwards here with the quality of the repro parts. It appears that the new lower control arm bushings I just received are too long. A shame I wasn’t aware when I tightened the castle nuts, as they stripped before I could see the hole for the cotter pin! I will try to somehow shorten the inner sleeve of the bushing before I ruin anything else.
Did you remove the old sleeves?
I use dish soap on rubber bushings and move the control arms when I install them, so the bushings seat better.
Yes, the sleeves came apart with the old bushings. I did NOT secure the upper ball joint in an effort to allow the upper control arms to move more freely, but did have them aligned loosely with the bolts that joined them at the upper ball joint.
The internal sleeves of the upper bushings were obviously too long upon failure, dissasembley and inspection.
These are the old fashioned rubber bushed replacements, as only available via Welsh at the moment.
I can now see that the internal sleeve is longer than the originals, and butt together to form a longer distance to compress. Hence my catastrophe.