The victim this time is the front left handle. Followed by F bombs galore. The front right exterior handle has been broken for years. The rear ones still work although the rear right is weak. Can these handles be cast out of steel or at least aluminum? How strong would that be?
Cheers!
good luck…reminds me of my Ford XF Fairmont…broke around 10 door handles, drivers door at least 5 times, (on a vehicle only 10yrs old)…sh!t design…so bad that chain auto parts stores always had them in stock
at one stage i would leave the window rolled down and enter it like a lizard
got the handle door change time down from all morning to 8minutes
hopefully someone with experience on XJ40 can help you, and the design was not as bad as the Ford part, which I found 3 separate engineering problems
Joseph
When you do replace the handle and on all of your other non-broken handles, the trick to keep them from breaking is to maintain proper adjustment of the push-rod that goes from the handle down to the latch. This can be difficult to keep in proper adjustment because the “adjustment” is done with threads on the latch end of the rod engaging with a plastic piece on the latch that eventually over time wears out and stops maintaining a good grip on the threads on the rod. Once the rod gets too loose then you end up pulling TOO far up on the handle to actually actuate the latch to open the door. This results in a BAD angle that eventually puts too much force onto a weak point in the handle assembly.
The trick to avoid this is to actually thread a small metal nut onto the threaded rod on top of where it enters the plastic piece on the latch mechanism. Then engage the threaded rod in the plastic piece and screw the metal nut down to butt up against the top of the plastic part of the latch. SO then the metal nut is what maintains the proper adjustment of the rod in the plastic piece and pushes down on the plastic piece when the handle is lifted instead of the poorly designed engagement into the plastic piece.
Tony, Steven, thanks guys for the reply. Interestingly this handle was used the most buy failed last. I’ve replaced the other three already. I’ll remove the door panel soon and take a closer look at it but I’m pretty sure that the extension arm of the handle that’s broken.
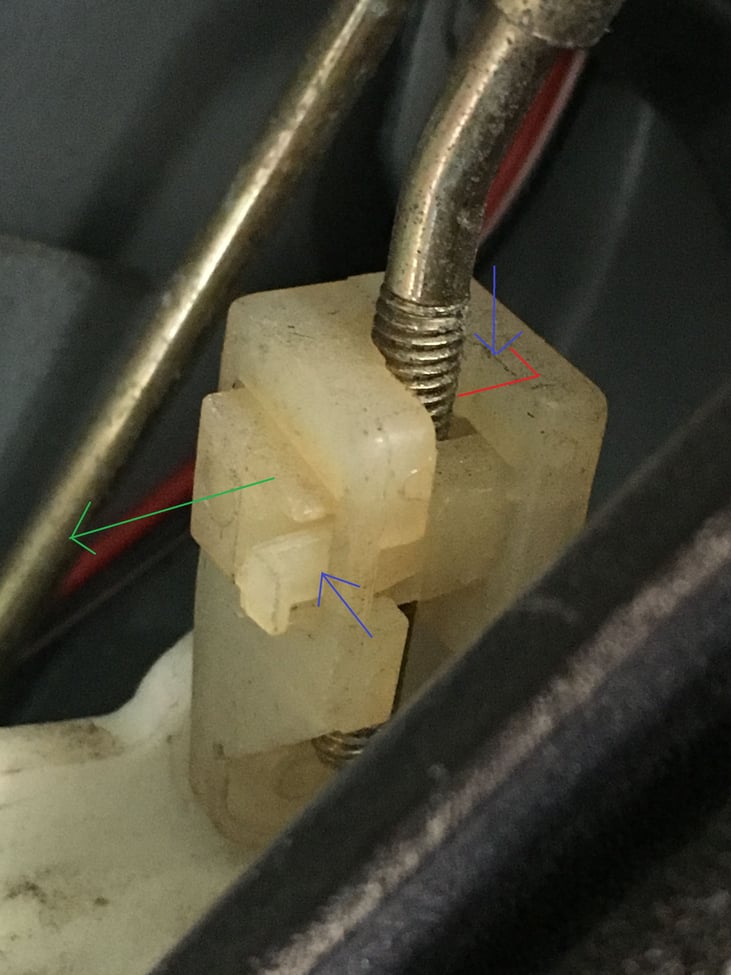
Here are some photos of the plastic piece that the threaded rod fits into. I threaded a nut onto the threaded rod before I slid the threaded rod into the plastic piece so the nut is above the plastic piece. Thus the bottom of the nut presses down on the top of the plastic piece and this is how the force of pulling on the door handle is transferred into the latch mechanism instead of with the threads trying to engage on the inside of the plastic.
I believe you Larry. Do you push the door with your knee or the other hand before open it? I do that on the rear left door. It makes it a lot easier on the handle. What size nut will fit?
I used to do the push, wiggle, hold my breath and all sorts of stupid stuff Joe, but now, to hell with it I just yank on the handle! The handles break if the travel is too much …fitting the nut allows you to adjust the rod so the handle actuates about halfway out and STAYS in that adjustment…
I think the nut is like 1/4" or 3/16" or even 1/8" maybe? can’t remember exactly …I just went to the hardware store with the rod and tried a few of the small nuts til I found the ones that fit.
If you don’t have the rod off and handy just buy a bunch of small nuts at the local hardware store. Good thing is they are not metric for sure.
Here you go Joe, this is how it looks after you add the nut - the rod can’t go out of adjustment due to the rod slipping in the thread as the nut does all the pressing, not the tiny threads of the rod.


