Got the fan ! I removed the safety shroud. Now how to attach Jag oem spider brace to the four holes of the new fan…

Get a 3mm Aluminium plate, cut it in the shape of the fan base and drill holes for the fan and tripod/spider mountings.
I would tend to keep the rubber isolators, so you might have to put spacers, or even extra isolators, between the fan and the plate, or do some creative bending.
Best,
Aristides
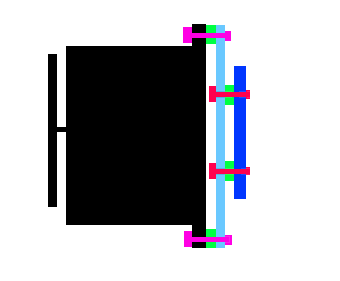
Thanks! Got my plan based on your good suggestion! Green are rubber spacers. 4 bolts for aluminum piece to fan motor. 3 bolts for spider mount (new holes) to aluminum piece.
Either this, or lots of duct tape 
On only a remotely relevant machine, I ditched the “legal defense” device/.
Little Red. The smaller of my two my two old Troybilt Chipper/shredders. A hefty cast iron “grill” in the output chute. Catch projectiles. Yep. And also shredded waste and jam. I merely stay away from the utput side when feeding the hopper. Repowered by ah HF sourced Predator, it is awesome.
Big Red will get the same when I solve it’s idler belt clutch issue!!!
Carl
I dunno how accurate you intended that diagram to be, but it’s not a good idea to set it up as shown. The original rubber isolators should have been grommets in the holes, rubber on both sides of the mounting flange and through the middle so the mounting bolts never touch metal on the spider. As you’ve shown, rubber between flanges but not through the mount holes and the heads of the bolts against metal will not work as intended.
You’re also showing rubber between your adapter plate and the fan motor. It’s probably not a good idea to have the fan double-isolated as shown. Use the OEM rubber isolators on the spider but rigidly attach the adapter plate to the fan motor.
Yes, the green bits will actual be rubber grommets with rubber on both sides.
Regarding the adapter/motor connection, I need to create a gap so that there is room for the head of the bolts that connect the adapter/spider. So I guess instead of rubber grommets between adapter/motor, just use washers to space it out? (orange are washers)

Yeah, I would. The double isolation might work, so I suppose you could try it. Watch that it’s not too flexible, though, and allows the fan to bang against the shroud. It also might set up a resonance, allowing the fan to start shaking while running.
I’m using 1/4" bolts, so the grommets are quite small. A double isolation may be needed. Also, I am using a 10" fan, not 11" like original, so plenty of room.
can I test the resonance on the bench?
You can reduce the gap to zero if you use countersunk screws.
i was thinking of that, but I’d like to use something beefier than a screw.
I don’t think a gap will be much of a problem…I’ve got plenty of depth to work with. Actually, maybe I should add more space so the blades are closer to the radiator.
A Allen headed C/sk screw would be more than man enough to hold the fan and adaptor in place.
I am a retired toolmaker and these things really hold on 
1 Like
I’m sure you are right. I don’t have much knowledge in these things, so tend to overbuild.
Greg, you and I seem to be alike insofar as pursuing the the more difficult path. Kirby once said my retrofit of the newer Electrolux wiper system was the most complicated fix for an “electrical problem” he had ever seen. But it paid off since the wipers are far superior to the OE Lucas system.
However, in this case I see little upside for what you are doing here. The Spal fan works just fine as it comes from the factory, and you will be doing a lot more work than simply removing the left shroud and bolting the Spal unit out of the box.
Really? I don’t see that much work. I already removed the Spal fan guard in 5 minutes.
It should take me 20-30 minutes to cut out a circle of 1/8" aluminum, smooth the edges, drill four holes for the motor and three for the OEM Spider mount.
It should take me 10 minutes to bolt everything together.
And then I attach the fan/spider mount back to the cowl, maybe 20 minutes if I don’t drop any nuts.
I also prefer Kirby’s advice of ditching the fan guard, just in case it does hurt flow.
Come on, Greg! It’ll take longer than that to go get the aluminum
I’ve been running one for a few years in factory configuration and it meets the need. But, to each his own. I’m sure it will be better than the OE, no matter how it’s installed.
Ebay will deliver the aluminum to my door on Friday.
Doesn’t everybody have an old stop sign in the attic?
2 Likes
But, they are tin, actually steel…
Left over from teen days in their room???
Not in my house as a kid. Dad !!!
USARMY TOP KICK…
carl
In the US road signs are alluminum. Damn heavy gauge too. And illegal to possess. Lots are on bar walls and man caves though.
