Back in the day, I would regularly lubricate those clutch pivot points, as part of a lube job.
“Lube job:” now I’m showing my age…
Back in the day, I would regularly lubricate those clutch pivot points, as part of a lube job.
“Lube job:” now I’m showing my age…
Hi Chris.
The worn spots in your shaft are caused by long contact with the steel insert cup which is welded into the side of the chassis frame. They are supposed to be concentric but not touching. I imagine the big spring was not holding the bronze bearing tight in the cup and allowing the shaft to move forward when the pedal was stepped on.
It may not be absolutely necessary to repair those worn spots, if they are located where the spring will be. Once it is back together the bronze bearings should hold the shaft in the center and there should be no contact with the worn spot.
But if you want to try it, I would set the MIG on the lowest setting and just do little spots, a short zap, like do one spot, wait 10 minutes for the area to cool off, do another spot, wait 10 minutes, etc. That way the piece should not get too hot and won’t warp very much.
Another technique would be to warm the whole area all around the diameter with a propane torch first, so the amount of additional thermal expansion from welding is thus reduced. Then you could do your spots with shorter wait times.
Then chuck it up in a 3-jaw chuck, not 4-jaw.
The hydraulic clutch came in with the Mark VII in '51, then Mark 1 in '55, and then XK150. It does seem odd that they couldn’t have done it on later 120, or at least with 140, but for some reason they didn’t.
Chris: I thought the rubber dust cover on the bell housing bearing collar looked like a tie-rod rubber boot and hadn’t considered wheel cylinders. Good point.
Wigs: Did your lube jobs back-in-the-day include lubing those tiny oil holes on the bell housing just above each end of the throw-out bearing pivot shaft? On my other car I drilled them larger and fitted them with those tiny Gits flip-top oilers as found on super-old generators and shafts that ran in babbitt bearings. I may do the same with this one. Otherwise, it’s sure to get plugged up with road dirt again.
Rob: I’ll consider your points – thanks – and get back here with a picture of the fix. I’m not too concerned with warpage now as the weld would be around only a portion of the shaft circumference and not parallel to the shaft length. Also, the shaft mass should act as a suitable-enough heat sink during the weld which should be of very short duration.
An upgrade is to use an XK150 shaft and the associated parallel, not tapered, pins. Just don’t forget the lock wire! The tapered ones very frequently break on removal. I purchased these parts from Coventry Auto Components, plus their upgraded high-strength alu/bronze alloy release bearing fork.
I’m just waiting on a final reaming of the Oilite bushes in the bellhousing (shaft is way too tight, and it needs free movement, without being loose). 3 sheared-off 1/4 x 20 UNC setscrews, of the 7 which attach the sheet steel lower closing plate, have been removed, the bellhousing bead blasted, and the Oilite bushes pressed in. Once the reaming is done, I can assemble the bellhousing. Next is the gearbox rebuild!
Finished repair to shaft. The welded fill area still stands almost 0.001" proud of the parent metal but a test fit of the bearings and measurements with the micrometer tells me this is entirely acceptable. My fingernail barely catches when dragged over the repairs. A tool post grinder would bring this down into the ten-thousandths but that’s a wish list item for now. I also went with using a four-jaw chuck and dial indicator simply because, well, I’m just persnickety that way. Jan will now get treated to dinner and cocktails at a recently reopened Stagnaro’s on the wharf tomorrow since I told her that if I can fix this the savings pays for dinner. With covid currently in decline hereabouts, I’m looking for any excuse to get out again anyway.
On a side note, with the amount of time it took me to fix this it would have been far easier to simply make one or more from scratch out of $10 stock from McMaster-Carr: but only if I had the correct key seat cutter too. Cut the two key seats at right angles to each other and drill only for two oil holes and a split pin.
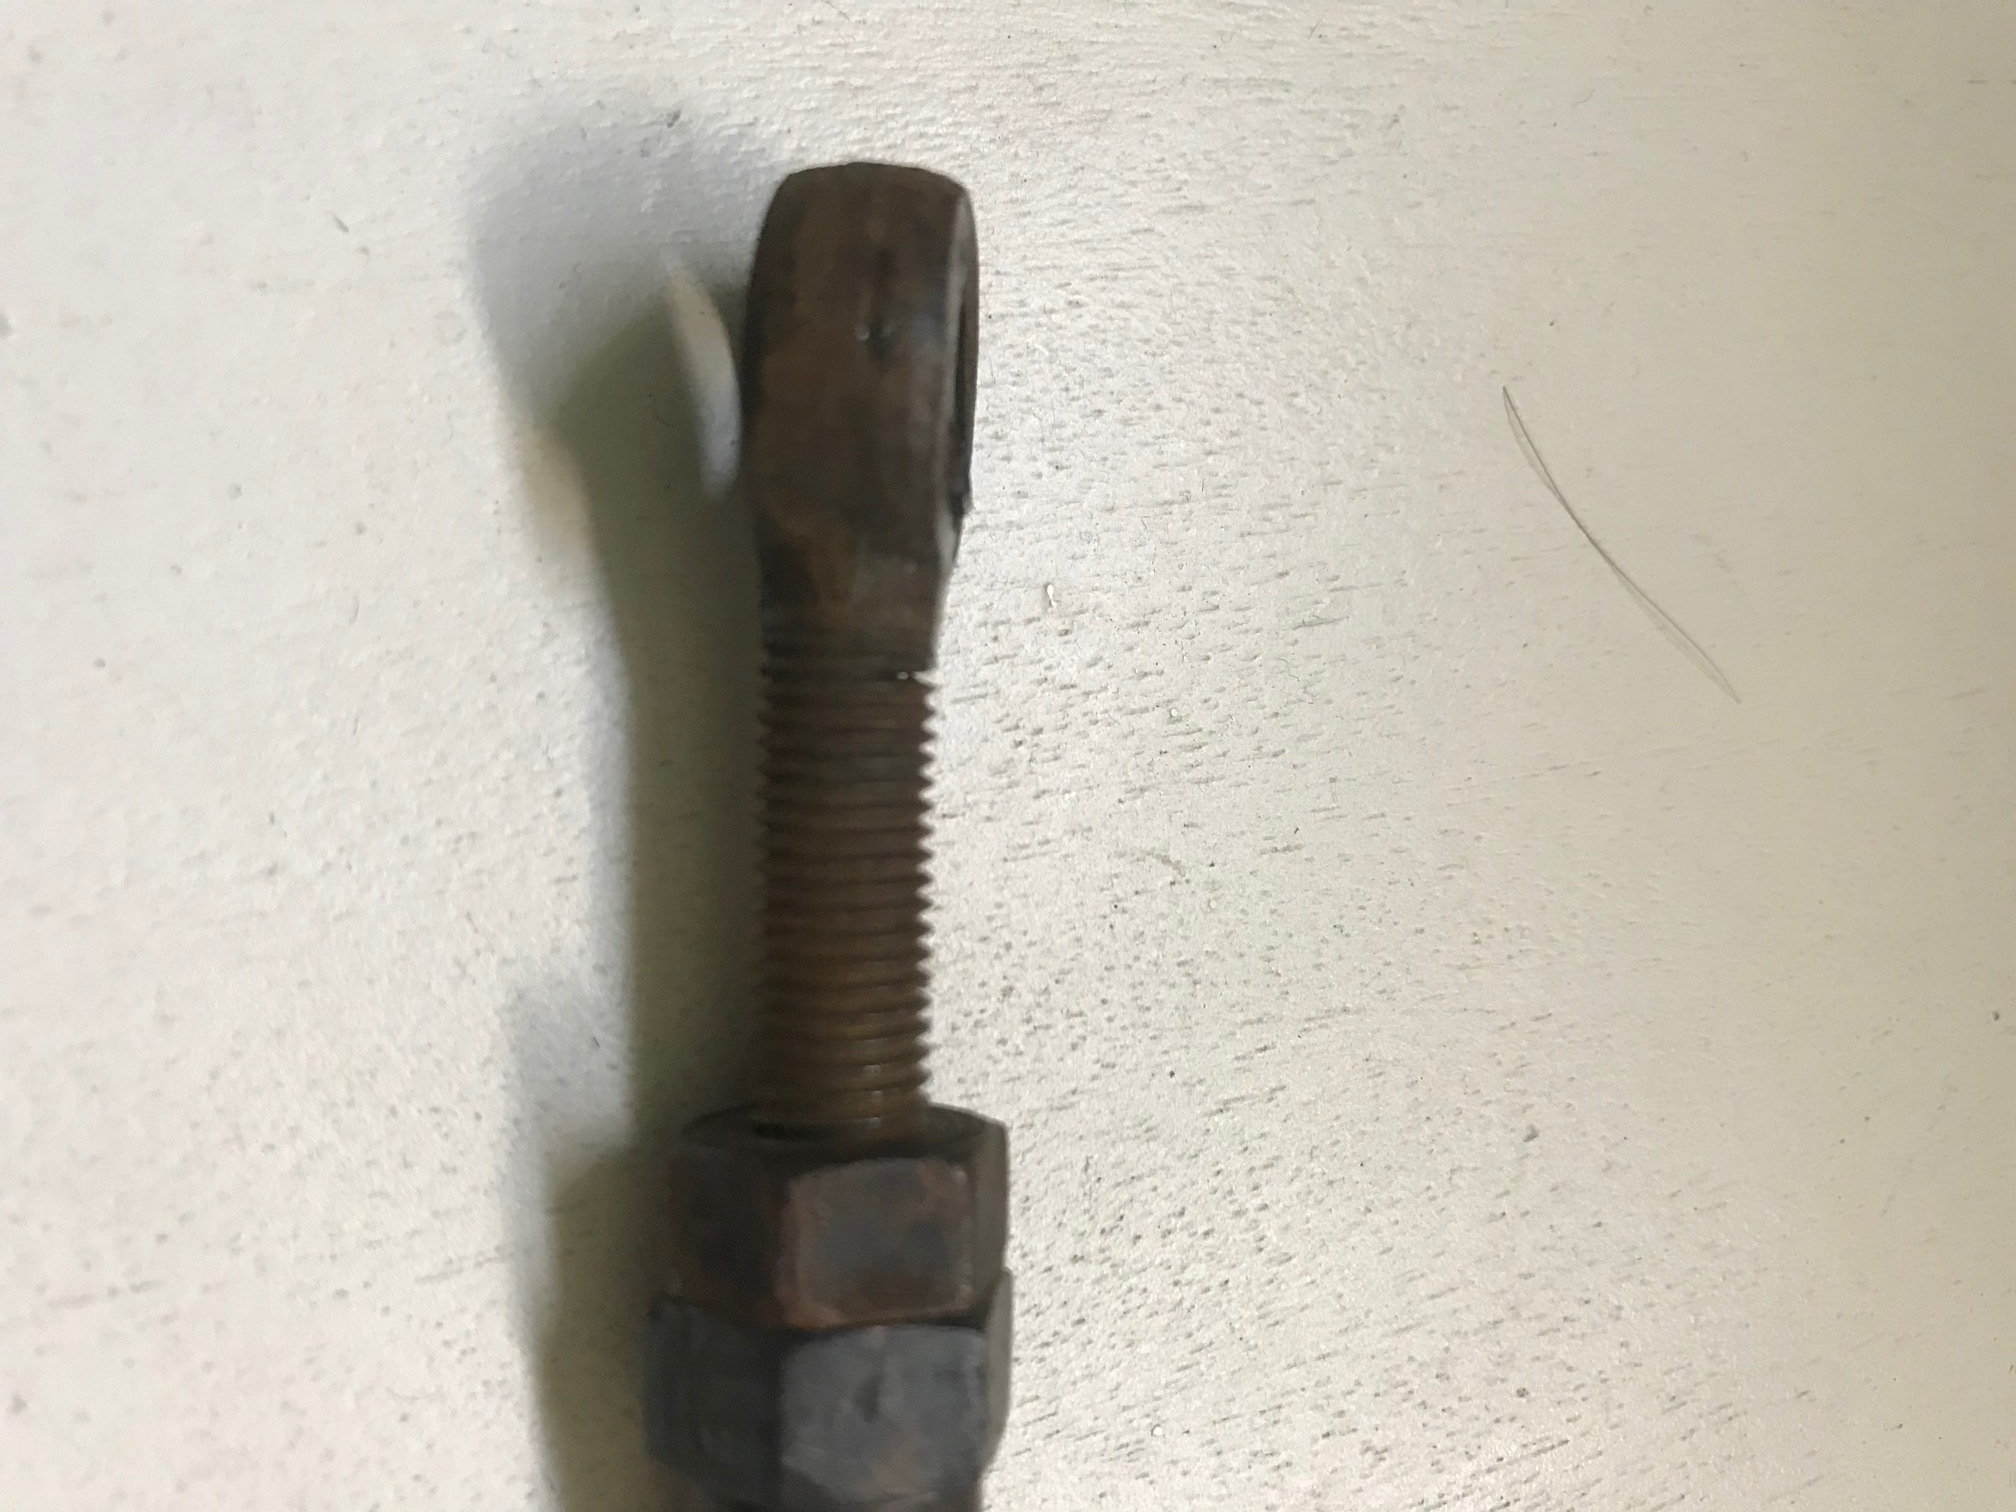
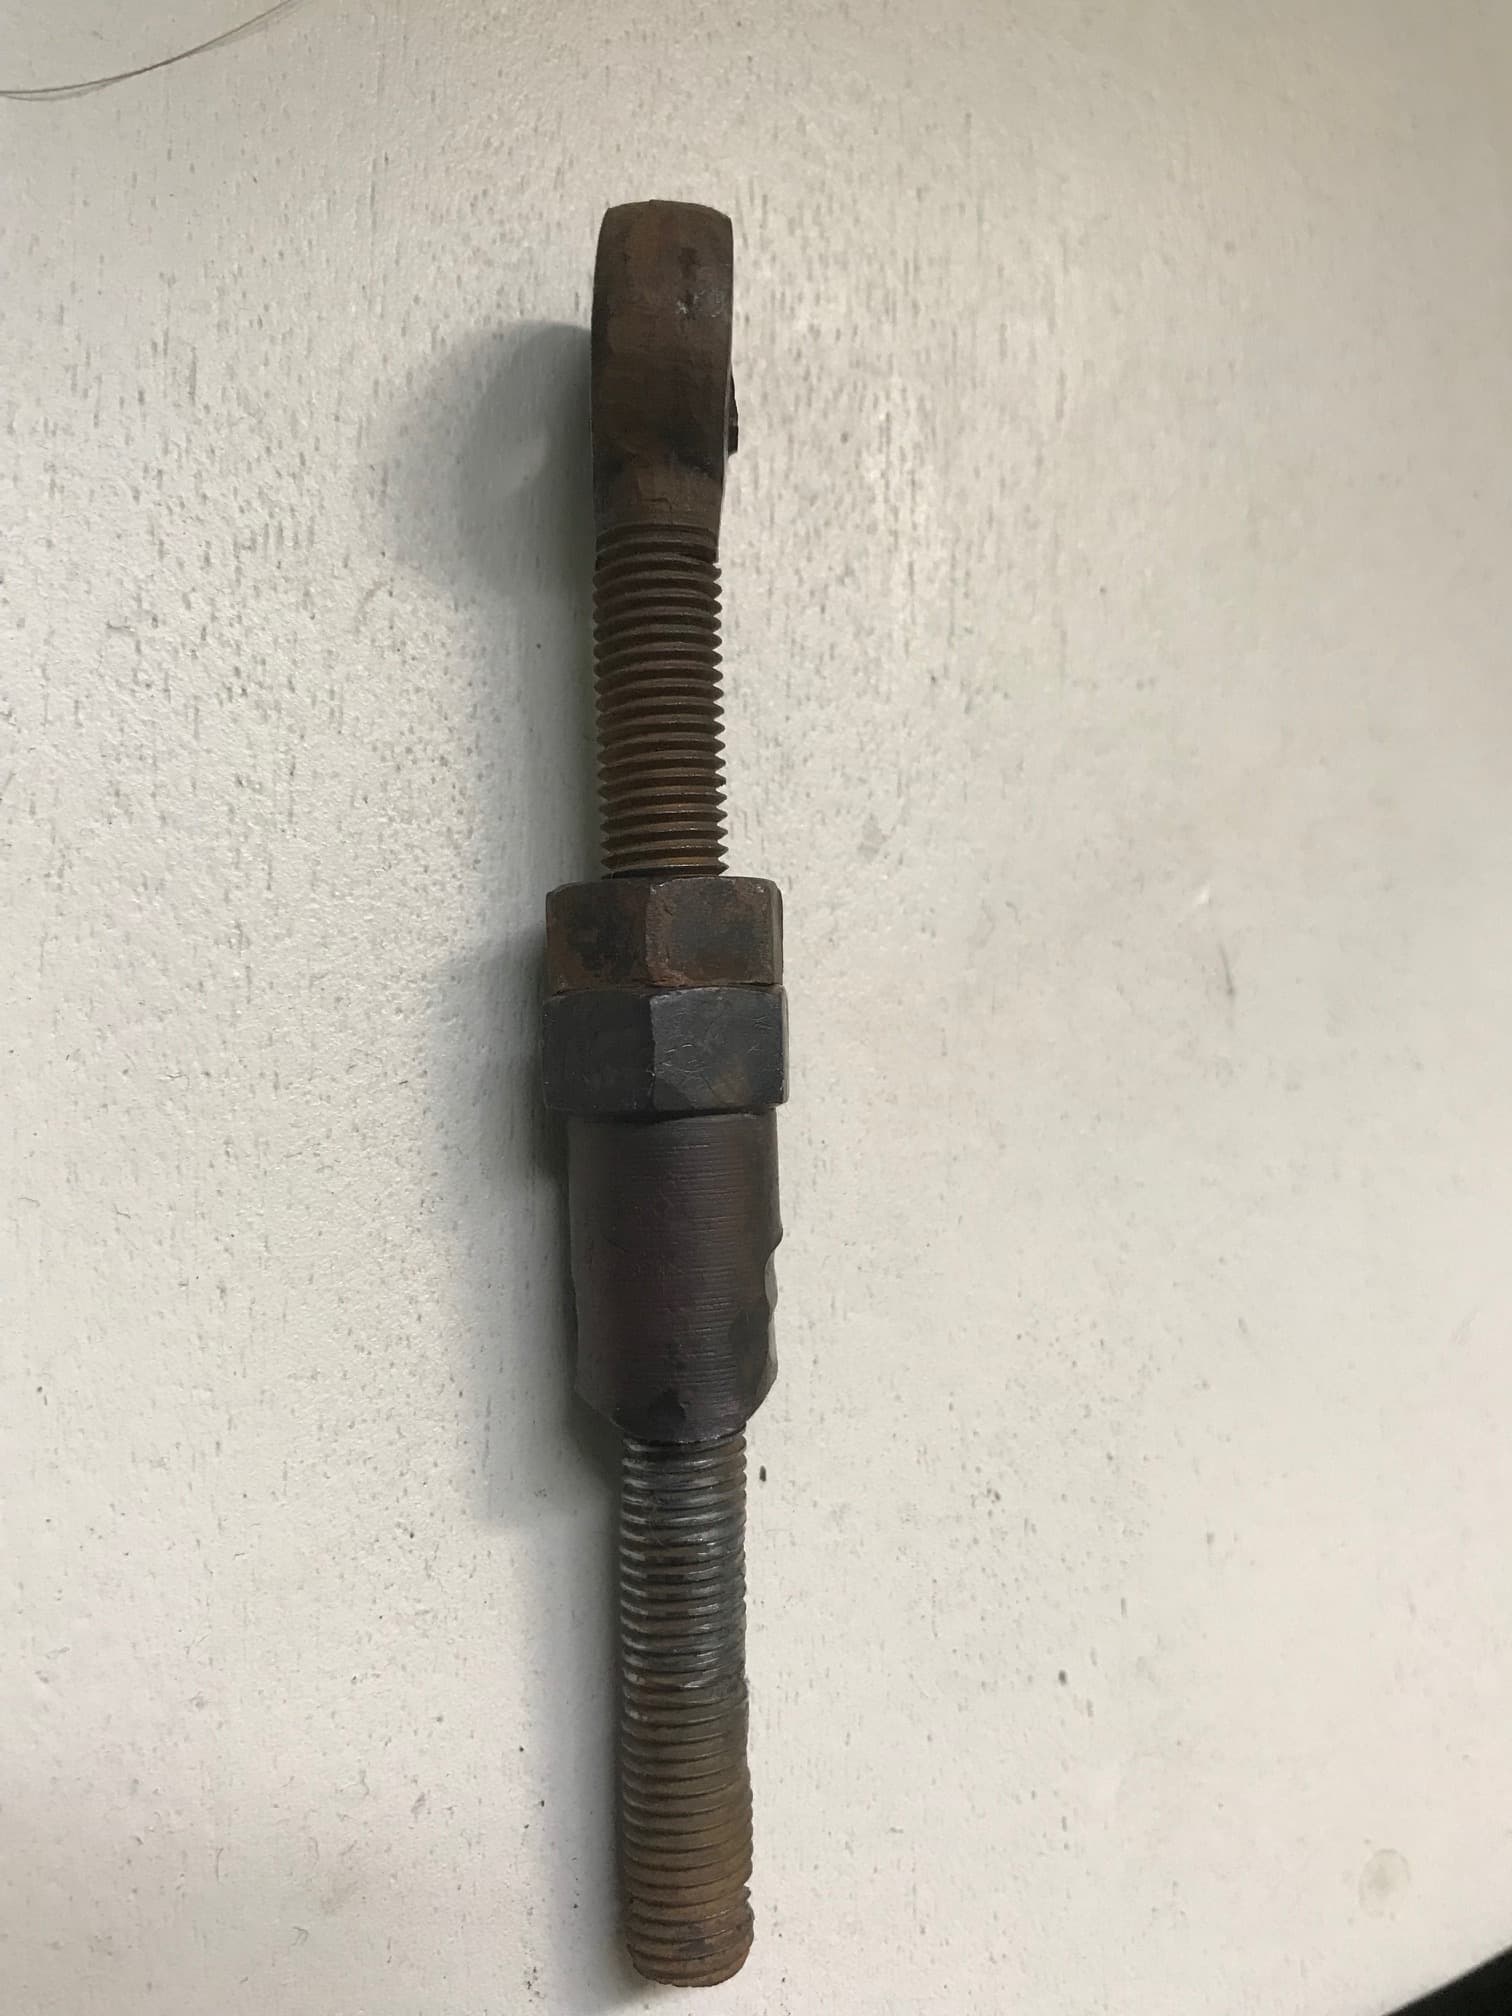
For those who are experiencing horizontal play with the clutch pedal shaft, know that the eyebolt at the bellhousing end of the shaft will put up with this for only so long. Per the attached two pictures, note how the “eye” has a slight bend to it. No problem I thought. Just heat with a torch and bend it back. Zooming in on the first thread, right hand side though will show that it’s cracked about 1/3 of the way through. This, on a part with a 5/16" diameter at best. I almost missed this and it would have surely led to a bang followed by no clutch action at all. The takeaway here is that in addition to the great advice from others to inspect the shaft, washers, bronze bearings, O-ring seals, etc. – don’t overlook this small, but very overstressed part as well.
Very interesting, Chris.
That crack would be caused by the clutch pedal shaft moving from side to side, for example if the cotter pin was missing and the big spring not compressed.

I wanted to thank everyone for this fascinating thread. My clutch shaft has been moving laterally about 1/2 the time I press the pedal, making a loud click as it snaps back into the correct position. This thread shows the probable causes and how to fix it. I’ve been lazy and lived with it for nearly 10 years, but am inspired to fix it after reading this thread.
This a great forum, which makes xk ownership possible for many of us amateurs. Imagine what it was like owning these old cars before we had the internet. You’d be like Buddy Palumbo, driving around to find mechanics who had experience on XK’s. Or, you’d have to wait for your monthly mimeographed newsletter, meaning this conversation would’ve taken over 2 years to complete (assuming you didn’t own a phone at your home).
John
John:
You make an excellent point. For years as a member of a large, international Jaguar club I would dutifully write in with my queries and, by the time the mail had traversed the Atlantic and the question was read and responded to, frequently 3 months had passed by the time I read the response in the monthly magazine. And the magazine also took forever to get here given the mail service. Certainly not as rapid as our current situation!
Chris.
True, but my recollection is that the replacement I ordered was much lighter construction than the original. My hope is that with proper adjustment and maintenance, the replacement eye bolt with lead an easier life, but definitely worth monitoring.
Hi all,
Is this the issue that’s being discussed here? My RHD clutch pedal appears to draw the shaft outwards as it’s pressed (original position inset):
And a link to a video:

Thanks,
Phil
Did you ever fix this? This seconds what I was saying about our crude clutch setup.
BR,
TFB
Hi, Yes I fixed with JB Weld.
Regards,
Teun
Very useful topic/thread. Thanks to everyone.
I adjusted my clutch pedal linkage on a 1955n140 LHD roadster, on Monday.
The mechanic said that at some stage we need to take the gearbox out and pull the bellhouse to get access to the weak/worn parts inside.
We would then attend to the shaft issues in this thread.
I would like to make a list of prts needed, so that when we do the work, we have everything needed. I don´t mind ordering parts that may not be needed in the end, but want to do the work in one day. My mechanic does not like cars stuck on the lift, waiting for parts from abroad.Can somebody point at the parts I should order?
I seem to remember reading about modern, improved parts, perhaps near the throw out bearing arm…
Peder
Here is a good starting point when it comes to parts to order:
The improved parts I referred to may well be
C9870 fork, and C2483 slave lever. Cant remember.
Someone talks about neglected oiling (engine oul), but ehere are those holes?
Peder
I’m assuming Peder Mansson and Peder are the same person using two different devices?
C584 brass bushings (2) in the bell housing
C2483 lever on operating shaft
C9780 fork on operating shaft
C568 tapered pins (2) securing lever and fork
C3262 wire securing tapered pins
C3255 spherical bearing
C3323 gaiter on pedal shaft over housing for spherical bearing
BB48444 release bearing assembly
BB10/98C clutch friction plate and pressure plate set
Those are the main things likely to be worn out.
Then there is always the possibility of something else being broke or missing.
There was a dis-improved reproduction fork on the market, which some people on this forum had trouble with, but it may be gone now.
The oil holes for the operating shaft are located on the bell housing directly above the shaft, one on each side.
Thank you very much Rob. Yes, I am the ”one and only”![]() Peder Mansson.
Peder Mansson.
In the meantime I will search for those holes and get my oil can ready.