On my 63 FHC, I am headed towards final painting of the underside of the bonnet. I understand that the bonnets were painted body color after they were assembled. That said, there are obviously areas of the bonnet that would not receive body color paint due to inaccesibility. I’m thinking the area inside the lower nose assembly but then again, if the sugar scoops were not installed one could technically blast some paint into there. Assuming the front underpanel was installed in the floor of the nose, there is certainly an inaccesible space there. And to some degree, there is a narrow space between the air ducts and the bottom of the bonnet center section that does not lend itself to getting paint into. I am thinking that for the area inside the headlight openings, they didn’t try and do a thorough job in there but there would certainly be some overspray? Same for the area above the air ducts. Just overspray with primer showing in the inner recesses of the space? And finally, there are all the flanged edges of the bonnet center section and the fenders. It would be nice if someone with knowledge based on an original car could chime in on this?
Finally, assuming some bare primer would exist, what color would it be?
That said, I am most likely going to take the entire bonnet apart one more time and could potentially paint all the inaccesible areas in body color, then re-assemble and paint the rest, including all the bolting hardware.
Here are the hinge bolts from the inside suggesting everything the bonnet was assembled and mounted prior to paint (though possibly those bolts were not tightened down):
I just bead blasted a lot of my bonnet parts. I can say the head light panels had primer and paint on them that appeared to be more than overspray. They were also heavily under coated over the paint.
The primer I blasted off was red in color and stuck very well.
I cannot comment on the panel edges. However I found it odd that it appears the bonnet was assembled with the oval washer directly on the primer and was painted body color along with the bolts and nuts.
The bolts are not all accessible for paint and seem to have been blackened from the factory. I found a kit from a company named EPI that I am procuring to reblacken the bolts. It is a high heat bath solution.
Wow, interesting document David! You come through with the history, per usual
“The completed body is taken on a mechanical conveyor to the paint shop”. As I have generally understood, all the metal work and assembly was done apparantly before any piece of metal was even primed, much less painted with color! They do discuss a phosphate application, which I assume was a wash, and underbody “dip” for corrosion protection. Then 2 coats of primer, “flattening”, sound deadener, sealer, and 2 coats of synthetic enamel. That would seem to indicate that anywhere inaccesible to a spray gun would not get painted with enamel, nor even primed for that matter! Crazy! Methinks I am not going to be that authentic and do as others have proposed/suggested i.e. make sure every surface gets a minimum of 2 coats of epoxy primer and I will most likely go ahead and apply basecoat/clearcoat to the flange seams and the interior sections of the nose.
I have not been able to fathom whether the bonnet wings were tightly bolted to the centre section/valance or whether they used temporary spacers in the seams to allow paint through. After all they would have to loosen the bolts to get the chrome trim in place. They would have been able to access all parts of the bonnet with the paint guns, including the two lateral vents, possibly with a lance.
Regarding the chrome trim, with the extra thick spacer washers used (C10193), and nice straight mating flanges, there is about a 3/32" gap introduced at the seam where the chrome trim goes. I think it is sufficient to install the brass clips for the chrome trim without loosening the bolts.
I hadn’t thought of special spray rigs, like a lance. That could explain how some folks are seeing paint in the area inside the headlight openings, etc.
Yes, the gap is sufficient for the brass clips, I assumed the paint might not have got through but I guess it must have been good enough. As for the headlight the gun could get in both from the front and the rear of the opening. The painters were skilled and paid piece work so they did not want their work rejected later down the line.
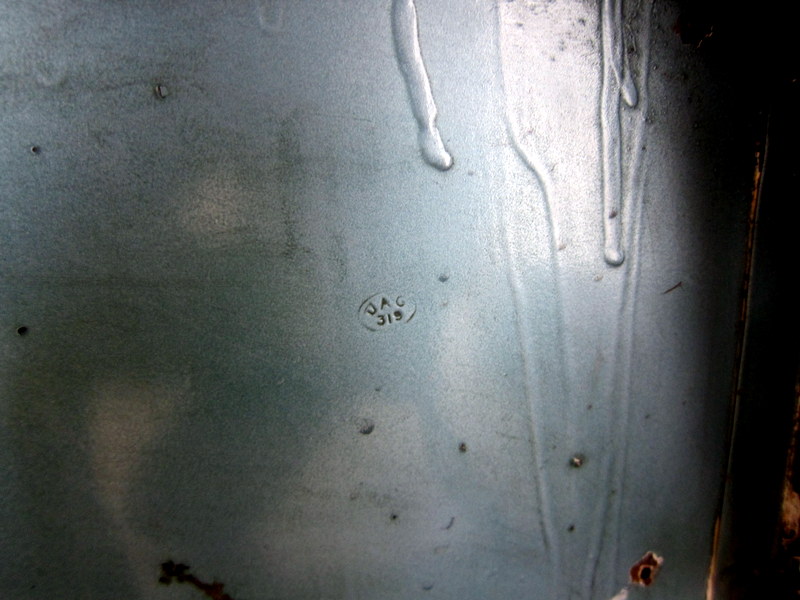
Bit of trivia - each painter had their own numbered stamp which they pressed into the wet paint in the rear number plate recess. This was how they were able to tally up how many pieces of work they had completed each week. Good way to check if an original car has been involved in a rear end accident. Here is an example and, yes, the paint runs are original!:
Regarding your build date, I was just thinking that it would make sense that they used blackened bolting hardware, versus cadmium, if they knew they were going to be painted. Mine is a 63 and I have been told that they used blackened hardware to assemble the engine frames. Which means they didn’t get painted. Which makes sense in light of David’s article (frames were assembled to the body shell later in the assembly line process).
Hello David,
I strongly suspect that the wings would have been finish tightened before painting, as dents are easily pulled into the top surface of the bonnet centre section and wings adjacent to the join, when tightening these bolts. Also, the join between the wings and centre sections below the headlight buckets on S2 and S3 cars are lead wiped and the bolts in that area would for sure, have been done up tight; I can’t see the rest of the bolts being treated differently.
There is plenty of room to assemble the chrome finisher for the joint and would be more difficult to complete the process with the bolts loose, as the alignment of the top surfaces of the wings and centre sections would have to be made with the finisher in place.
On S3 cars, its clear that the bonnet latch hardware was in place when the bonnet was painted, for even the rubber buffer got a coat of paint, whereas, this was not the case with S1 and S2 cars. By the time of the S3, it could have been the case of “leave the catches on, so we don’t have to go through that process again and get some paint on the bloody thing whilst its still a good fit”.
David is this painter stamp likely to be underneath the rear number plate ? I am uncertain but I think my car may have had one re-spray at some point in its life but maybe not much done in the rear number plate recess since it still has paint runs very similar to the ones in your photo. I am trying to check for any remains or any indentations of a stamp like in your photo.
I am still trying to find out how long they continued with the practice of stamping their work so not sure if it continued into S2 production. It would be good to get feedback (thanks Wiggles! Tweety was a 63 car IIRC?) on the production dates where the stamp is found. It is always on the rear number plate panel of both OTS and FHC cars and may have a different number to the one shown above. I know of a 1966 OTS that has the stamp. Wonder if Joey’s original car has it?
Having that stamp present is a huge part of the car’s history and gives a new dimension to the whole “numbers matching” debate!
I will pull the rear number plate off 1E35152 this weekend to see if I can find any evidence of that kind of stamp. I know it has the original body tag under the number plate but never knew to look for a painter’s stamp before. Since original paint is becoming so valuable to more folks I guess this could be a fairly definitive way to tell how original the paint is on a car.
Just went through this on mine. Not saying it is totally factory correct as I am not trying to be concours but this is the way they did mine. I disassembled the bonnet into it’s component parts and took them back to bare metal. The individual components were primered and painted. Reassembled the bonnet, with the washers between the wings and main bonnet section. Bonnet was them fitted to car and final bodywork, gaps done. The bonnet was then removed and seam sealer applied to the components of the assembled bonnet. Bonnet was mounted on stand for final spray inside and out. Hope this helps.