It does, but the problem with a lot of modern-built switches is they tend to develop leaks, apparently, and with the mechanical one, that will initiate the red lights sooner than the hydraulic one.
Judging by your photos you are talking about brushes, not bushings.
Yeah, yeah – – Yeah
Brushes – those brush things; not bushing’ Sheeesh
Craig not-a-mechanic Balzer
1 Like
It will fit but will become slow in no time. It lights up well after the brakes engage, quite dangerous in traffic. I went through about 4 if them before hooking up a mechanical one to the brake pedal.
1 Like
I went back through the archives and found a thread from 2015 where mechanical brake switch NAPA SL 143 was recommended and back then was priced at $13.00. Couldn’t tell if this was for Series I/II or all Series’ of E-Type (so much of the discussion here is 6-cylinder-centric). But logic dictates Jaguar would keep as much of the hardware consistent across all series - maybe
Found this today
https://www.napaonline.com/en/p/ECHSL143
priced at $14.00.
My only concern with this option is the threads are likely metric but I reckon a bit of fab-ing could cover that . . .
That isn’t a mechanical switch. That is hydraulic, just like the original. This is the type most people use. The threading is irrelevant because you have to fabricate a little bracket to hold it in front of the brake pedal. On the short cars there is a convenient brake pedal box stud in line with the pedal that can be used to secure the bracket which is nothing more than a piece of strap steel with a couple bends.
You’ll need to take a peek under your dash or ask the question of where to secure it on a S3. Then you just plug in the wires. There is a convenient union at the left corner of the dash where the brake switch wire can be tapped into. Then adjust the switch so it triggers the light with the lightest pedal movement, finis.
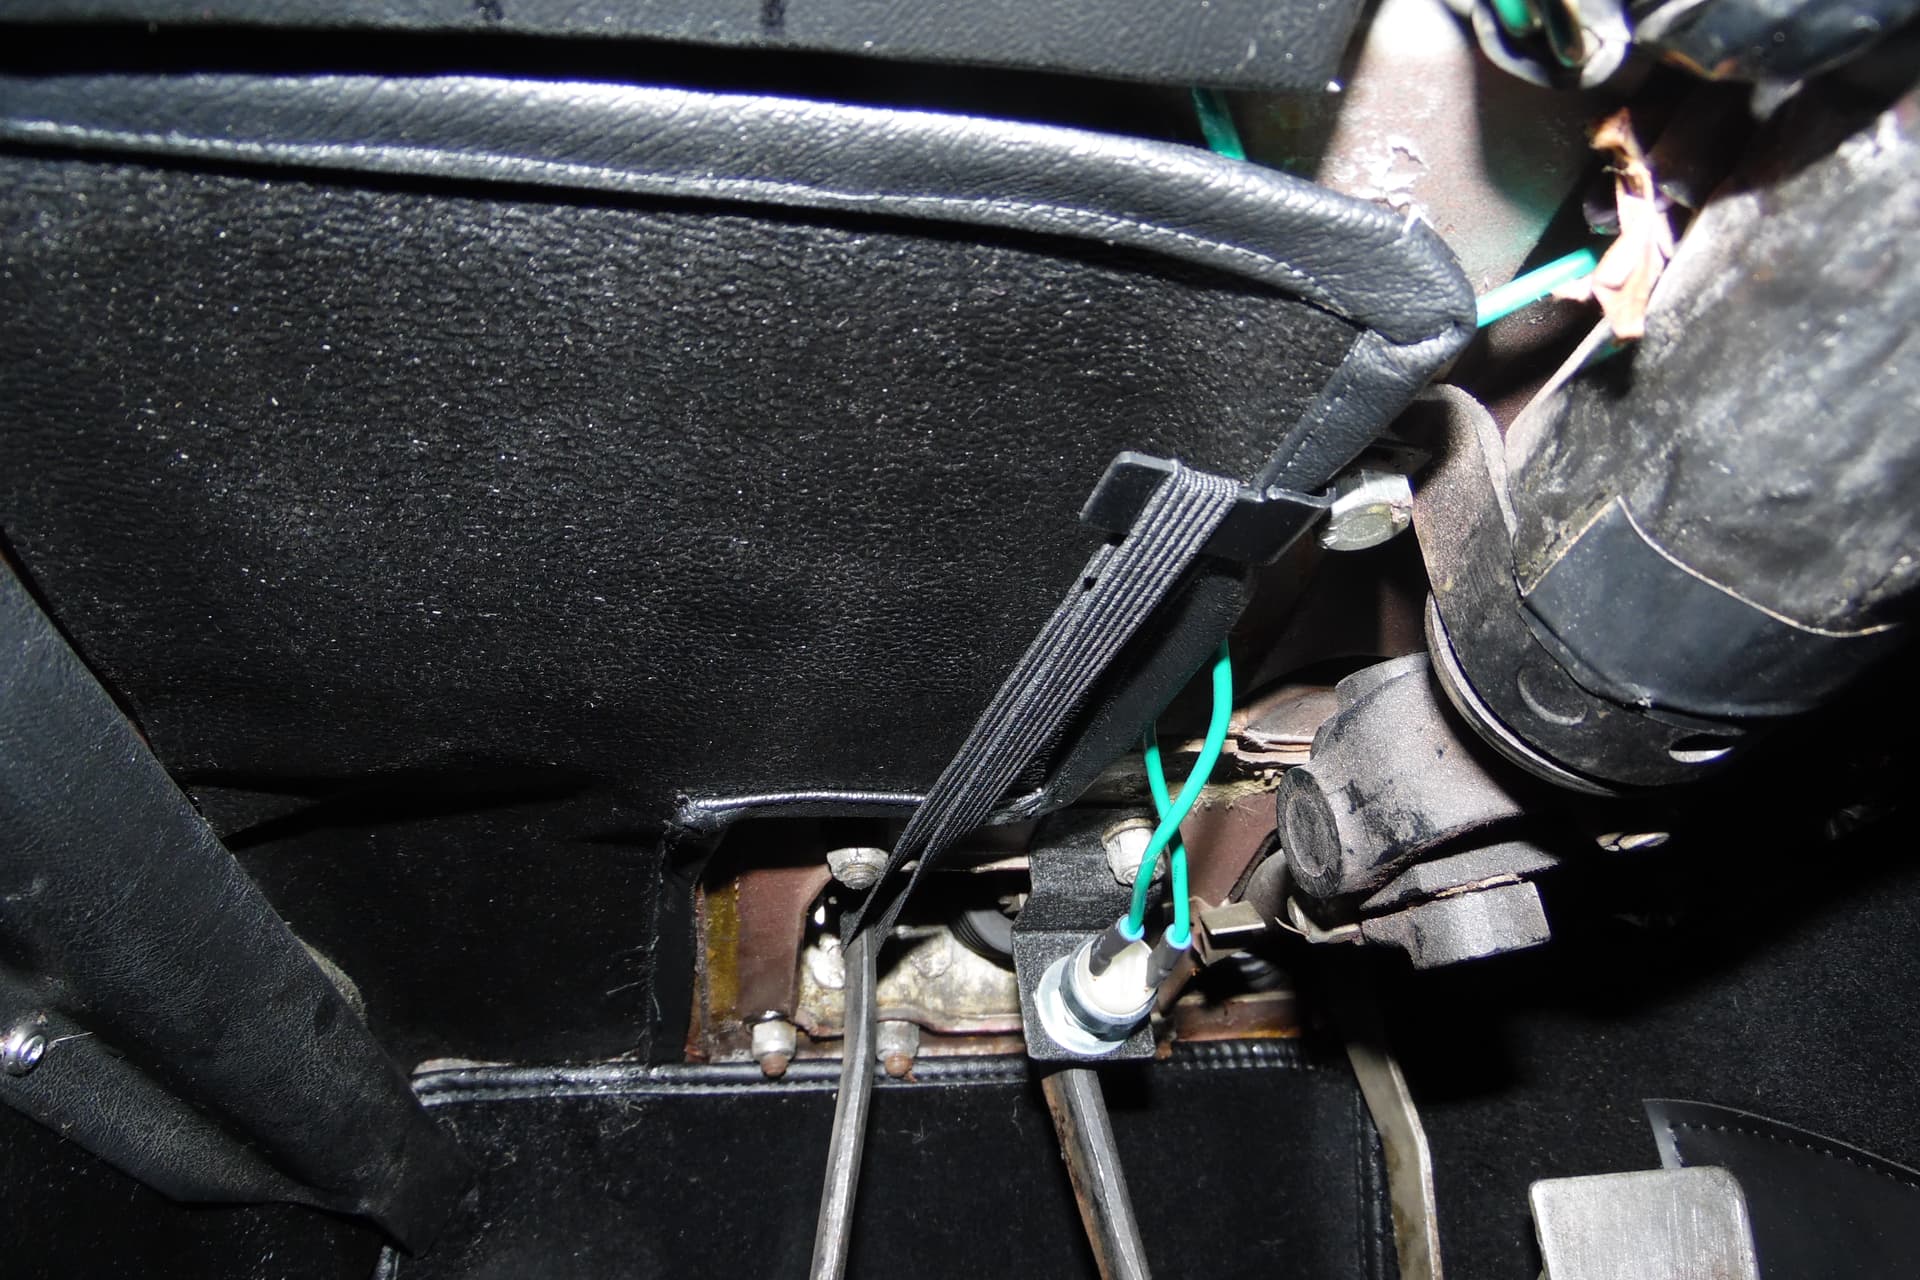
Here’s how it’s done on a Series II. Shown with the color coordinated elastic clutch return spring. I picked up the switch at NAPA, part number ATM1433011.
1 Like
Erica
Thanx for the tutorial and details re installation.
I used your link and ordered the last one the vendor had
Cleared that hurdle (and dodged a future bullet) with your help and that of the other JL-ers, especially John Walker
Craig
3 Likes
Thanks Dennis – that is an interesting find.
Appreciate the lead
The LEDs will be better…![]()
Already ordered stop/tail lights panels and a pair for the front huge and orange turn signal lamps
Notified of shipping (from Welsh Ent) this AM
Just saw this on your post Craig……… reminded me of my father saying “ it’s God’s way of giving me exercise”
1 Like
I LIKE it.
A lot
1 Like
I made the trek to Pueblo on Saturday to attend the Rocky Mountain Street Rod Nationals ostensibly to retrieve 5 pieces that needed re-do of the chroming. Paul was unable to attend, so I was left to my own devices after my business was done.
There were over 2,000 cars present – I saw license plates from Texas, South Dakota, New Mexico, etc. I am sure I only saw 1/3 of them.


Heavy on street rods, there were a respectable representation of muscle cars. I also saw a handful of unusual makes and models . . .
Someone shoehorned an LS3 into a 1959 Austen-Healy 100-6

There were a pair of 1958 Impalas - one a sedan and the other a convertible.


Of course, there had to be a Hot Rod Lincoln


As nice as the paint was on nearly every car, the opposite end of the spectrum was also represented


These young ladies dressed for the event

This guy copied the coloring and paint scheme of a war bird (or helicopter)

While this guy got the best of an early 'Vette (1962) and a C7


A coupla oldies but goodies
I would not want to replace this windshield


Some of you know I’m partial to Buicks. There was few 50’s models, but no GSs to be seen. The most unusual was this 1935 charmer

A random selection of others


This 63 T-Bird was for sale: 33,000 miles but no price mentioned


This poor fellow seemed confused and misguided

1 Like
Fussing with the fuel tank and am about to reattach the oval fitting for the fuel feed and return.
It has an oval opening and a cork gasket.
So - two options:
- Install gasket as is
- Use (insert name) goop on {top of gasket only} {on bottom of gasket only} {on both sides of gasket} {on the fuel tank itself}
The one on the left

Fuel resistant goop, the proper kind of washers, and most importantly, the correct length of screws is highly important.
I have cleaned and intend to re-use the cleaned up (theoretically original) bolts and copper washers that I removed.
Fuel resistant goop it is – where do I apply it?
1 Like
Tbinly, on both sides of the gasket, and a tiny little bit underneath the copper washers.
Thanks
![]()
![]()
and, despite to emoticons, still need 20
1 Like