Front Spring Removal

I am getting ready for my big winter project of several things. One of them will be removing/replacing the front springs of my XJ-S.

I have been studying the method of using 4 foot long threaded rods, swapping one at a time until all four are in place with nuts, and then slowly backing the nuts off to lower the pan. I will be doing this with the entire sub-frame/suspension removed, so I won’t be right under the spring pans, I can face the spring away from me. I am purchasing the required 3/8"-24 rods in Grade 8 steel, along with Grade8 nuts.

I’ve also seen it is important to mark the rods to make sure they are not turning when backing out nuts. And also to use a bit of anti-seize on the threads.

Any other tips? Thanks.

You’ve got the basics. It takes a long time to do. Just keep the nuts backed off equally. If I do it again, I’d make up the extended socket as in this video:
https://youtu.be/VAvXIB6K7yo

Just a cheap socket cut in half and welded to each end of a tube. A lot faster than hand wrenches.
Edit: or I’d get the tool from JCNA on their tool loan program.

1 Like

Both methods work, but genuine compressor is much better. You will end up with stripped pan holes or broken threads in the wishbone if your spring pan has excessive flex due to metal rusting away. As always - a hybrid of both methods is the best. Photos below:


2 Likes

I went for the single big threaded rod with 2 guides when i did this job.
IMG_20191013_181708|375x500
Build my own usng m20 rod 10.9 (~grade 8) Main reason was that i didn;t like to use the small rods to take all the load and this method requires less time with spring loaded with rods. Other eason was that here (europe) it wasn;'t straightforward to get 3/8 rods in high strength steel

1 Like

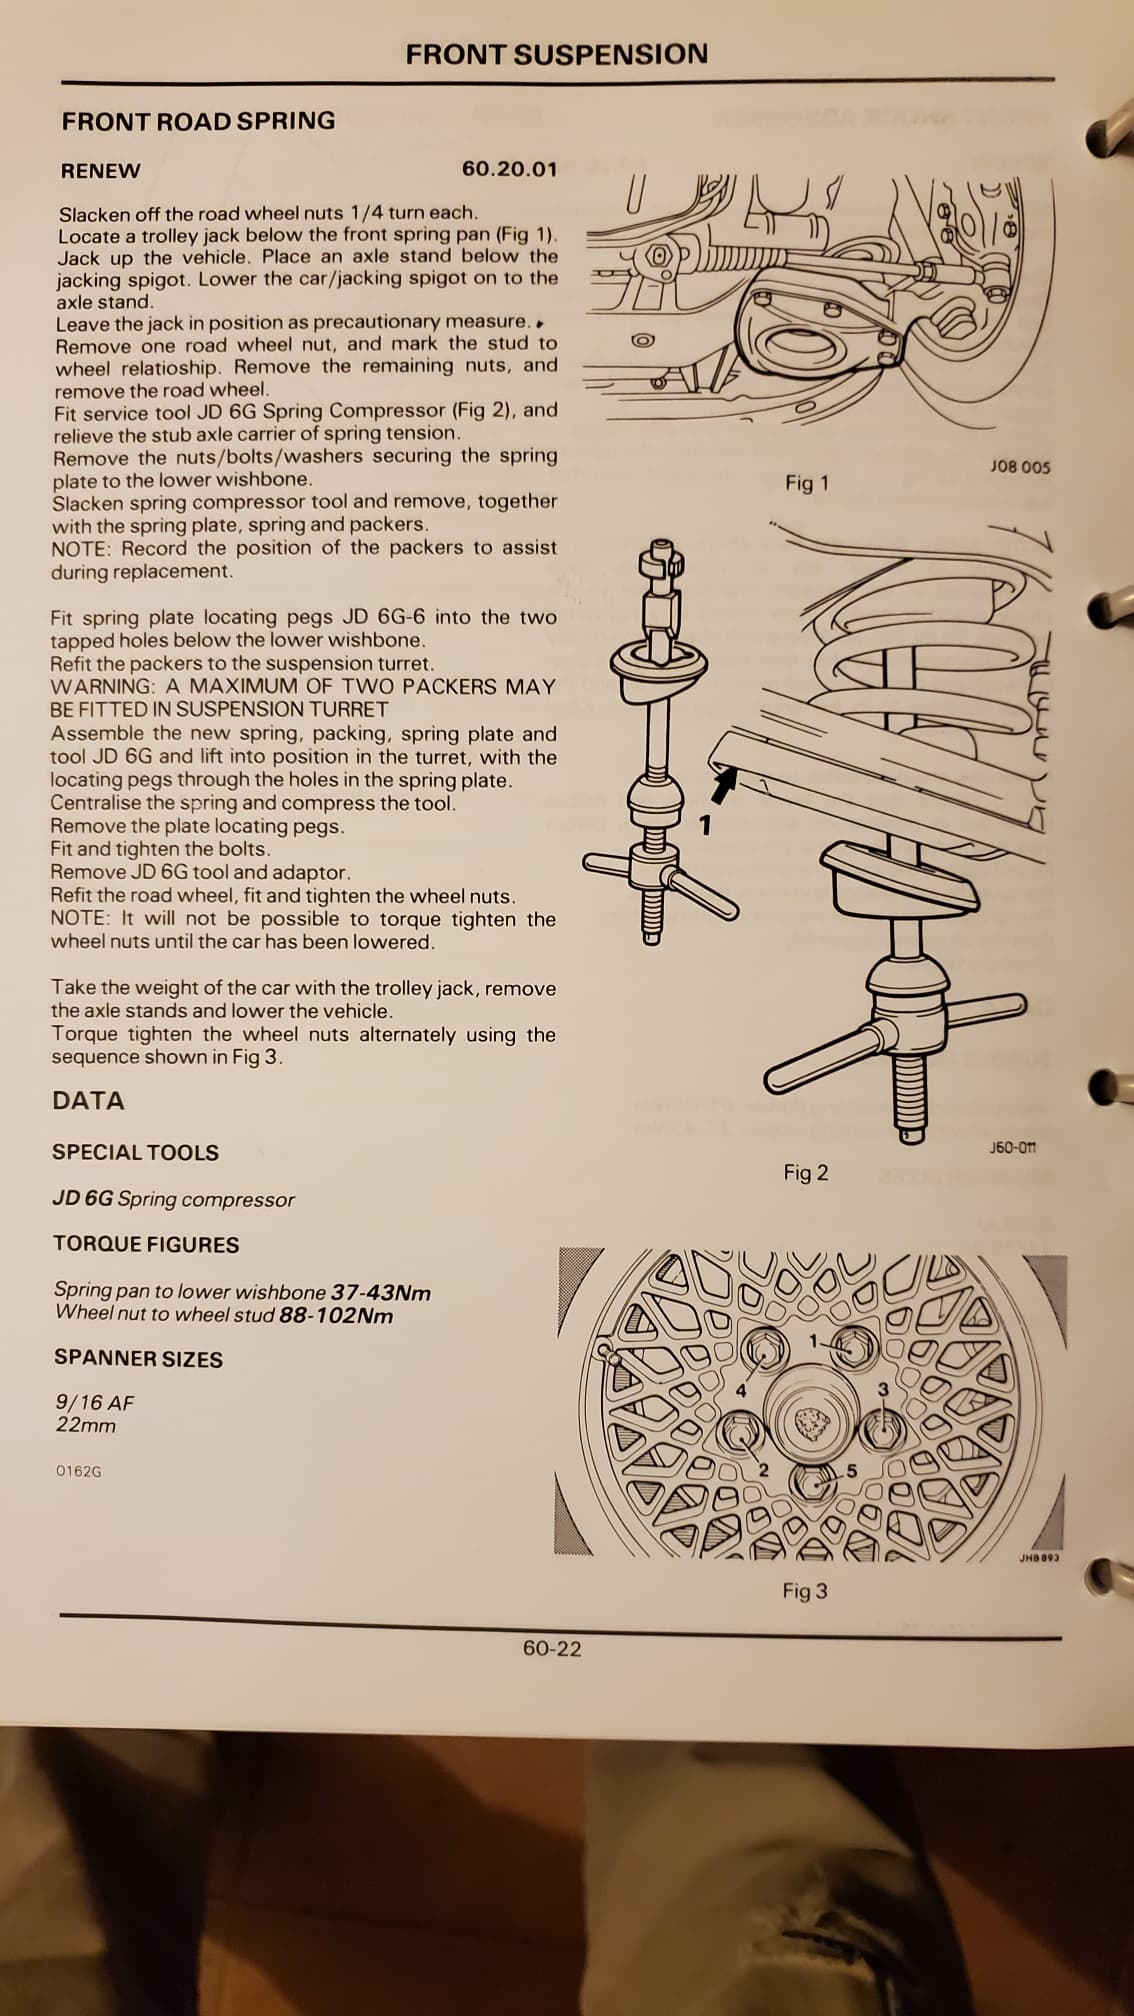
Not to be a smart ass, or overstate the obvious, locate the OE tool. that’s works the best. If you’re a North American Jag club member or a local member (which some of the dues go to the national club) then you can rent the OE spring compressor can be rented from the North American Jag club.

I’ve done this task several different ways. None of which involved the OE spring compressor.
First off getting the spring out is easy peasy.

  • I’ve done it with a QUALITY floor jack, not one of the little narrow $29.95 versions. This is an important distinction. the jack has to have a wide stance so it’s not knocked over. Anyway.
    heavy duty tie down (strap), & 1 jack stand. Putting all of the cars weight on the single corner, with the tie down threaded through the spring and the upper and lower control arm (there’s a hole behind the upper control arm mount where the OE spring compressor attaches top side)
    loosely. The strap is to prevent the the padoing factor taking out you or your neigbors pet.
    Once all of the weight is on the front corner, and the spring is totally compressed, then loosen the bolts a little bit at a time paying close attention to the position of the spring pan - whether the spring is stilll under tension and pulling away from the control arm in which it was attached to. if so, keep jacking the corner of the car up. until the gap is closed back up. snug up the rachet strap to take up some of the slack as a preventative measure.
    Then one at a time replace each bolt with threaded drill rod (ready rod works, but can get caught up on the threads) about 6 or 8" long (I can’t remember I’d have to go look). replacing each of the bolt with the long rod one at a time. Then very very slowly lower the car onto the 1 jack stand, once the spring is completely uncompressed, raise the car with your second floor jack and put two jack stands under both sides of the car. then slide the spring pan and spring out from under the control arm. There is a bit of pucker factor this way

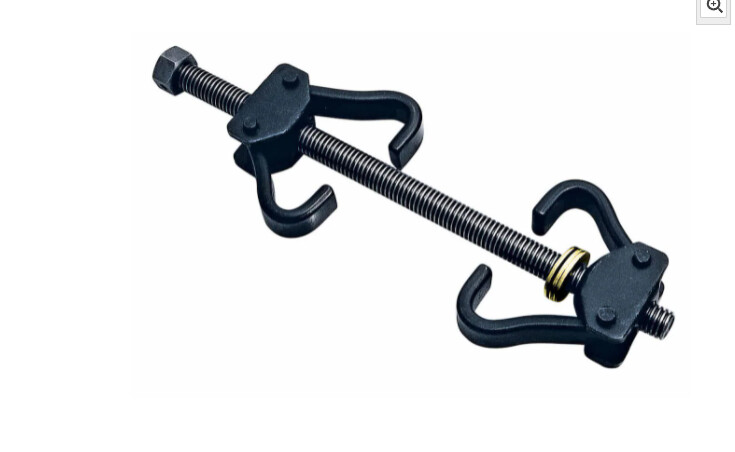
Then I’ve also used a spring compressor like this


removed the hooks, took the other bit, and flipped it upside down so the flat parts where facing each other. Took one end off , ran the acme threaded rod up through the center of the spring, and screwed into the end that just came off which is now located behind the upper control arm. then tightened compressed the spring, removed the bolts screwed the thread drill rod, and uncompressed the spring.

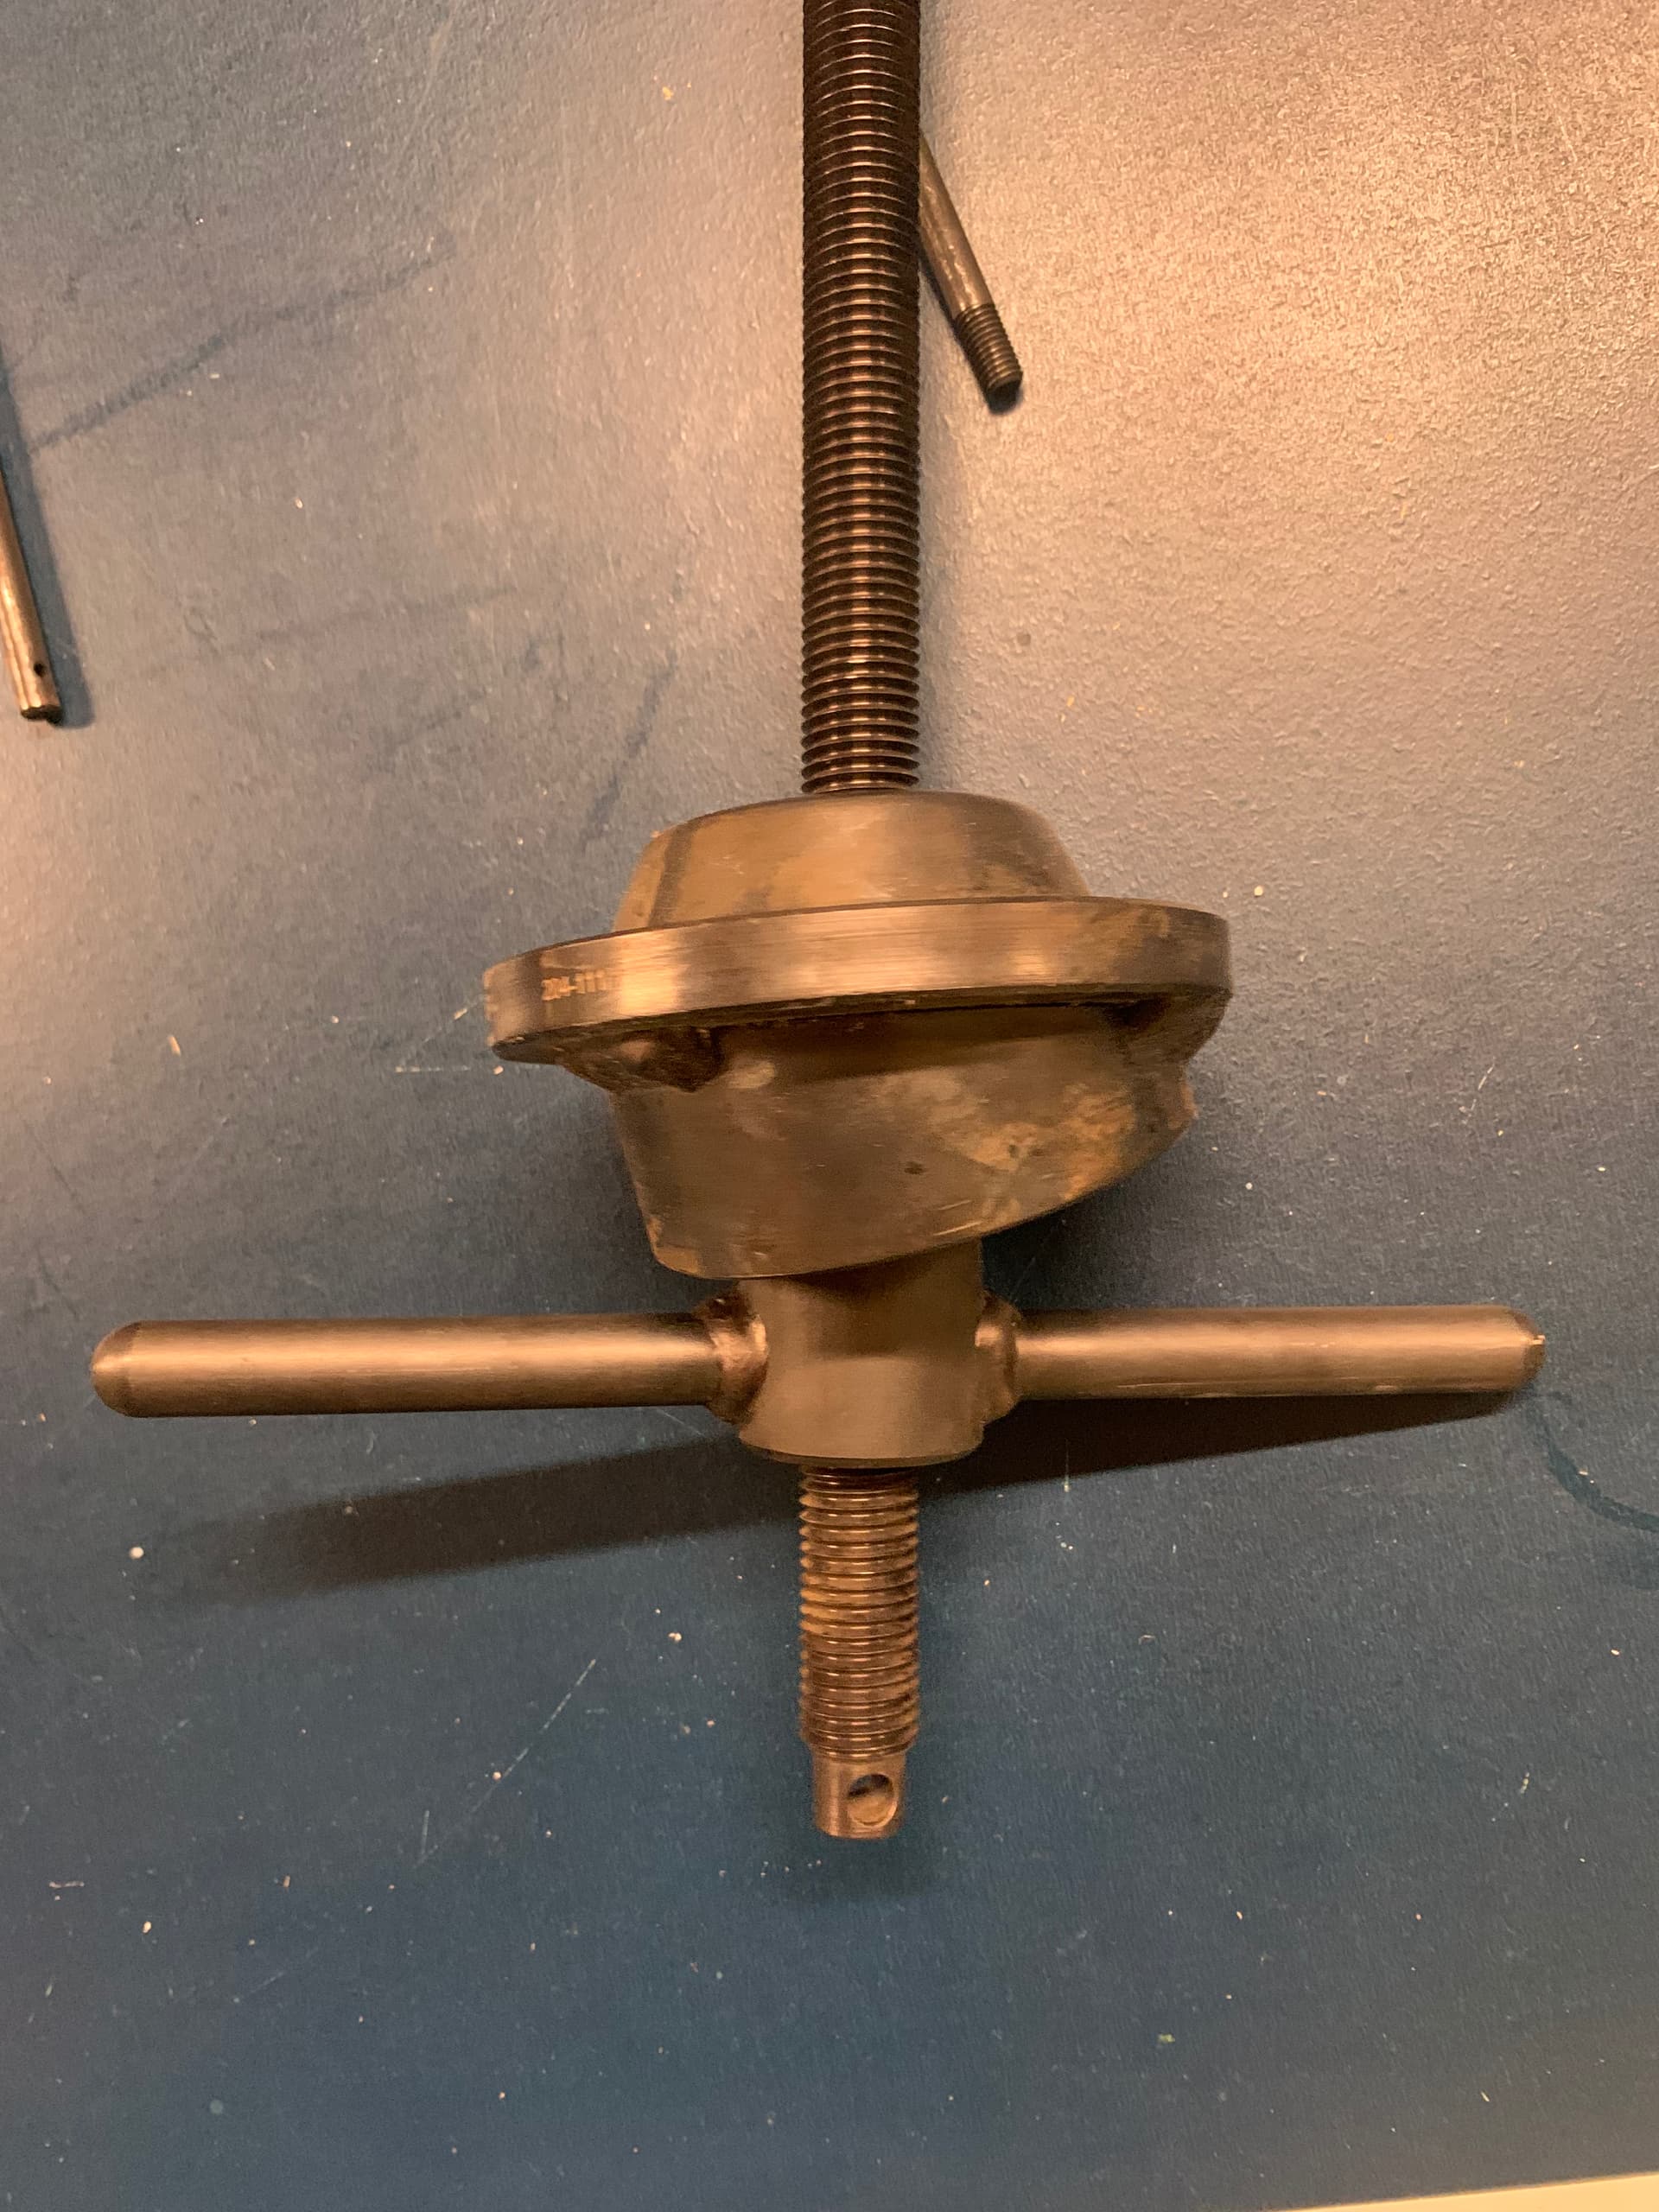
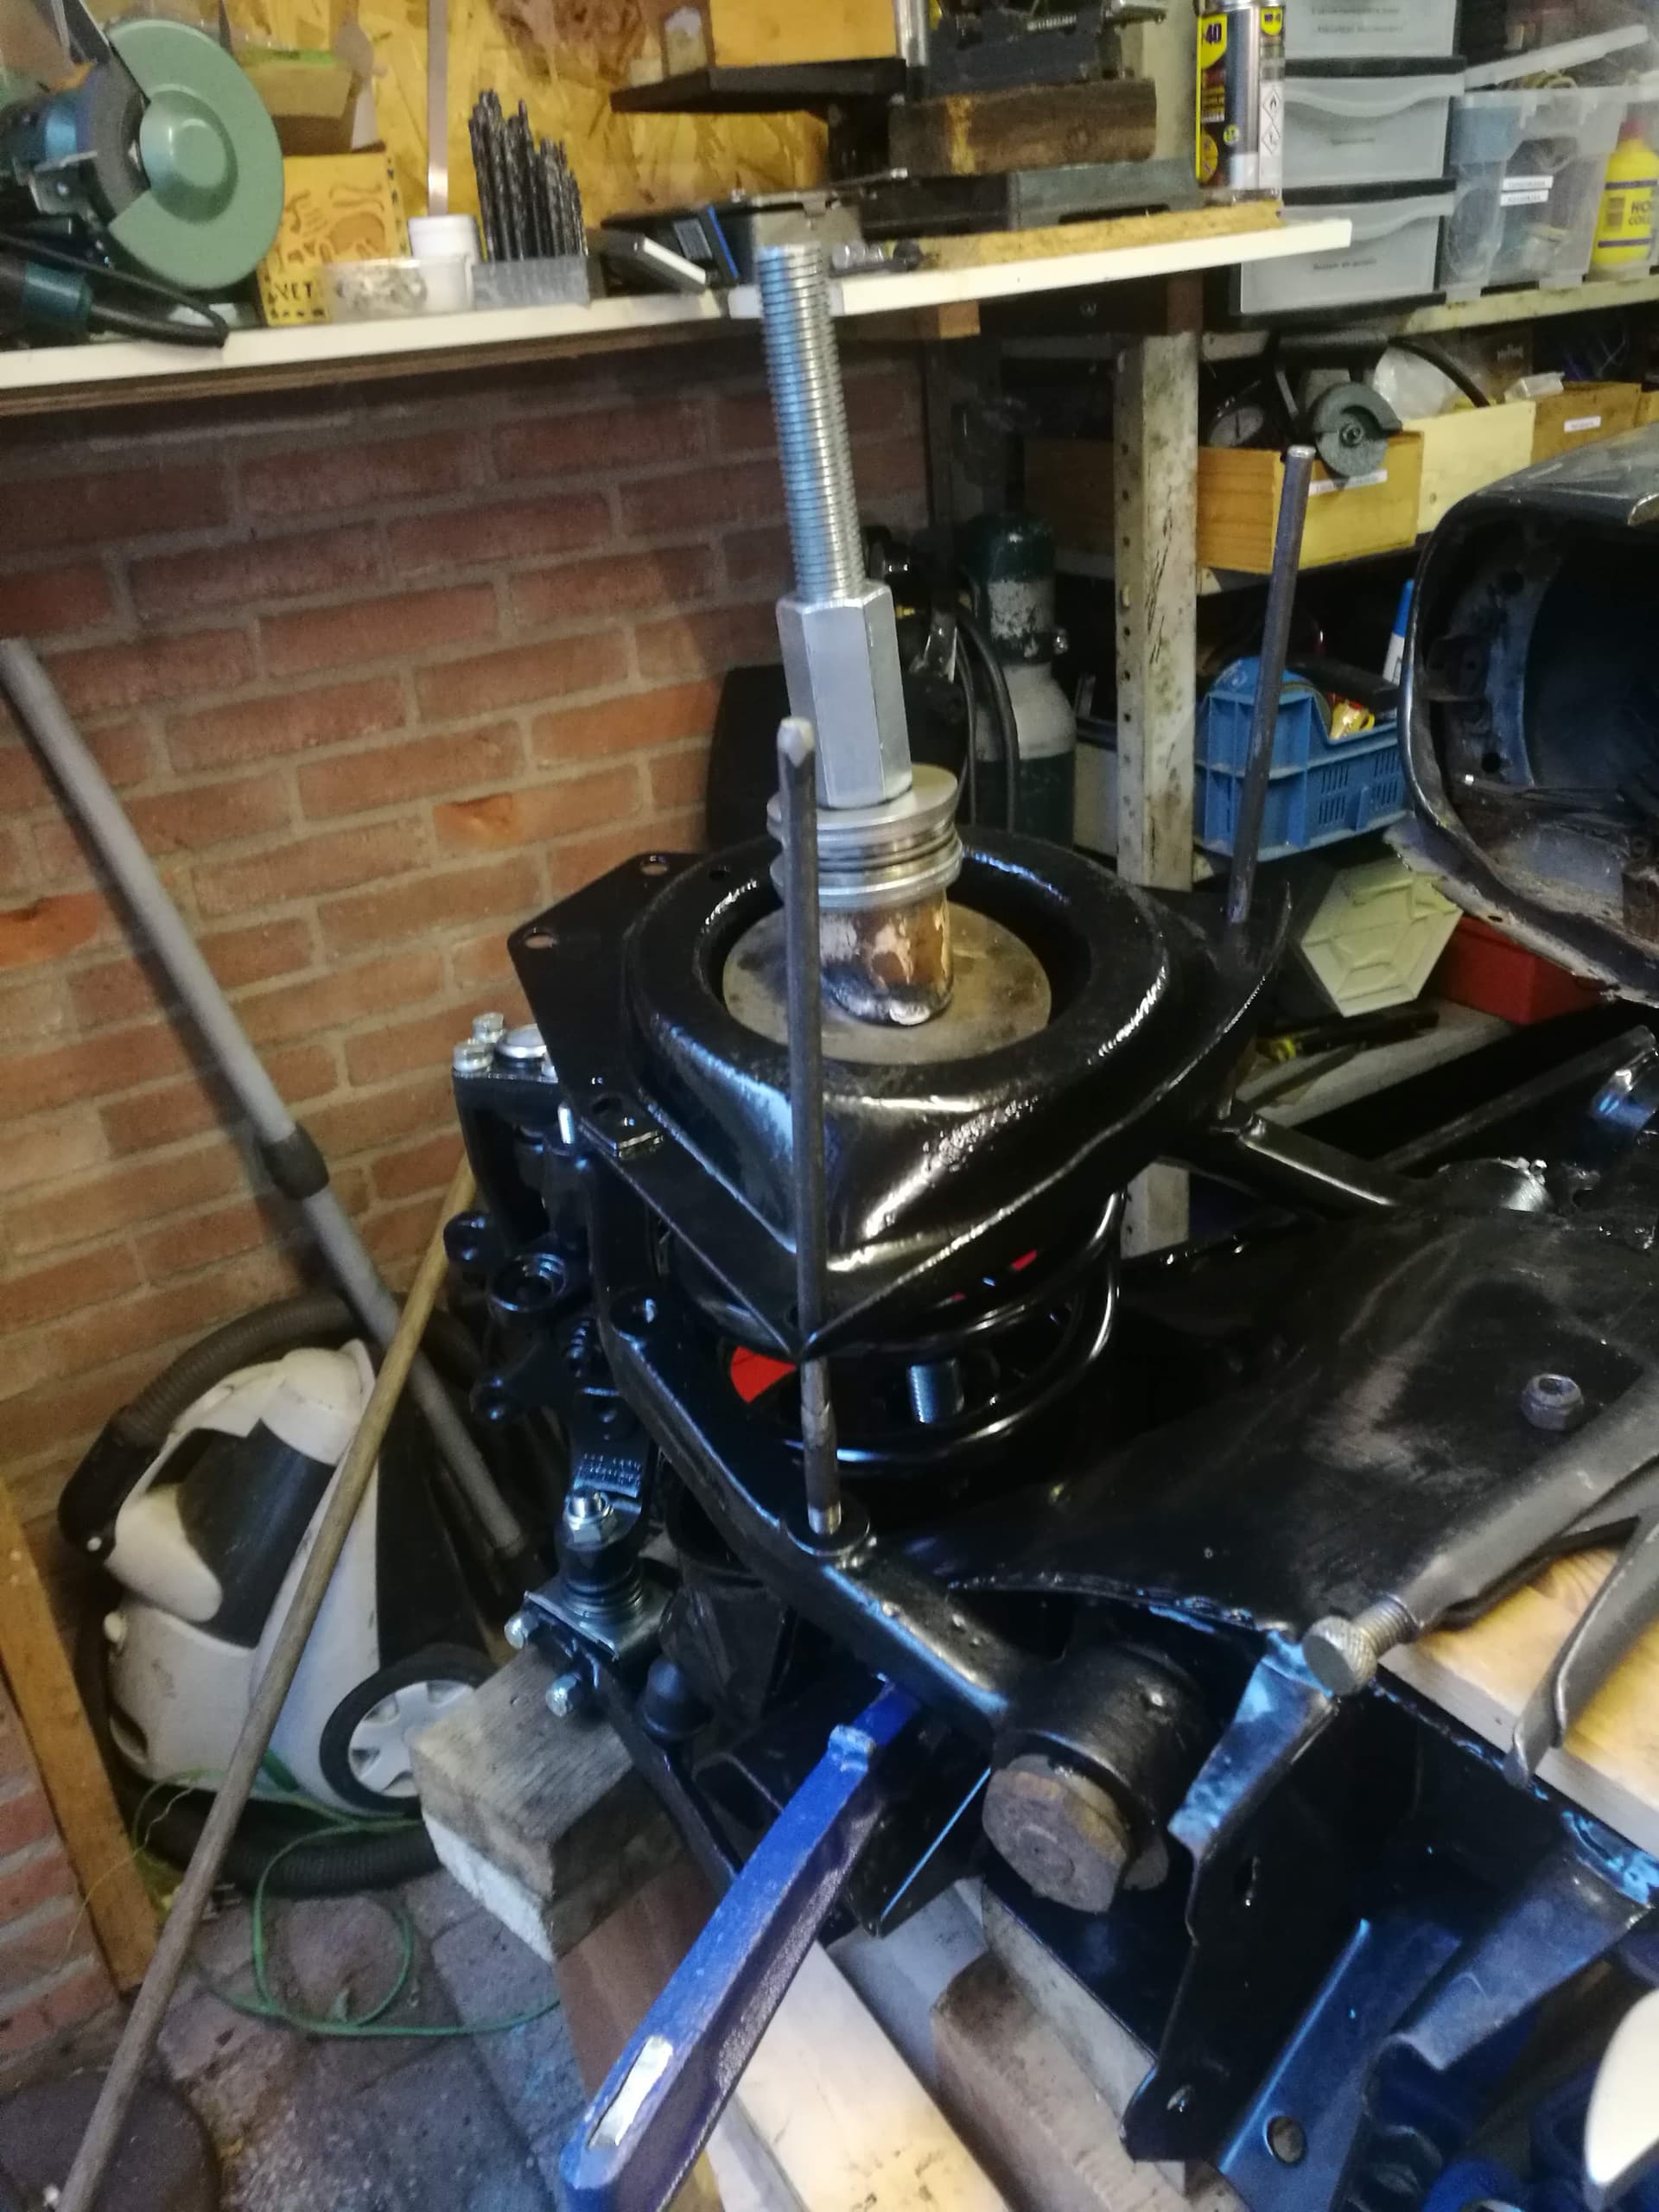
Now getting it back in. is a serious PITA. the guide rods used to remove it are your last ditch hope of getting back in. This is where using drill rodd, or a very long grade 8 bolt threaded just at the end so the rod itself is smooth and the spring pan wont hang up on the threads of the ready rod.

I’ve put the spring back the both ways as I removed it once with a floor jack, the other with the modified spring compressor. either way, it’s a bitch to get the pan and the spring flat against the back in it’s rightful position and the bolts back in.

The modified spring compressor does appear to be safest and somewhat easier; though what I found, is that it tends to not want to line up, and there’s not much leverage if things do get out of wack.

I suppose that maybe the ready rod could help with getting things lined back up. My biggest concern with using the ready rod solution is the thread engagement wasn’t real stellar and wiggled around way too much for my loose comfort level, I put a bottle jack up the center just to add something else that could injure me if things went sideways.

In the not to distant future, I will be doing a video series on rebuilding the front suspension. Granted it’s an XJ6 - but for all intent and purpose, it’s the same thing.

Sincerely,
Mark

2 Likes

Drawing on all the posts and experience here, I just completed one side and preparing to do the second on 94 2+2, With the subframe IN, I used the center large threaded rod, and 4 guide rods with a jack stand under the front support, and a second jack lift (motorcycle) back from this on the bottom frame. I found that you can put minimum load on the guide bolts and center bolt during the install with two bottle jacks (2 ton), positioned to contact the center and the back of the spring pan (one each between the outboard and inboard guide rods). I just alternately jacked on the front and back bottle jacks to “rock” up the pan, about 1/4" at a time, and then could easily hand tighten the nuts on the guide and center all-thread to keep up with where the bottle jacks moved the pan. Ended up with no gaulling on the threads. I was able to engage the nuts for the two bolts holding the bottom shock bracket and pan first, then replace the center all- thread with their bolts, and finally the back bolts. For the last 1" or so, the outboard bottle jack started to lift the frame off the jack stand, hence the need to have the pan slightly tilted up at the shock bracket bolts and engage these with their nuts first. The inboard bottle jack can then raise the pan without lifting the frame off the jack stand. The bottom ball joint was also replaced with the coil out. I found that with the wheel cocked hard over, I could just get the harbor freight ball joint remover (item 99849) in there from the back side enough to bite on the upper ball joint bolt enough to get the old joint out. I was surprised that after 175k, that lower ball joint looked really good and probably did not need replaced, but since I was in there already I changed it.
As others have said, need to ensure that the guide all-thread is fully engaged in the lower arm threads - these bolts are 3/4" so you need to have the al thread in about 10 or 12 threads (1/2" or so).

Bill

1 Like

Going back to the OPs question. Yes, threaded rods will work. Yes, it’s safe, as long as the rods are fully engaged in the threads in the lower control arm, and the spring pan is not rusted out. I’ve done it that way twice, once with the suspension cross member off the car, once on the car. You are using high strength threaded rod and nuts, so you should have no issue.

1 Like

Thanks for all the feedback! I really appreciate it.

I am a member of JCNA. The tool rental is only 10 days, and I’ll need way more time between removal and putting in the new spring. There seems to be several charges for shipping and restock. I may be down for a good month or so, getting things painted, etc., so double rental is a lot.

So I think what I’ll do, is use the threaded rod approach for removing the springs, and then rent the Jaguar tool to put in the new Eibach springs, as it sounds like that’s the hard part. And it sounds like I could use some of the rods in addition to help?

The pans have surface rust, but I don’t think they’re rusted out. I’ve tapped with a screwdriver, and they sound solid. I’ll inspect a bit more before I proceed.

Oh, and one last question…where do I find instructions on how to USE the OEM tool? Thanks.

If you make your own single rod tool make sure your get threaded rod meant for this use. It will have threads at a lower angle and heavier than an all thread. Makes it much easier. I made my own tool using a tow ball for the bottom and all thread. It worked okay.

Hello Greg - here is a picture of the page, from my service manual, that gives instruction for front spring removal using the Jaguar JD-6G tool - Tex.

1 Like

Trying to determine the condition of that pan is virtually next to impossible while connected to the car.

Reading through the posts reveals that there is obviously more than one way to skin a cat. I won’t get involved with suggesting what you should or should not use, but I will say this. When I was replacing the springs on the XJ81, and before I fully understood how the tool was supposed to work, and before I had confidence in what I was doing, the tool slipped as I was replacing the right side spring. To this day I’ll never forget how thankful I was to have been using the official tool instead of something else, because it saved my life.
I will also say IMO that replacing the front springs has to be the most dangerous part of repair on this car.
Between the cost of the tools and the shipping charges I spent a BUNCH of money for what I thought at the time was going to be one time use, and I didn’t know how to justify it. It’s funny that during, and after that one horrifying moment I was HAPPY to have spent the money. Of course renting the tool, even several times will not come close to what I paid, but……

Be careful in whatever route you choose and be aware that you haven’t heard of any horror stories, because everything is all good until it’s not.

2 Likes

I’ll have the entire suspension off the car before doing this, so I can inspect the spring pan very closely. I will use OEM Jag tool, better safe than sorry.

Here’s a good video (starting at 16:00) showing putting spring back using Jag OEM tool together with the two rods for guides.

I have the OEM tool. I can check to see how much it would be to ship? It’s not very light, nor is it shaped efficiently for shipping?

Assuming, your MY also uses the JD115 tool?

Guess I should have also wrote, when I posted the page from my service manual showing the use of the JD-6G tool for the front spring renewal, that this was from my 1983 t0 1988-1/2 XJS service manual - figured that this is what Greg needed for his 1986 - Tex.

No XJS used JD115. JD115 has a tiny pin to retain the long rod at the top of the spring tower. The neccessary JD6 uses a huge wedge of bronze. The little pin on 115 mates to a specific shape on the XJ40+ cars. I wouldn’t trust it on an XJS for a second.

So my 88 XJS is VIN 141xxx, still a Lucas just before the switchover. (Manufactured in 87) According to the service manual, mine should use the JD 6G. The 115 is for the XJ6?

I would listen very carefully to John on this one, because he is absolutely :100: correct.

This is what I have…


I was heavily involved with JCNA when the tool loan program was thought of and started. George Camp made it happen and handles it through the Coventry Foundation for the benefit of JCNA members and Coventry Foundation partons. There is no charge or restocking fee. The only thing you pay for is shipping unless you want to pick it up. We have tools now on both coasts to make it easier. Initially it was set up for a 30 day loan. I guess it depends on the tool and demand. Have you called to check or just making the 10 day part up? Changing out both front springs on the XJS/XJ6 using the proper tool is about an hour job. It can be highly dangerous. Best to follow the shop manual guidelines. If you don’t have one, get one. Haynes is not a proper shop manual. There are guide rods used to reassemble along with the compressor. Real straight forward and safe when done right. When done wrong, it can kill you. Drill rod is not recommended. It is hard but does not bend or flex. When put on a side load, it can snap. I have seen a spring come loose, hit the floor, bounce and hit the wall 50 feet away with a lot of force. If you were in the way, it would hurt. Do it right or take it to someone to do it right.

3 Likes

this is on the loan form:

  • The Member agrees that a late charge shall be assessed and deducted from the Member’s deposit if the tools are not timely returned. At this time, this is 10% of the deposit for each additional loan period of 10 working day, not counting shipping time.

  • The Member agrees that a small maintenance and restocking fee is required.

Thanks for the advice, I may go ahead and get the tool twice just to be safe.