Further to gearbox discussions. On the first few drives out this year now that the weather is finally warming up I have experienced some difficulty shifting. Having owned this car for 57 years I am reasonably conversant with shifting the Moss box, however, on shifting from 3rd to 4th, even slowly and deliberately as one does, I cannot avoid a clash. If I blip the throttle in neutral while shifting up I can eliminate the grind/clash going into 4th. Also, when in neutral at a stoplight I am experiencing difficulty moving into 1st or 2nd (and yes I know about pulling back into 2nd prior to moving into 1st.). The experience seems like a synchromesh problem to me. The clutch appears fine and I have no difficulty getting into reverse when backing into the garage. This problem seems to have come on over the winter as I don’t real any difficulties last Fall.
The gearbox was re-built back in 2006 when bearings where replaced etc. and at the time I was informed that nothing could be done about the synchros on a Moss box (JL 17472). The car has travelled some 40,000 miles since that time. There is no excessive noise coming from the gearbox and the oil level is where it should be (SAE 30). I seem to recall reading on the Forum about Walt at Vintage Jag Works having the ability to re-cut synchros, is this the case? Or, if it is a synchro problem, am I going to have to try and locate another Moss box or (gasp!) think about a T5 conversion?
The metal came from the internal cones on the synchro sleeves. The end faces of the synchro sleeves can be cut back so the internal cones get a good bite on the external cones.
I did it on my second sleeve. There was no need on my 3rd/4th sleeve, but the process would have been the same.
I imagine this is what Vintage does.
When I had my JLE apart, I noticed just what Reilly described. I used a soft(brass, IIRC) tool to remove the slough, then lapped the 2 parts together…doing clean-up once again. I still had enough clearance between the parts after this operation as my car only had about 38,000 miles on it and had acceptable synchro sleeve wear.
Thanks very much. My far more computer literate wife has down loaded and printed your comments and photos and I will be taking these out to the company who did my gearbox back in 2006 to get their reaction. If this can be done and resolves the problem it will be a bit easier for me as these guys are in Burlington, Ontario, about a 20 minute drive away. A bit closer than either Idaho or CT. Thanks again.
Chris
Really make sure you are getting full master cylinder movement, as you are aware there is adjustment on the pedal and the rod connected to the master. If you are not getting full movement you will find it difficult to get into any gear.
Much cheaper to do a clutch adjustment than re-machining synchros and then still find you cant get the gears.
In my very limited experience, trouble shifting into all gears usually suggests a clutch adjustment problem (disc dragging on the flywheel). But that doesn’t explain why it shifts ok when you stop and rev In neutral. And might not hurt to change the GB oil. Would be quick and easy to check the clutch adjustment before diving into a gearbox rebuild
An XK120 doesn’t have a master cylinder controlling the clutch. It’s only for the brakes. The clutches on these are controlled by all-mechanical linkage – which has it’s own issues usually related to sheared pins.
I don’t want volunteer Mr. Reilly BUT, he has a treasure trove of photos and drawings relating to the Moss box and MANY other components…oops, I guess I do want to volunteer him after all…
Well, ok, this forum has always been about sharing accurate information.
Morris and John make a good point that the linkage adjustment is the first suspect, and low oil might be the second. But if Chris has already checked those, then it might be well to pull off the top cover and have a look.
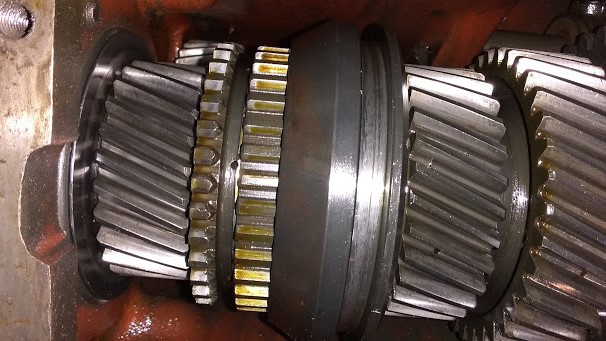
This is the only picture I have of the inside of a synchro sleeve to show you the internal cone surface.
Here is a box in 3rd.
Here is the same box in 4th.
The synchro sleeve is the part with long straight splines.
The operating sleeve pulls it forward or rearward to grab the external cone on 4th or 3rd before the operating sleeve gets all the way forward or rearward, before it begins to catch those little boat shaped teeth.
Hi Chris,I live about 20 minutes north of Burlington ,would like the info on the shop the shop that worked on your Moss Box.
Regards Gerry 62 Etype Ots
Thanks for the additional photos and comments, I’ll get the computer whiz to download these as well. An interesting aside to this problem is that when the gearbox was done initially in 2002 (I think I earlier said 2006) I replaced the clutch disc and throw out bearing. When everything was back together I was irritated to experience clutch judder/grabbing in first/reverse. Later in 2006, following a complete rebuild of the original 3.4 engine and following the removal of the 3.8 I had been running in the car for some 20 years and installation of the “new” engine, I put yet another disc in and had the flywheel “surfaced”. Needless to say I was very upset following this installation to discover that I still had clutch judder! In a later conversation with the chap who did the motor for me he said that one should always replace clutches with new units and discs and avoid rebuilds. As this fellow raced a very successful Datsun 510 back in the day I tend to listen to what he has to say.
So, bottom line is that I had reconciled myself to pulling the gearbox yet again at some point to deal with the clutch judder and this issue has forced my hand. To my knowledge, at least in my ownership, things like the bronze bushing in the housing, bearing shaft etc. have never been touched. When looking at the clutch adjustment linkage, aside from the fact that it is fully adjusted out. I can get lateral play on the shaft, I assume this is supposed to be the case to allow for removal. Also, there is a degree of play at the pedal before it activates bearing contact (draft extruder clears the firewall by an inch or so) which I assume is normal. In addition, recently I have heard a rattling/rotational (?) noise when the clutch is fully depressed which goes away if the pedal is released slightly. Clearly, once things are apart there may be issues in this department that need to be addressed. While I have some mechanical ability it does not measure up to tackling things like engine and transmission rebuilds, however, if a top cover removal will show the build up up of displaced material as the problem then it will determine me taking the box back to the rebuild company for stripping. cleaning and cutting back of the end faces of the synchro sleeves as you suggest.
Once again, Rob, I am indebted to you for your expertise and assistance and will download the latest, thanks again.
Suppose I should have thought of you guys sooner, but I have two Moss overdrive gearboxes I have not needed for years and likely never will. They are Mk1/Mk2 (GBN?) and in good condition AFAIK. If spares are so hard to get,I’d certainly be glad to offer them here. The shipping would likely cost as much as what I’d want for them.
Returning to this thread after several months to update the situation. I decided to bite the bullet and pull the gearbox which, after reading a couple of strong recommendations from members and being cognizant of my own limited abilities, shipped it off in late May to Vintage Jag Works for the rebuild. I found lots of things requiring attention within the bell housing and clutch as I delved into it: tapered pins that sheared upon removal on both the throw out bearing to clutch rod and clutch lever to rod; clutch rod bushings that had worn to the point where one, with a thickness resembling cigarette paper, literally flaked apart on removal; a friction plate in which on of the retaining rivets had pulled out allowing the raised segment to chafe against the forks in the clutch assembly. The gearbox itself required quite a bit of work including re-machining the synchros, it arrived back earlier this week. Assorted new parts were fitted as required while awaiting the return of the box and a new clutch kit was purchased. There is now no play with respect to the clutch rod as there had been before (clearly the old bushings were shot) and the new tapered pins, snugged up firmly with Loctite, have also eliminated a lot of play in both of their locations.
I was advised by Walt at Vintage Jag Works to replace the pilot bushing prior to installing the gearbox because, if worn, it could result in clutch judder. It looked OK to my unpracticed eye and I couldn’t deduce from the invoice if a new one had been put in during the engine rebuild some twenty thousand miles back and ten years ago, but for a few bucks at this stage it made sense. Herein lies my question (I read previous posts in the archives about filling the cavity with oil and using a drift or, the Charles Bishop preferred method of stuffing it with wet toilet tissue), can the methods mentioned be used with the flywheel attached and engine in the car (I removed the box out through the floor)? I have attempted the oil method unsuccessfully a couple of times and suspect it is because a large part of the oil runs out before I can insert the drift! Walt stated that he uses a tap and “they just twist out”, my worry with that method is driving the tap in and then being unable to remove it or damaging the crank in the process! I had not anticipated removing the flywheel unless necessary. Any observations/advice from those who have done this before or frequently would be appreciated as I have several days before the replacement pilot bushing arrives. Thanks.
You could also thread tap the old pilot bushing then screw in a length of threaded rod with nuts and washers attached.Then, borrowing a cylindrical hammer from a dent puller, reverse hammer it out. It’s just a bronze bushing. It won’t be in there very tight.
After striking out with the grease and wadded paper towel methods to remove the pilot bushing I followed your advice and purchased a 5/8" tap and found a NC threaded bolt about a foot long which I utilized to get the thing out. The process involved lots of large diameter washers, an old socket and, once it started to move, a couple of pieces of 1/2" plywood to brace against the flywheel. After many additions of washers and much cranking with a big adjustable plus applications of PB Blaster I finally got it to the point where I could wiggle it out the last 1/4". While many have removed these with relative ease, for me this chore ranks right up there with replacing hinge boxes! Thanks for the tip.