Bill, what’s your take on assembling the taper to the carrier? I would think it should be clean and dry like a ball joint taper. tom
1 Like
Good question, John. I haven’t found one either, but I’m not at the point of installing mine yet. I’m cleaning and painting the carriers while they’re out, since I’m replacing upper and lower ball joints and the tie rod ends too.
With 5/8 UNF threads, assuming grade 2, I’m probably planning for ~80 ft-lbs for the axle-to-carrier nut, with anti-seize on the threads. Certainly open to input from others! I suspect I’ll have the same questions for the upper and lower ball joint and tie rod end nuts too.
RobY
I looked at torque charts for that size bolt in grade 5, then looked at the recommended torque for the nuts in the rear hubs (140 ft/lbs) and decided to use that.
Rear hub bolts are the same as the front? I have no experience with the rear, yet. Making my way though!
Maybe I’ll follow your lead here.
RobY
IIRC, it’s the same size thread. The table I used for the stub axle nuts showed torque values of 144 ft/lb for K=0.17 and 170 ft ft/lb for k=0.20.
1 Like
It is how I always did taper joints: lathes have Morse tapers for many of the tools, and it is critical they be used dry.
From the S3 E type service manual…stub axel rear nut to carrier 97-107 lbs ft
Hello Geoff,
- I wouldn’t go as far as saying they become unsafe. They would have to be extraordinarily worn, but give that the inner race is spinning to create the groove, there is the possibility of the surface of the journal and the ID of the bearing picking up. Once that happens, things would go downhill fast.
- Yes. If that was your plan, I would loosen Stub Axle, rotate it 180deg, then fit the spacer system.
- I should have qualified my statement in my previous Post. As the majority, I suspect, aren’t using the spacer system, then yes, the surface finish is important. If the spacer system is used, then its not important.
- Just contact me with your requirement.
The following picture is of my standard Stub Axle. The two that follow it are of the same part, but zoomed in on the bearing journals to show the comparison of the surface finish between the journals and the all important feature that joins the two journals together. ![]()
All surface finish was achieved straight off the tool.
Regards,
Bill


1 Like
Hello Rob,
Every original equipment Stub Axle I’ve tested, fall into the Grade 5 category. The taper is not a self locking taper, such as a Morse Taper, and therefore, relies on the nut to pull the male and female taper together with sufficient force to ensure it locks.
The torque for a 5/8 UNF grade 5 bolt is 150lbft. However, the nut used is a self locking nut and therefore, the assembly is not relying on the natural elasticity of the Thread feature to keep the nut tight. There is no strict requirement to go to 150lbft torque, but you need to be sure that sufficient torque is applied to ensure the male taper pulls well into its counterpart.
Whilst on the subject of grades of bolts. There are some that say Grade 8 Bolts shouldn’t be used in suspensions. Its true that Grade 5 Bolts spend more time in the yield zone before failure than a Grade 8, but what is overlooked, is that the Grade 5 Bolt will have failed long before the Grade 8 even reaches its yield zone.
Regards,
Bill
2 Likes
Hello Tom,
I agree with Paul, but with a qualifier. He is correct with a Morse taper, which is a self locking taper, but the taper of the stub axle is drawn into the female taper by a nut. No double entendre meant, or implied Paul. ![]()
You want the two tapers to slide axially when the nut is tightened. Therefore, I wipe the two tapers with a thin lubricant and then wipe each dry. There will be a very thin residual of lubricant left that will circumvent either surface picking up when the tapers are pulled together…
Regards,
Bill
2 Likes
I resemble that comment, Bill…![]()
Thanks for the clarification on the physics of the two tapers.
Which beats discussion of how two tapirs mate.
![]()
1 Like
Thanks Bill. Those stub axles you make are too pretty to install!
Same as porcupines? Very carefully!
Oh Paul! 
20 cha
Finally a day with decent weather so I drove the car today. The front end feels really dialed in.
Thanks again for everybody’s input on this project.
3 Likes
Question for the group regarding these spacers. It looks like the SNG spacers come with shims, while the Welch ones don’t list shims. Thinking about it a bit more, I suspect the shims offered by SNG are for a non-E-type model, and we still set the end float per the procedure in the manual, with the spacers and without any shims installed?
I’m considering a set of the Welch ones and just want to ensure I understand what’s-what!
RobY
Rob,
I don’t see how you can hope to get the correct end float/preload of the bearings without using shims with the spacer. The tolerances of the components are not that tight. If you plan to use the Welch spacer, I’d contact them and ask if they supply shims, or if you are expected to make/source your own.
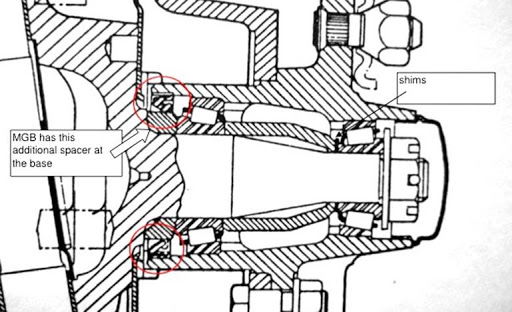
When you use these spacers, the outer nut on the stub axle gets torqued down. This puts the stub axle under thousands of pounds of tension, and effectively creates a large bolted joint out of the front hub assembly for better stub axle stability.
Without the shims, the whole hub will lock up as you torque the nut down. So, the shims are critical for setting your hub end-float.
Installing these spacers, and setting your wheel bearings the old way would render the spacers useless.
Here’s a cross section of an MG Midget hub for reference. The MGB is very similar, and from memory, the torque spec on the outer nut has a range of 40-70 ft-lbs!!
Hi Rob…there are options for these spacers…SNGB sell a “kit”( bearings, spacers, shims, nut)…or you can just buy the spacer and shims,…Dennis Welch sell all parts seperatly…if you look at the spacers on their website the shims in various thickness are shown below…as others have said you need shims but will have to use a dial guage to set up the hub…initially useing too large a shim pack so that you can measure exess endfloat and then remove shims to get requires measurement…Steve