I decided to remove all the chrome from my '38 SS saloon and take it to my plater to do this winter.
Here is the surprise, something odd for us to ponder.
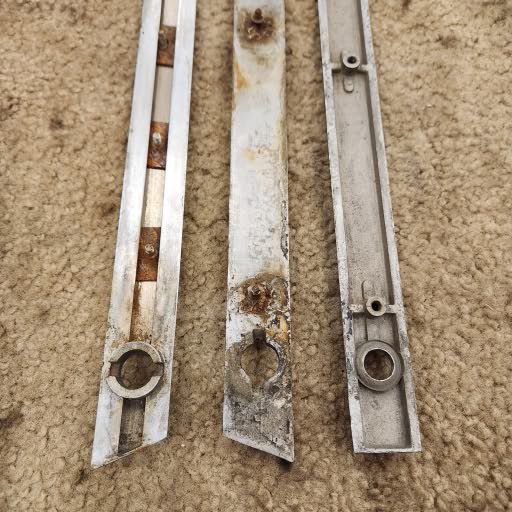
Right to left are the chrome strips from the left front, right front, and right rear doors. Notice 3 different methods of construction.
My car is chassis 40051 with body S5580. Which means it is one of the first with the all-steel body.
It would appear that they hadn’t quite narrowed down the design of the chrome, and I have one of each.
Anybody else seen anything like this?
Another odd thing, the access holes in the inner door panels were not in line with the nuts on these chrome moldings, they were about 1/2" too low, which meant I could not get a socket on the nuts, I had to get them off by getting my hand in there with a wrench. Another example of mistakes at the factory when they were getting the steel body into production.
What a pity the left rear was missing, presumably broken long ago. Some PO created a wooden replacement. I never found one, so I’m making one out of brass. I bought a vertical band saw just for this job.
It’s 30 years since I made my chrome strips. I can remember silver soldering little bosses for the fixings and also soldering a modified brass plumbing fitting for the driver’s door lock but I can’t remember but I think the pin nearest the lock will release it. The other pin is just to retain the shaft I think. http://www.nostalgiatech.co.uk/New%20page%2016.htm
I removed the chrome trim from the bonnet and the A, B and C pillars.
The bonnet mouldings are made just like the one from the left front door, extruded channels with studs on rectangular bases that slide in from the end.
The small pillar mouldings are made just like the right rear door moulding, Mazak castings with tapped bosses and threaded studs with nuts. It would appear that SS Cars was buying chrome from two or three different suppliers.
The pillar mouldings all have a number 70231 hand etched on them with a vibrating etching pen. I can’t guess what that would mean, unless the parts were a matched set.
Working on the LR door chrome moulding.
Doing the beveled edges with a belt sander. The protractor clamped to the bench on the left is set at 55 degrees as an eyeball guide for my sanding. It worked out pretty good. My bevel came out within a degree or so of 55.
Screw location center lines marked with a scratch awl. Spots pre-tinned, it takes quite a lot of heat to tin such a large thick piece of brass.
Brass flat head screws, #10-32 x 3/4" long also pre-tinned. Soldered in place.
Now trial fit on the LR door, and I discover a funny surprise. The bolt holes are in the wrong places. The new piece does not match the C-pillar piece.
Today I worked on the moulding from the right front door.
The attachment fasteners were inserted before the channel was plugged at the end and finished, and are captured in the channel, no way to get them out.
I tried to remove the boss at the front end. No luck, it must be a press fit.
These fasteners slide into the slot. They should be simple enough to make new. Just a rectangular flat piece of sheet stock with a hole, and a flat head screw pushed in so the head is flush, then soldered.