hi all. on my 65 s type i have some play on bottom of steering column. if you hold top of steering wheel and pull downwards and up you can feel the movement down the bottom where it goes through bulkhead/floor. in the engine bay get hold of the u/joint and you can move the shaft all over the place. do you think this is the plastic/rubber bush between the inner and outer column and if so is it an awkward job or is it ok for a diy person.
In most Saloons, their is a plastic bush in both the top and bottom of the section of the steering column that goes through the firewall.
Consult your Factory Service Manual for instructions for the S-Type
Parts can be bought from the major suppliers
I have replaced them, (in a 420G) but I cant remember exactly how many parts had to be removed to get the job done
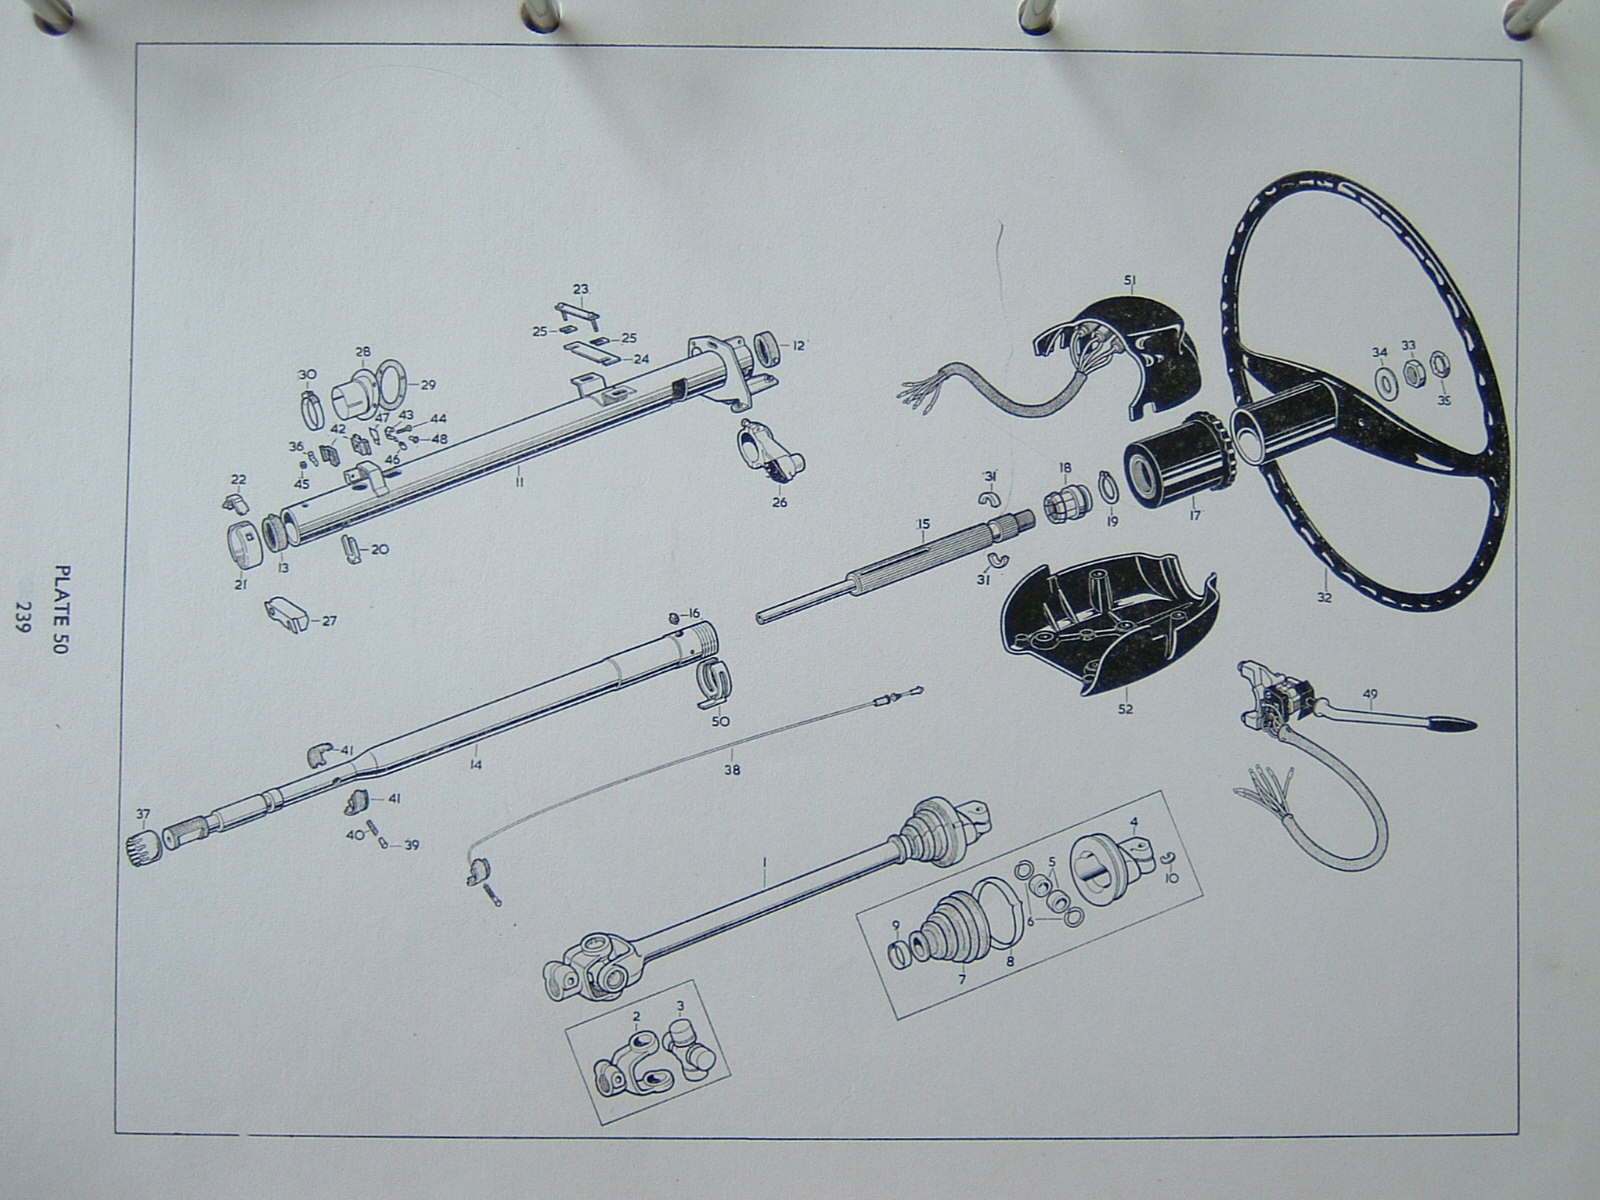
I have done this job on my S Type. It is a bit time consuming but possible for the home technician. No special tools needed. Remove the upper and lower nacelle around the column, unplug the warning lamps for the turn signals, etc and remove, label the bulb sockets for correct replacement. Remove the black plastic cover around the horn button, (screws on the back side) remove the nylon nuts and springs under them from the horn ring mounting. Remove the ring. Remove the turn signal lever from the upper column and set aside. No need to unplug all the wires. Remove the lock nut and main nut holding the steering wheel on its splines of the inner column. Take care to collect the split cones (part 31). From the engine compartment undo the pinch bolts on the U joint. Mine is slightly different as it is converted to a steering rack. Keep in mind the splined section is relieved only in part of the circumference to accept the pinch bolt. Remove the fuzzy shroud above the parcel shelf, two small screws. Remove the two bolts (or nuts?) then exposed, holding the outer column to the underside of the dashboard. From near the floorboard inside the car remove or loosen the hose clamp that holds the outer column in place (part 30). The upper column can be then removed from the car. To disassemble the column, take the thrust bearing out of lower part of the column (part 20) after removing its retaining ring and clip (21 and 22). There are two nylon or plastic bushes one at the top and one at the bottom (parts 12 and 13). These have a tit that locates them. I think they may be of different sizes. Check for fit, and verify no sideways play, and be sure to lubricate them upon installation, otherwise steering will not center when driving. (learned the hard way). Take care with the serrated brass ring that is part of the horn system (part 37), and the horn wire and its contact at each end such as the contact finger (43) and its insulating pieces. When replacing, it is a bit tricky getting the column splines lined up correctly, so the wheel is centered when driving straight. Some minor adjustment can be made at the wheel on the spines but turn signal cancelation arm may have to be re-adjusted. Remember, upper inner column to the lower column splines can only go in a certain position as the relief for the pinch bolt is not full circumference. The reassembly is a reverse of the disassembly. Ensure horn works correctly as it is part of this process. Check for proper cancellation of the turn signals. Good luck.


It’s been awhile since I’ve done that job but I recall it being a pretty simple, straightforward job compared to many other Jaguar repairs I’ve done.
Remove the lower steering column inside the engine bay. I can’t recall if it just a matter of removing the upper pinch bolt and the letting it drop once the upper column is pulled out or if I took the whole lower column out but either way is pretty easy to do. After that, bend yourself into a ball to get to the retaining clip at the lower part of the column inside the car. You can easily pull it out once you spin the ring that makes sure the clip doesn’t fall out by using a small pair of water pump pliers or something similar. Disconnect the horn wire from the column. You should now be able to withdraw the steering column a foot or whatever it takes to replace the lower bushing from inside the engine bay if I recall properly.
If you are also replacing the upper bushing then there are two bolts holding the column to the under dash that will need to be removed as well that will allow you to drop the column tube enough to withdraw the steering wheel and column from the tube.
I am doing this from memory as I don’t have a manual handy at this point as I sent that along with my S when I sold it but if I missed anything I’m sure someone will chime in. I should’ve kept one of the manuals as it sure would help me explain this a bit better as well as answer other questions that come up. I’ll have to track down an old S manual at some point just to have.
Nice write up John but for clarification does the entire column need to be removed to change the upper and lower bushings? As I recall I was able to change both bushings without the removal of the steering column tube (Part 11).
Just a hint. Check the horn sliding contact on the lower column while you have access and make sure that there is enough pressure on the contact.
Intermittent horn operation can occur due to a contact worn enough to not make continuous contact.
P
1 Like
Chris, you could be right but I would be concerned with buggering up the delicate and complex horn contact and wire.
I agree with John. It’s not a big or difficult task to remove the column and you can check and inspect everything. A job you’ll only need to do once.
As do I.
The hardest bit is getting the pinch bolt off in the engine bay and you have to do that anyway. It’s an extra 10 minute job to get the column housing out.
Just remove the screws holding the indicator stalk and leave it connected.
Then you can work on the whole thing easily on the bench, test your horn circuit and make sure everything is properly assembled.
Be advised that at least one of the bushes is tapered, and its possible to fit one or both incorrectly.
It can be hard to identify this issue unless you know about it, as the bottom bush (in my case) was basically dust. However, I did know, due to someone on this list showing pics, so if you are in doubt, post pictures.
I have tried 2 separate steering columns to rectify my non working horn, with no joy, parts being missing. One should be very careful on this part of the job, as the new replacement parts are allegedly not very good. I have another one to try, in the meanwhile a dash mounted button activates my horn relay
Just done this job this morning - see post 923 in What did you do to your saloon today?
Both bushes I think (certainly one of them) are shaped to help the inner column go back inside the outer column but not tapered like you have to mount it the right way up.
I got mine from SNG Barratt but I guess they all have them
Steering Column Bush/Bearing Set (C23592/93) (sngbarratt.com)
1 Like