I also considered the idea of installing a hidden subframe but decided against it as I had doubts about how much rigidity a 1x2 inch tubing would add over a span of about 4 feet. I have a small bending brake so I formed up a series of 3 18 gauge vstiffeners to span between the two factory ones. Martin Robey markets a one piece panel that is similar. My reasoning that the addition of the 3 panels plus the 4 extra pinch welds would add both bending and torsional rigidity but who knows. I am a veterinarian not an engineer! Plus I had left over sheet metal so it was cheap😀. The picture is from the trial fitting. I do not think I will bother when I do my coupe but I was a bit concerned about paint chipping on the ots.
v
1 Like
Actually, I think you may have gotten it exactly right. I added a single stiffener in the middle, but three makes it even better. My concern was more driven by the location of the jacking point in the middle without any internal strengthening.
1 Like
The single stiffener in the middle seems to be a pretty common addition even in restoration shops. I figured if one is good 3 must be better!
I use avgas, 100 LL, gives the valves a bit of lead for lube and avgas does not go bad. Smells different in exhaust, but my pipes are nice light grey, fires up instantly, even after sitting a bit.
Live on a private airport, so easy access for fuel, about $1 more than ethanol 93 oct.
John

Yeah… that might be just a bit beyond my fabrication skills. Might be hard for the next owner to take it back to original!
My jacking point was missing, It’s the center one on the OTS and FHC, can someone post a photo and a dimension so I can fab something. Thanks


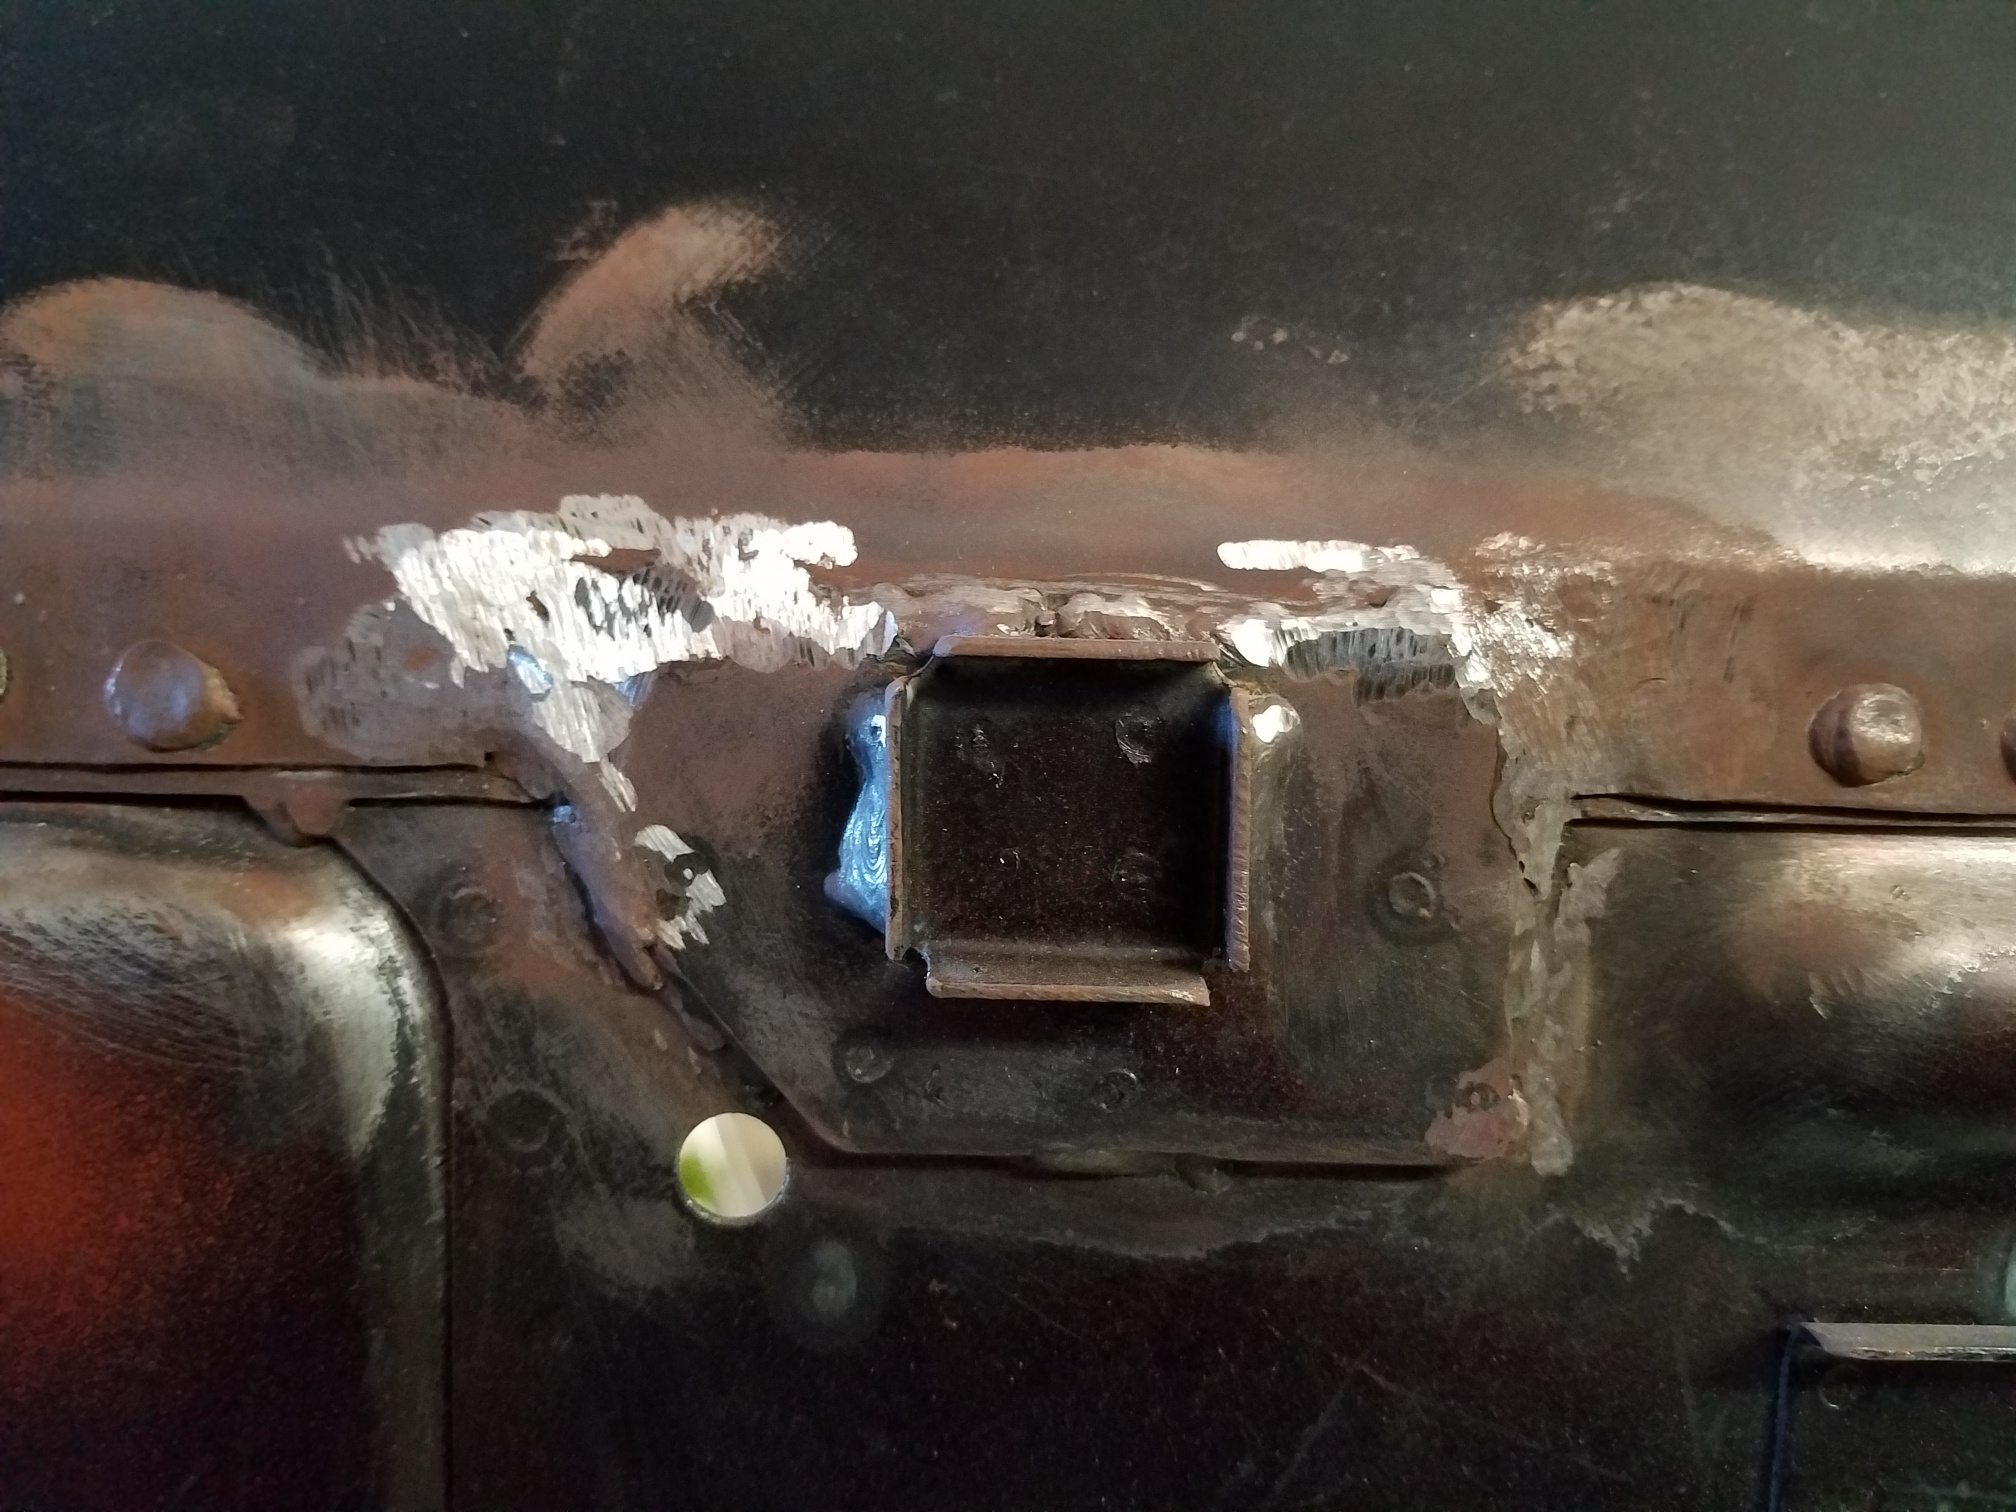


That’s what mine measures as well. If you fabricate something your self a good double check would be to make sure what you fabricate fits in the square lifting appliance on the end of your factory jack.
Just rechecked my post and realized it was not clear. The first picture is the measurement from the back edge of the outer sill in case you need to know wpexactly where to locate the jacking point.

I added my new personal plate today. The previous owner called her Lilly, so it made it simple to create.
3 Likes
Today (really, over the past couple of weeks) I disassembled, cleaned and reinstalled my oil cleaner assembly. I was experiencing low (zero) oil pressure. I was told that one possible cause was debris getting jammed in the oil pressure relief valve, causing it to remain open, eliminating any pressure to be “seen” by the oil pressure sender.
Getting the assembly off the car was a tedious and messy job as I’m sure many of you have experienced. Once disassembled, I found two small pieces of metal inside:

Anyone recognize what those are? Cotter pin fragments?
I was missing a number of small parts from the cleaner assembly, and a few others were crushed and/or worn. (Photo below is of the rubber washer under the bolt head (6158), old one on left, new one on right:
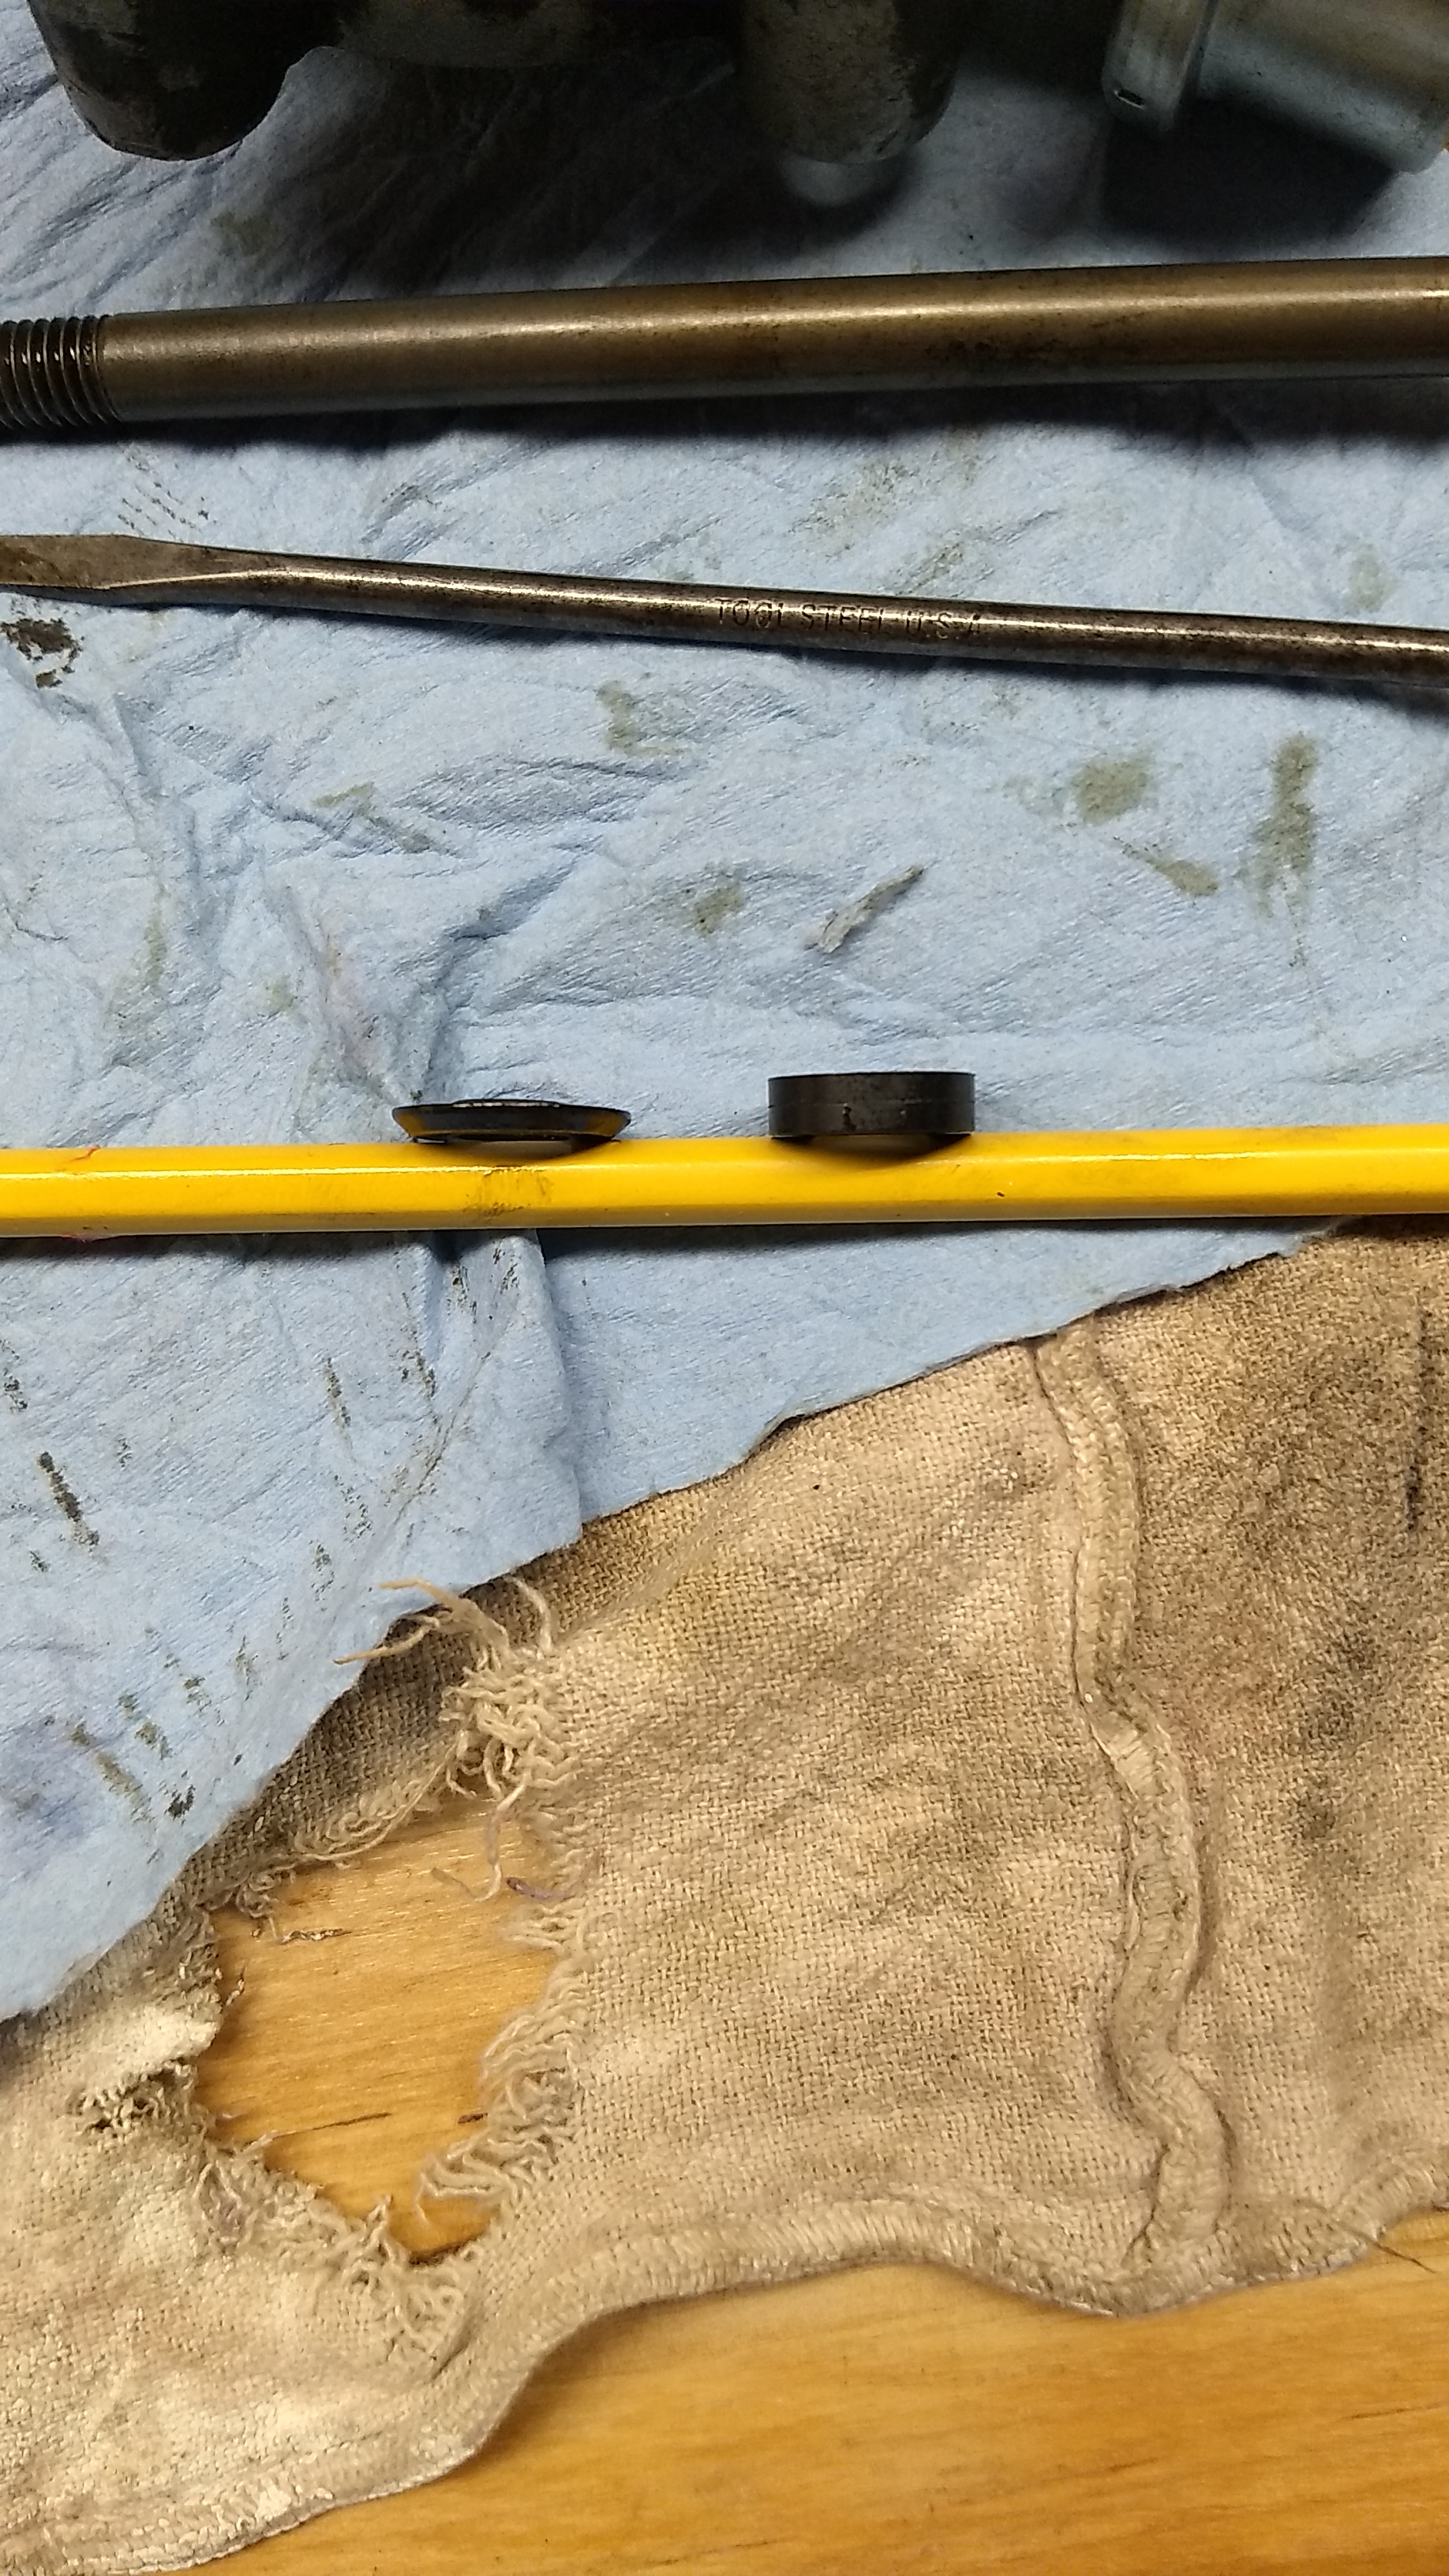
The replacements included the felt washer inside the canister, the rubber washer under the canister bolt head, the gasket between the cleaner assembly block and the engine block, the filter element and its sealing ring, the washer under the pressure relief valve and the washer under the balance valve. For those who may read this in the future, I will note that all of the replacement parts (ordered from SNG Barratt) worked fine, except for the washer under the balance valve (8103). This was not SNG’s fault: their catalog and online system did not include 8103, but did offer RTC1142 which was marked as suitable for a Series 1 4.2. I thought it worth gambling $0.40 to see if the 4.2 version fit my 3.8. It didn’t. So I went to Home Depot and bought a fiber washer with the correct inside diameter but oversize outside diameter; my daughter trimmed it to fit (her version on left below, RTC1142 on right):

Reinstall was a PITA. One challenge: how to keep the gasket aligned when refitting the oil cleaner block to the engine block? I could only work one bolt at a time, so the gasket kept falling off or migrating out of position. I ended up using two rubber bands around the oil cleaner block and gasket as I mounted it, and just before tightening down, I cut the rubber bands and pulled them clear. I will also note for future readers that my replacement gasket was a fiber material whereas the old one I pulled out (on the right in the photo below) was a stiffer plastic-type material:

I also had some trouble getting the hose clamps properly located on the hose that runs from the oil pressure relief valve downpipe to the oil pan, but eventually got that right.
I took the car for a 30’ spin this morning on neighborhood streets. (We’re expecting snow tomorrow, so the county has applied Jaguar repellent to all of the major roads.) Oil pressure is now in the 5-15 psi range, depending on engine RPM (15 psi when running at 2500 rpm), which, as my father used to say, is better than a poke in the eye with a sharp stick. But its still not where it ought to be, is it? I should mention that the dipstick shows full, and I’m using Mobil 1 10W30. I’d welcome any suggestions regarding further trouble-shooting.
Bob
First, pinch off the return hose: if the pressure rises, the pump is up to the task.
The bypass valve can look perfectly good, but not work: I replaced mine, and went from 5 psi at idle, hot, to 20, and 40 at cruise.
1 Like
Hmm… not sure about your oil. I would hesitate to use a 10-30 oil, unless the engine was really fresh. Otherwise I would go with 20-50, but I’m in California. I’m assuming most of your driving is done on nice days. Just a thought.
15 is low. Don’t mind the oil grade for troubleshooting now, it should still give much more pressure, especially cold. Not good, remove the assembly again (sorry) and see what’s wrong.
When my (XJ) valve clogged… twice - the oil lamp would just flicker at idle and above 900-1000 rpm it just went off and started to register. 15-20psi was the highest I saw.
You could have forgotten something like a shim but I know the E’s valve is weird. And maybe the symptoms are not from the valve but one of the o-rings is not correct and there is a similar drainage path.
Is oil splashing around the cams?
Yay! I finally own a E-type and get to start posting in this thread. I haven’t brought the car home yet, but I have one of the wheels. I should have taken a before photo, but suffice to say, after 20 years off the road, there was a fair amount of grime and a bit of rust.
Four hours with a toothbrush, 000 steel wool and degreaser yielded significant improvements. Still have a ways to go but I’m really enjoying this. Hope to get the rest of the car home next weekend.


2 Likes
You’re a sick man Scott. Thus you will fit in on this forum perfectly ![]()
3 Likes
![]()
I was just really pleased to see that I can make them at least look tolerable. New wheels are not something I wanted to spend money on. Just ordered new Vredesteins tonight, so hope to have it rolling on four round tires soon.