Read all reviews through search. Inserting key to right I
hear the relay working. I believe that locks it. Turning
left I hear relay working, but truck latch remains soft. Key
in side doors energizes the relays, and unlocks & locks the
doors. The inside left & right door paddle works on both
doors. BUT, the trunk won’t unlock? Any simple solution?
I’m non-mechanical, and 82 (god help me, huh?) Thanks for
any solution to this problem.–
former owner XK140MC fixed head coupe
–Posted using Jag-lovers JagFORUM [forums.jag-lovers.org]–
In reply to a message from dhl sent Sun 8 May 2016:
Hi,
Try these unlock instructions from the drivers handbook
Manual Only Operation
To lock: I nsert the key in the vertical position. turn 90�
clockwise and remove. With the lock in this position it can
not be operated electrically.
To unlock: Insert the key in the horizontal position and turn
180� anti-clockwise . Return the key to the vertical
position to remove. With the lock in this position it can be
operated
electrically.
I had a similar problem with my '92 and had to resort to RTFM.–
David Christensen, Tucson, 13 XJ, 91 XJS Conv, 65 Etype OTS
–Posted using Jag-lovers JagFORUM [forums.jag-lovers.org]–
–Support Jag-lovers - Donate at http://www.jag-lovers.org/donate04.php –
Good luck,
Steve–
The original message included these comments:
Read all reviews through search. Inserting key to right I
hear the relay working. I believe that locks it. Turning
left I hear relay working, but truck latch remains soft. Key
in side doors energizes the relays, and unlocks & locks the
doors. The inside left & right door paddle works on both
doors. BUT, the trunk won’t unlock? Any simple solution?
I’m non-mechanical, and 82 (god help me, huh?) Thanks for
any solution to this problem.
In reply to a message from dhl sent Sun 8 May 2016:
You mentioned that the trunk latch remains soft?
When the trunk is locked, you will not be able to press the
latch. I don’t care what method you used to lock it, key,
FOB, valet, if the lock is locked, the latch won’t press in.
If the latch is soft, or able to be pressed without being
able to open the trunk, then the latch is broken.
How do I know? It just happened to me. I came back from a
long trip and I was able to pull some of my bags out of the
car. When I came back to grab something I had forgotten, I
felt a crunch and the latch is now useless.
I’m planning on opening it up this week. I’ll let you know
how I fare.
I happen to have the hole drilled behind the license plate
already, so I have the means to open it manually. If you
haven’t check behind the plate, you should.–
1996 XJS 2+2 Convertible with 4.0L AJ16
–Posted using Jag-lovers JagFORUM [forums.jag-lovers.org]–
–Support Jag-lovers - Donate at http://www.jag-lovers.org/donate04.php –
In reply to a message from dhl sent Sun 8 May 2016:
Are you certain you are not using the valet (green)key?–
The original message included these comments:
left I hear relay working, but truck latch remains soft. Key
in side doors energizes the relays, and unlocks & locks the
doors. The inside left & right door paddle works on both
In reply to a message from Veekay sent Mon 9 May 2016:
Hi. Valde is absolutely correct. If the lock is locked you
cannot press the lever upwards because the mechanical arm
inside the mechanism has been swung in the way of it. That
is all there is to lock the mechanism. I know because I have
one in front of me and it doesnt matter how you have locked
it either by key in the lock, key in one of the door locks,
remote fob or by one of the paddles on the inside of the
doors. Locking the boot/trunk with a key will not central
lock or unlock the door locks and fuel filler cover on the
late facelift models by the way, however it does work the
other way round and locking/unlocking the doors by any
method will central lock or unlock the trunk by means of a
tiny electric motor. If the latch can be moved and the trunk
still cannot be opened then as Valde says the mechanism is
either broken or the linkage between the latch and the
releasing mechanism has become detached. This means the
removal of the number plate and a hole drilling to release
by hand. I have as yet been lucky enough not to have to do
this but many have and they would be the ones to say exactly
where to drill, bearing in mind that this is a late facelift
car and very different from a pre facelift in this exact
area. Back to you Valde with an ‘X marks the spot diagram’.
I am seriously considering drilling a similar hole in case
of emergency as the time to do it is while you can still get
in to the trunk! Good luck. Cheers. Richard.–
The original message included these comments:
You mentioned that the trunk latch remains soft?
When the trunk is locked, you will not be able to press the
latch. I don’t care what method you used to lock it, key,
FOB, valet, if the lock is locked, the latch won’t press in.
If the latch is soft, or able to be pressed without being
able to open the trunk, then the latch is broken.
How do I know? It just happened to me. I came back from a
long trip and I was able to pull some of my bags out of the
car. When I came back to grab something I had forgotten, I
felt a crunch and the latch is now useless.
I’m planning on opening it up this week. I’ll let you know
In reply to a message from Jackdog1 sent Mon 9 May 2016:
Drill a hole now, while you still can. No reason to wait
until the inevitable happens. You’ll be glad you did.
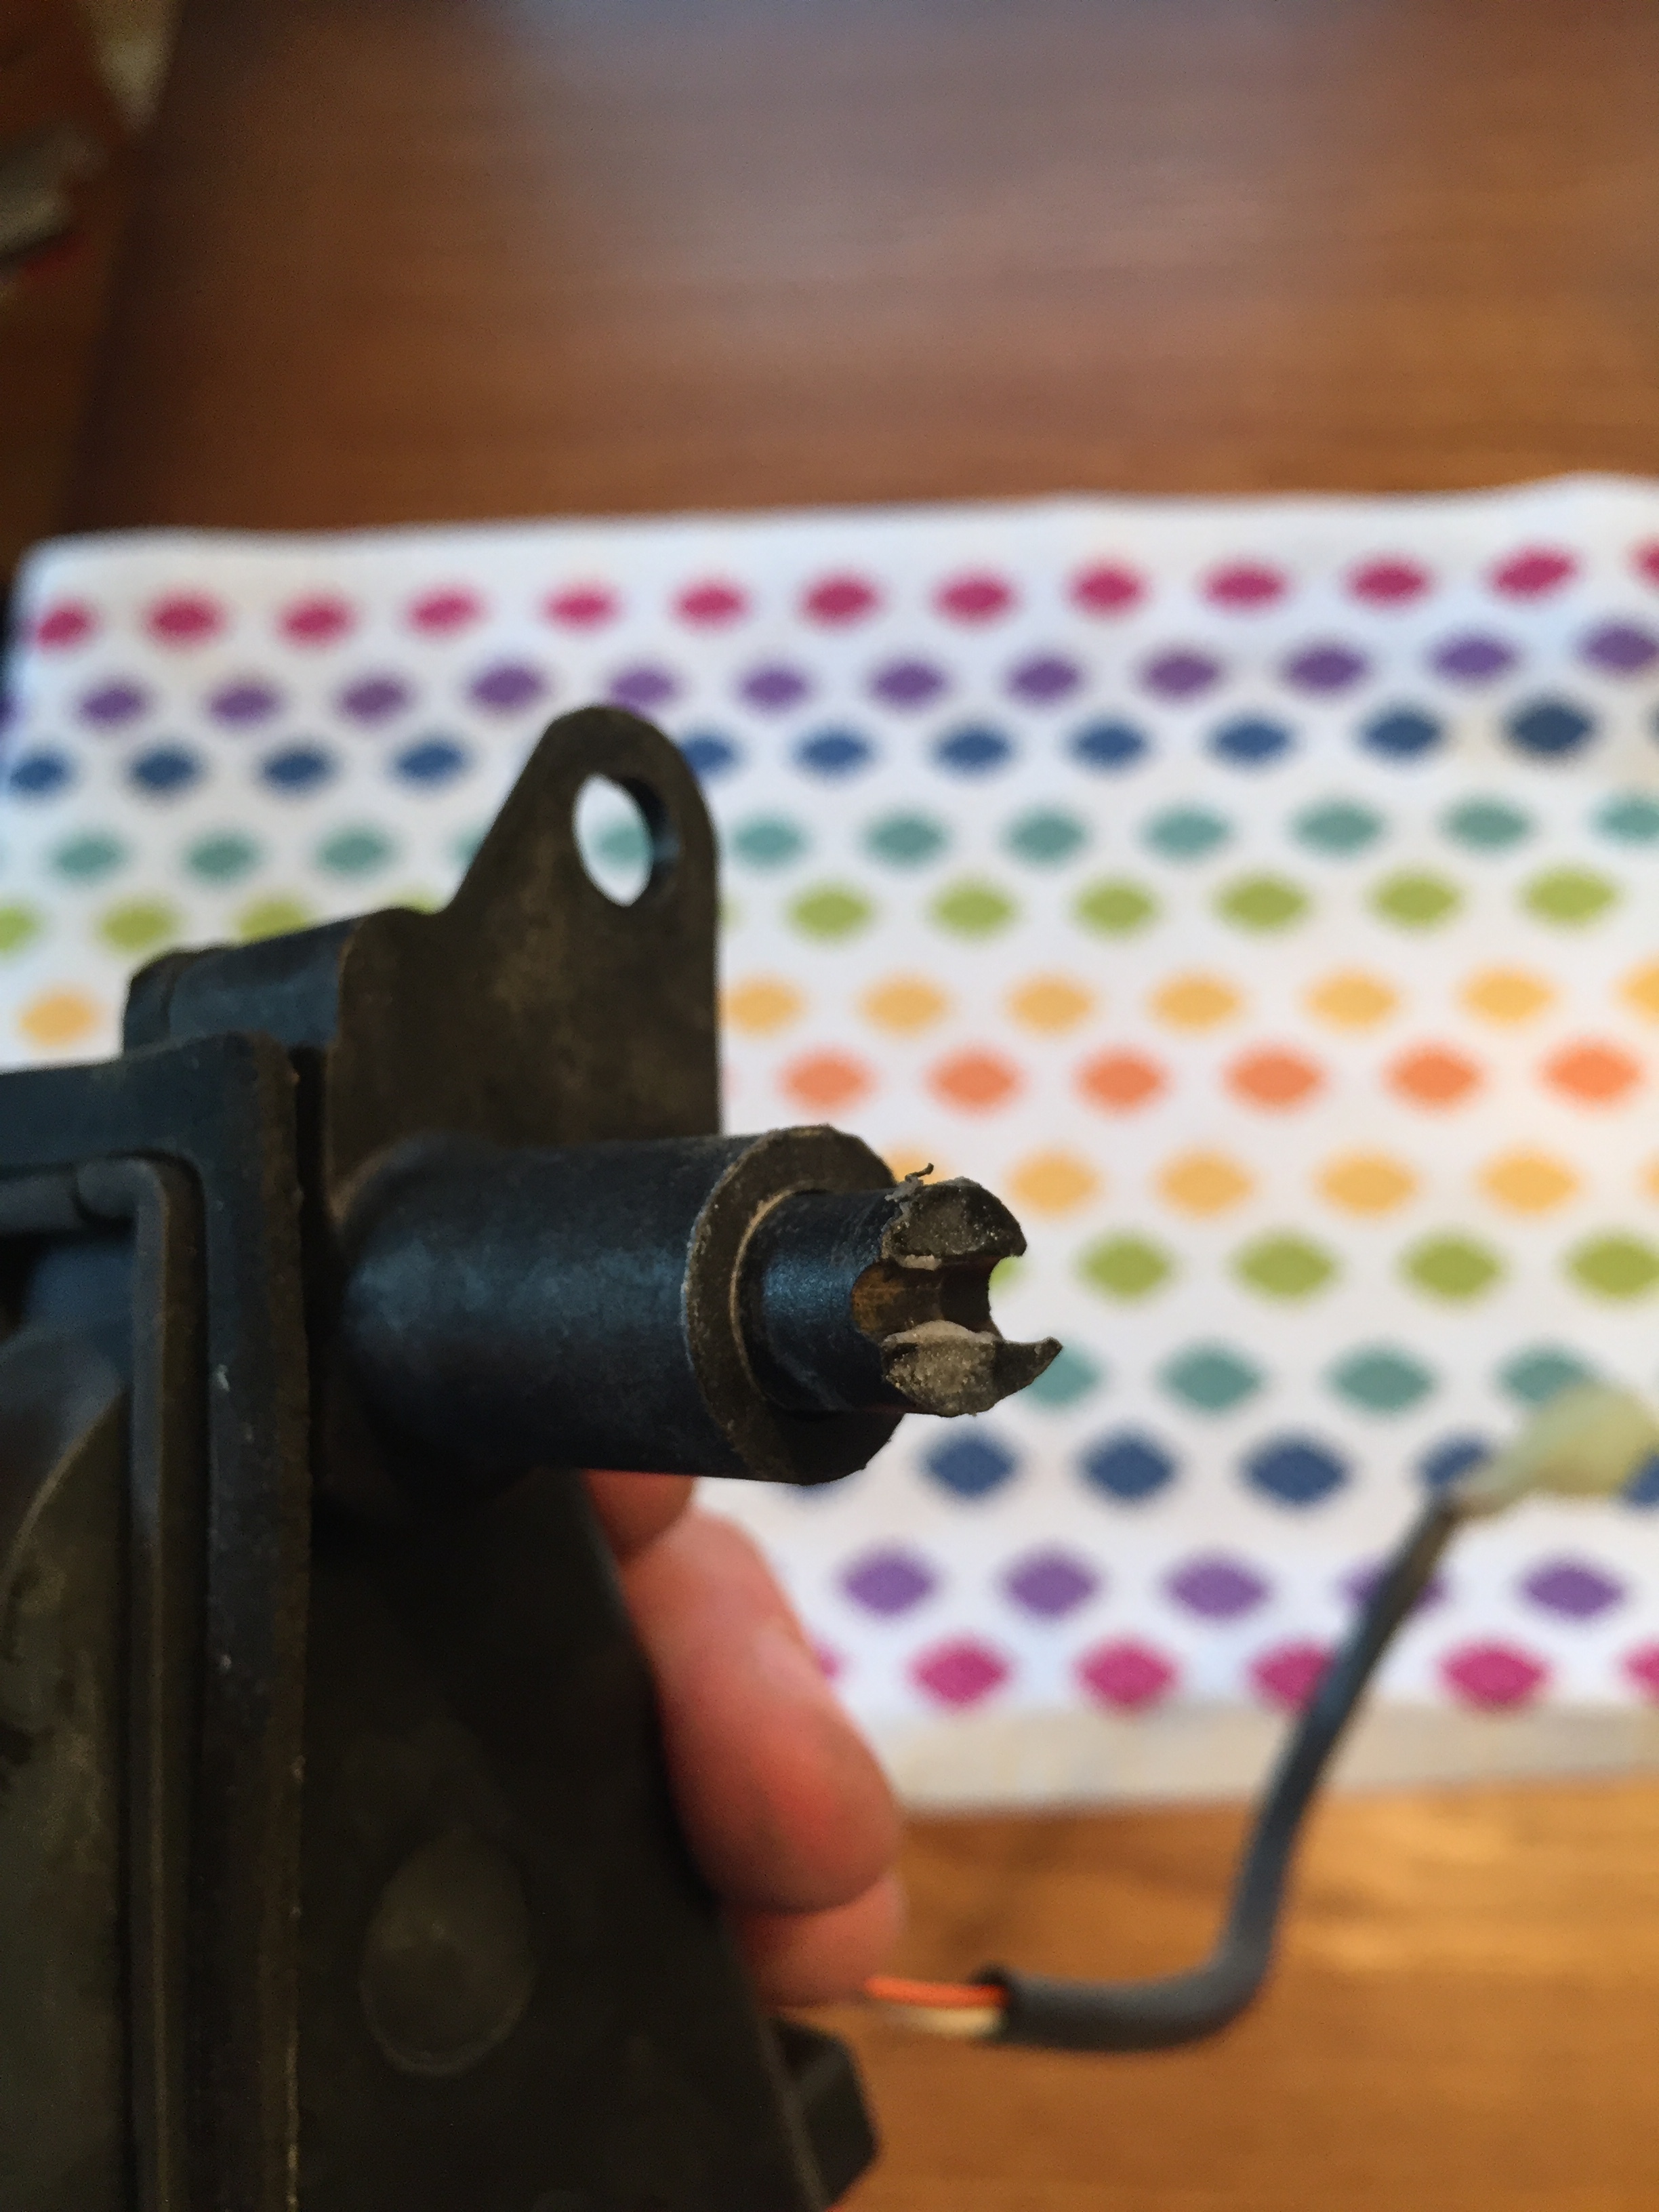
There’s a metal rod that does through a plastic cylinder
that releases the latch when you squeeze the trigger. The
plastic cylinder has a hole through it that seemed to have
snapped off. Luckily I spotted a replacement part on eBay
for $30!
The rest of the mechanism seems pretty stout. Plastic is
getting brittle. What probably exacerbated the issue was
he fact that I replaced the trunk struts about 6 months
ago adding stress to the assembly.
I’m going to figure out a way to repair the broken one I
have now. Perhaps epoxy can fix it…–
1996 XJS 2+2 Convertible with 4.0L AJ16
–Posted using Jag-lovers JagFORUM [forums.jag-lovers.org]–
–Support Jag-lovers - Donate at http://www.jag-lovers.org/donate04.php –
// please trim quoted text to context only
Kirbert
(Author of the Book, former owner of an '83 XJ-S H.E.)
8
There’s a metal rod that does through a plastic cylinder
that releases the latch when you squeeze the trigger. The
plastic cylinder has a hole through it that seemed to have
snapped off.
I’m going to figure out a way to repair the broken one I
have now. Perhaps epoxy can fix it…
Not a chance. Epoxy doesn’t stick to plastic well.
Someone needs to start fabbing replacement levers out of aluminum or
steel.
– Kirbert
// please trim quoted text to context onlyOn 9 May 2016 at 19:26, Veekay wrote:
In reply to a message from sbobev sent Mon 9 May 2016:
Well, thanks to all you guys, I had to go out to the garage and do
some surgery to the trunk lid.My license plate was bolted on with
nylock nuts ,so they had to go.I put two ‘‘Nutserts’’ 1/4x20 in
their place, and measured, and marked the spot, and drilled a 7/8
hole, then a bit of paint ,and two pieces of electrical tape, then
license plate back on. And my trunk lock is the simple non-
electrical variety.Better safe than sorry, though!
Thank you, Steve!
Dave.–
The original message included these comments:
If you’ve seen what’s in the archives, you probably should
be preparing the hand-drill.
This appears a common problem nowadays with the trunk
mechanism. You’ll need to drill a hole behind the rear
license plate to fix it.
In reply to a message from Veekay sent Tue 10 May 2016:
Hi and thanks for the pictures. That lock is the same as
mine. What I need to know is where to drill and how big a
hole I need to make. How would one then open the trunk
through the hole? With some thin nosed pliers perhaps to
move the rod up or down? I do have the advantage of being
able to access my trunk at the moment but would still like
to know some dimensions for drilling from behind the number
plate if you have them. Cheers. Richard.–
The original message included these comments:
I’ve added pictures to my library if anyone wants to see
what broke. I have the before and after.
Hopefully it helps!
In reply to a message from equiprx sent Mon 9 May 2016:
Nope. It’s the regular ignition key. I have two of these
XJS’s. Both 1996 models. White one truck opens. And after I
got back to Oregon, I opened the white trunk. Geeeez. To
me, there is no way to get into the mechanism even with the
trunk open. Carpet cover over the whole inside trunk.
Though there are plastic plugs holding it up. How the heck
do I remove same without ruining them? Then, is the
inspection hole exposed where the motor/assembly lock can
be removed? Any pictures out there showing it?
I did get a response from a member that showed how to drill
& where. Thanks for that help. I know if I drill it, I’ll
screw it up, so going to call my Jag mechanic in Goshen
Oregon and see what he has to offer. Then of course there
is the Jaguar dealer in Portland I can call on.–
The original message included these comments:
Are you certain you are not using the valet (green)key?
In reply to a message from dhl sent Sun 29 May 2016:
Buy some of those plastic tools to remove these plastic
plugs. I think there are either 4 or six to remove.
A set on eBay is like $5.
Once you pop them off you can get to the lock mechanism.
There are two bolts hold it in place. You will also need to
disconnect a metal rod assembly that actuates the lock as
well as unplug the power lock mechanism. It’s pretty
simple.
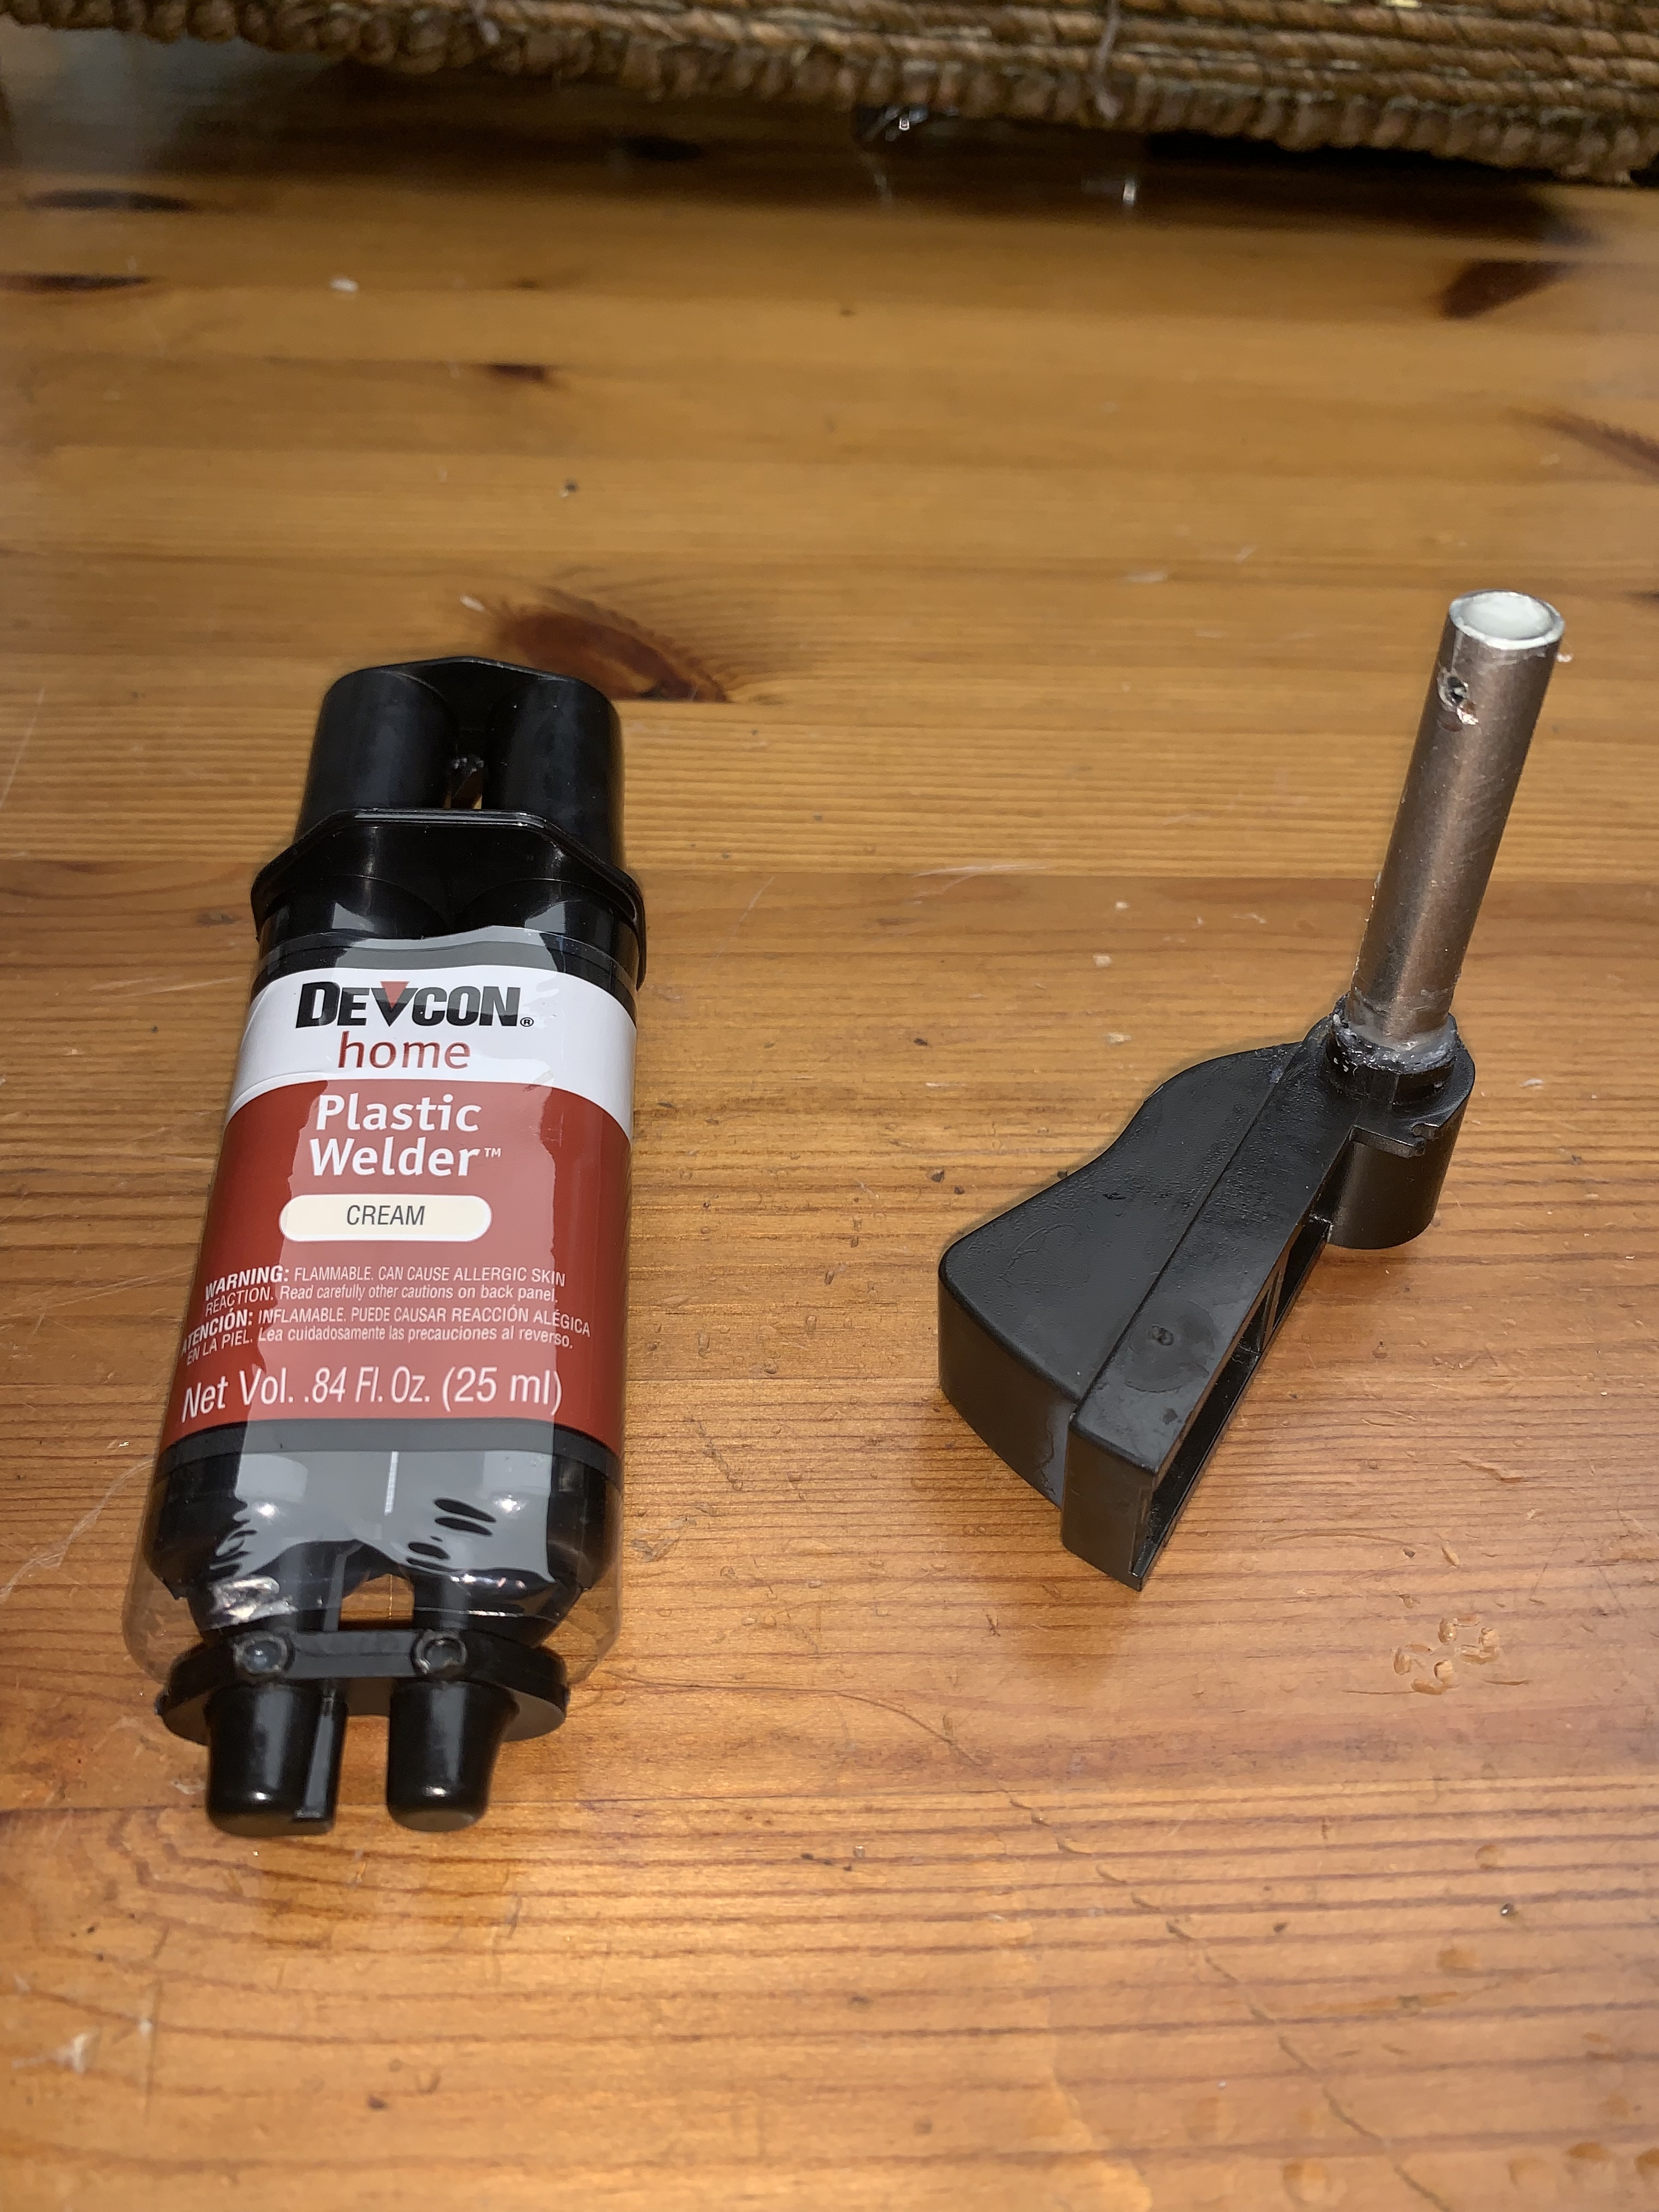
I finally got around to permanently fixing BEC4568.
I ground down the post, enough to slide a 3/8” OD stainless steel tube over the plastic shaft. I got the tube at a hardware/hobby store. They had it in brass too.
The length of the shaft will need to be about 45mm. I say about because it’s not super critical. You can be a bit sloppy here, just don’t make it a whole lot shorter.
Whats critical here is the hole for the pin. I used a 3/32” drill bit and it was about 40mm from the bottom.
I didn’t take a picture of the ground down plastic post, but because I am not perfect, there were plenty of ridges and imperfections along the shaft that the glue is going to love sticking into.
I tried running a narrow steel brush through the tube, but that didn’t seem to rough anything up. I had a conical Dremel attachment that fit inside the ID of the tube and I was able to scuff it up very well.
I soaked both pieces in some cleaner/degreaser left over from a POR15 project I did a few years ago and I was ready to go!
I ended up using a plastic welding epoxy, but now that the project is done, I think I should have just gone with an epoxy that specializes in bonding to metal, even though this particular plastic epoxy claims it works with metal too. As mentioned before, there are enough ridges and gaps for the epoxy to fill such that any cured epoxy would be able to grab and hold. It’s the bond to the metal that is critical here. Hopefully the dremel did enough scuffing to let this epoxy bite into it permanently.
Now I’m letting this thing cure out for 24 hours before I see if I can separate it with my hands. If I can’t, I’ll be satisfied and it will become my new permanent latch!
I’ve installed the part and I have only two bits of info to share.
I misaligned the hole. Luckily I was able to drill a new hole easily. The hole needs to be 1/8” to reuse the same pin.
The entire assembly is sealed in place with plastic rivets. I drilled new holes and added screws to keep the assembly locked closed. All depends what kind of screws You have, but I used 3/32” hole with some shorty screws.
Kirbert
(Author of the Book, former owner of an '83 XJ-S H.E.)
18
Am I to presume that the original shaft was plastic, and it broke off? If so, how do you expect your SS sleeve to be any better, seeing as how it’s bonded solely to the original shaft – and that original shaft has been ground down to a smaller diameter? Or am I misunderstanding what’s going on here?
I’ve packed epoxy into the cylinder, assuming this plastic welder epoxy marries up to the plastic, I would suspect it would now work similarly to sistering a joist.
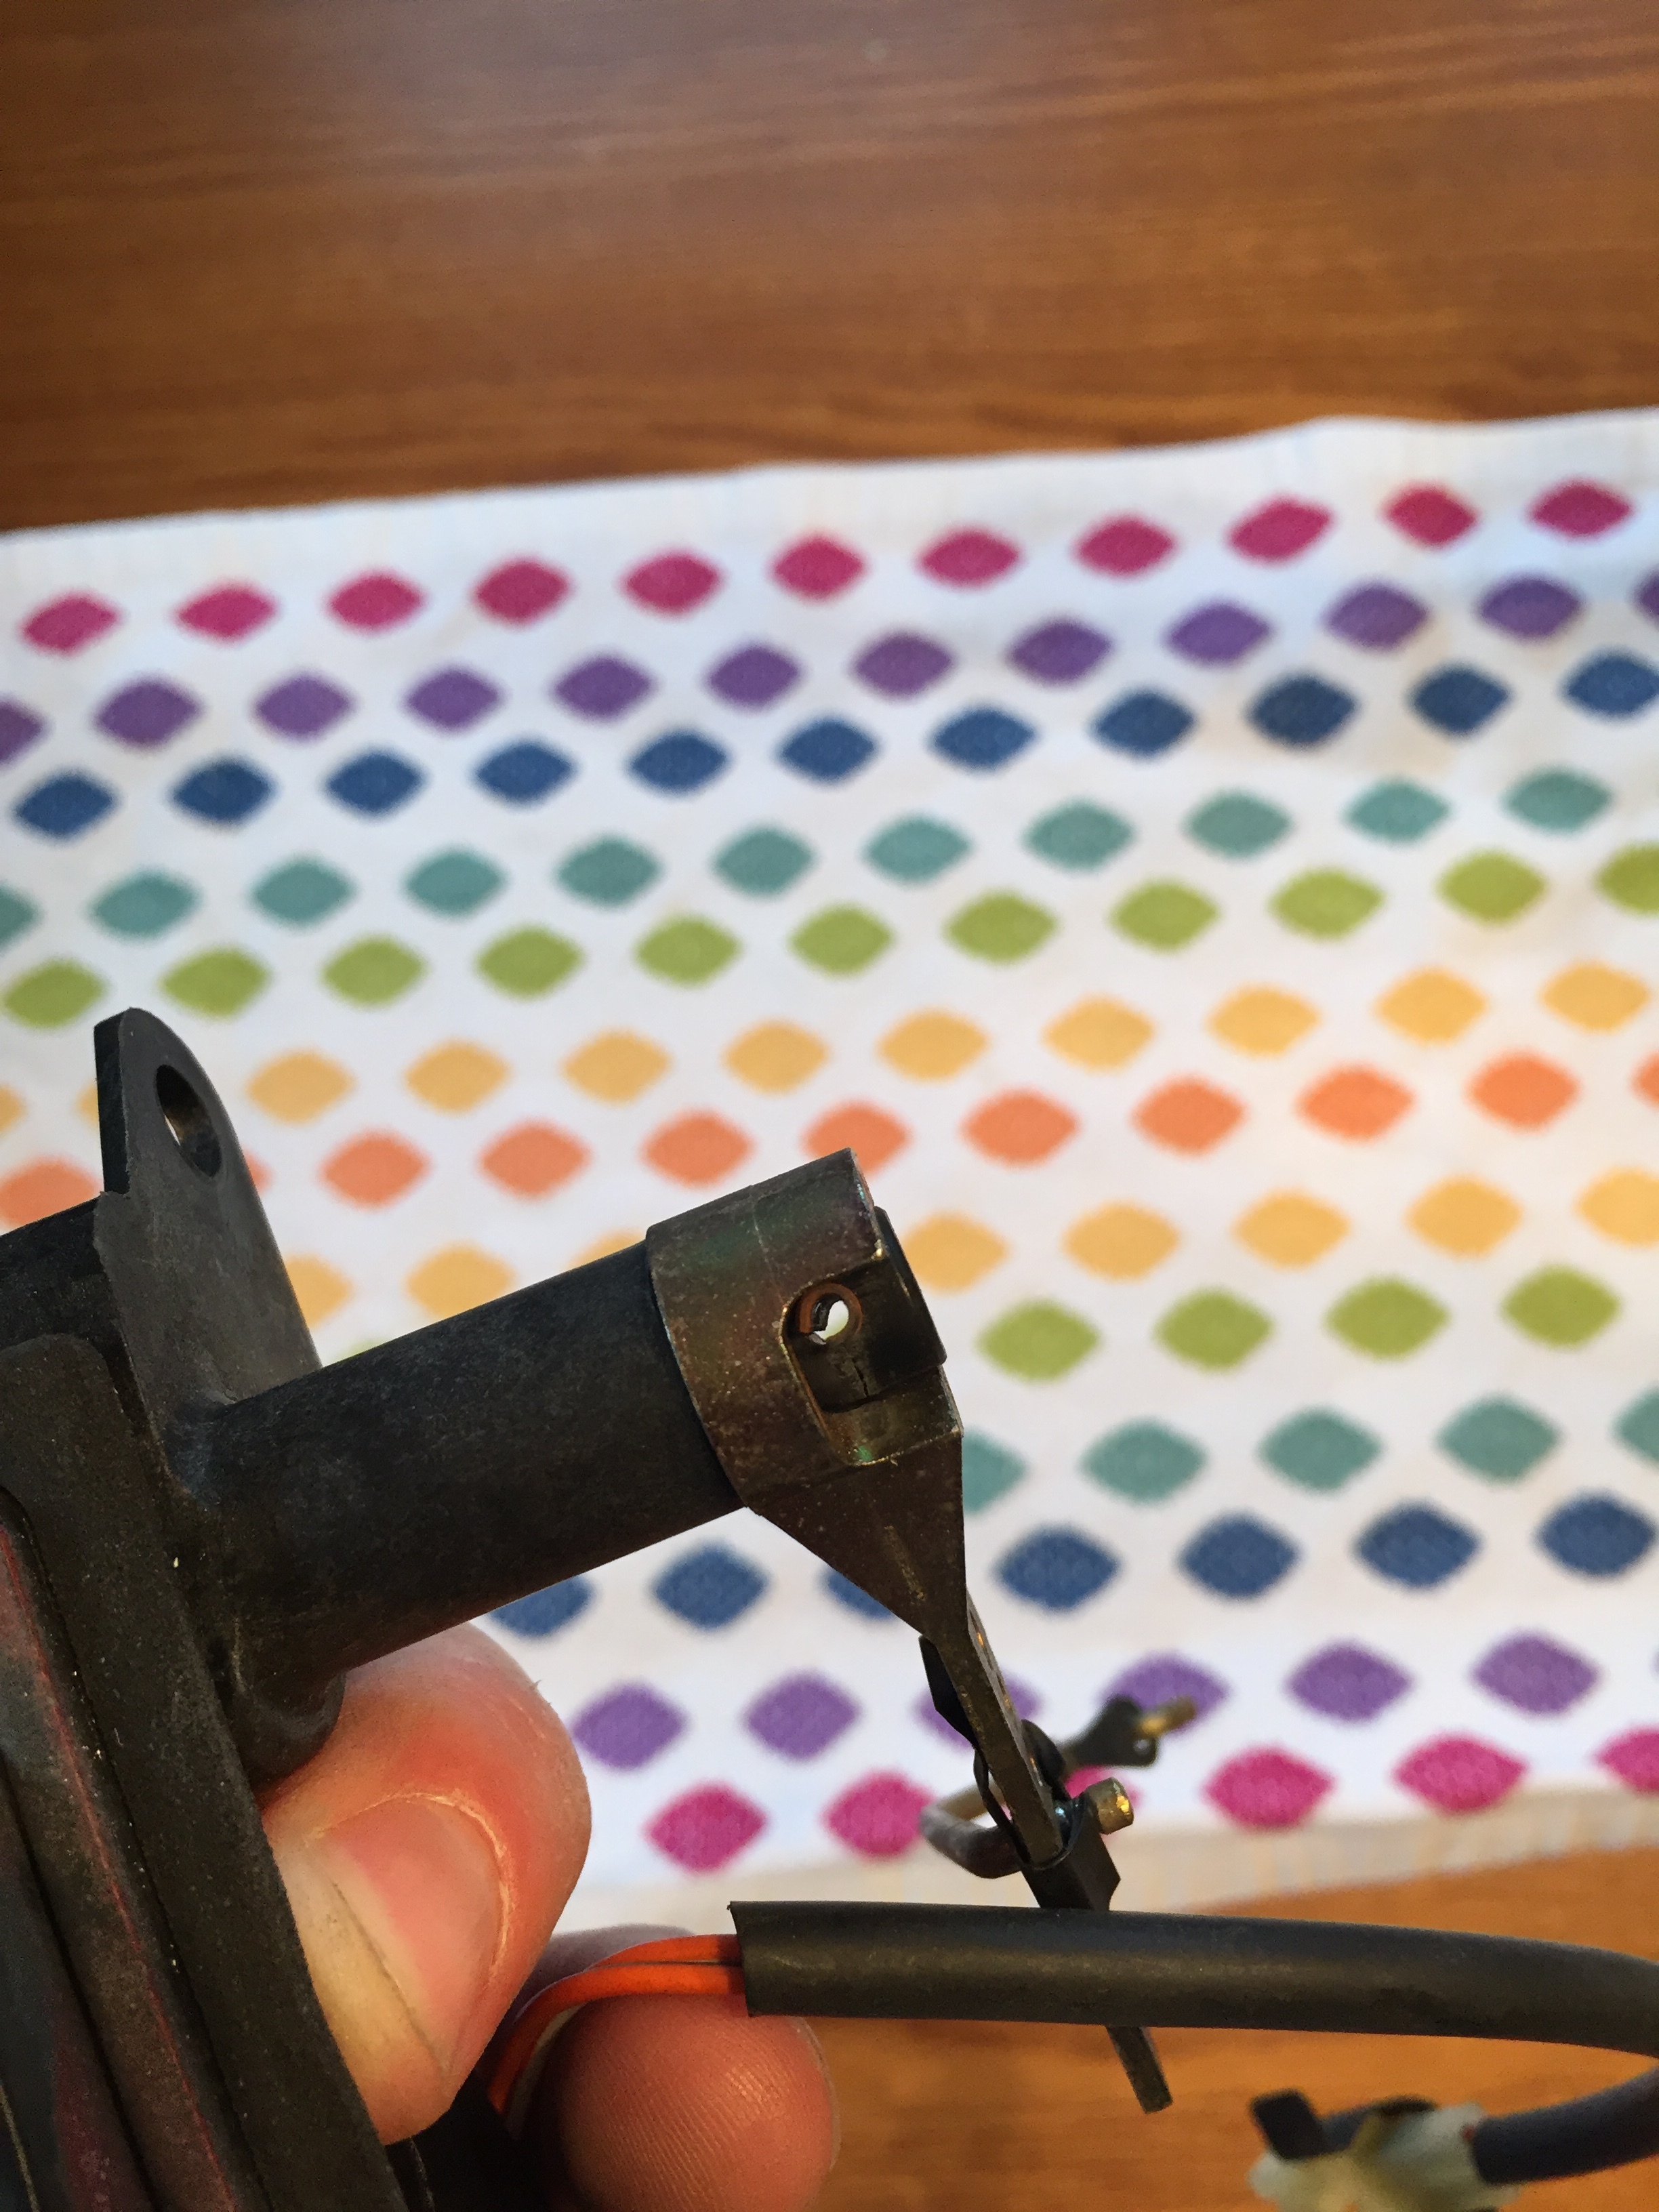
It’s not the plastic cylinder that ended up failing, but the tip, where the cylinder had a hole in it to accept a pin. That seems to be the point of failure on this assembly.
I believe the following pictures reveal the failure point.
I could have just fixed the tip end. I figured the more steel and epoxy there was to hold on to the assembly, the better the repair would be.
The weak point now, as I see it, is where the steel, epoxy and plastic shaft all meet at the handle. I wouldn’t doubt that the epoxy ends up being stronger than the plastic. The question is how well does it bond to it?
Kirbert
(Author of the Book, former owner of an '83 XJ-S H.E.)
20
Thanks for the pics. Yes, the hole in the plastic shaft was obviously a weak spot. Your fix looks pretty good; it replaces the weak point with a much stronger metal tube, but introduces a new concern: The epoxy. If your epoxy job is any good, though, it’ll probably hold up just fine.
Other ideas might have included cutting the plastic shaft slap off and affixing a solid metal shaft, possibly with an internal thread and a flush head screw holding the trigger to it. Or possibly replacing the trigger with something metal as well.