I’ve reviewed all the prior threads on this topic and still thought it worthwhile asking the question, as I’m not absolutely sure how to proceed.
I’m replacing the lower ball joints on my XK140 for a couple of reasons:
I have a long-term front wheel wobble that comes and goes, that seems to be triggered by taking gentle curves at around 55mph. Wheels seem to be true and in balance, and I’ve been unable to find any slack in the wheel bearings or suspension. Toe in is in spec.
Both lower ball joint rubber boots are split all the way round and I suspect that this has been true for a long while. Grease has escaped, and no doubt road grime has got into the joint.
I’m not too optimistic that replacing the joints will fix the wobble, but the job needs to be done anyway because of the split boots.
I started work on this yesterday on the passenger side. The lower cup is made of brass, and a steel “spigot” is fitted to the upper surface to align the cap that contains the lower cup. No shims were fitted to the joint. There is some wear evident in the ball (plating worn away in some spots) and lower cup (localized marks suggesting grit in the grease). The replacement kit I bought from one of the usuals contains the plastic lower cup which is taller than the brass one, as it also performs the function of the original steel spigot to align the lower cap. When I install the lower cup, and ball, and tighten the 4 bolts securing the lower cap, the ball joint moves smoothly and easily (I can move it with a single finger). If I add one shim, the ball joint feels very similar, but if I repeatedly pull on the shaft of the ball joint I can hear (not so much feel) movement, so there is clearly some free play. With no shims I don’t hear any play, but the joint moves smoothly suggesting it isn’t too tight. The only spec I’ve seen for free play is the 0.010" in the XK120 Service Manual, but this was probably written when the lower cup was brass. So, my question to the assembled experts is should I leave the joint with no shims, one shim (0.004") or two (0.008")? I’m leaning towards none.
Sounds like none is correct if you have free movement with none, and your new cup is seated down in the cap. If it was tight you would put a shim in to loosen it up.
Your wobble may be due to worn C3003 metalastik bushings in the upper lever arms.
Thanks Rob. I’m planning on replacing those bushings too, as the “flanges” on the ends of each of them are either missing, or in the process of departing. The un-exposed rubber may be fine, but as I had to tear down everything to get the lower ball joints to separate, I decided to replace anything else that looked a bit suspect.
They scare me a little too, but from reading the history it seems that is what Jaguar did. There is a lot in the archives about this, including the cycle of removing the grease zerk, and then adding it back later. My XK140 has the grease zerk. The “plastic” that Jaguar used was named “morganite”, though I don’t know whether the parts that the usuals supply is similar. My fear is that on California roads these cups will take a hammering, and not last long. I’ve checked all the XK parts suppliers I’m aware of here and in the UK, and all seem to supply non-brass cups. Some may be better than others perhaps, but who knows - they may all come from the same source.
The modern replacement is I believe high strength nylon.
The original cups in 1948 for Mark V and XK120 were either brass or Morganite bronze, then they went to Ferrobestos which is a sort of composite fiberous material intended to run dry, then back to Morganite bronze, and eventually nylon.
We’ve discussed this many times on this forum.
Hello Paul,
I concur with Rob Reilly. Also, E Types used a composite fibrous material, but meant to be lubricated.
I have no issue with high strength nylon being used in ball joint assemblies, but would be reluctant to use plastic. In all cases where a relatively soft material like nylon in used, extra care should be taken to ensure against the ingress of dirt into the joint (not that due care shouldn’t be exercised in any event). The principle of lapping is to have a soft material (the lap) combined with the harder material of the part being lapped and an abrasive lapping compound. In operation, the abrasive used embeds in the soft material of the lap and wears away the hard material. Accordingly, abrasive that may get into the joint can (and probably will) embed in the nylon, or plastic and increase the wear on the ball pin.
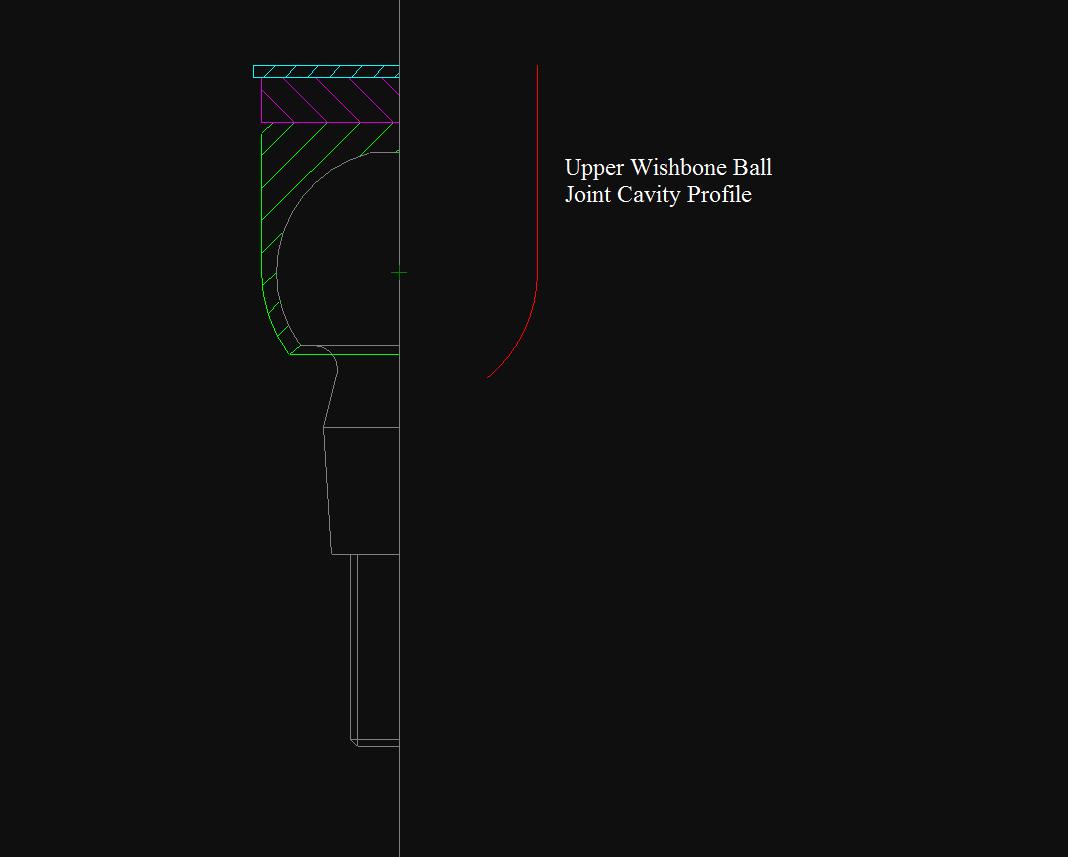
A little Off Topic, but still on front suspension Ball Joints, I rather like the after market repair system for reclaiming the worn Ball Socket of E Type upper wishbones, that uses a Nylon Sabot as an insert. To make the repair, the Ball Socket is machined to remove the worn feature of the Ball Socket and to match the shape and dimensions of the replacement part.
The following picture show the general arrangement of the replacement components.
Hell Paul,
All models of E Type use the same upper Ball Joint System; the detail and size are the same in that area for all models. As only A Arms for S1/S2 cars are available as an After Market part, S3 owners have little choice. However, even with the S1/S2 units, the modification of the original part is cost effective against the new item. The new item from SNG Barratt come with the Nylon Sabot system installed as standard.
Its not a repair that you can have done on a one off basis at your nearest machine shop and have it be cost effective. You really need to be set up reasonably well (as in my case) to be able to do the job at a reasonable price. Because the AUD is worth stuff all against the USD, it would probably be even more cost effective, even taking into account postage, to have this modification done over here.
My two replaced knee joints use high density polyethlene as the wearing surfaces and are supposed to last 10-15 years. Given the choice between brass and good quality nylon as the wearing surface in ball joints I might choose nylon.
I’d like to see results from a testing lab before installing plastic of any nature in such a high pressure, high wear area as the lower ball joint.
Each has got to be supporting … about 30-35%…? of the car’s weight and swivel at the same time, all while taking hits on a bumpy road.
Given the repop parts bashing we engage in, I can’t imagine anyone blithely popping out solid metal in exchange for a plastic part.
The marks in one of my brass cups may be removed by simply lapping and polishing. I’ll remove a shim or two. I’m going to try it before having a new brass cup made. The other one is nearly perfect.
One of my engineering school classmates studied the lubricity and impact toughness of various engineering plastics for some project. The winner was UHMW PE.
I’d certainly be inclined to use UHMW PE, in that position.
I used it a TON, on geophysical field equipment, where it took mighty beatings.
When I said, upthread, “plastics,” my real intent was indicating normal nylon bushes. Still, that may work OK, especially on most of these cars, that see easy use.
This cup is the lower cup of the lower ball joint. The weight of the car is taken by the upper surface of the ball which sits in the machined body of the lower A-arm. The nylon/plastic cup does not take the static load.
Are you sure about that David? When I look at the lower a arm the taper of the ball joint fits through the cone in the a arm and the ball then rests on the cup which is bolted underneath the upright. I am happy to be corrected if I am wrong. Not like it has never happened before.
Lower ball joint at the bottom of this photo. Taper of ball joint seen emerging through hole in the upright passes through the lower A-arm from below. Securing nut on top of A-arm. Silly thing is, having been correct about this for 2 days, I suddenly “realized” today that it wasn’t so bad, as the nylon cup doesn’t take the weight of the car - WRONG!! Just as well I didn’t decide to remove the 4 bolts securing the ball joint cap to the bottom of the upright with the weight of the car on the wheel…
I find that I am constantly second guessing myself on things like this. Probably an age related thing. I just wanted to double check to make sure it was clear for a future reader of the thread. When you only restore a car once or twice in your lifetime things can get confusing.